Hyster h007 (h12.00 xm europe) forklift service repair manual
SAMPLE SUB-ASSEMBLY DOCUMENT, ALISA AXTMAN
1. VersaBuilt VBX-160 Sub-Assembly
End-Effector Valve Mount Sub-Assembly Instructions
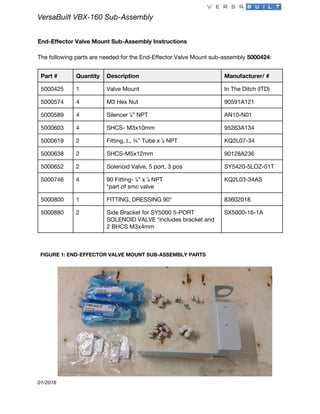
The following parts are needed for the End-Effector Valve Mount sub-assembly 5000424:
Part # Quantity Description Manufacturer/ #
5000425 1 Valve Mount In The Ditch (ITD)
5000574 4 M3 Hex Nut 90591A121
5000589 4 Silencer ⅛” NPT AN10-N01
5000603 4 SHCS- M3x10mm 95263A134
5000619 2 Fitting, L, ¼” Tube x ⅛NPT KQ2L07-34
5000638 2 SHCS-M5x12mm 90128A236
5000652 2 Solenoid Valve, 5 port, 3 pos SY5420-5LOZ-01T
5000746 4 90 Fitting- ⅛” x ⅛NPT
*part of smc valve
KQ2L03-34AS
5000800 1 FITTING, DRESSING 90° 83602018
5000880 2 Side Bracket for SY5000 5-PORT
SOLENOID VALVE *includes bracket and
2 BHCS M3x4mm
SX5000-16-1A
FIGURE 1: END-EFFECTOR VALVE MOUNT SUB-ASSEMBLY PARTS
01/2016
2. End Effector Valve-Mount Sub-Assembly Instructions
The following tools are needed for the End-Effector Valve Mount sub-assembly 5000424:
● Flat Head Screwdriver
● 7/32” Open Ended Wrench
● 11mm Open Ended Wrench
● 2.5mm Allen Wrench
● 4mm Allen Wrench
● Loctite 263
FIGURE 2: END-EFFECTOR VALVE MOUNT SUB-ASSEMBLY TOOLS
01/2016
3. End Effector Valve-Mount Sub-Assembly Instructions
Assembly
Step 1:
Assemble Solenoid Valves with Fittings and Silencers:
Locate parts:
● two Solenoid Valve, 5 port, 3
pos- 5000652
● two L-Fitting ¼”x⅛
NPT-5000619
● four L-Fitting 5/32”x
⅛NPT-5000746
● four Silencer x⅛”NPT-5000589
Tools:
● 11mm open ended wrench
FIGURE 3: SOLENOID VALVE, FITTINGS AND
SILENCERS x 2 AND TOOLS
01/2016
4. End Effector Valve-Mount Sub-Assembly Instructions
● Attach one L-Fitting ¼”x⅛NPT-5000619 to each Solenoid Valve, 5 port, 3
pos-5000652. Use 11 mm open ended wrench to tighten fittings.
◊ Locate two Solenoid Valve, 5 port, 3 pos-5000652 and two Fitting, L, ¼” Tube
x ⅛NPT-5000619
◊ Locate the intake port or port P, the middle port
◊ Screw in one fitting per valve in the middle hole of the 3 port using the 11mm
open ended wrench
◊ Make sure fitting is pointed forward towards the face of the valve
FIGURE 4: FITTING IS POINTED FORWARD TOWARDS FACE OF VALVE
01/2016
5. End Effector Valve-Mount Sub-Assembly Instructions
● Attach 2 L-Fitting 5/32”x ⅛NPT-5000746 to each Solenoid Valve, 5 port, 3
pos-5000652. Use 11 mm open ended wrench to tighten.
◊ Locate two Solenoid Valve, 5 port, 3 pos-5000652 and four Fitting, L, 5/32”x
⅛NPT-5000746
◊ Locate the two output ports or port A and port B, the two top ports
◊ Screw in two fittings per valve into the top holes using the 11mm Open Ended
Wrench
◊ Make sure fitting is pointed forward towards the face of the valve
FIGURE 5: 3 L FITTINGS ATTACHED TO SOLENOID VALVE
01/2016
6. End Effector Valve-Mount Sub-Assembly Instructions
● Attach 2 Silencers ⅛” NPT-5000589 per valve
◊ Locate the empty relief ports on each side of the L Fitting. (Make sure to keep
the L Fitting pointing towards the front of the Valve.)
◊ Screw in 2 silencers per valve in the relief ports on either side of the Fitting, L,
¼” Tube x ⅛NPT-5000619.
◊ Attach two Silencer x⅛”NPT-5000589 to the open ports on each Solenoid
Valve, 5 port, 3 pos-5000652, but do not screw in all the way since they will be
removed to allow fastener entry to the bracket.
FIGURE 6: 2 SOLENOID VALVES WITH L FITTINGS AND SILENCERS ATTACHED
01/2016
7. End Effector Valve-Mount Sub-Assembly Instructions
Step 2:
Attach two Side Brackets for SY5000 5-PORT SOLENOID VALVE (*includes bracket and 2
BHCS M3x4mm) - 5000880 to each Solenoid Valve, 5 port, 3 pos-5000652.
Locate parts:
● Two Side Brackets for SY5000
5-PORT SOLENOID VALVE(*includes
bracket and 2 BHCS M3x4mm)-
5000880.
● 2 solenoid valves with L fittings and
silencers attached
Tools:
● Flat head screwdriver
● Loctite 263
FIGURE 7: SOLENOID VALVES, BRACKETS
AND TOOLS
01/2016
8. End Effector Valve-Mount Sub-Assembly Instructions
● Attach a side bracket-5000880 to both assembled Solenoid Valves, 5 port, 3
pos-5000652 using the 2 BHCS M3x4mm per bracket and Loctite 263. Fasten tightly
with Flat Head Screwdriver.
FIGURE 8: ORIENTATION OF SIDE BRACKET TO SOLENOID VALVE
FIGURE 9: SIDE BRACKETS 5000880 ATTACHED TO SOLENOID VALVES
01/2016
9. End Effector Valve-Mount Sub-Assembly Instructions
Step 3:
Mount the assembled Solenoid Valve, 5 port, 3 pos- 5000652 with fittings, silencers, and
brackets to the Valve Mount- 5000425 using four M3 Hex Nut- 5000574 and four SHCS-
M3x10mm.
Locate Parts:
● one Valve Mount- 5000425
● two assembled Solenoid Valve, 5
port, 3 pos- 5000652
● four M3 Hex Nut- 5000574
● four SHCS- M3x10mm
Tools:
● Loctite 263
● 4mm Allen Wrench
● 7/32” Open Ended Wrench
FIGURE 10: VALVE MOUNT 5000425
01/2016
10. End Effector Valve-Mount Sub-Assembly Instructions
● Remove Silencers-5000589 to allow access for fasteners into the bracket, these will
be tightened back into each respective Solenoid Valve, 5 port, 3 pos-5000652 once
the fasteners holding the brackets to the Valve Mount-5000425 are firmly fastened.
FIGURE 11: REMOVE SILENCERS FROM SOLENOID VALVES
01/2016
11. End Effector Valve-Mount Sub-Assembly Instructions
● Mount the Solenoid Valves, 5 port, 3 pos-5000652 to the valve mount with the 2-port
side facing upwards
◊ Use two M3 Hex Nut- 5000574 and two SHCS- M3x10mm per bracket.
◊ Apply Loctite 263
◊ use 4mm Allen Wrench and 7/32” Open Ended Wrench to tighten fasteners
firmly
FIGURE 12: SOLENOID VALVES MOUNTED TO VALVE MOUNT
01/2016
12. End Effector Valve-Mount Sub-Assembly Instructions
Step 4:
Fasten FITTING, DRESSING 90°-5000800 to the Valve Mount-5000425.
Locate parts:
● FITTING, DRESSING
90°-5000800
● Assembled Valve
Mount-5000425
FIGURE 13: FITTING, DRESSING AND ASSEMBLED
VALVE MOUNT
● Attach the FITTING, DRESSING 90°-5000800 to the valve mount
◊ Unscrew the plastic hex nut on the FITTING, DRESSING 90°-5000800.
◊ Place threads of the fitting through the mounting hole on end of the
Assembled Valve Mount-5000425.
◊ Screw the plastic hex nut back onto the threads of the FITTING, DRESSING
90°-5000800.
FIGURE 14: ASSEMBLED VALVE MOUNT WITH FITTING, DRESSING 90°-5000800 ATTACHED
01/2016
13. End Effector Valve-Mount Sub-Assembly Instructions
Step 5:
Attach assembled Valve Mount to the robot arm
Locate parts:
● Assembled valve mount with
FITTING, DRESSING
90°-5000800 attached
● 2 SHCS M5 x 12mm (#5000638)
Tools:
● Loctite 263
● 4mm Allen Wrench
FIGURE 15: PARTS AND TOOLS TO ATTACH
VALVE MOUNT TO ROBOT ARM
01/2016
14. End Effector Valve-Mount Sub-Assembly Instructions
● Attach assembled valve mount to robot arm
◊ Locate mounting holes on robot arm
◊ Position Valve Mount so that metal extension holes are lined up with the holes
on the robot arm
◊ Use Loctite 263 on 2 SHCS M5 x 12mm (#5000638)
◊ Insert 2 SHCS M5 x 12 mm and tighten with 4mm Allen Wrench
FIGURE 16: ASSEMBLED VALVE MOUNT ATTACHED TO ROBOT ARM
01/2016