
Recommended
More Related Content
More from Arne Backlund
More from Arne Backlund (20)
EcoVac manual_2019 swedish and english
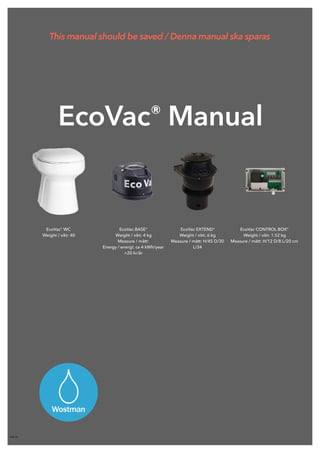
- 1. EcoVac Manual Page of 1 12 Wostman Wostman This manual should be saved / Denna manual ska sparas EcoVac® Manual EcoVac BASE® Weight / vikt: 4 kg Measure / mått: Energy / energi: ca 4 kWh/year >20 kr/år EcoVac EXTEND® Weight / vikt: 6 kg Measure / mått: H/45 D/30 L/34 EcoVac® WC Weight / vikt: 40 EcoVac CONTROL BOX® Weight / vikt: 1.52 kg Measure / mått: H/12 D/8 L/20 cm 19.01.01
- 2. EcoVac Manual Page of 2 12 Wostman ENGLISH Important before installation! • This manual should be saved by the owner! • Read the whole manual before installation. • Installation must be done by a professional tradesman, or by a person with comparable experience and knowledge. • When installing a tank, make sure to check what is approved in your respektive commune. • Don’t remove the small foam pieces under the front edge. (They hold the flushing pipe in place).. • FOR SEPARATING WC: The is a pre-mounted water trap in the urine bowl, no additional water trap should be mounted in the urine outlet. • The control unit has a counting unit that shows the number of flushes, and gives an indikation of how filled the tank is. However a separate septic tank alarm that warns about high levels must be installed. • The turbine in the vacuum unit is expendable and will need to be replaced within a few years. Usually ca 4-5 years. • The whole system is sensitive to frost and needs to be kept frost free. • If the toilet risks being exposed to degrees below 0 degrees Celsius, empty the water trap and the solenoid valve of water, otherwise frost damage can emerge. • No napkins, paper towels, feminine hygiene products, cotton balls etc. should be flushed down the WC. Only toilet paper with shorts fibers should be used. • See complete troubleshooting at www.wostman.se/support. Warranty Reklamations of EcoVac-system and its components that are delivered by Wostman Ecology AB is made according to the Consumer Purchase Act. In case of complaint, the place of purchase is contacted, i.e. the retailer, contractor or store from which the product is purchased. Remember to always show a receipt of the purchase in question when filing a complaint. If the product is bought directly at Wostman Ecology AB, please have following information ready when filing the complaint. * Name, adress and phone number * Product name, please also include RSK-number * Receipt / invoice * Picture of the product * Cause of error
- 3. EcoVac Manual Page of 3 12 Wostman SVENSKA Viktigt innan installation! • Den här manualen ska sparas av ägaren! • Läs hela manualen innan installation påbörjas. • Installation måste göras av fackman, eller av en person med likvärdig kompetens och kunskap. • När du installerar tank, kontrollera med din komun vad som gäller. • Angående toaletten, ta inte bort de små skumgummi-bitarna under porslinskanten (de håller spolslangen på plats). • FÖR SEPARERANDE WC: Det finns ett förinstallerat vattenlås i urinskålen, inget ytterligare vattenlås ska installeras på urinavloppet. • Styrenheten har ett räkneverk, som ger en indikation om tankens fyllnadsgrad, men ett externt överfyllnadslarm måste installeras. • Motorn i motorenheten ska betraktas som en förbrukningsvara som kan komma att behöva bytas ut efter 4-5 år. • Hela systemet är frostkänsligt och måste hållas frostfritt. • Om toaletten periodvis riskerar att utsättas för minusgrader, se till att toalettsystemet är förberett enligt skötselanvisningen för vinterunderhåll. • Inga servetter, hushållspapper, mensskydd, bomullstussar, tops etc. får spolas ned i toaletten. Endast toalettpapper med korta fibrer får användas! • För fullständig felsökning och skötselanvisning, se www.wostman.se/support. Reklamation Reklamation av EcoVac-systemet och dess komponenter som är levererade av Wostman Ecology AB görs enligt konsumentköpslagen. Vid reklamation kontaktas inköpsstället, d.v.s. den återförsäljare, entreprenör eller butik som varan är köpt av. Kom ihåg att alltid uppvisa kvitto på köp vid reklamation. Om varorna är köpta av Wostman Ecology AB direkt, vänligen ha följande uppgifter redo vid reklamation: * Namn, adress och telefonnummer * Produktnamn, gärna även RSK-nummer * Kvitto/faktura * Bild på produkt * Felorsak
- 4. EcoVac Manual Page of 4 12 Wostman oVac EcoVac BASE® (1 WC) What’s included / Vad som ingår What you need / Vad som behövs Remind this! / Att tänka på! • WC EcoVac / Toalett EcoVac • Vacuum turbine / vakuummotor • Control Unit / Styrbox • Muffler / Ljuddämpare • Manual / Installationsmanual • Septic tank (vacuum secured) / Septiktank som klarar vakuumtryck • Pipes + 45° angles (50 mm) • Ventilation pipes (75/110mm) • Cables • Electrical outlets • Frost guard • BASE is used for 1 WC • Septic tank must be handle vacuum pressure. • Septic tank must be sealed. Use rubber fitting in the lid. • Do you need to isolate the pipes? / Behöver du isolera rören? • Alarm should be installed on septic tank. / Nivålarm ska installeras på septiktanken. • >0-30 meter till avloppet • 0-30 meter mellan turbin och tank • 0-15 meter till avluftning 230V 12V Motor/Turbin WC Sealed lid Ø 50 mm pipes 2 x 4 5 ° 30 m Control box Water Muffler *Princip skiss på möjlig lösning*
- 5. EcoVac Manual Page of 5 12 Wostman EcoV oVac EcoVac EcoVac EcoVac EXTEND® (1-2 WC) What’s included / Vad som ingår What you need / Vad som behövs Remind this! / Att tänka på! • WC EcoVac / Toalett EcoVac • Vacuum turbine BASE / vakuummotor • Vacuum Unit EXTEND • Control Unit / Styrbox • Muffler / Ljuddämpare • Manual / Installationsmanual • Pipes + 45° angles (50 mm) • Ventilation pipes (75/110mm) • Cables • Electrical outlets • Frost guard • EXTEND is used for 1-2 or multipel WC • Every WC has 1 BASE + 1 EXTEND • Can be used to any septic tank • Septic tank should be ventilated • Do you need to isolate the pipes? / Behöver du isolera rören? • Alarm should be installed on septic tank. / Nivålarm ska installeras på septiktanken. • 0-30 meter från wc till tank • 0-30 meter från turbin till tank • 0-15 till avluftning 230V Ø 50 mm pipes 2 x 4 5 ° 30 m Control box Water WC 12V Turbine Muffler Muffler *Princip skiss på möjlig lösning*
- 6. EcoVac Manual Page of 6 12 Wostman < 2m 90° > 2m 90° Piping / Rördragning Possibilities / Möjligheter: Recommendations / Rekommendationer: Avoid / Undvik: No hard 90° on the pipes, it can cause clogging. Inga tvära 90° böjar på rören, det kan orsaka stopp. Avoid sinks where water can gather and freeze. Undvik sänkor där vatten kan samlas och frysa. The rubber part behind the WC should remain it’s original shape. Gummistosen bakom WCn måste behålla sin originalform. A slight fall on the pipes is recommend, it allows flushing even in the event of power failure Lutning på rören rekommenderas, det möjliggör för spolning även vid strömavbrott. If a turn must be installed, use x2 45° rather then x1 sharp 90°. Om en böj måste göras, använd x2 45° vinklar istället för x1 skarp 90°. The pipes does not have to be buried deep since they are always empty and are not sensitive to frost. Rören behöver inte ligga djupt eftersom de alltid är tomma och inte är särskilt frostkänsliga. The pipes can be mounted uphill. But not exceed a hight difference of 2m. If the pipes are mounted uphill the possibility of using the toilet under a power break is limited. Avloppsrören kan dras uppåt, men får inte överstiga en höjdskillnad på 2m. Om avloppsrören dras uppåt tas möjligheten att använda toaletten vid strömavbrott bort. The pipes can be mounted through walls or be drawn through the floor. Avloppsrören kan dras ut igenom väggar eller rakt ner genom golvet. A 50mm pipe or PEM hose can be mounted inside existing 110mm pipes.. En 50mm rör eller PEM slang kan dras inuti befintliga 110mm rör.
- 7. EcoVac Manual Page of 7 12 Wostman 450 mm 580 mm 395 mm Solenoid valve / magnetventil Junction box / Kopplingsdosa Stainless hose / Rostfri flexislang 50 mm Ø outlet / 50 mm Ø utlopp Stainless flush button / Rostfri spolknapp F B
- 8. EcoVac Manual Page of 8 12 Wostman EcoVac® WC Measure the pipe in the floor. Mät röret som sticker upp i golvet. Cut the pipe. Såga av röret till rätt längd. Clean the pipe. Rensa röret från ojämnheter. Open the junction box and prepare for the electrician. Öppna anslutningsdosan och förbered för en elektriker Put the WC in place. Use the small plastic plates to balance the WC if the floor is uneven. Ställ WCn på plats. Använd de små plastbrickorna för att balansera WCn om golvet är ojämnt. Glue the WC in place with transparent silicone. Limma fast WCn i golvet med transparent silicone. The very last step of the installation is connection the water. Test-flush the WC before first usage. Det allra sista steget i installationen är att ansluta vattnet. Test-spola WCn innan förstaanvändning. CV: > 60 1 2 3 4 5 6 7 Connect the signal cable to the control unit. Make sure the control unit is NOT connected to any power. Anslut signalkabeln till styrenheten. Se till att styrenheten INTE är ansluten till någon ström.. 8 < 350 mm.
- 9. EcoVac Manual Page of 9 12 Wostman Manual EcoVac EcoVac EcoVac 2 sec EcoVac EcoVac EcoVac Manage the Control unit / Hantera Styrenheten 230 V out 230 V in [ENTER] Push Enter to save settings. Hold Enter for 5 sec to reset all settings. Tryck på Enter för att spara en inställning och håll inne Enter i 5 sek för att återställa alla inställningar. [-] [+] Increase or decrease settings. Minska eller öka ett värde i inställningarna. [MODE] Scroll through different settings. Push [ENTER] to save each setting.. Bläddra genom olika inställningar. Tryck [ENTER] för att spara varje inställning. x2 10 A fuses. x2 10 A säkringar. Reset counter by pushing this button for 3 sec. Nollställ räkneverket genom att hålla inne denna knapp i 3 sek. [TEST] Test flush. Testspolning. Starts to flush the bowl. Adjust time depending on water pressure and until cleaning satisfaction. Spolning för att rengöra skålen. Justera tiden beroende på vattentrycket och tills spolmängden gör rent. nual EcoVac EcoVac EcoVac 2 sec 3. Pause / Mellantid 4. Refill / Återfyllnad 1. Flush / Spolning A pause is necessary for the vacuum to shut off completely before the refill of the bowl begins. The pause should not be shorter than the vacuum time. Mellantiden är viktig så att vakuummotorn stängs av helt innan återfyllnaden av skålen börjar. Mellantiden får inte vara kortare än 3 sekunder. The number of sec the bowl refills with water. It is correct when the water level is 1,5 cm above the outlet hole.. Antalet sekunder som skålen återfalls med vatten. Vattennivån ska sluta vid 1,5 cm över utloppshålet.. Vacuum time indicates the number of seconds the vacuum turbine is on. Vakuumtid indikerar antalet sekunder som vakuummotorn är igång. 2. Vacuum time / Vakuumtid
- 10. EcoVac Manual Page of 10 12 Wostman Adjust the settings in the Control unit / Justera inställningarna i Styrenheten Setting EcoVac BASE EcoVac EXTEND 1. Flushing time / Spoltid 1-2 Sec 1-2 Sekunder 1-2 Sec 1-2 Sekunder 2. Vacuum time / Vakuumtid Straight / falling pipes: Raka / lutande rör: 0-15 m = 3 sec 15-30 m = 5 sec Vertical / rising pipes: Vertikala / stigande rör: 0-15 m = 4 sec 15-30 m = 6 sec Straight / falling pipes: Raka / lutande rör: 0-15 m = 3 sec 15-10 m = 5 sec Vertical / rising pipes: Vertikala / stigande rör: 0-15 m = 4 sec 15-10 m = 6 sec X meters = distans between WC and vacuum turbine. (Not hight difference. Hight difference may not exceed 2 m with rising pipes.) X meter = avstånd mellan WC och vakuummotor. (Ej höjdskillnad. Höjdskillnaden får inte överstiga 2 m vid stigande rörledning.) 3. Pause / Mellantid The pause is always 3 seconds. Mellantid är alltid 3 sekunder. The pause is always 3 seconds. Mellantiden är alltid 3 sekunder. Ex: 6 Sec vakuum time = 6-7 sec Pause. Ex: 6 sekunder vakuumtid = 6-7 sekunder mellantid. 4. Refill / Återfyllnad 2-4 seconds. 2-4 sekunder. *Beror på vattentryck* 2-4 seconds. 2-4 sekunder. *Beror på vattentryck* Until water level is 1,5 cm above outlet hole. Tills vattennivån är 1,5 cm över utloppshålet. The control unit is completely reset and all settings need to be adjusted according to the modell below. Test flush your EcoVac before first usage to make sure all the settings are correct. The owner is responsible for the settings and the management of the Control unit. Styrenheten är helt nollställd och alla inställningar behöver justeras enligt modellen nedan. Testspola din EcoVac innan första användning för att kontrollera att alla inställningar är korrekta. Ägaren ansvarar över inställningarna och hanteringen av Styrenheten. Manual EcoVac EcoVac EcoVac 2 sec Manual EcoVac EcoVac EcoVac 2 sec EcoVac EcoVac EcoVac Manual EcoVac EcoVac EcoVac 2 sec
- 11. EcoVac Manual Page of 11 12 Wostman Mount the Control unit / Montera styrenheten Recommendations: - The control unit should be placed in a dry and accessible place. Preferably inside the house, by the power central. (It should not be put next to the vacuum turbine (BASE) or the vacuum unit (EXTEND). It should be easy to find and make changes to the settings if necessary (and you should de able to hear the alarm signal.) - Tank alarm should be installed on the septic tank. This should also be taken into consideration during wiring. - Wire the control unit without RCD (Residual current device) since the vacuum turbine (BASE) is often placed in a moist, locked place under ground and do not have constant power. - Connect the signal cable to the WC before you connect the control unit to any power. - One extra single phase cable should be installed at this point from the power central to the tank. This cable should be installed with constant power for the frost guard and heat cable. (OBS. don’t use three phase cable). EKKY 3x1,5 mm. - Make sure to use the supplied seal strip for the lid on the Control unit. - Styrenheten ska placeras på ett torrt och lättillgängligt ställe. Helst inne i huset vid elcentralen (den ska inte sitta vid motorenheten (BASE). Man ska enkelt kunna hitta den och ändra inställningarna, om det behövs (Man ska även kunna höra om larmet ljuder från styrenheten). - Nivålarm på tanken ska installeras. Detta bör även planeras in för eldragning. - Anslut styrenheten till uttag utan jordfelsbrytare eftersom motorenheten (BASE) sitter i ett fuktigt, låst utrymme under mark och krypströmmar kan utlösa jordfelsbrytare. - Anslut signalkabeln till WC innan styrenheten kopplas på med ström. - En extra 1-faskabel bör läggas från husets elcentral ut samma väg till tanken, denna med fast ström till frostvakt och värmekabel. OBS. ej 3-faskabel! (rekomenderas: EKKY 3x1,5 mm). - Se till att fästa den medföljande tätningslisten på glaslocket till styrenheten. The picture above shows an example of control units for two EcoVac mounted next to the power central. / Bildan ovan visar ett exempel på styrenheter till två EcoVac monterade bredvid elcentralen. Rekommendationer:
- 12. EcoVac Manual Page of 12 12 Wostman