
Recommended
More Related Content
Recently uploaded
Recently uploaded (20)
Featured
Featured (20)
Study & installation scanner and web camera presentation by syed mehdi raza
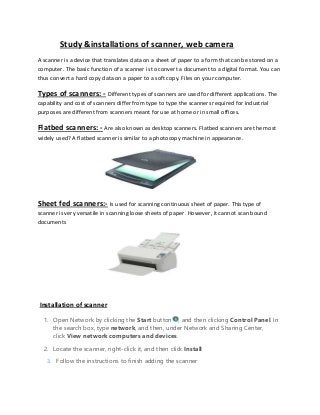
- 1. Study &installations of scanner, web camera A scanner is a device that translates data on a sheet of paper to a form that can be stored on a computer. The basic function of a scanner is to convert a document to a digital format. You can thus convert a hard copy data on a paper to a soft copy. Files on your computer. Types of scanners: - Different types of scanners are used for different applications. The capability and cost of scanners differ from type to type the scanners required for industrial purposes are different from scanners meant for use at home or in small offices. Flatbed scanners: - Are also known as desktop scanners. Flatbed scanners are the most widely used? A flatbed scanner is similar to a photocopy machine in appearance. Sheet fed scanners:- Is used for scanning continuous sheet of paper. This type of scanner is very versatile in scanning loose sheets of paper. However, it cannot scan bound documents Installation of scanner 1. Open Network by clicking the Start button , and then clicking Control Panel. In the search box, type network, and then, under Network and Sharing Center, click View network computers and devices. 2. Locate the scanner, right-click it, and then click Install 3. Follow the instructions to finish adding the scanner
- 2. Web camera: a webcam is a video camera that feeds or streams its image in real time to or through a computer to computer network. When "captured" by the computer, the video stream may be saved, viewed or sent on to other networks via systems such as the internet, and email as an attachment. When sent to a remote location, the video stream may be saved, viewed or on sent there. Unlike an IP camera (which connects using Ethernet or Wi-Fi), a webcam is generally connected by a USB cable, or similar or built into computer hardware, such as laptops. Installations web camera: Step 1: Buy your webcam from a reputable supplier, either online or a local computer shop. Webcams come in all shapes and sizes, and vary from basic models to more complicated ones that come with extra gadgets such as motion detectors. Prices vary a lot, too. Make sure that the one you choose has a built-in microphone if you want to use your webcam for chatting to friends and relatives. Step 2: Carefully read the installation instructions before attempting to install the webcam. Step 3: Make sure you have everything to hand that you’ll need to complete your installation. The webcam should come with a USB cable that will connect it to your computer (except if you have a wireless version). Step 4: The webcam package includes a CD containing important software. Insert this into your computer’s CD drive. The set-up program should run automatically, but if it doesn’t, click Start and then My Computer. Double-click on the disk drive as this will prompt the files to run on the CD. - See more at: http://digitalunite.com/guides/email-skype/webcams/how-set-webcam#sthash.l0j70CeI.dp Step 6: Now position your webcam. If it has a monitor clip, attach it securely to the top of your screen pointing at your face (see left for an example). Adjust it so that that people at the other end can see your whole face and not just your forehead. Once you’ve adjusted it to your satisfaction, don’t fiddle with it during a call – there’s nothing more irritating to the person you’re talking to than to spend a call looking, first, at the light fitting and then at the carpet while you’re chatting. If your webcam doesn’t have a clip, make sure it’s sitting firmly on a flat surface so that your web pictures are level. The tops of older-style CRT monitors are perfect for webcams to sit on. Remember that everyone will see whatever is behind you, so keep it tidy – and think about getting dressed! Step 7: Now you’ve completed the set-up, it’s time to see the results! Click Start again and find your webcam program. Double-click on it and the program will open up. - See more at: