
Recommended
Recommended
More Related Content
Recently uploaded
Recently uploaded (20)
Featured
Featured (20)
Get familiar with panels in adobe illustrator cs6.pdf
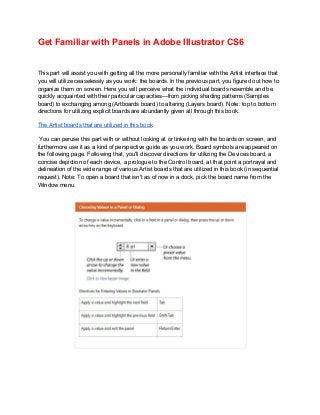
- 1. Get Familiar with Panels in Adobe Illustrator CS6 This part will assist you with getting all the more personally familiar with the Artist interface that you will utilize ceaselessly as you work: the boards. In the previous part, you figured out how to organize them on screen. Here you will perceive what the individual boards resemble and be quickly acquainted with their particular capacities—from picking shading patterns (Samples board) to exchanging among (Artboards board) to altering (Layers board). Note: top to bottom directions for utilizing explicit boards are abundantly given all through this book. The Artist boards that are utilized in this book You can peruse this part with or without looking at or tinkering with the boards on screen, and furthermore use it as a kind of perspective guide as you work. Board symbols are appeared on the following page. Following that, you'll discover directions for utilizing the Devices board, a concise depiction of each device, a prologue to the Control board, at that point a portrayal and delineation of the wide range of various Artist boards that are utilized in this book (in sequential request). Note: To open a board that isn't as of now in a dock, pick the board name from the Window menu.
- 2. Distinguishing the board symbols Each board in Artist has a one of a kind symbol. An On the off chance that you keep the boards imploded to ration screen space, you can distinguish them by their symbols. On the off chance that you don't perceive a board symbol, utilize the apparatus tip to distinguish it.
- 3. A When fallen, each board has a one of a kind symbol. Stow away or show all the presently open boards, including the Apparatuses board and tear off toolbars > Tab Stow away or show all the at present open boards however not the Apparatuses board or tear off toolbars Move Tab
- 4. Utilizing the Instruments board Notwithstanding the apparatuses on the Devices board, which are utilized for making and altering objects, you will likewise discover shading controls, a menu or symbols for picking a drawing mode, and a menu for picking a screen mode. In the event that the board is covered up, pick Window > Instruments to show it. To change over the board format from single segment to twofold segment or the other way around, either click the twofold sharpened stone at the top or double tap the top bar. Snap once on an obvious device to choose it, or snap and hang on an apparatus that has a little pointed stone to pick a connected device from a fly-out menu. You can go through devices on a similar menu by Alternative/Alt tapping the obvious apparatus. To make a tear off toolbar for a gathering of related instruments, red_star.jpg press and hang on the pointed stone for an apparatus, at that point click the vertical tear off bar on the correct edge of the menu.A–B To dock tear off toolbars together, drag one tear off toolbar to the side of a current one and delivery when the vertical drop zone line displays.C–D To make a tear off toolbar vertical rather than level, click the twofold bolt E–F or double tap the top bar. To close a docked tear off toolbar, drag it by its gripper bar out of its dock, at that point click its nearby catch (x).
- 7. To get to an apparatus rapidly, utilize the letter alternate route that is appointed to it. The alternate routes are recorded in enclosures on the following two pages, and furthermore in the apparatus tips onscreen (Note: If the device tips aren't showing, go to Artist/Alter > Inclinations > General and check Show Instrument Tips. A few devices can likewise be gotten to incidentally by means of a switch key. For instance, squeezing Cmd/Ctrl transforms the current apparatus into an impermanent choice device. You'll learn many apparatus flips as you continue through this book. To transform the apparatus pointer into a focus symbol for more exact situating, go to Artist/Alter > Inclinations > General and check Utilize Exact Cursors. Or on the other hand on the off chance that you want to keep that inclination off, you can turn the pointer to a focus symbol briefly by squeezing the Covers Lock key. You can pick choices for the current apparatus from the Control board (see page 42). A few apparatuses, for example, the Paintbrush and Pencil instruments, have a connected choices exchange, which opens when you double tap the device or when you click the device and afterward press Return/Enter.
- 8. The Tools panel illustrated
- 11. The Control board The Control board houses numerous often utilized controls helpfully under one rooftop, and changes relevantly relying upon what device and sort of article are chosen. Two of the numerous varieties are demonstrated as follows. For instance, you can utilize this board to apply fill and stroke tones; change an item's factor width profile, brush stroke definition, or murkiness; apply fundamental sort ascribes, for example, the text style family and point size; adjust and disperse numerous articles; access controls for altering images, Picture Follow, and Live Paint protests; and install or alter connected pictures.
- 12. At the point when no articles are chosen, you can utilize this board to pick default fill, stroke, brush, style, and obscurity settings for the current report and rapidly access the Record Arrangement or Inclinations exchange by tapping the catch with that name. To move the Control board to the top or base, separately, of the Application outline, pick Dock to Top or Dock to Base from the menu at the correct finish of the board. Or then again in the event that you like to make the board free-drifting, drag the gripper bar on the extreme left side. To control which alternatives show on the board, uncheck or check any of the things on the board menu. Choices are in more steady areas on the Control board in Artist CS6 than they were in variant CS5.
- 13. Opening an Impermanent Board red-arrow.jpg Snap a connection (word or letter that has a blue underline) on the Control board to open a connected board. For instance, you could click Stroke to open an impermanent Stroke board, or snap Haziness to open a transitory Straightforwardness board. red-arrow.jpg Snap the Stroke or Fill shading square on the Control board to open a brief Patterns board, or Move click either square to open an impermanent Shading board. red-arrow.jpg You can open other impermanent boards by clicking a thumbnail or pointed stone. For instance, you could tap the Style thumbnail or sharpened stone to open a brief Realistic Styles board. Adjust board align panel The catches on the main two columns of the Adjust board adjust as well as disperse at least two articles along their focuses or along their top, left, right, or base edges. Items can be adjusted to a choice, an artboard, or a key article (one of the chosen objects). Catches in the lower piece of the board rearrange (even out) the separating among at least three articles. See pages 105–106. This board can likewise be utilized to adjust anchor focuses (see page 170). Adjust fastens additionally show up on the Control board when at least two articles are chosen.
- 14. Appearance board appearpanelicon The appearance credits of an article consist of its fill and stroke tone, Stroke board settings, impacts, and Straightforwardness board settings. The Appearance board records the particular appearance ascribes and settings for whichever layer, gathering, or item is presently focused on the Layers board. You can utilize the board to add additional fill or stroke credits, alter or eliminate ascribes, apply and alter impacts, and alter singular credits inside an applied realistic style. Utilizing helpful in-board highlights, you can alter credits rapidly. For instance, you can click a connection (blue underlined word) to open a discourse or a transitory board: Snap Stroke to open the Stroke board, Mistiness to open the Straightforwardness board, or the name of an impact to open its exchange. To open a brief Samples board, click the Stroke or Fill shading square, at that point click the thumbnail or sharpened stone (or Move click the last to open an impermanent Shading board). See Section 14.
- 15. Artboards board appearpanelicon Notwithstanding posting all the artboards in the current record, the Artboards board allows you to show, make, rename, and copy artboards; change their request; modify them in the report; pick alternatives for them; change their direction; and erase them. The Artboard Choices discourse opens when you double tap the artboard direction symbol, which is situated to one side of the artboard name. See pages 7–12 and 28. Traits board artboards panel The Qualities board lets you pick overprint choices for an article (see page 415), show or conceal an item's middle point (see page 103), switch the fill among shading and straightforwardness in a compound way (see page 348), or change an article's fill rule. You can likewise utilize this board to make a hotspot for Web yield. Allot a picture map shape and a URL to a chosen object, at that point to confirm the URL in the Internet browser that is at present introduced on your framework, click the Program button.
- 16. Brushes board brush panel There are five assortments of enlivening brushes that you can apply to ways: Calligraphic, Dissipate, Craftsmanship, Fiber, and Example. You can apply a brush either by picking the Paintbrush apparatus and a brush and afterward drawing a shape, or by applying a brush to a current way. To customize your brush strokes, you can make and alter custom brushes. On the off chance that you adjust a brush that is being utilized in an archive, you'll be given the choice by means of a ready discourse to refresh the ways with the modified brush. Brushes on the Brushes board spare with the current report. See Part 23. To open a brief Brushes board, click the Brush Definition thumbnail on the Control board, or for a chosen Stroke posting on the Appearance board, click the Brush Definition thumbnail.
- 17. Character board You will utilize the Character board to apply type ascribes: text style family, text style, text dimension, driving, kerning, following, flat scale, vertical scale, benchmark move, character pivot, unique glyphs, a language to be utilized for hyphenation, and an enemy of associating technique. See pages 263–266 and 280. At the point when a sort apparatus or a sort object is chosen, the Control board additionally gives some essential kind controls. To open a transitory Character board, click Clipping path Character on the Control board.
- 18. Character Styles board A character style is an assortment of settings for type characters, including a textual style family, textual style, text dimension, driving, following, and kerning. Not at all like section styles, which apply to entire passages, character styles are utilized to rapidly arrange modest quantities of type, (for example, shots, unabashed words, emphasized words, or huge introductory covers) to recognize them from the principle text. At the point when you alter a character style, any content where it is being utilized updates as needs be. Utilizing the Character Styles board, you can make, apply, alter, copy, and erase styles. See pages 274–277. (Contrast this board and the Section Styles board, which appears on
- 19. Character Styles board charstylespanelicon A character style is an assortment of settings for type characters, including a text style family, textual style, text dimension, driving, following, and kerning. Dissimilar to passage styles, which apply to entire sections, character styles are utilized to rapidly design modest quantities of type, (for example, projectiles, unabashed words, stressed words, or enormous beginning covers) to recognize them from the principle text. At the point when you alter a character style, any content where it is being utilized updates in like manner. Utilizing the Character Styles board, you can make, apply, alter, copy, and erase styles. See pages 274–277. (Contrast this board and the Passage Styles board, which appears on page 51.)
- 20. Shading Aide board Utilize the Shading Aide board to create shading plans from a base tone by picking a concordance rule and additionally a variety type (Colors/Shades, Warm/Cool, or Distinctive/Quieted). You can click any variety pattern to apply it as a fill or stroke tone to at least one chosen object. You can likewise spare varieties from the Shading Aide board as a gathering to the Samples board, or alter the current shading bunch by means of the Alter Tones exchange. See pages 115 and 128–130.
- 21. Archive Information board The Report Information board records information about work of art in your archive, contingent upon which class is picked on the board menu: Archive (all information), or all Items, Realistic Styles, Brushes, Spot Shading Articles, Example Articles, Slope Articles, Text styles, Connected Pictures, Installed Pictures, or Text style Subtleties. On the off chance that Determination Just is picked on the menu, the board records information relating to simply chosen object(s). See page 432.
- 22. Flattener Preview board Craftsmanship that contains hazy articles must be straightened before it is printed. Utilizing the Highlight menu alternatives in the Flattener Preview board, you can review which objects in your archive will be influenced by smoothing, change the leveling settings, at that point click Refresh to see the impact of the new settings in your craftsmanship. See page 418
- 23. Glyphs board Utilizing the Glyphs board, you can discover which character varieties (substitute glyphs) are accessible for some random character in a particular OpenType text style, and supplement explicit glyphs from that textual style into your archive (counting glyphs that can't be entered by means of the console). See page 269. Inclination board The Gradient board allows you to make, apply, and alter inclinations, which are delicate, continuous mixes between at least two tones. You can utilize the board to apply a slope to an item's fill or stroke, change the measure of a shading by hauling its stop, pick an alternate tone or murkiness esteem for a chose stop, click beneath the inclination slider to add new tones, move a midpoint precious stone to change the area where two contiguous tones are blended similarly, invert the inclination tones, change the general angle type or point, or change the arrangement of an inclination in an article's stroke. See Chapter 24.
- 24. Realistic Styles board The Graphic Styles board empowers you to store and apply assortments of appearance credits, for example, various strong shading fills or strokes, straightforwardness and overprint settings, mixing modes, brush strokes, and impacts. Utilizing realistic styles, you can apply ascribes rapidly and make a durable look among various articles or reports (like how section styles are utilized with type). See Chapter 16. To open an impermanent Graphic Styles board, click the Style thumbnail or sharpened stone on the Control board.
- 25. Picture Trace board The Image Trace highlight recognizes and follows zones of shading and shade in a raster picture that is opened or set into Illustrator, for example, a Photoshop, TIFF, or JPEG picture or filtered craftsmanship, and converts those regions to Illustrator ways. You can browse a wide exhibit of following choices on the Image Trace board preceding the following—and in light of the fact that the following is "live," you can likewise utilize the board to calibrate the outcomes. You can utilize an underlying following preset (predefined settings) as a beginning stage, or make and apply custom presets. Among the various settings that you can determine are a mode (high contrast, grayscale, or shading), a shading palette, the quantity of coming about tones, regardless of whether fill or potentially stroke tones are created, and the exactness with which the picture is followed. See Chapter 17.
- 26. Data board On the off chance that no items are chosen in the current archive, contingent upon the current apparatus, the Info board records the x,y (level and vertical) area of the pointer. On the off chance that an article is chosen, the board records the area of the item, its width and tallness, and information about its fill and stroke tones (the shading parts; or the name of an example or slope; or a shading name or number, for example, a PANTONE PLUS number). While an item is being changed through a change instrument, the board records relevant data, for example, a rate, an incentive for a scale change or a point of revolution. At the point when a sort apparatus and type object are chosen, the board shows type particulars. At the point when the Measure apparatus is utilized, the Info board opens naturally and records the separation and point the instrument has recently determined. Layers board The essential Layers board allows you to add and erase layers and sublayers in an archive, and make layer gatherings. You can likewise utilize this board to choose, target, restack, copy, erase, stow away, show, lock, open, combine, change the view for, or make a cut-out set for a layer, sublayer, gathering, or individual item. At the point when your work of art is done, you can utilize an order on the board menu to straighten the record into one layer or deliver all the items to isolate layers for send out as a Flash activity. See Chapter 13.
- 27. Connections board At the point when you place a picture from another application, for example, Photoshop, into an Artist report, you can select to have Artist install a duplicate of the picture into the record (and in this way increment the record measure yet permit the program to shading oversee it) or simply connect the picture to your archive (and limit the document estimate yet require the first document to be accessible for print yield). Utilizing the Connections board, you can screen the status of connected pictures, convert a connected picture to an installed one, open a connected picture in its unique application for altering, update an altered picture, and reestablish the connection to a picture that is absent or changed. See pages 300–303.
- 28. Sorcery Wand board The Sorcery Wand device chooses objects that have the equivalent or a comparative fill tone, stroke tone, stroke weight, murkiness, or mixing mode as the at present chosen object. Utilizing the Enchantment Wand board, you determine which credits the device may choose and set a resilience esteem for each trait. For instance, if you somehow managed to check Obscurity, pick a darkness Resistance of 10%, at that point click an article that has a murkiness of half, the apparatus would discover and choose objects in the report that have a haziness somewhere in the range of 40% and 60%. See page 97. Guide board The Pilot board has two primary capacities. To utilize it to move the current record in its window, drag or snap in the intermediary review region (red sketched out box). To change the record zoom level, utilize the zoom controls at the lower part of the board. To both zoom to and make a particular zone of a report visible, Cmd-drag/Ctrl-haul in the intermediary review zone.
- 29. OpenType board Among the Roman OpenType textual style families that transport with Artist, the text styles that contain an extended character set and a huge collection of substitute glyphs are named with "Professional." By clicking a catch on the OpenType board, you can indicate which substitute characters (glyphs) will show up in your content when you type the imperative key or keys. The unique characters for a given textual style may incorporate ligatures, swashes, naming characters, expressive substitutes, ordinals, and divisions. You can likewise utilize the board to determine choices for numerals, for example, a style (e.g., plain coating or old-style) and a position (e.g., numerator, denominator, superscript, or addendum). See page 270. Artist gives seven boards to the altering type: Character, Character Styles, Glyphs, OpenType, Passage, Section Styles, and Tabs. Every one of them can be opened through the Window >Type submenu; the Glyphs board can likewise be opened by means of the Sort menu. Four of them can likewise be opened by means of an alternate route, as recorded beneath.
- 30. Section board Utilize the Passage board to apply settings that influence whole sections, for example, level arrangement, space, dividing previously or after, and programmed hyphenation. By means of the board menu, you can pick hanging accentuation and arranger alternatives and open an exchange for picking avocation or hyphenation choices. See pages 267, 271–273, and 278. The Adjust Left, Adjust Center, and Adjust Right fastens are likewise accessible on the Control board when a sort object is chosen. To open an impermanent Section board, click Passage on the Control board.
- 31. Section Styles board A section style is an assortment of passage determinations (counting even arrangement, space, separating previously or after, word dividing, letter dispersing, hyphenation, and hanging accentuation), just as character ascribes, for example, the textual style family, textual style, and text dimension. At the point when you apply a passage style to at least one chosen section, the sort is reformatted with the determinations in that style. At the point when you alter a section style, the sort wherein it is being utilized updates likewise. With passage (and character) styles, you can typeset text rapidly and guarantee that the arranging is steady. Utilize the Section Styles board to make, store, apply, alter, copy, and erase passage styles for the current report. See pages 274–277. Pathfinder board Contingent upon how they are applied, the Shape Mode orders on the top line of the Pathfinder board consolidate chosen, covering objects into at least one standard way or into a compound shape. The Extend button changes over a compound shape into either a way or a compound way (the last mentioned if the order initially delivered a pattern shape). The Pathfinder catches on the base column of the board produce straightened, cut-up shapes from different chosen objects. See pages 341–346.
- 32. Example Choices board Through the Example Alternatives board, alongside some instinctive on-picture controls, you can make and alter consistent examples. At the point when you make an example, it shows up naturally on the Samples board for the current archive. You can apply any example sample in the Patterns board to an item's fill (inside) or stroke (edge). The Example Choices board lets you change the example tiling arrangement (Framework, Block, or Hex); change the dispersing among tiles; and for objects that ride the tile limit and cover each other, control which articles are in front. You can likewise pick review choices for design altering mode, including the quantity of duplicates that show, how much the duplicates are diminished, and whether the tile and additionally pattern limits show. See pages 135–142
- 33. Detachments See board The Partitions See board gives you a thought of how the individual C, M, Y, and K shading segments in a CMYK archive will separate to singular plates during the business printing measure. You can utilize the board to watch that a shading is appropriately set to take out tones underneath it in your fine art, or to check whether a shading is appropriately set to overprint on top of different tones. Different utilizations for the board are to screen the utilization of spot tones in the work of art, to confirm that any spot tone is set to take out shadings underneath it, and to decide if a particular dark is a rich dark (a combination of C, M, Y, and K inks) or a straightforward dark that contains just the K segment. See pages 414–415. Stroke board Stroke settings control the presence of an article's way (edge). By utilizing the Stroke board, you can determine a stroke weight (thickness), cap (end) style, and corner (join) style, and an arrangement choice to control the situation of the stroke on the way. You can likewise utilize the board to make a run (or spotted) line or outskirt, apply a sharpened stone as well as tail style, and change the stroke width profile. See pages 120–122 and 162. To open a brief Stroke board, click Stroke on the Control or Appearance board.
- 34. Samples board Utilize the Samples board to pick, store, and apply strong shadings, examples, slopes, and shading gatherings. In the event that you click a pattern, it turns into the current fill or stroke tone (contingent upon whether the Fill or Stroke square is dynamic on the Apparatuses board and Shading board), and it is applied to all at present chosen objects. Double tapping a sample opens the Pattern Alternatives discourse, in which you can change the pattern name or change its sort to worldwide cycle, non global cycle, or spot. See pages 114, 116, 118, 124–127, and 132. To open a transitory Samples board, click the Fill or Stroke square or pointed stone on the Control or Appearance board.
- 35. Images board Images are Artist protests that are put away on the Images board and spare with the current report. Utilizing images, you can rapidly and effectively make an unpredictable assortment of items, for example, a bank of trees or mists. To make one case of an image, you essentially haul from the Images board onto the artboard; to amass different cases rapidly into what is known as an image set, you utilize the Image Sprayer instrument. The other imagery instruments let you change the position, stacking request, nearness, size, pivot point, or straightforwardness of numerous occurrences in a set, or steadily apply a shading color or realistic style—while keeping up the connection to the first image on the board. On the off chance that you alter the first image, all examples of that image in the report update naturally. See Section 28. Tabs board The best way to adjust sections of text accurately is by utilizing tabs and the Tabs board. Utilizing the board, you can embed, move, and change the arrangement of custom tab markers, determine a pioneer, (for example, a period character, to create a dabbed line), and indicate a character for your content to adjust to, (for example, a decimal point). See pages 278–279.
- 36. Change board The Change board records the area, width, tallness, revolution point, and shear point of the as of now chosen object, and can be utilized to change those qualities. By clicking a reference point, you can control what part of the item the changes are determined from. The board can likewise be utilized to adjust chosen objects to the pixel framework. Through orders on the board menu, you can control whether simply the article, the item and a fill design, or simply the fill design is changed. See pages 148–149. A reference point symbol and X, Y, W, and H fields likewise show up on the Control board when at least one way is chosen. To open a brief Change board, click the X, Y, W, or H connect (or if those fields aren't appearing, click "Change").
- 37. Straightforwardness board You can utilize the Straightforwardness board to change the mixing mode or mistiness of a layer, gathering, or individual article. The Make Veil button applies the darkness esteem and grayscale likeness, a shading (or tones), angle, or example in the highest item to fundamental chosen objects, and alternatively conceals segments of those articles that stretch out past its edges. See Part 27. To open a brief Straightforwardness board, click the Darkness interface on the Control or Appearance board. You can likewise change the darkness of an article legitimately through the Control board.
- 38. Hi , Hope you are fine. Clippingpathlab.com is offering you 100% satisfaction guarantee photo editing service at minimum lower cost. Our expert designers are working here at 24/7 to provide you clipping, masking, retouching, shadow and many other image editing services with master quality. For bulk quantity images you will get an attractive discount. Service that we Provide: Clipping Path Background Removal Image Cutout Color Correction Jewelry or Metal Retouching E-commerce Image Retouching Cropping / Web Image fixing Photo Restoration Model Retouching Raster To Vector Conversion* Web Design and Development Services please provide us a chance to serve you with great quality service. If you don't like our service, then you can leave us. But we are making a promise that you must be happy with our service. Please send your images and feel relaxed. http://clippingpathlab.com/request-for-quote/ Best Regards Abdullah Ibna Jafar Clipping Path Lab Skype: clippingpath.lab Phone: +8801744674565 www.clippingpathlab.com