Cara ganti fusing belt mpc4502
•
0 likes•840 views

Cara pasang/ganti sparepart fushing belt mesin Ricoh mpc4502

Recommended
Recommended
More Related Content
What's hot
What's hot (15)
Viewers also liked
Similar to Cara ganti fusing belt mpc4502
Similar to Cara ganti fusing belt mpc4502 (16)
Recently uploaded
Recently uploaded (20)
Cara ganti fusing belt mpc4502
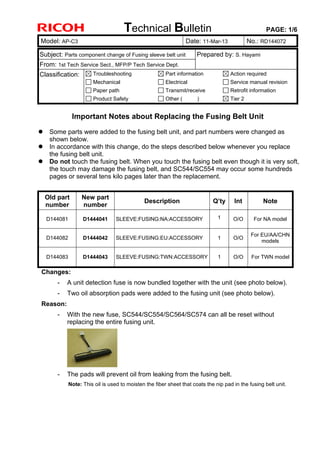
- 1. Technical Bulletin PAGE: 1/6 Model: AP-C3 Date: 11-Mar-13 No.: RD144072 Subject: Parts component change of Fusing sleeve belt unit Prepared by: S. Hayami From: 1st Tech Service Sect., MFP/P Tech Service Dept. Classification: Troubleshooting Mechanical Paper path Product Safety Part information Electrical Transmit/receive Other ( ) Action required Service manual revision Retrofit information Tier 2 Important Notes about Replacing the Fusing Belt Unit Some parts were added to the fusing belt unit, and part numbers were changed as shown below. In accordance with this change, do the steps described below whenever you replace the fusing belt unit. Do not touch the fusing belt. When you touch the fusing belt even though it is very soft, the touch may damage the fusing belt, and SC544/SC554 may occur some hundreds pages or several tens kilo pages later than the replacement. Old part number New part number Description Q’ty Int Note D144081 D1444041 SLEEVE:FUSING:NA:ACCESSORY 1 O/O For NA model D144082 D1444042 SLEEVE:FUSING:EU:ACCESSORY 1 O/O For EU/AA/CHN models D144083 D1444043 SLEEVE:FUSING:TWN:ACCESSORY 1 O/O For TWN model Changes: - A unit detection fuse is now bundled together with the unit (see photo below). - Two oil absorption pads were added to the fusing unit (see photo below). Reason: - With the new fuse, SC544/SC554/SC564/SC574 can all be reset without replacing the entire fusing unit. - The pads will prevent oil from leaking from the fusing belt. Note: This oil is used to moisten the fiber sheet that coats the nip pad in the fusing belt unit.
- 2. Technical Bulletin PAGE: 2/6 Model: AP-C3 Date: 11-Mar-13 No.: RD144072 PROOFING MATERIAL: FUSING COVER:LOWER FUSING COVER:LOWER
- 3. Technical Bulletin PAGE: 1/6 Model: AP-C3 Date: 11-Mar-13 No.: RD144072 When replacing the fusing belt unit: 1) Do the following when you remove the protective paper from the fusing belt. Note: This is necessary because it is possible to press the belt by mistake or press the belt’s surface, forming a dent on the belt. This is a major cause of SC544/SC554. 1. Hold the lateral metal stays, and pinch the tape on the paper gently as shown. IMPORTANT: Be careful not to press the fusing belt surface. 2. Peel of the tape very carefully, pulling the tape up in a vertical direction (90 degrees to the belt surface). Fusing belt Tape Pull tape gently in this direction Protection paper Pinch the tape gently Hold the metal stay TapeTape Side metal stay Protection paper
- 4. Technical Bulletin PAGE: 2/6 Model: AP-C3 Date: 11-Mar-13 No.: RD144072 2) Do the following if you are replacing the fusing belt unit in order to clear SC544/SC554/SC564/SC574. IMPORTANT: Only attach the new detection fuse if you are replacing the fusing belt unit to clear one of the SCs listed above. If you install this new fuse but none of these SCs has occurred, the PM counters for the fusing unit, pressure roller, and others will not be reset properly. 1. Release the three harnesses from the hook, as shown. HookHook
- 5. Technical Bulletin PAGE: 3/6 Model: AP-C3 Date: 11-Mar-13 No.: RD144072 2. Remove the connector from the hook and attach the new detection fuse as shown. 3. Set the fuse into the hook, so that it rests within the edge of the metal frame. 4. Change SP3-902-018 to a value of “1”. Note: This step should be done before or shortly after you replace the fusing sleeve belt unit, even if you are attaching a new unit detection fuse. This is because if the machine detects the new unit detection fuse, the machine does not reset the PM counter while SC544/SC554/SC564/SC574 is occurring.
- 6. Technical Bulletin PAGE: 4/6 Model: AP-C3 Date: 11-Mar-13 No.: RD144072 3) Do the following to attach (or replace) the two oil absorption felt strips included with the unit. 1. Remove the old oil absorption felt, if present. 2. Wipe the attachment surface for the felt with an alcohol-wetted cloth. Note: If you do not wipe this area properly, the new felt will not adhere to the cover. 3. Attach the oil absorption felt strips to the fusing lower cover, as shown. Important: Attach the felt strips in alignment with lines A-D shown below Line A Line B Line C Line D