
Recommended
More Related Content
Similar to 3D Printing FAQ Guide
Similar to 3D Printing FAQ Guide (20)
3D Printing FAQ Guide
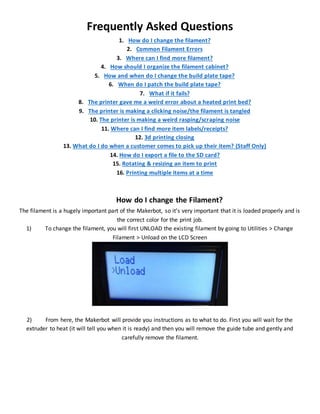
- 1. Frequently Asked Questions 1. How do I change the filament? 2. Common Filament Errors 3. Where can I find more filament? 4. How should I organize the filament cabinet? 5. How and when do I change the build plate tape? 6. When do I patch the build plate tape? 7. What if it fails? 8. The printer gave me a weird error about a heated print bed? 9. The printer is making a clicking noise/the filament is tangled 10. The printer is making a weird rasping/scraping noise 11. Where can I find more item labels/receipts? 12. 3d printing closing 13. What do I do when a customer comes to pick up their item? (Staff Only) 14. How do I export a file to the SD card? 15. Rotating & resizing an item to print 16. Printing multiple items at a time How do I change the Filament? The filament is a hugely important part of the Makerbot, so it’s very important that it is loaded properly and is the correct color for the print job. 1) To change the filament, you will first UNLOAD the existing filament by going to Utilities > Change Filament > Unload on the LCD Screen 2) From here, the Makerbot will provide you instructions as to what to do. First you will wait for the extruder to heat (it will tell you when it is ready) and then you will remove the guide tube and gently and carefully remove the filament.
- 2. 3) Cut any melted plastic away and leave an angled tip, like this: The angled tip will help the extruder’s motor grab on to the filament more easily.
- 3. 4) Next, we will want to load the correct colored filament. Identify the color needed and place the filament with the front of the spool (labeled) facing outwards and the rear of the spool facing the rear of the Makerbot: The filament will feed up into the guide tube like so: 5) Before you start to feed the filament into the motor, go back to the LCD panel and choose Load to load new filament. Again, the Makerbot will provide you on-screen instructions. The extruder should already be heated (if it is not you’ll just have to wait a few minutes for it to heat again), so once the Makerbot tells you that it is ready, you can feed the filament down into the extruder.
- 4. You will need to PUSH the filament down into the motor with an even pressure. You will likely need to use more force than you think. Once the Makerbot starts to extrude plastic let it run for just a few seconds before exiting. Wait for a few moment while the extruder works. It’s okay if it runs for more than a few seconds -- it’s important to make sure it is extruding correctly. Once you have a steady flow, press the M button on the LCD screen to stop the extruder. You can remove any heated plastic and throw it away. Common Filament Errors There have been some challenges with filament loading recently. Filament won’t load: If you are trying to load new filament and you hear a clicking noise and the motor does not seemto be “grabbing” the filament, try cutting the filament again at a new angle and trying again after a few minutes. Filament is tangled: If a job has already started and you start to hear a clicking noise from the IC Desk, this may mean that the filament has become tangled. You can pause the print job (navigate to the left on the LCD screen and select “Pause”) and untangle the filament. Select “Change Filament” and then “Unload” to unload the filament, then untangle as necessary and re-load the filament. When you are finished, select “Resume”.
- 5. Filament is not extruding: Most times when the extruder becomes clogged it can be easily cleared by unloading and re-loading the filament a few times. If you experience a clog that cannot be easily cleared, email 3d@lib.arizona.edu Where can I find more filament? You just ran out of red filament and there’s none in the case. Where can you find more? First, enter A122. Make a left just past the Equipment Lending desk. You should now be looking right at the gray metal case that contains spare filament and other supplies (spare build plates, build plate tape, etc). There’s a few of these cases and they all look the same, so double check this is the right one. If we are all out of a certain color of filament, email 3d@lib.arizona.edu
- 6. How should I organize the filament cabinet? The filament cabinet is organized by row. On the top row there should be a neat display of 3d printed items. Items with labels should be grouped together so that the label is clearly visible and associated with that object. Sometimes the items and labels can get separated as we take objects in and out of the case. The second row should be filament starting with black, cool gray, warm gray, clear (“natural”), white and arranged in color order (ROYGBIV) for the next row. Specialty colors, such as photochromatic blue & magenta, as well as the translucent colors, should be kept on the second row. Although this may seem nitpicky, the reason for this organization is to keep specialty colors separated from colors that they could be confused with. For example, the difference between the clear (natural), translucent, and photochromatic colors is not always visually clear. How do I change the build plate tape?
- 7. Use the laminated build plate template to cut the build plate tape to the correct size. Then, carefully peel the sheet of tape off and apply it to the build plate with as few wrinkles and bubbles as you can. It’s okay if you have to reposition it or try more than once before you get the hang of it. If you run out of build plate tape, more is located in the filament cabinet. Hint: To do multiple sheets of tape at a time, you can use the paper cutter at the IC Desk! When do I patch the build plate tape? - Patch the build plate tape with leftover trim or the painters tape roll only when there are very small, minor tears. Do not patch with any other kind of tape.
- 8. - If there are large holes or rips in the tape, do not patch. Replace the sheet entirely. We have plenty of these large sheets so there is no reason to try and stretch their longevity - When we patch a lot, we end up with an uneven build plate. For example, patching the tape like this in multiple overlapping areas can create uneven ridges in our prints : What if it Fails? Is it failing? If you see any of these signs, then the print job may be failing : - filament printing in midair (scribbling) - filament is becoming disconnected from the build (lacing) - the original base position of the item has moved - it is warping (a flat surface is breaking away from the build plate) - it looks anything like this:
- 9. Scribbling Warping Lacing If you see an item failing
- 10. When in doubt, get a second opinion! Remember from your training: if you are CONFIDENT of the reasons why the build has failed (it tipped over, someone bumped the bot, etc), you can reprint it. If you are not sure why it failed, just highlight the item in the spreadsheet and leave a note. Make sure to email 3d@lib.arizona.edu if this happens. The printer gave me a weird error about a heated print bed? Sometimes this happens! Just press the “M” key and it will continue to print as normal. The printer is making a clicking noise/ The filament is tangled Filament mounted to the rear of the printer can often become tangled as the spool is used. This most often happens when the spool is halfway or more depleted. The “clicking” noise is actually the filament tangling and rubbing against itself. Since this most often occurs during printing, the best thing to do is temporarily untangle the spool (see the video below) and untangle it fully once the print is complete. If the tangle is exceptionally bad, pause the printer by selecting “Pause” on the printer’s LCD screen and untangle the spool. The best way to clear a tangle is to select “Change Filament” and unload the filament altogether, untangle the spool, and then re-load it. https://www.youtube.com/watch?v=nX6TvrDp8oE&feature=youtu.be The printer is making a rasping/scraping noise The printer will sometimes make an odd rasping or scraping noise. Usually that rasping noise indicates that the build plate needs to be leveled and what you are hearing is the extruder head scraping on the printed surface. If the printhas justbegun,cancel the joband re-level the buildplate (if you know how to do this). If the print is already mostly completed, make sure to watch it carefully as the extruder can knock over support structures or cause other parts of the print to fail. Unfortunately there is no way to fix this while the object is printing other than adjusting the build plate without a guide (not recommended). Otherwise, email 3d@lib.arizona.edu Where can I find more item labels/receipts? More item labels can be found in the Box in the 3D printing subfolder of the AIS Student Employees folder. The image is titled “Completed Item Receipts.jpg”
- 11. 3d printing closing issues Sometimes a job isn’t done before we close on Fridays and Saturdays. If this happens, navigate to the left on the LCD display and choose “Cold Pause (Sleep)”. What do I do when a customer comes to pick up their item? (Staff Only) When a customer comes to the desk asking about their 3D printed object 1) First, ask if they have received a notification email letting them know that the object is ready. If they haven’t received a notification email, it can mean: a. The object hasn’t been printed yet b. The objecthas beenprinted but the charges have not yet been added to the customer’s account. They may have seen the object in the case and assumed that it is completed. In any case, please let the customer know to wait until the email is received. At that time the charges will be added to their account. If they have any questions about their charges or the object itself, please encourage themto email 3d@lib.arizona.edu ratherthana specificstaff member.These emailsgotoall members of the 3d printinggroup,whichcurrentlyconsistsof Jessica Calderwood, Rachel Castro, Alia Moore, and Scott Buchanan. 2) If the customer indicates that they have received the email, check their Millennium account under the “Fines Paid” tab. a. If the object has been paid for, retrieve the item from the case and have the customer sign & date the receipt. Make sure to check the customer’s CatCard to verify their identity. b. If the object hasn’t been paid for, please let the customer know that they can pay online or directly at the EDC during open hours.
- 12. c. If there is nocharge pendingorpaidon theiraccountbut theyreceivedanotificationemail,itmaymean that they have been processed like a community user. Sometimes UA affiliates do not give us their CatCard number when submitting job requests, so we process those requests as we would for a non- affiliate. i. Checkif the objectis inthe case. If the object is in the case and has a label attached, give them the label and let them know that they can pay at the EDC. The price should be clearly listed. If theypreferto have the chargesaddedto theiraccount,please letthemknow toemail 3d@lib.arizona.edu andinclude their CatCard number. They will be able to pick up the object once the charges are paid. How do I export a file to the SD card? Open your file in the Makerbot Desktop software
- 13. Once the item is positioned on the build platform and is ready to be exported, click on “Export Print File”. Navigate to the correct SD Card on the computer and save. It’s that easy! REMEMBER: The Makerbot can ONLY read files in the .x3g format from the SD card. While the desktop software can open .stl files and other file types, if you load a .stl onto an SD card the Makerbot will NOT recognize it.
- 14. Printing from an SD Card From the display panel from the front of the Makerbot, choose “Build from SD” and then navigate to the file you want. Press the center “M” button to select. Rotating & Resizing an item to print 1) Sometimes when you open up a printing file it will look like this - flipped on the wrong side, way too big, etc. We will want to rotate and resize the item so that it can print optimally.
- 15. 2) Firstly, let’s rotate the shark so that he is standing the right way up. The easiest object for the printer to build is a column, so let’s orient the shark so that he can print correctly. In this case, you will add +90 degrees on the X-Axis, but I’ve also highlighted the Lay Flat button which can help for other objects in the future.
- 16. 3) Now you can see the shark is standing upright, but his feet are positioned under the build plate. The object won’t print properly this way, so let’s put him On Platform and Center him. 4) Next, we will need to check the queue to make sure he is the right size. In this sample, you can see the submitter has specified that he be 100mm tall, so we will need to adjust the dimensions to fit. Usually we will want to maintain the aspect ratio (the highlighted box checked Uniform Scaling).
- 17. The Makerbot’s X, Y, & Z notations can be a little tricky when you are used to thinking of length, width, and height, so here’s a handy translation: 5) Now our shark is the right size and is oriented the right way - he’s ready to print! Before you print, however, make sure to check the following: ● Does the object need Rafts or Supports? ● What is the Size of object?
- 18. ● What color Filament will be used? 6) Next, send the item to print. Make sure to collect your data from the following screen: Printing multiple items at a time Printing Two Different Items: From the Makerbot software, navigate to File -> Add and then choose the file you want to add.
- 19. It will default to adding the object to the center of the build plate, so make sure to move it so the items are not touching.
- 20. Copying an item is easier, just select it (it will be highlighted in yellow) and copy (ctrl+c) and paste (ctrl+v) it.
- 21. When in doubt: Consult the Makerbot User Manual!