The aim of this document is to provide an overview for high school teachers for introducing
students to Basic Digital Literacy as well as for integration in subject teaching learning for maths and science. This
material is also intended to be used by teachers for their professional developmen
ICT integration in education : training handout (maths and science)
1. ICT Integration in Education
Training Handout (Maths and Science)
IT for Change
Bengaluru, Karnataka
www.itforchange.net
Table of Contents
Objective...............................................................................................................................................4
1 Main ideas of the program................................................................................................................4
1.1 Basic Digital Literacy....................................................................................................................4
1.2 Technology for connecting and learning.......................................................................................4
1.3 Technology for creating resources.................................................................................................4
1.4 Technology for teaching learning..................................................................................................4
2. 2 Basic Digital Literacy.......................................................................................................................4
2.1 ICTs and Society............................................................................................................................4
2.1.1 Digital paradigm.........................................................................................................................5
2.2 The ICT environment today...........................................................................................................6
2.2.1 Computer is not a washing machine...........................................................................................6
2.2.2 Hardware....................................................................................................................................7
2.3 Learning to input with keyboard using Tux Typing......................................................................8
2.3.1 Overview....................................................................................................................................8
2.3.2 Detailed steps to use...................................................................................................................9
2.3.3 Brief information about the keyboard......................................................................................10
2.4 Learning to input with mouse using Tux Paint............................................................................10
2.4.1 Overview..................................................................................................................................10
2.4.2 Detailed steps to use.................................................................................................................11
3 Basic Digital Literacy - working with the computer......................................................................12
3.1 Edubuntu operating system.........................................................................................................12
3.2 Creating and managing files and folders.....................................................................................13
3.3 Importance of Open Software - Free and Open Source Software...............................................14
3.4 Importance of Open Content - Open Educational Resources......................................................15
3.4.1 Kinds of OERs..........................................................................................................................16
3.4.2 Principles of OERs...................................................................................................................17
3.4.3 Licensing and copyright...........................................................................................................17
3.4.4 OERs – A national priority.......................................................................................................17
4 Basic Digital Literacy - What is the Internet..................................................................................18
4.1 Networks of computers................................................................................................................18
4.1.1 Benefits of computer networks.................................................................................................18
4.1.2 The structure of the internet......................................................................................................19
4.2 Basic working of the internet......................................................................................................19
4.3 The evolution of world wide web................................................................................................20
4.4 Web browser................................................................................................................................21
5 Technology for Connecting and Learning – Personal Digital Library...........................................23
5.1 Accessing information from the internet.....................................................................................23
5.1.1 Search engines..........................................................................................................................23
5.1.2 Intelligent search......................................................................................................................25
5.2 Objectives of a personal digital library.......................................................................................25
5.3 How to evaluate an Internet resource..........................................................................................25
5.3.1 Checklist for evaluating a website............................................................................................26
5.3.2 For teaching-learning resources - In addition to the above......................................................26
5.3.3 How to evaluate a resource for teaching-learning....................................................................26
5.3.4 Classification of websites accessed..........................................................................................27
5.4 Steps in creating a personal resource folder................................................................................27
6 Technology for Connecting and Learning – Emailing and Professional learning communities....27
6.1 Emailing......................................................................................................................................29
6.1.1 Detailed steps to use.................................................................................................................29
6.1.2 Tips for emailing.......................................................................................................................33
6.1.3 Emails on mobile phones..........................................................................................................33
6.2 Mailing groups.............................................................................................................................35
7 Technology for Resource Creation – Concept Mapping................................................................35
7.1 What is a concept map.................................................................................................................35
7.2 How to use Freemind...................................................................................................................35
8 Technology for Resource Creation - Text Editing..........................................................................39
ICT Training Handout (Level 1) -July 2016 2/55
3. 9 Technology for Resource Creation - Geogebra..............................................................................42
9.1 Introduction.................................................................................................................................42
9.1.1 Detailed steps of use.................................................................................................................44
9.2 Practice Activities........................................................................................................................46
9.2.1 Perpendicular Lines..................................................................................................................46
9.2.2 Parallel Lines............................................................................................................................46
9.2.3 Constructing triangles...............................................................................................................46
9.2.4 Circles.......................................................................................................................................46
9.2.5 Drawing polygons....................................................................................................................47
9.2.6 Creating a geometric figure and discussions............................................................................47
9.2.7 Discussion questions................................................................................................................50
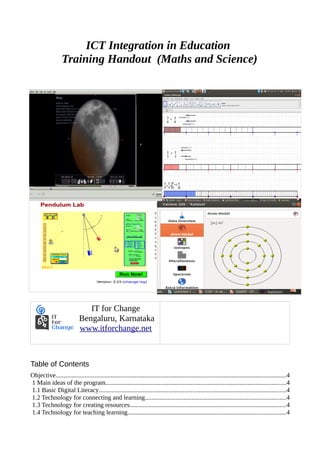
10 Technology for Resource Creation - Simulations (PhET)............................................................51
10.1.1 What are computer simulations?............................................................................................51
10.2 Observe the simulation “Wave on a String”..............................................................................52
10.3 Observe the simulation “Pendulum Lab”..................................................................................53
CC BY SA
This resource book is released under the Creative Commons Attribution Share Alike 4.0 License
which makes it available for wide, free, non-commercial reproduction and translation.
Author: IT for Change, 17th Main, 35th Cross, Jayanagar 4T Block, Bangalore 560041
Tel: 080-26538690; 080-26654134
For comments, feedback please write to koer@karnatakaeducation.org.in
July 2016, Bangalore, Karnataka
ICT Training Handout (Level 1) -July 2016 3/55
4. Objective
The aim of this document is to provide an overview for high school teachers for introducing
students to Basic Digital Literacy as well as for integration in subject teaching learning. This
material is also intended to be used by teachers for their professional development.
1 Main ideas of the program
1.1 Basic Digital Literacy
In this strand teachers will be introduced to the basics of working in an ICT environment. This will
include introduction to the PC and mobile environment, various devices involved, basic hardware
and software familiarity and developing skills in using the different devices.
1.2 Technology for connecting and learning
Technology for connecting and learning - Technology allows for possibilities for connecting and
learning through emails, accessing the Internet and through the creation of personal digital libraries.
Teachers will be introduced to online repositories, Open Educational Resources and issues of copy
right; they will also learn how to evaluate internet based information.
1.3 Technology for creating resources
In this strand, teachers will use various free and open source software applications to create
resources. They will explore different ways of resource creation using text documents, images and
concept maps for general resource creation and also mathematics resources using Geogebra.
1.4 Technology for teaching learning
This will focus on integrating technology into the teaching learning process and will include a
demonstration of possible lesson plans using Geogebra and text editing. Teachers will explore how
technology can support teaching processes.
2 Basic Digital Literacy
2.1 ICTs and Society
Information and Communication Technologies (ICTs) refer to the infrastructure and devices that
constitute creating information content, organizing, processing and representation of the
information, as well as communication of the information. Across the world, ICTs are now being
used in education systems as methods of improving educational outcomes, in school administration
processes as well as a separate body of knowledge by itself.
ICTs are not new; they are as old as human beings. Language could be seen as first 'ICT', it
enabled (oral) communication amongst human beings. Yet oral communication had the limitation
ICT Training Handout (Level 1) -July 2016 4/55
5. that people must be together at the same time. Writing was the next ICT which enabled information
to be held distinct from the communicator. Script means information could be passed on even when
two people are not sitting together. Writing also enabled easier recording of human history; this
was a big achievement. Invention of printing technologies scaled up the 'writing' process and
enabled mass production of books. The invention of radio and television created the 'mass media' in
which simultaneously the same message could be transmitted to thousands of people.
2.1.1 Digital paradigm
What is new now is the digital nature of ICTs. We are now in a society where we use digital
methods of accessing, creating, modifying sharing, storing information as well as for
communication. The digital format of resources has caused lots of changes since creation, storage
and dissemination of information has become much easier and cheaper than before.
Movement of ICTs
Knowledge
model / Basis
Method Storage Sharing Publishing
(mass sharing)
Features
Oral /
Language
Oral Human
memory
Speaking
- Hearing
Not possible Requires synchronicity of space and time
Written /
Script
Text Books Physical Not possible Share knowledge across space and time,
but in limited manner
Print /
Printing
Text Books Physical Books Explosion
Mass Media/
Radio, TV
Analogue
-Audio, video
Cassettes/
similar
analog
devices
Physical Over broadcast
media
Mass reach across space and time
Digital (ICT) Digital
methods (text /
audio / video
editors)
Digital
storage like
hard disks
Email Websites,
blogs, Wiki's –
'desktop
publishing'
Information spreads fast and wide1
. Much
easier construction and much Wider
possibilities – text, audio, video
1Wikipedia, the worlds most popular encyclopedia has the vision of 'all the knowledge of the world being available to
all the people in the world, see www.wikipedia.org
ICT Training Handout (Level 1) -July 2016 5/55
6. Having an overview of ICTs and their larger social implications, we will now learn how to use
ICTs. Any technology has a skill component and an ICT is something all of us can practice for our
own use.
2.2 The ICT environment today
Source: Wikimedia Commons
Today the ICT devices are connecting to produce convergent solutions. ICT no longer means a big
computer, the mobile phone is a computer.
2.2.1 Computer is not a washing machine
What makes the computing devices so powerful is the varied use. If you have a fridge or washing
machine, it can only do washing or keeping things cool. But in a computer or a mobile phone, you
can read, play music, send email, watch a movie, do mathematics problems, connect and read some
information that is sitting miles away. This is possible because in computers and mobiles, there is
hardware but separate software which can give instructions for doing many things.
A computer is a device which takes input, processes it and gives output which can be stored and
shared. When you enter data into your computer, it is called as input. An input can be data like text
ICT Training Handout (Level 1) -July 2016 6/55
Illustration 1: ICT environment today
7. or picture or an instruction (what to do with the data). This data is processed (process means to
perform a series of operations on a set of data) and you will get the output.
The software is what makes the computer and mobile so powerful. Learn more about the history of
computers http://www.computersciencelab.com/ComputerHistory/History.htm and
http://en.wikipedia.org/wiki/History_of_computing_hardware
2.2.2 Hardware
In a typical ICT environment, you will see the following:
Source: Wikimedia Commons
1. Scanner (nowadays this is in mobile itself, not
very much used)
2. CPU – This is the processing unit. Many
“chips” are there which determine the speed of
computer. For example Intel core is a chip.
3. Main Memory: RAM: This determines how
fast the computer works
4. Expansion cards
5. Power supply unit 6. CD Drive – External storage device
7. Hard disk: This determines how much storage
capacity
8. Motherboard: This is where all instructions
are wired together and helps the computer work Source: Wikimedia commons
ICT Training Handout (Level 1) -July 2016 7/55
Illustration 2: Parts of a computer explained
Illustration 3:
Motherboard image
8. 9. Speakers 10. Monitor
11. Operating System 12. Application Software
13. Keyboard 14. Mouse
15. External Hard Disk 16. Printer
Hardware: Parts 2-8, 10, 13 and 14 constitute basic hardware and are parts of all computing
devices. These have now all been combined into one unit in a laptop or mobile. Largely, the
hardware is divided into input, storage and output functions.
Internet connectivity devices
Source: Wikimedia
commons
This is a modem.
This is used for connecting the computer- laptop
or mobile to the internet through a broadband
connection. In a networked environment, this
modem will be used together with a LAN.
Peripherals:
Speakers, external hard disk and printers are important peripherals that are used for storing and
output and these can be connected to the computer or laptop. An important peripheral is a modem
for connecting to the internet.
2.3 Learning to input with keyboard using Tux Typing
2.3.1 Overview
Tux Typing is a free and open source typing tutor created especially for new computer learners. Tux
Typing is an educational typing program for children starring Tux, the Linux Penguin. The program
includes two video game-style activities for younger players, with phrases and finger lessons for
experienced users.
Overview of the Tux Typing Tool
Tux Typing is part of the Ubuntu distribution (in the training). This can be opened from
Applications → education → Tux Typing.
ICT Training Handout (Level 1) -July 2016 8/55
Illustration 4: Modem
9. 2.3.2 Detailed steps to use
When we open the Tux Typing
it will show the window like
this. Typing can be practiced
by games and lesson.
When we select the lesson
option it will show the window
like this. It contains 43 basic
lessons. Go through the each
lessons to practice the typing.
Illustration 5: TuxTyping Step 3
Before displaying the keyboard
window it show another 2 window
and ask you to press space and p
key
If
After clicking space and p key it
will show the window like this. On
the screen you can see list of items
Time, Chars, CPM, WPM, Errors
and Accuracy; these will basically
tell you how well you are doing the
typing lesson
ICT Training Handout (Level 1) -July 2016 9/55
Illustration 7: TuxTyping: Step 1
Illustration 6: TuxTyping: Step 4
Illustration 8: Illustration: TuxTyping Step 2
10. your “capslock” is ON, then Tux Typing will not allow you to
continue. It will beep every time you type.
You will find a blinking button on
each finger to guide you as to
which finger to be used for typing
a given character.
2.3.3 Brief information about the keyboard
Keyboard is usually the main device to providing instructions to the computer. The keys on the
keyboard can be divided into several groups based on function:
1. Typing (alphabets and numbers) keys: These keys are arranged as in a traditional
'QWERTY' typewriter
2. Special purpose keys: These keys are used alone or in combination with other keys to
perform certain actions, such as CTRL, ALT, ESC, Function keys etc.
3. Navigation keys: These keys are used for moving around in documents / editing text. They
include the arrow keys, HOME, END, PAGE UP, PAGE DOWN, DELETE and INSERT.
4. Numeric keypad: The numeric keypad is handy for entering numbers quickly. The keys are
grouped together in a block like a conventional calculator or adding machine.
2.4 Learning to input with mouse using Tux Paint
2.4.1 Overview
Initially, the keyboard was the only device for providing instructions to the computer, but with the
invention of the 'graphic user interface'(GUI in short), the mouse has become an important input
device. The mouse makes giving instructions much simpler by point the mouse and clicking.
This product is similar to other free image editing programs. It features a simple interface and a
fixed drawing area with access to previously made images using icons. Tux Paint is equipped with a
lot of tools designed to excite kids, from cartoon mascots who encourage them to use the software
to cartoon sound effects.
Overview of the Tux Paint Tool
The Tux Paint version – 0.9.21 . Tux Paint is part of the Ubuntu distribution (in the training). This
can be opened from Applications → Education → Tux Paint
ICT Training Handout (Level 1) -July 2016 10/55
11. 2.4.2 Detailed steps to use
When we open the Tux Paint we will
get window like this. This window or
main screen contains a tool bar, a
drawing and a selection panel on the
right for the type of drawing mode
chosen. In the bottom panel, a palette
of available colors are shown near the
bottom of the screen.
At the very bottom of the screen, Tux,
the Linux Penguin, provides tips and
other information while you draw.
The Paint Brush tool lets you draw
freehand, using various brushes
(chosen in the Selector on the right)
and colors (chosen in the Color
palette towards the bottom).
As you draw, a sound is played. The
bigger the brush, the lower the pitch.
You can also use pictures, shapes
stamps, line drawing to create your
picture.
An example of filled and unfilled
shapes.
ICT Training Handout (Level 1) -July 2016 11/55
Illustration 7: TuxPaint: Step 1
Illustration 8: TuxPaint: Step 2
Illustration 9: TuxPaint: Step 3
12. 3 Basic Digital Literacy working with the computer
To explain our instructions to the computer we need a special computer program which is called the
operating system. Operating system is also called system software as it
works with the hardware. Every computer must have an operating system to
run other computer programmes. Even your mobile phones will have an
operating system. Operating systems start automatically when you turn on the
computer, this process is termed booting. All the other computer programmes
like programmes to paint, type, listen to music, learn maths etc., are called
application software or 'Apps' which work with the system software. People
who write programmes are called computer programmers or software
developers. On any computer you will have software to paint, to type letters,
to watch movies, to find something on the Internet, to learn maths.
The operating system is like the Foundation of a building. By itself it may not be most useful to the
user, but it is the basis for all other applications (other floors of the building, which are used by us)
3.1 Edubuntu operating system
How does the operating system enable you to use the computer?
Operating systems use a program called the Graphical User Interface (GUI, which is pronounced as
goo-ee). It allows you to access other computer programmes (applications) by using a mouse. The
popular operating systems are Microsoft Windows, GNU/Linux and Mac OSx. In this section, you
will learn about the functions of an operating system, using an example of Ubuntu GNU/Linux
operating system. With this learning, you can operate a computer with Windows of Mac operating
systems
Logging in :
Select your user name and type your password the desktop will appear. The desktop is shown in
image here. When you switch on your computer, you will see a login screen, login with the user id
and password created by the system administrator. Edubuntu allows you to have a user interface in
Assamese, by specifying your language as Assamese during your user id creation. The
applications menu at the top left has a list of all the programmes (apps) on your computer. The
places menu, next to it, lets you access the hard disk, CD/DVD or pen drives. Digital cameras and
MP3 players are also listed here when plugged-in.
The Application menu has sub menus for Education, Office, Internet, Games etc. Each sub-
menu has many applications. You can try to learn them yourselves by clicking and selecting
options. “Self learning” is an important possibility with ICT. Try, Learn, Enjoy.
ICT Training Handout (Level 1) -July 2016 12/55
Illustration 10:
Layers of
software
13. Shutting down the computer
What will you do after you have finished your work? You have to turn off the computer. You must
turn it off by clicking on the last button on the right hand top corner and select shut down. Never
turn off the power button without shutting the computer properly.
If you have doubts or difficulties in using the Edubuntu operating system or any of the applications,
you can search for solutions on the Internet using a search engine. You can also find 'frequently
asked questions and answers' on
http://karnatakaeducation.org.in/KOER/en/index.php/Frequently_Asked_Questions .
3.2 Creating and managing files and folders
When you write an essay or paint something on a paper, you would like to keep it for future, right?
You would probably put it in a hard bound folder. Maybe, if you have more than one essay or
painting, you would have one folder to hold your essays and one folder to hold your paintings.
When you download resources from the Internet or create digital materials on your computer, you
would like store it in a meaningful manner, as you would do with your papers. You can store all that
you have done on a computer as a file. Every program, image, video, text document, song and
document is stored as a file. And you can keep similar / linked files together in a folder. Folders can
also store other folders called sub-folders
(you can imagine them as binders within a
hard bound folder). Folders are also called
'directories'. Do you know where the files and
folders are kept in a computer? They are
stored on a disk (remember your hardware
chapter where you learnt about hard disk, pen
ICT Training Handout (Level 1) -July 2016 13/55
Illustration 11: Edubuntu Education Menu has many educational
applications
Illustration 12: File Manager
14. drives, CDs). To manage all the files and folders that you make, we need a file manager (also
called as file browser). A file manager or file browser is a computer program that provides a user
interface to work with files. Ubuntu uses a file manager/browser called Nautilus and you can create
folders and documents, display your files and folders and search and manage your files using
Nautilus.
This file manager lets you organist your files into folders. Folders can contain files and may also
contain other folders. Using folders can help you find your files more easily. You can also copy or
move files from one folder to another, create new folders, delete unwanted folders, give new names
to the files and folders etc. using the file browser.
You can download the files from the Internet into a folder that you should create. Folder names
should be as meaningful as possible and can be long. Folder name like 'Untitled1' or 'files' etc is
meaningless. If you are storing information relating to mathematics topic say 'quadrilateral', you can
create a folder named Quadrilateral. Inside this, if you are storing an image of a square, you can
name the file 'Image of a Square'. Mentioning the month/date of the file downloading can also help
later in remembering for re-use.
Ubuntu creates default folders for each user for music, pictures, videos, documents. You can create
your own sub folders within documents folder for your different requirements, for e.g. . One folder
for each of the subjects of this course – Mathematics, Telugu, English etc. Within the subject folder,
you can create sub folders for resources, assignments etc.
3.3 Importance of Open Software - Free and Open Source Software
Ubuntu is a ‘Free and Open Source Software’ (called FOSS in short). While software applications
like Microsoft Windows or Adobe Photoshop are ‘proprietary’ , meaning they cannot be copied or
shared or modified by us, FOSS applications are licensed under the ‘General Public License’ which
allows all of us to share the software freely, we can also modify the software as per our needs.
Hence it is important to use FOSS in our schools. Teachers must learn and teach FOSS and avoid
use of proprietary software, since it is not possible for all to access and use proprietary software.
There are many technological, economic, pedagogical benefits from using public (free and open
source) software instead of proprietary software:
1. GNU/Linux is freely shareable. This can save public funds on license fees on procuring
proprietary software and upgrade fees at later dates. An IIM Bangalore study estimates India
ICT Training Handout (Level 1) -July 2016 14/55
15. would save around 20,000 crores per year on license fees by adopting public software. It can be
installed on all computers without restriction or paying license fees to vendors
2. The GNU/Linux operating system is virus-free, its technology architecture is superior to
Windows. This means no need to procure anti-virus software and no need to periodically format
the computers when it is virus affected. This saves lot of time and effort. In most schools and
educational institutions, many computers are unusable due to being affected by viruses.
GNU/Linux is virus resistant and hence more secure.
3. Since all the software like Office, web browser, educational software can be bundled with
Ubuntu GNU/Linux operating system, so all applications can be installed on the computer at
one time. On proprietary software Windows, each software has to be separately installed, which
makes it cumbersome and complicated.
4. There are a large number of freely shareable educational tools on GNU/Linux, pertaining to
mathematics, science, social sciences etc which can be used in all schools.
5. There are large number of additional tools on GNU/Linux freely shareable, such as IBUS which
supports word processing in more than 50 languages, including all languages used in Karnataka
such as Assamese, Assamese, Tamil, Urdu, Marathi, Hindi etc. or the ORCA screen reader
necessary for the visually handicapped or Scribus for desktop publishing.
6. Education should not allow 'lock-in' into proprietary products, that is bad for education.
7. Tools such as Drupal or Wordpress or Inkscape/Scribus or PiTiVi Video editors would provide
huge employment opportunities to students. Students and teachers can copy the software to their
own computers freely.
8. Public software permits local customization. The Assamese version of GNU/Linux is provided
in the training. Educational tools can be customized in Assamese by teachers as well. Such
customization. is not possible with proprietary software platform.
3.4 Importance of Open Content - Open Educational Resources
You have heard of the National Curriculum Framework 2005, which speaks of contextual, inclusive
and meaningful education. In your units on education, you have also read about constructivist
learning models. For these ideas to come true, relevant learning resources must be available for the
students (teachers) and teachers (teacher-educator). These resources must be contextual, easily
available, allow for learners to modify and adapt for their requirements.
ICT Training Handout (Level 1) -July 2016 15/55
16. Right now, in many cases, the textbook tends to be the most important resource for teachers, if not
the only resource. This resource is limited, made once in a year and represent on set of thoughts.
These resources are largely text based, have very audio visual resources and may not address
multiple learning needs. External resources, though available, are also largely non-digital,
expensive and cannot easily be adapted for local needs and contexts.
For critical and diverse perspectives to develop, multiple resources must be available and it must be
possible for knowledge to be constructed and shared from multiple contexts. Otherwise, it is
possible that only some forms of knowledge will remain important and other will die out. For
knowledge sharing to freely happen, educational resources must become freely available, freely
shareable and freely changeable to adapt to local contexts and needs. You have also read about the
role of ICTs in the creation, sharing and distribution of knowledge in section on ICTs and Society.
Open Educational Resources (OERs), as they are called are such learning resources. Open
Educational Resources are digital resources that are available freely, in multiple formats – text,
audio, video – to allow for multiple learner needs.
This is a global phenomenon and began in 2001 with the launch of wikipedia (www.wikipedia.org),
where knowledge is created and shared by many many people and not restricted to one person.
Following this, Massachussetts Institute of Technology, a leading university in the United States of
America, released many of its course materials for free called Open Courseware (2001). In teacher
education also, educational resources were developed collaboratively by a programme for Teacher
Education in Sub Saharan Africa and published on http://www.tessafrica.net. These are some of the
early initiatives in OERs; now many more OERs are available across the world teaching and
learning. In India, National Programme on Technology Enhanced Learning (NPTEL)
(http://nptel.iitk.ac.in) and IGNOU have offered many of the courses as Open Educational
Resources.
3.4.1 Kinds of OERs
There are different kinds of OERs:
- Sharing already created academic content for free www.khanacademy.org; www.tessafrica.net -
- Structuring free course materials and courses – like www.nroer.metastudio.org; ; www.edx.org;
www.coursera.org ; www.nptel.iitk.ac.in
- Collaborate and creating materials - www.wikipedia.org
ICT Training Handout (Level 1) -July 2016 16/55
17. The Karnataka Open Educational Resources (KOER) project is a project of DSERT Karnataka to
enable and support teachers to collaborate and create educational resources and share with all.
3.4.2 Principles of OERs
Open Educational Resources are those resources that allow the following four kinds of freedoms to
learners/ users. These “Freedoms” are as follows:
• Resources can be accessed for free, used and 're-used'
• Resources can be revised/ adapted to make it relevant
• Resources can be re-mixed / combined to make a new resource
• Resources can be redistributed - the revised/ remixed resource can be shared back. These are
called the 4 Rs (re-use, re-vise, re-mix and re-distribute)
3.4.3 Licensing and copyright
These resources are shared under copyright which are less restrictive than the usual 'all rights
reserved' and allow for some or all of the four R's. One popular copyright used for such resources is
the “Creative Commons”. Creative Commons is a type of copy right (sometimes called Copy Left)
that will allow you to use the resources, modify them, combine them and also redistribute. When
you are accessing/ sharing something as OERs, you can share it under Creative Commons License,
by explicitly mentioning that 'Copyright – Creative Commons' in your text. If nothing is mentioned,
the default copyright is 'all rights reserved', which will mean others cannot modify or share your
resources.
3.4.4 OERs – A national priority
At the national level, the is maintaining a National Repository of Open Educational Resources. For
more information on NROER, click http://nroer.gov.in/home
Karnataka Open Educational Resources, is a resource repository collaboratively created by the
teachers of Karnataka. It is organized on the same principles of OERs and is built on a wiki
platform like wikipedia. Teachers and teacher-educators play a key role in creating locally relevant,
meaningful and dynamic resources.
The objectives of KOER are
1. To develop a process of learning, sharing and creating by building collaborative peer networks
2. To provide for continuous learning through the process of resource creation
ICT Training Handout (Level 1) -July 2016 17/55
18. 3. Provide a sustainable model of creating and sharing educational resources that can enhance the
educational outcomes
4. To build a repository of teaching resources – for teachers, teacher educators and as a resource
base for teacher education
For information on KOER, visit
http://karnatakaeducation.org.in/KOER/en/index.php/KOER_background-note
4 Basic Digital Literacy What is the Internet
We have heard many terms called Internet, Web, Cloud, Online, etc. We will now understand what
these mean. We have already seen what the computer can be used for, what are the parts and how to
operate the computer. One important part of the use of ICT is that of connecting with each other.
4.1 Networks of computers
Computers can connect with each other to share information and process information. Some of
these computers act as 'servers', they route data
across computers. A network is a connection of
many nodes. Even computers can be connected in
a network. A computer network is a group of two
or more computer systems linked together.
Computer networks can be broadly classified as:
• Local Area networks (LAN) : The computers
are close together (may be, in the same
building. In your lab, you must have seen all the computers (clients) connected to one main
computer - the server. It is a LAN. The cables from the clients are connected to a device called
a 'hub' and the hub is connected to the server. (Your computer lab should be on a LAN. This
will help in sharing files, printer across computers).
• Wide Area networks (WANs) : The computers are farther apart and are connected by telephone
lines or radio waves.
4.1.1 Benefits of computer networks
What is the use of sharing information over a computer network? You might have booked train or
bus tickets when you travel across the state. To book a ticket you need to find out which train or bus
goes from your place to wherever you want to go and also if the tickets are available on the dates
you want to travel. If your computer is connected to the computer in a railway reservation office
which has the information about the trains and ticket availability, you can book tickets from home.
ICT Training Handout (Level 1) -July 2016 18/55
Illustration 13: LAN and WAN
19. Such a connection of computers is called an Internet connection. Information is communicated
and shared between the two computers, through the Internet connection.
4.1.2 The structure of the internet
If you want information about some book available in your library, you can connect to the library's
computer from home and get the information that you want. There are many such computers in
different organisations giving us different types of information. These computers are all connected
to one another. This is called the Internet. So, for sharing or getting information from another
computer on the Internet, you need a connection to the Internet. The Internet is a physical network
of millions of computers across the world, each of which has a unique identifier.
What do you need to connect to the Internet?
Illustration 15: How does modem
connect?
Before you can connect to the Internet, you must
have a computer, a modem (A modem is a
hardware device that allows a computer to
transmit data over telephone or cable lines) and
access to a telephone line which is connected to
the Internet and a software to connect. You can
also use a device called data card for connecting
to the Internet without any wire connections.
The data cards use the mobile phones network to connect to the Internet. The connection software is
usually provided by the service providers (which are mostly telephone companies).
4.2 Basic working of the internet
As we saw earlier, the Internet is a physical network of millions of computers across the world, each
of which has a unique identifier called . Some of these computers act as 'servers', they route data
across computers. The routing of data is governed by a method or protocol called the TCP-IP,
ICT Training Handout (Level 1) -July 2016 19/55
Illustration 14: How does a computer connect
to the Internet
20. (transmission control protocol/internet protocol). As the name suggests, TCP/IP is the combination
of TCP and IP protocols working together. Under TCP/IP each file being transported across the
Internet is broken into smaller parts called "packets" by the server. Each packet is assigned an IP
(Internet protocol) address of the computer it has to travel to. As the packet moves through the
global network it is "switched" by a number of servers toward its destination, the requesting
computer or "client" computer.
These packets do not usually travel together on the Internet. Packets from the same file may travel
via different paths through different servers, but toward the same destination. This “splitting into
packets” technology allows us to use Internet most efficiently. It means parts of a file can be shared
across a number of phone lines instead of having to find one phone line to put a large file into. It is
also hard to break the network, as the data will be routed around the trouble spot. In this respect
TCP/IP can be likened to a group of cars which need to go to the same destination, but instead of all
of them going on one road (which may be busy), each car can select a different road out of
thousands of roads available (thus picking the roads with least traffic), hence all cars can reach the
destination in overall least time.
The TCP/IP protocol, which is the heart of the Internet was invented by Vincent Van Cerf,
Robert Kahn and Louis Pouzin.
Some of these servers maintain the links between the ip addresses of the servers and the 'domain
names' that we use while accessing the Internet. These are the 'domain name servers' and translate
'www.teachersofindia.org' into its IP address (which would be a series of number like
192.168.12.14).
4.3 The evolution of world wide web
Web is an application on the Internet (www). This was invented by Tim Berners Lee, to allow
computers to access the Internet in the form of a web page, using an application called the Web
Browser. There are millions of pages of shared information on the computers in the network,
created by many people and organizations, in the form of 'web pages' accessed using a software
application called a 'web browser'. This information network is called the World Wide Web. The
source of information is called the web site. A web site is a collection of related web pages of
information. Initially this was only for downloading, and this was called Web 1.0; when more
people wanted to create their own materials and publish on the Internet, the second generation of
www was evolved, called Web 2.0. We have moved further along now to collaborative creation of
web pages, through online collaboration platforms. Now more and more processing can be done on
ICT Training Handout (Level 1) -July 2016 20/55
21. the Internet, where the data, results and analysis is stored the Internet and we can operate/ add/
access through various web based applications. This is called Cloud Computing.
4.4 Web browser
Once you are connected to the Internet and are ready to look for things, you will need a software
called the web browser. Browser is a software program that you use to access the internet and view
web pages on your computer. Web browsers allow a user to quickly and easily access information
provided on many web pages at many websites.
Web browsers communicated with web servers primarily using HTTP (hypertext transfer protocol)
to fetch web pages. HTTP allows web browsers to submit information to web servers as well as
fetch web pages from them. Pages are identified by means of a URL (uniform resource locater),
which is treated as an address, beginning with “HTTP://” for HTTP access.
Firefox is a very popular web browser. We will use Mozilla Firefox to learn how to browse the web
as this is a Free and Open Software application. One of the great things about Firefox is that it is
supported on all different operating systems. Firefox is also open source which makes its support
group a very large community of open source developers. Firefox is also known for its vast range of
plug ins/add-ons that let the user customize in a variety of ways. Firefox is a product of the Mozilla
ICT Training Handout (Level 1) -July 2016 21/55
Illustration 16: An example of a web page
22. Foundation. We have many other Free and open source browsers called Google chrome, chromium,
opera, Dolphin and gnome web browser. All browsers will have similar functions.
Source taken from: http://openbookproject.net/courses/intro2ict/web/web_browsers.html
Overview
Tool Version
Right now we are using Firefox 43 and it will keep upgrading with out any charges.
You can access Firefox through one of two methods:
i. Applications-→ Internet-→ Firefox Web Browser
ii. Click on the icon on your top panel to start the Firefox Internet browser when you are using
Ubuntu.
You will see a screen like this.
A website is nothing but a folder on a computer connected to the Internet, which has a 'address '.
You will have to enter the address of a website in the address bar (see the picture). This address is
also called Uniform Resource Locater (URL). In the address bar, type www.wikipedia.org and
press enter. This is a website where you can find information on many subjects. Browsers takes
HTTP and www by default, hence typing wikipedia.org is automatically replaced by
http://www.wikipedia.org This website has information in many languages. Move the mouse
pointer on English and you will find that
the pointer has changed to a hand. These
are links to other sections of the web site.
ICT Training Handout (Level 1) -July 2016 22/55
Illustration 17: Web browser
Illustration 18: Wikipedia
23. They are called hyper links. A hyper link is a mechanism by which a web page is linked to another
related web page. Text, images can be made into hyper links. When you click on English, you get
the information from the encyclopedia in English. There are different sections, if you look at the
right hand top corner, giving information about Arts, History, Maths, Science etc. You can click on
Maths and search on a certain topic. Type multiplication in the search box that you see just above
the different sections. You will get an article about multiplication.
5 Technology for Connecting and Learning – Personal Digital
Library
The Internet has enormous possibilities of accessing information. This changes the way we can
think of learning and the skills of learning. Skills of accessing information, organizing, evaluating
information are very important. Communication and collaboration skills are very important as
learning will no longer be limited to our immediate physical environment. We can interact and
learn from people and colleagues separated from us also. Internet allows us to connect in ways that
were not possible before.
5.1 Accessing information from the internet
Information can be accessed in multiple ways from the Internet and we need to know how to search
for information on the Internet. Sources of information, even if freely available on the Internet,
needs to be acknowledged. There are different formats of resources available on the Internet -
images, videos, audio files and each of these files have different formats. We must be aware of
Internet safety while accessing images, videos and other information on the Internet.
We already saw that each website is a page on the Internet and has an address. We can either copy
and paste the link directly in the address bar of the browser (shown above).
Another way of finding information on the Internet is through the use of a search engine.
5.1.1 Search engines
A search engine is used to search for information on the World Wide Web. It keeps a track of all
web pages. We can search for information we want by providing a word or a sentence to a search
engine. Google is very popular search engine. In your browser's address bar type
'www.google.com'. In the search box you see type 'Sachin Tendulkar centuries'. You will see a list of
all the web pages having information about Sachin Tendulkar's centuries. You can click on the
hyper links and get more information. Alternate search engines include Bing (from Microsoft),
DuckDuckGo (https://duckduckgo.com) etc.
ICT Training Handout (Level 1) -July 2016 23/55
24. The search engine software is built in a way to retrieve large amount of relevant information in a
short time. Type in different words relating to your professional and personal interests. See how
many pages of information are retreived and the time it takes to retrieve the same. How do you
think the search engine does this so quickly? Also do all of you get the same links on page 1 when
they search for an information? On what criteria does the search engine decide to provide some
links on page 1 while others on page 2 and still others on page 20?
In the past, rote learning (remembering information) has been seen as important, since such
committing information to memory would allow us to access it during need. Traditional Indian
schools also had memorizing scripts as an important learning method. However, with ICTs that has
changed. Thanks to information explosion, it is now impossible to commit to memory the numerous
aspects of our daily lives. Secondly, thanks to methods of storage and retrieval, including use of
search engines, the need to memorize has also reduced. Twenty years back, we used to remember
peoples telephone (land-line) numbers, which were not too many. Now with large number of
contacts we have, we do not need to memorise their phone (cell phone) numbers, since we can store
it in the phone itself and can retrieve by name. In the same way, any factual information can be
retrieved in a fraction of a second and hence not worth memorizing.
Accessing relevant information and evaluating a resource for correctness/ relevance is an important
skill. We should also be aware of legal, ethical, copyright (content and presentation) and safety
issues.
ICT Training Handout (Level 1) -July 2016 24/55
A google search
25. 5.1.2 Intelligent search
The second aspect of using a website relates to how we search for information. What words we use,
how we phrase the question for search are all important features in deciding the quality of search
results. For example try these different searches - Giraffe, Evolution and Evolution of giraffe.
Hence for search, we should be as precise/exact as possible to get best results.
You will notice that the pages that come up are all different. What we also need to keep in mind is
who is the user, what is the use etc. How we use the search terms determines what results see and
how relevant they are.
5.2 Objectives of a personal digital library
The focus of building a resource library is on the following :
1. identify, classify and organizing learning resources (for self) and for classrooms
2. do curriculum analysis identify appropriate ICT resources for various learning needs - analyzing
and abstracting, evaluating and problem solving
3. develop a concept map of learning outcomes and map to resources
4. to evaluate an ICT resource
5. build personal resource libraries for classroom ideas
5.3 How to evaluate an Internet resource
There are a few things to check when we look at the usefulness of the information on any website.
1. Source of the website. It is important to know about the source of the information. This will
help us have an idea of many ways of looking at things.
2. Use of multiple websites: Only one website will give us only one kind of information. Using
more than one website will give multiple perspectives. We can also cross check and identify
errors if any.
3. Relevance: Often when we search, one page will come up and often time we share with others
also. But it is important to really read (at least quickly) the contents of the page. This is because
of the way a search engine works. Any web page will have key words (called tags) and
sometimes, keywords will be added even if the word (and associated issue) is discussed very
very briefly. So, sorting for relevance is important. Information use is very contextual. A web
page written about rainfall and look at lifestyle and crops will be different for different places.
ICT Training Handout (Level 1) -July 2016 25/55
26. So we need to look at how it will be useful for us. Information also has to be valid for a given
time. If the information is very old, we need to test for accuracy.
4. Features of a website: How useful a website is depends on how many different ways we can
access the information and use it and view it. Can it be used by teachers, students, general
public? The understanding of this will also help us determine how much we can use the
content. Please pay attention to the following while browsing.
• Home Page
• Resources available
• Is it free/ paid/ registered?
• Copyright (Creative Commons)
• About us ; contacting the website
• Links available on the page - internal, external:
• Opening a link from a page - new tab, new window:
• Browser back button vs using links to navigate:
Settings and preferences
• Accessing information and downloading:
5.3.1 Checklist for evaluating a website
1. Whose website is it? How to contact the website? (check About Us)?
2. What kind of web site - commercial, educational, etc.
3. What kind of resources? Is the information reliable - always check more than one website
4. Does it allow for a discussion
5. Does it have transaction - like e-commerce websites
6. Is it easy to navigate?
7. what is the copyright clause - Free/ Paid/ Subscription
8. Navigation - Internal and External web links
5.3.2 For teaching-learning resources - In addition to the above
1. What is the website about?
2. Is the information reliable - always check more than one website
3. Who made it?
4. What does it have?
5. Is it for teachers or for children or both?
6. How to use in class?
5.3.3 How to evaluate a resource for teaching-learning
When you are compiling a resource library for teaching-learning, we have to evaluate how it can be
used for teaching in the classroom. Some questions that you check when evaluating resources are:
i. what are the concepts to be covered and how do the specific ICT resources fit in
ii. areas of learning reinforced
ICT Training Handout (Level 1) -July 2016 26/55
27. iii. how can learning be extended; what new ideas/ connections are possible?
iv. suitability to a given classroom context (age appropriateness, content level)
5.3.4 Classification of websites accessed
Web
Site
name /
address
Relevance Accuracy Bias Variety of
resources
Free/
Membership
/
Subscription
Copyright Can it be
used by a
teacher?
0-10; Give
a rank and
explain
why
0-10 –
Give a
rank and
explain
why
Bias –
Yes/
No
Why??
(Audio,
video, text,
image)
Is it
Creative
Commons
or not?
How useful
is it for a
teacher? In
what stage of
the teaching-
learning
process can
this be used.
5.4 Steps in creating a personal resource folder
There are several steps in creating a resource folder:
1. Make a folder on the computer by topic
2. Access relevant resources from Internet
3. Save pages, images, videos
4. Copy and paste links
5. Insert into document
6. Insert links into document
7. Format document
For more information on how to create a resource library click
http://karnatakaeducation.org.in/KOER/en/index.php/How_to_build_a_resource_library
6 Technology for Connecting and Learning – Emailing and
Professional learning communities
Every profession has its own professional association for learning and sharing – like doctors,
lawyers, accountants, IAS officers and so on. These associations are a method of continuous
interactions with fellow practitioners (peers) and allow methods of learning beyond the college or
university. You have also learnt earlier about social constructivism and how we learn from each
other and how conceptual learning and contextual understanding are equally important.
ICT Training Handout (Level 1) -July 2016 27/55
28. Teachers, as professionals too need to connect regularly to their peers, for sharing their experiences,
practices as well as insights and learnings. They also need to be able to contact peers as well as
mentors for seeking support. However, in the large school system in India, we find that teachers are
often isolated in their practice and they have no way of sharing their experiences, reflecting and
sharing understanding or seeking solutions for their specific challenges. In the traditional in-service
teacher training programmes, the learning is usually at a point in time; teachers learn in workshops,
and there is limited opportunity for interactions after that. They largely do not have any formal,
organized methods of being in touch with their trainers or with each other to extend the learning
after the workshop. Hence field-level problems are difficult to solve and also teachers are not able
to share their experiences, ideas and resources with one another. After the training workshops,
teacher interactions is very limited and physical meetings at the cluster, block or district levels are
often not enough to meet these needs. ICTs can provide ways of connecting and communicating
beyond the restrictions of meetings of physical time and space through online communities. Online
communities can be mailing forums or discussion groups, can be accessed either through your
phone or the computer and are often a good way of continuing interactions.
The National Curriculum Framework for Teacher Education (NCF-TE, 2010) talks about a
pioneering model of teacher education with the following key components - (i) integrating
technology tools for teaching learning, (ii) collaborative networks for learning and sharing, (iii)
continuous learning models that allow for different paths and spaces for learning. Peer learning is
regarded as a key component of Teacher Professional Development.
In Karnataka, DSERT has implemented an in-service teacher training program called the “Subject
Teacher Forum” where the training program has incorporated technology for classroom teaching
methods as well as for creating networks for collaborative and peer learning. Mailing forums are a
good way to keep the teacher community in contact with one another and serve as a complement for
the physical communities and interactions and provide for learning beyond the workshops. Teacher
use the mailing forum to share their experiences, share resources, ask for clarifications, share
question papers, share activities and ideas for CCE, issues in school administration and for general
information sharing as well. Over 22000 teachers are members of these mailing forums in
Karnataka.
Assam is beginning such a program now for building professional learning communities.
ICT Training Handout (Level 1) -July 2016 28/55
29. 6.1 Emailing
Overview
E-mail (electronic mail) is the exchange of computer-stored messages by telecommunication. E-
mail was one of the first uses of the Internet and is still the most popular use. There are many
domains to use emails for communication.
Gmail (pronounced Gee-mail) is a free Web-based e-mail service from Google that provides users
with 15 gigabytes of storage for messages and provides the ability to search for specific messages.
The Gmail program also automatically organizes successively related messages into a
conversational thread. This handout will explain how to do this on www.gmail.com
All smart phones will have email option and we can configure email to access emails.
Email, short for electronic mail refers to the exchanging of digital messages from an author to one
or more recipients, across the Internet or other computer networks. Email servers accept, forward,
deliver, and store messages. Neither the users nor their computers are required to be online
simultaneously; they need connect only briefly for as long as it takes to send or receive messages.
Email provides a way to exchange information between two or more people that is generally far less
expensive than physical meetings or phone calls. Email is a popular method for communicating
with your colleagues, since it has many advantages
1. you can send a mail to many people at the same time, and they can also send their reply to the
same people, hence facilitating a group conversation
2. you can reply to a mail at your convenience, email is 'asynchronous', unlike a phone call, when
you need to be available for the same time period as the other person
3. the email is an electronic record of the conversation and can be recalled later
4. discussions over email thus can be a useful information source for review by oneself and others
5. email is cheap, since you pay for Internet access than for each mail. There are also free email
providers like google (gmail), yahoo (yahoomail) etc
6.1.1 Detailed steps to use
This section describes how to create an email and also use emails for communicating. To create an
email id please open your browser, Application-→ Internet → Firefox Web Browser
ICT Training Handout (Level 1) -July 2016 29/55
30. Open any browser - Mozilla Firefox or Google
Chrome and type www.gmail.com in the address
bar. If you have you email ID and password,
please enter them in these boxes you will see.
Do not click on the box which says "Stay signed
in". This means your Gmail account will always
be open. If you do not have an account click on
Create Account and the following form will
appear.
To Create new Gmail ID click on Create
Account and follow the below steps.
1. Enter your name
2. Enter username and password. User name
can be the same as your name. Keep your
password simple to remember.
3. Enter your date of birth, gender and phone
number. To prove that it is a human being
registering, you must enter the code
numbers.
4. Enter another email address if you have
one. Check the privacy and terms and
conditions box.
5. Click on Next Step and your new gmail
account is ready.
ICT Training Handout (Level 1) -July 2016 30/55
Illustration 19: Emailing: Step 1
Illustration 20: Emailing: Step 2
Illustration 21: Emailing: Step 3
31. 1. Type the website for your mail
(www.gmail.com for gmail) in the
address bar.
2. Enter your username and password
without any spelling mistakes.
3. Do not check the "Stay Signed In" box.
4. To check your existing messages, go to
Inbox. Your new Inbox will look like
this with Welcome Message from Gmail
1. To compose a new message, go to
"Compose". This can be found on the
left panel. When you click on that you
see a panel open for composing a mail.
2. If you click the double arrow in the right
hand corner of this panel, the compose
window will pop out. You can see the
bottom panel with formatting options
3. Enter the address of the recipient; this
can be one recipient or to the mailing
forum. You can post to mailing lists by
entering the address of the group in the
"To" or "Cc" box. For example, mail to
assammathsforum@googlegroups.com
will be delivered to the STF forum.
4. You can addess an email to one recipient
and copy the mail to others by putting
their email IDs in the "cc" box.
5. Enter the subject. Type the contents in
the box. Attach files (if any) by clicking
on the image like a clip. Click "Send"
ICT Training Handout (Level 1) -July 2016 31/55
Illustration 22: Emailing: Step 4
Illustration 23: Emailing: Step 5
Illustration 24: Emailing: Step 5
32. 6. If you receive an email in your Inbox
you can select Reply or Forward the
mail. You can also reply to a mailing list.
7. Remember that if you reply to a list, all
members will get the email. To reply to
an email sent to you, type or select only
the email id of the sender.
8. To reply, click on Reply , Type your
message and click on send. To forward,
click on Forward instead of Reply
Type in the email address (or addresses)
for the individual(s) you want to forward
the message to. Note: When you
forward an email, any and all
attachments will also be forwarded.
Download an attachment
1. A paper clip icon next to an email
indicates that there is an attachment
2. To download an attachment in an email,
scroll down the message and come to the
file attached.
3. You can either view or download the file.
4. Click on Download
5. A window will appear Click on Save
6. Choose the location where you
want to save the file; click on Save
ICT Training Handout (Level 1) -July 2016 32/55
Illustration 25: Emailing: Step 6
Illustration 26: Emailing: Step 7
33. 1. To delete an email message, click on the
check box next to that email
2. Note: You can delete several emails at
once by selecting multiple check boxes.
3. Click on the Delete button to delete the
selected email
Log out when you’re done
1. When you are finished, log out by
clicking on your photo or circle with
your intial (located on the top right
corner ).
2. Then click on Sign out.
6.1.2 Tips for emailing
1. Remember to check your spam folder regularly. Sometimes, mails go to spam folder
because the email software decides that it is spam. Messages more than 30 days will be
deleted and you will lose information.
2. Never share password, account information on any email - even if it seems to come from
banks, government organization, etc. These are called phishing mails and can lead to fraud.
3. You can create filters on your email to help sort.
4. Sign out email properly after you finish with your work, Do not click on the red X to close
the browser window; this may not log you out.
6.1.3 Emails on mobile phones
In this section, we will see how to access emails on mobile phones. Mobile Mail is a simplified
webmail interface that you can use on your phone's web browser. The following instructions will
configure an Android smartphone as an IMAP client.
ICT Training Handout (Level 1) -July 2016 33/55
Illustration 27: Emailing: Step 8
Illustration 28: Emailing: Step 9
34. Touch the E-Mail icon to configure your e-mail
settings. This is located either on your home
screen or customized screens or in the Apps
icon which shows all of your apps in one place.
Choose IMAP account. If you would like to use
POP3, choose POP3 account. POP3 is post
office protocol 3, These let you download the
messages to your computer. This removes them
from the server in normal use. A later method is
IMAP or Internet Message Access Protocol. This
stores all messages on the server, so you do not
clear them when they are read. This means you
can access them from ANY computer, without
losing them on other computers.
Input your e-mail address in both the Email address and Username fields. Input the password
associated with your e-mail address. For IMAP server , input imap.domainname.com, where the
highlighted portion is your own domain name. Security type should automatically be set to None.
Port should automatically be set to
143; IMAP path prefix is not necessary.If you chose POP3 account in the previous step, input
pop.domainname.com. In the POP serverfield, the port will automatically be set to 110. Select
Next.
ICT Training Handout (Level 1) -July 2016 34/55
Illustration 29: Emails on mobile
phones: Step 1
Illustration 30: Emails on
mobile phones: Step 2
Illustration 31: Emails on mobile phones: Step 3
35. For outgoing server, input
smtp.domainname.com,
Port should be set to 587.
Require sign-in is checked; User name is your e-
mail address. Password is the password
associated with the e-mail address. Select Next
It will take several seconds to check the
outgoing server settings. After that screen,
you will be able to configure how often your
e-mail syncs and other settings. Select Next.
6.2 Mailing groups
Mailing groups are when a group email ID is created and this can be used to communicate with all
members in the group. This is useful because we do not have to type individual email IDs.
You can become member of mailing-lists in which a mail sent to the mailing-list will be forwarded
to all members. The mathematics teachers in Government high schools have a state wide mailing-
list called the mathssciencestf@googlegroups.com. In Assam, a forum has been created for maths
teachers to interact and communicate assammathsforum@googlegroups.com.
7 Technology for Resource Creation – Concept Mapping
7.1 What is a concept map
Concept mapping is a highly effective way of thinking and analyzing. Concept mapping is a
creative and logical means of mapping out ideas and exploring the connections between ideas.
Freemind is one such mind mapping tool. This allows us to create concept maps around an idea and
to explore the connections between various ideas. Teachers can use this to plan for lessons or to
discuss in the classrooms.
7.2 How to use Freemind
To Open from the desktop menu select Applications > Office > Freemind.
ICT Training Handout (Level 1) -July 2016 35/55
Illustration 32: Emails on
mobile phones: Step 4
36. Once Freemind is open you will see a window like this.
The new mind map is the root node and you can give it any
name you want. The name of this root node will be the
name of the mind map. Once you have given it a name, you
can save the mind map.
ICT Training Handout (Level 1) -July 2016 36/55
Illustration 33: Freemind:
Step1
37. Once you click on save, you will see a window like this.
You can save the folder you want to select the folder you
want to save it on.
Here the mind map is named Food and is saved under
home/ranjani/Documents
Now you see that the mind map is named Food and the root
node is called Food. To insert other words that are
connected, you can enter them as child nodes. To enter these
nodes, you can use the "Enter" key or "Insert" key after
selecting the node to which the child nodes must be added.
Here, the child nodes have been added after selecting the
node "Food". The child nodes added are called sibling nodes
and the main node is called parent node.
You can keep adding child nodes to any node. For example
you can add child nodes to the node called environment by
selecting and using "Insert" key. You can also add a sibling
node to environment by selecting the node environment and
using "Enter" key. "Plants" and "Animals" are child nodes
for "environment" and "agriculture" is sibling node for
"environment.
When you discuss concepts, we notice that sometimes
concepts are connected, and we want to link them to study in
detail. For doing this we can add a graphical link (an arrow)
to connect two nodes.
To do this select two nodes and select Insert Option from the
menu bar, and add graphical link. You can click on the
arrow and move it around.
ICT Training Handout (Level 1) -July 2016 37/55
Illustration 34: Freemind: Step 2
Illustration 35: Freemind: Step 3
Illustration 36: Freemind: Step 4
Illustration 37: Freemind: Step 5
38. We will also see that sometimes these concepts are very
large and we may want to create a new mind to study them.
For example, in this mind map we may want to create a new
mind map called agriculture to study. After we create a new
mind map called agriculture, we can insert a "file link" to
open the new mind map when the node "agriculture" is
clicked. To do this, we click on node called agriculture and
click on "Insert". Under Insert, click on "Hyperlink - File
chooser". This will open a window from where you can
select the document name to be opened. This can be a mind
map. The file can be a picture or video also.
We can also insert weblinks to any node for additional
information. To do this, you select the node to which
additional information is to be added and click on "Insert".
Under Insert, click on "Hyperlink - Text field". It will open
a window in which you can enter the hyperlink manually.
You can also add notes to a node to add more description to
a node. To to this, you need to go to "View" and select
"Note Window".
This will open a box where you can enter text. You can
adjust the size of this box. To enter a note, select a node and
enter the notes below in the note window.
ICT Training Handout (Level 1) -July 2016 38/55
Illustration 38: Freemind: Step 6
Illustration 39: Freemind: Step 7
Illustration 40: Freemind: Step 8
39. The completed mind map with links and notes will look like
this below.
You can select the Format and Navigate to change colours,
layout and also to move the nodes around.
You can also export your mind map to Image or Text
Document using File → Export As.
Once you create a mind map, you can view and edit it as a mind map using Freemind.
8 Technology for Resource Creation Text Editing
A text editor is a software used for creating (including writing, editing, formatting, and possibly
printing) text documents. Apart from entering and editing text, you can insert images and links also.
This software lets you to create a document, store it on the disk, show it on a screen, make changes
to it using the keyboard and print it on a printer. LibreOffice Writer, Microsoft Word,
OpenOffice.org writer, Web-based text editors (Google Docs) etc are popular text editors. In this
section you will learn how to use LibreOffice Writer on Ubuntu. LibreOffice works on Ubuntu
GNU/Linux, Mac and Windows operating systems. This handout has been created in Libre Office
Writer.
To create a document in Libre Office Writer go to:
Applications → Office → Libre Office Writer. It
will open an empty document. The first step to do
would be to give the file an appropriate name and
save it under a correct folder.
ICT Training Handout (Level 1) -July 2016 39/55
Illustration 41: Freemind: Step 9
Illustration 42: Text Editing with LO
Writer: Step 1
40. When you do File Save As it will open a folder,
you can select the folder under which you want
to save the file. The name of the file is Libre
Office Introduction .odt
ODT is the short form of Open Document Text.
ODT conforms to Open Document Format
(ODF) which is recommended by the
Government of India through its
Policy on open standards”. The .docx format of
Microsoft Office is not an open document
format. It is not recommended by Government
of India policy.
The Menu Bar has the following options:
1. File Menu has options for File Save, Close, Print
2. Edit Menu has options for Copying, Cutting and Pasting Text – this will allow us to move
text from one part of the document to another. To copy text from one place to another, or
from one document to another, you can select the text, go to Edit --→ Copy and go to a
different place in the document to paste it; Edit → Paste.
ICT Training Handout (Level 1) -July 2016 40/55
Illustration 43: Text Editing with Libre Office
Writer: Step 2
Illustration 44: Text Editing with LO Writer: Step 3
41. 3. Insert Menu has options for entering page breaks, page numbers, formulas and images.
4. Format has options for changing the
format of the text, font type, size and also
advanced layout options. In the tool bar,
the letter “B” and “I” can be used to
make the text bold and italics.
You can also create numbered lists in a Writer
document.
For this select the text input that has been
entered, go to Format, Select Bullets and
Numbering and choose the numbering type that
is needed.
This will produce a numbered list.
ICT Training Handout (Level 1) -July 2016 41/55
Illustration 47: Text Editing with LO Writer:
Step 6
Illustration 45: Text Editing with LO Writer: Step 4
Illustration 46: Text Editing with LO Writer:
Step 5
Illustration 48: Text Editing with LO
Writer: Step 7
42. To insert a formula, go to Insert → Object →
Formula.
It will open a window as shown – a left panel
which has various options for formulas and a
bottom panel in which the formula is to be
constructed.
Go to Insert → Image → This will open a folder
from which images are to be inserted.
The image inserted above looks like this.
9 Technology for Resource Creation Geogebra
9.1 Introduction
Geogebra is an interactive geometry , algebra, statistics and calculus application, intended for
learning and teaching mathematics from primary school to university level. GeoGebra is a
mathematical software application that helps you learn Geometry and Algebra. This application is
free and licensed under the GNU Public License. Can you guess why the creators of this tool named
it GeoGebra. Geo is an abbreviation for Geometry and Gebra for Algebra. Did you know that you
can represent all geometric figures as algebra equations? GeoGebra helps you see both the
geometric figures and its algebra representation at the same time, hence the name GeoGebra.
ICT Training Handout (Level 1) -July 2016 42/55
Illustration 50: Text Editing with LO Writer:
Step 9
Illustration 49: Text Editing with LO Writer:
Step 8
Illustration 51: Text Editing
with LO Writer: Step 10
43. Overview of Geogebra Tool
The GEOGEBRA version is - 5.0.236.0-3D in the custom distribution. Geogebra is part of
the Ubuntu distribution (in the training). This can be opened from Applications → Education
→ Geogebra.
Web download
You can download this from www.geogebra.org
Mobile version
Geogebra can also be downloaded for the mobile from Google Playstore
In GeoGebra you can animate the geometric figure you have drawn and dynamically see how
some values like length, area, perimeter of a figure changes, see the same figure in different ways.
For detailed resources on how to learn Geogebra you can click on
http://karnatakaeducation.org.in/KOER/en/index.php/Portal:ICT_Literacy.
ICT Training Handout (Level 1) -July 2016 43/55
Drawing 1: Introduction to Geogebra Window
44. 9.1.1 Detailed steps of use
Drawing points, line segment and rays
Select Point Tool, and click anywhere on the
drawing point to plot six points A, B, C, D, E, F.
Drawing line segments and lines
Select Segment between two points tool, click
o on point A and then point B.
Select Line through two points tool, click on
point C and then point D.
Select Ray through two points tool, click on
point E and the point F.
ICT Training Handout (Level 1) -July 2016 44/55
Illustration 52: Learning Geogebra:
Step 1
Illustration 53: Learning Geogebra: Step 2
Illustration 54: Learning Geogebra: Step 3
45. Can you describe in your own words the
difference between a segment, line and ray?
Also see the algebra view and observe the
equations of the line b and ray c. The line
segment a is represented in the algebra view as a
= 2.83, where 2.83 is the length of the segment.
Continued on next page
ii. Drawing a parallel line
iii. Select Point Tool and click anywhere on the
drawing point to plot three points A,B, C.
iv. Select Line through two points tool, click on
point A and then point B.
Select Parallel Line tool, click on point C first.
Then click on line AB. Now use the Move Tool
and move points A, B and C. What do you
observe? Describe it.
Next with Move Graphics view tool and move
the drawing pad. Do the two lines ever meet?
Rotate a ray
Draw line segment AB of any length (Segment
between two points tool).
Select the Ray Through two points tool, click
on point A, then select another point C on the
drawing pad as shown in the figure.
Select the Angle tool, as seen in the figure and
ICT Training Handout (Level 1) -July 2016 45/55
Illustration 55: Learning Geogebra: Step 3
Illustration 56: Learning Geogebra:
Step 4
Illustration 57: Learning Geogebra: Step
5
46. click on points B, then A and finally C. You will
see an angle measure. Click on the Move tool
and move point C.
Observe the change of angle.
Observe the direction (clockwise, anticlockwise)
in which you move the ray? In which direction
does the angle increase/ decrease?
9.2 Practice Activities
9.2.1 Perpendicular Lines
i. Draw a line
ii. Draw a perpendicular line (after plotting a point on line)
iii. Measure the angle and move the angle label
iv. Save the file as “perpendicular line.ggb”
v. Make a point on perpendicular line
vi. Draw a perpendicular on perpendicular
9.2.2 Parallel Lines
i. Make two parallel lines
ii. Make transversal
iii. Draw perpendicular; intersect point and measure distance
iv. Name the object using textbox
v. Give colour and bold
9.2.3 Constructing triangles
i. Draw one segment
ii. With circle tool draw two other segments
iii. Measure angle
iv. Write angle sum property in text box
v. Make triangle
vi. Take midpoint, draw medians, mark and measure all segments
vii. Calculate ratio
viii. Add text box
ix. Take screenshot
x. Put in maths question paper
9.2.4 Circles
i. Draw a circle
ii. Draw tangents from an external point
iii. Mark points of contact of the tangents
iv. Join centre of circle to points of contact
v. Measure angle at the centre
vi. Measure angle between the tangents
vii. What is the sum of above two angles
ICT Training Handout (Level 1) -July 2016 46/55
47. viii. Join centre and external point
ix. Does the line segment bisect angle at the centre
9.2.5 Drawing polygons
1. Select Point tool and plot three points A B and C to represent the vertices of a triangle.
2. To draw a three-sided polygon – triangle, select Polygon tool click on point A, then B and C
and again click on point A.
3. Select Point tool and plot three points A B C and D to represent the vertices of a
quadrilateral.
4. To draw a four-sided polygon – quadrilateral, select Polygon tool, click on point A, then B,
C and D and again click on point A.
5. Try making a pentagon and hexagon on your own.
9.2.6 Creating a geometric figure and discussions
Now we will draw a right angled triangle where the base is 5 units and the hypotenuse is 8 units.
For more information on triangles, you can refer to reading material on KOER at
http://karnatakaeducation.org.in/KOER/en/index.php/Triangles and
http://karnatakaeducation.org.in/KOER/en/index.php/Similarity_and_Congruence
You have to familiarize yourself with the tool bar to complete this figure. All buttons on the tool
bar hide many related tools. You choose the tool you want by pressing the small red arrow in the
lower right corner of the button. Choose from the list that shows up.
1. Start your drawing by using the tool Segment with Given Length from Point.
ICT Training Handout (Level 1) -July 2016 47/55
Illustration 58: Learning Geogebra :
Step 6
Illustration 59: Learning Geogebra:
Step 7
48. 2. Continue by drawing the right angle. Do this by drawing a perpendicular line through
point A. Choose the perpendicular line tool, click on point A first and then on the line.
3. To mark the third corner of the
triangle you use one of the circle tools,
Circle with Centre and Radius.
4. Click on the point B and fill in the
length of the hypotenuse as radius.
ICT Training Handout (Level 1) -July 2016 48/55
Illustration 60: Learning Geogebra : Step 8 Illustration 61: Learning Geogebra:
Step 9
Illustration 62: Learning Geogebra :
Step 10
49. 5. Choose the tool Intersect Two Objects, click on the circle and the perpendicular line.
The point in the intersection is the third corner of the triangle.
6. The perpendicular line and the circle,
even the points do not need to be visible
or seen now, you only want to show the
triangle. Hide an object by right-clicking
the object and uncheck Show Object by
clicking on it.
7. The lengths of the sides in the triangle can be shown. Right-click one of the sides and
choose Object Properties in the menu which shows up. Check the Show Label field and
ICT Training Handout (Level 1) -July 2016 49/55
Illustration 63: Learning Geogebra : Step 11
Illustration 64: Learning Geogebra :
Step 12
Illustration 65: Learning Geogebra :
Step 13
Illustration 66: Learning Geogebra : Step 14
50. choose Value from the drop down list.
8. To show the size of the angles use the Angle tool. Click on each vertex of the triangle.
The order in which you click the vertices must be in the clock wise direction. In this figure
click in this order BAC, CBA, and ACB.
9. Click on Area tool and then click on the polygon.
10. Change the shape of the triangle by moving the points you are able to move (use the
Move tool).
9.2.7 Discussion questions
1. How many points do we need to draw a triangle? How many segments?
2. What is the hypotenuse? Is it a side of the triangle also?
ICT Training Handout (Level 1) -July 2016 50/55
Illustration 67: Learning
Geogebra : Step 15
Illustration 68: Learning Geogebra : Step
16
Illustration 69: Learning Geogebra :
Step 17
Illustration 70: Learning Geogebra:
Step 18
51. 3. If a triangle is a right triangle, what should be the value of one angle? How do we draw that?
[There are two ways – one with a perpendicular line and the other with a rotating ray]
4. Why are we using the circle with hypotenuse as radius for the third point? Is there any other
way you could have done this? Do we have enough data to do that?
5. Measure the third side and also measure the other two angles. With the same base can you
construct other right triangles?
6. Verify the area calculation of the triangle.
7. Complete this to be a rectangle and also discuss why the area of the triangle is given as
Area = ½ x b x h
10 Technology for Resource Creation Simulations (PhET)
PhET is a collection of simulations that can be integrated in classroom teaching-learning. We will
look at two examples of simulations.
For this we will need to open an application called PhET on the computer. You can find PhET
under Applications> Education> Science. PhET is an educational resource that contains computer
demonstrations of experiments and activities. When we click on Play with sims – it will open
simulations in various subjects. We will click on Physics and scroll down to the simulation on
Pendulum Lab.
When we want to open a simulation, we click on the green rectangle which says “Run Now”.
10.1.1 What are computer simulations?
Computer simulations are very useful for scientific research when a physical experiment may be
very costly or dangerous or extremely time consuming to do. When a scientist is studying a
problem, she will make assumptions about what causes the change and make predictions about what
will change. This is based on past study of the subject and knowledge. This information can be
input to the computer and the simulation will make all the calculations and show what changes
happen. Sometimes, the changes that the simulation will show will be different from what the
scientist predicted. This will help the scientists refine the theory. The simulation shows the
experiment on a computer. The scientist can change the inputs to see how the experiment changes.
In a classroom, a simulation of an experiment can be used to generate discussions around a concept/
phenomenon. Computer models are different from animations. In an animation, we simply see a
ICT Training Handout (Level 1) -July 2016 51/55
52. movie which shows a phenomenon happening. The inputs cannot be changed whereas in a
simulation you can change the inputs/ parameters.
When using simulations, it is important that we make the approach one of inquiry and not one of
visual representation of a content area.
We will look at two examples of how to work with simulations.
10.2 Observe the simulation “Wave on a String”
You will see a picture like this. This is similar to a situation that you might have had where you tie
a rope to one end and the other end is in your hand. When you shake your hand, the rope will shake
though it will be fixed at the other end. Similarly, if we move the wrench here, the rope (which is a
collection of beads) will also move without being removed from the other end.
Answer the following questions
1. When you “move” the wrench up and down, did the string move? How did it move? How
did each of the beads move?
2. When you look at the simulation, it looks like something is moving from one end to another.
What is moving?
3. Let us understand what happens when you move the string using the manual option.
Move the wrench upwards
Move the wrench downwards
Move the wrench upwards and downwards
Are the beads in the string moving left to right; right to left, or up and
down? What does this tell you about waves
How fast does the string move when tension is high and when tension
is low. Is there a difference and why?
When you add damping how does the string move
4. Let us understand what happens when you move the string using the oscillating option. You
can complete the table below. You will see that there is a green rectangle on the top in
which there are control buttons for amplitude, frequency and damping. We know what
damping is. At the end of this simulation, you will be able to describe amplitude and
frequency.
Increase and decrease
amplitude
How does the wave look? How do the beads
move? What changes in the beads when you
change the amplitude? Do all the beads move in
ICT Training Handout (Level 1) -July 2016 52/55
53. the same way? When you increase or decrease
amplitude, what happens to the frequency
Increase and decrease
frequency
How does the wave look? How do the beads
move? What changes in the beads when you
change the amplitude? Do all the beads move in
the same way? When you increase or decrease
frequency, what happens to the amplitude?
Change the values of tension
and damping
What do you observe is happening to the wave?
What happens if the wave end is not fixed but
loose?
Use the ruler to see how the
beads move?
How far do the beads jump? Does it change?
10.3 Observe the simulation “Pendulum Lab”
1. Notice where the pendulum is – is it
higher, lower or at the same level as the
central position?
2. Notice the graph – what are the two
variables on the bar chart?
3. What do you think will happen to the
pendulum next?
4. Notice where the pendulum is – has it
moved? What can you say about its
movement?
5. Notice the graph – what are the variables
on the bar chart? What are the values of
PE and KE as compared to total energy?
ICT Training Handout (Level 1) -July 2016 53/55
54. 6. Notice where the pendulum is – has it
moved? Is it higher or lower than the
central position?
7. Did you notice anything about the speed
of the bob as it moves from one extreme
position to another?
8. Notice the graph – what are the variables
on the bar chart?
9. What has happened to the values of the
KE and PE as compared to total energy?
10. What do you think is happening? Is this
what you will think will happen when
you try this experiment? Why? Why not?
What is different?
11. Notice where the pendulum is. This
extreme position to the right is at a
different height than. Why? What role
does friction play and where does it
come from
12. Look at the graph – what are the
variables in the bar chart? Where has the
thermal energy come from? What do you
expect will happen to the simple
pendulum?
Mechanics of the simple pendulum
The motion of a pendulum is a classic example of mechanical energy conservation. A pendulum
moves it sweeps out a circular arc, moving back and forth in a periodic fashion. Neglecting air
resistance (which would indeed be small for an aerodynamically shaped bob), there are only two
forces acting upon the pendulum bob. One force is gravity. The force of gravity acts in a downward
direction and does work upon the pendulum bob. However, gravity is an internal force (or
conservative force) and thus does not serve to change the total amount of mechanical energy of the
ICT Training Handout (Level 1) -July 2016 54/55
55. bob. The other force acting upon the bob is the force of tension. Tension is an external force and if it
did do work upon the pendulum bob it would indeed serve to change the total mechanical energy of
the bob. However, the force of tension does not do work since it always acts in a direction
perpendicular to the motion of the bob. At all points in the trajectory of the pendulum bob, the angle
between the force of tension and its direction of motion is 90 degrees. Thus, the force of tension
does not do work upon the bob.
Since there are no external forces doing work, the total mechanical energy of the pendulum
bob is conserved.
ICT Training Handout (Level 1) -July 2016 55/55