
Recommended
More Related Content
What's hot
Viewers also liked
Viewers also liked (20)
Similar to Webex whiteboard
Similar to Webex whiteboard (20)
More from Katie_JXK
Recently uploaded
Recently uploaded (20)
Webex whiteboard
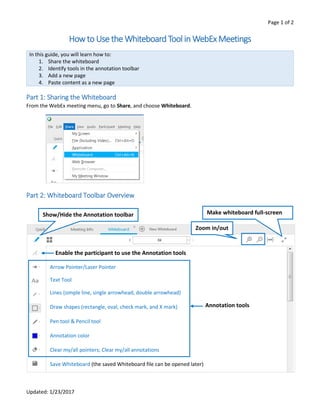
- 1. Page 1 of 2 Updated: 1/23/2017 Howto Use the Whiteboard Tool in WebEx Meetings In this guide, you will learn how to: 1. Share the whiteboard 2. Identify tools in the annotation toolbar 3. Add a new page 4. Paste content as a new page Part 1: Sharing the Whiteboard From the WebEx meeting menu, go to Share, and choose Whiteboard. Part 2: Whiteboard Toolbar Overview Arrow Pointer/Laser Pointer Text Tool Lines (simple line, single arrowhead, double arrowhead) Draw shapes (rectangle, oval, check mark, and X mark) Pen tool & Pencil tool Annotation color Clear my/all pointers; Clear my/all annotations Save Whiteboard (the saved Whiteboard file can be opened later) Enable the participant to use the Annotation tools Annotation tools Show/Hide the Annotation toolbar Zoom in/out Make whiteboard full-screen
- 2. Page 2 of 2 Updated: 1/23/2017 Part 3: Adding New Pages There can be multiple Whiteboards in your meeting. In each whiteboard, there can be multiple pages. To add a new page, go to Edit, and choose Add Page. Part 4: Pasting Content You can prepare your content to paste into the whiteboard in advance. Please remember that pasted content will appear on a new page. 1. Copy the content. a. Text: Select the text, and use the shortcut (Ctrl+C on PC; Command+C on Mac). b. Image: Right click on the image, and choose Copy. 2. Pasting Option 1: a. Put the cursor in the whiteboard. b. Use the paste shortcut (Ctrl+V on PC; Command+V on Mac). 3. Pasting Option 2: a. Go to Edit. b. Choose Paste As New Page. Note: You and your students can also use the annotation tools with the pasted content. This is the end of part 4. Use the Thumbnail View or arrows to navigate through pages.