GraphQL, Redux, and React
•Download as PPTX, PDF•
13 likes•2,603 views

A short intro of graphql and an example application usage of integrating graphql server with redux and react.

Recommended
Recommended
More Related Content
What's hot
What's hot (20)
Viewers also liked
Viewers also liked (20)
Similar to GraphQL, Redux, and React
Similar to GraphQL, Redux, and React (20)
Recently uploaded
Recently uploaded (11)
GraphQL, Redux, and React
- 1. Graph QL
- 2. Problems with REST API GET id -------------------> data GET id2 -------------------> more data GET data.id ------------------> even more data
- 3. Multiple Round Trips ● In order to descent into the object graph, multiple round trips to the server are required. ● Critical for Mobile Environment
- 4. Over fetching Unless specifically designed, you might receive needless information
- 6. Backend APIs are storage-centric Front-end APIs are product-centric
- 7. Graph Application Layer Query Language (not Storage Query Language) “A better solution that can replace restful server and mvc framework”
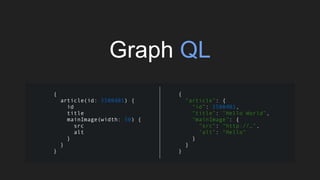
- 8. Basically JSON without the values No custom endpoints Clients ask exactly what they want person:{ name:, address: } Graph QL
- 9. ● User-defined type system - “schema” ● Server describes what data is available ● Clients describe what data they require ● User-defined data fetching (“how do I get an article”) ● Front end request independent to backend How Graph QL Works
- 10. GraphQL has a type system Three main “types” required to get an endpoint up and running. 1. A type for the model 2. A type for the query 3. A type for the schema In reality, it is more complex than this. (forget about it for now)
- 11. Our Data var goldbergs = { 1: { character: "Beverly Goldberg", actor: "Wendi McLendon-Covey", role: "matriarch", traits: "embarrassing, overprotective", id: 1 }, 2: { character: "Murray Goldberg", actor: "Jeff Garlin", role: "patriarch", traits: "gruff, lazy", id: 2 }, 3: { character: "Erica Goldberg", actor: "Hayley Orrantia", role: "oldest child", traits: "rebellious, nonchalant", id: 3 }, 4: { character: "Barry Goldberg", actor: "Troy Gentile", role: "middle child", traits: "dim-witted, untalented", id: 4 }, 5: { character: "Adam Goldberg", actor: "Sean Giambrone", role: "youngest child", traits: "geeky, pop-culture obsessed", id: 5 }, 6: { character: "Albert 'Pops' Solomon", actor: "George Segal", role: "grandfather", traits: "goofy, laid back", id: 6 } }
- 12. Model Type Model Type is pretty much a mirror image of each Goldberg in our goldbergs data ---------> var goldbergType = new GraphQLObjectType({ name: "Goldberg", description: "Member of The Goldbergs", fields: { character: { type: GraphQLString, description: "Name of the character", }, actor: { type: GraphQLString, description: "Actor playing the character", }, role: { type: GraphQLString, description: "Family role" }, traits: { type: GraphQLString, description: "Traits this Goldberg is known for" }, id: { type: GraphQLInt, description: "ID of this Goldberg" } } }); 1. Create a new instance of GraphQLObjectType, “Goldberg” 2. Under “fields”: Each “type” indicates the type expected (e.g. string (GraphQLString) for character, int (GraphInt) for id.) 3. “description” fields are good for self-documentation
- 13. Query Type The query type tells how we will query our data var queryType = new GraphQLObjectType({ name: "query", description: "Goldberg query", fields: { goldberg: { type: goldbergType, args: { id: { type: GraphQLInt } }, resolve: function(_, args){ return getGoldberg(args.id) } } } }); function getGoldberg(id) { return goldbergs[id] } 1. Query Type is an instance of GraphQLObjectType, it just serves a different purpose. 2. Create a new query field called goldberg and set its “type” to the goldbergType we created earlier. Our new goldberg field will accept an id as an assignment. 3. When we resolve our query we return the output of a function getGoldberg()
- 14. Schema Type Schema type combines them all together. /* creating schema instance */ var schema = new GraphQLSchema({ query: queryType }); /* serve our schema */ var graphQLServer = express(); graphQLServer.use('/', graphqlHTTP({ schema: schema, graphiql: true })); graphQLServer.listen(8080); console.log("The GraphQL Server is running.")
- 15. { goldberg ( id : 2 ) { id, character } } { “data” : { “goldberg” : { “id” : 2, “character” : “Murray Goldberg” } } Let’s Test Go to GraphiQL IDE and test it yourself. (GraphiQL IDE is just like postman of RESTful API for GraphQL)
- 16. React and Redux Let’s delete the “hello world” from static/index.html and add a new message using React in index.js: | -- app | -- actions | -- components | -- reducers In the “reducers” folder we’ll create a new file called reducer.js where we’ll work on our reducer function. import React from "react"; import ReactDOM from "react-dom"; const Main = React.createClass({ render: () => { return ( <div> <p>hello react!</p> </div> ) } }); ReactDOM.render( <Main />, document.getElementById("example") );
- 17. React and Redux We’ll be using the Immutable module for our state so that we can form some good habits. Our state has two fields — one to let us know if we are in the middle of a query/awaiting a response from the server and another that contains the response data. Next we plug our immutableState into a reducer function: import Immutable from "immutable"; const immutableState = Immutable.Map({ fetching: false, data: Immutable.Map({}) }) -------------------------------------------------- export const queryReducer = (state = immutableState, action) => { switch (action.type) { case "STARTING_REQUEST": return state.set("fetching", true); case "FINISHED_REQUEST": return state.set("fetching", false) .set("data", Immutable.Map(action.response.data.goldberg)); default: return state } }
- 18. Store Back in index.js we want to create a store out of our reducer and feed it to our main component. We’ll need to import the reducer we just created along with some helpers from redux and react-redux. We also need the redux-thunk middleware to help us later on when we need to make some requests. import React from "react"; import ReactDOM from "react-dom"; import { createStore, applyMiddleware } from "redux"; import { Provider } from "react-redux"; import { queryReducer } from "./app/reducers/reducers.js"; import thunkMiddleware from "redux-thunk"; /* First, we apply the redux-thunk middleware:*/ const createStoreWithMiddleware = applyMiddleware( thunkMiddleware )(createStore) /* Then we wrap our Main component in the Redux Provider and pass our queryReducer into createStoreWithMiddleware.*/ ReactDOM.render( <Provider store={createStoreWithMiddleware(queryReducer)}> <Main /> </Provider>, document.getElementById("example") );
- 19. Actions In the “actions” folder we’ll create a new file called actions.js. We need to create two actions to dispatch to our reducer, one for “STARTING_REQUEST” and one for “FINISHED_REQUEST”: const startingRequest = () => { return { type: "STARTING_REQUEST" } } const finishedRequest = (response) => { return { type: "FINISHED_REQUEST", response: response } }
- 20. Actions The great thing about the redux-thunk middleware we applied to our store earlier is that when an action returns a function that function is injected with dispatch(). We’ll get to use dispatch() twice in a new action called getGraph: When getGraph() is called we dispatch startingRequest() to indicate the start of a new query. We then begin the async request (note the “application/graphql” content type in the header) and when our query is complete we dispatch finishedRequest() with the results of our query. export const getGraph = (payload) => { return dispatch => { dispatch(startingRequest()); return new Promise(function(resolve, reject) { let request=new XMLHttpRequest(); request.open("POST", "/graphql", true); request.setRequestHeader("Content-Type", "application/graphql"); request.send(payload); request.onreadystatechange = () => { if (request.readyState === 4) { resolve(request.responseText) } } }).then(response => dispatch(finishedRequest(JSON.parse(response)))) } }
- 21. Component For now we’ll create an empty Query component: We need to hook up our component with our store and the dispatch method by creating a container component and using the react-redux connect() helper. import React from ‘react’; import { connect } from ‘react-redux’; import { getGraph } from ‘../actions/actions.js’; let Query = React.createClass({ render() { return ( <div> </div> ) } }); const mapStateToProps = (state) => { return { store: state } }; export const QueryContainer = connect( mapStateToProps )(Query); let Query = React.createClass({ componentDidMount() { this.props.dispatch( getGraph("{goldberg(id: 2) {id, character, actor}}") ); } });
- 22. Component We’ll also add the elements that our response data will fill and a button to submit additional queries. We want to know if we are in the middle of a query so we’ll grab our fetching field from our state and display it on the page. let Query = React.createClass({ componentDidMount() { this.props.dispatch( getGraph("{goldberg(id: 2) {id, character, actor}}") ); }, render() { let dispatch = this.props.dispatch; let fetchInProgress = String(this.props.store.get('fetching')); let queryText; let goldberg = this.props.store.get('data').toObject(); return ( <div> <p>Fetch in progress: {fetchInProgress}</p> <h3>{ goldberg.character }</h3> <p>{ goldberg.actor }</p> <p>{ goldberg.role }</p> <p>{ goldberg.traits }</p> <input ref={node => {queryText = node}}></input> <button onClick={() => { dispatch(getGraph(queryText.value))} }> query </button> </div> ) } });
- 23. Component With that done, the last thing we have to do is plug our QueryContainer component into our Main component. In index.js: import { QueryContainer } from “./app/components/Query.js”; // And replace “hello react!” const Main = () => { return ( <div> <QueryContainer /> </div> ) };
- 24. ● https://learngraphql.com/basics/introduction ● https://medium.com/@thisbejim/getting-started-with-redux-and-graphql- 8384b3b25c56#.x08ia9y7m Resources used in this Presentation Go to GraphiQL IDE and test it yourself. (GraphiQL IDE is just like postman of RESTful API for GraphQL)