SlideShare a Scribd company logo
1 of 82
Professional Electronics Institute Inc. – Iloilo City - 1 -
Computer Hardware Servicing NC II Prepared by: O.C. Cabillos
PROFESSIONAL ELECTRONICS INSTITUTE INC.
La Salette Building, Valeria St., Iloilo City
COMPUTER HARDWARE
SERVICING
NC II
Prepared by:
ORLANDO C. CABILLOS
Bachelor of Science in Computer Science
Masters of Science in Computer Science (units)
International Driving Licence Certificate Holder (Singapore)
TESDA Certified Trainer/Assessor
CHS NCII
Accreditation Number: CA-CHS0206011012001
Professional Electronics Institute Inc. – Iloilo City - 2 -
Computer Hardware Servicing NC II Prepared by: O.C. Cabillos
A. BASIC COMPETENCIES
A.1. Participate in Workplace Communication
Workplace – the American Heritage Dictionary defines workplace as
a place, such as an office or factory, where people are employed. In other
words this is the common working place of employees.
Communication – is the transfer of information such as though or
messages through a medium between two or more subjects.
Workplace communication – a communication that is taking place in
the workplace that involve people of the different levels. This type of
communication is very important as it contributes many aspects in the growth
of a certain institution.
For an effective workplace communication, an employee should:
1. Know that…
–included here are facts about your organization and their
specific job – what business you are in, who your customers are, specific
details about your product or service, where forms are located, who to see
when there is a problem ...
2. Master that…
–included here are the practical skills required to do their job
well – repairing a machine, filling out an invoice, designing a building,
writing a software program ...
3. Feel that…
–included here are the interactions that give them a sense of
belonging and self-worth – being listened to, respected, trusted, valued ...
Communication may be working effectively at the higher level but
fails on the lower level or vise versa. Gone are the days when departments
could stand as silos, isolated from the rest of the organization by impenetrable
barriers. Intra-national and international competition is now so fierce that
everyone in the organization needs to collaborate closely on solving
organizational challenges and on achieving agreed strategic objectives.
As a member of an organization’s technical team, it’s very important
that communication between you and the next higher level of persons in
authority should have a very well established form of communication.
A.2. Work in a Team Environment
Professional Electronics Institute Inc. – Iloilo City - 3 -
Computer Hardware Servicing NC II Prepared by: O.C. Cabillos
The key to working well in teams is to have great communication
among everyone involved.
As a team member, communication is critically important. If you
have a problem with other team members, talk to them directly. If you
can't talk and listen to other team members you might as well be
working individually.
Communicating effectively can also make your team, as a whole,
work better and accomplish your given tasks quicker.
Here are some other ideas to help you work well with team
members:
1. First focus on the work assigned to you.
If you finish with your task before other team members, ask
other members if they need your help.
2. Meet your deadlines.
If you must miss a deadline, apologize for not meeting it, tell
your team when they'll have your part, and then make sure you meet
that deadline. The rest of the team will respect you more for owning up
to your problem rather than blaming someone else.
3. Be supportive of your team members.
When discussing ideas for the project you're working on, be
sure to consider other team members' suggestions, even if you don't
think they'll work. Considering other ideas shows you're interested in
someone else's opinion.
4. Realize the project is a collaborative effort.
It doesn't belong to any one person. It's important that each
team member can claim ownership of some part of the project. By
having ownership they're more likely to put forth the effort to make the
project a success.
5. If you're leading the team, let the team members know what's
expected of them.
Establish clear objectives and how each person will contribute.
Be open to making changes if someone else can do a certain aspect of
the job better than the person you assigned to do it.
6. Motivate the team.
Professional Electronics Institute Inc. – Iloilo City - 4 -
Computer Hardware Servicing NC II Prepared by: O.C. Cabillos
Work on establishing and maintaining each team member's
morale and their motivation to succeed as a team. Give them a reason
to want the team to succeed rather than riding off into the project
sunset like the Lone Ranger.
7. Work together on the plan.
The team will feel more ownership of the project if everyone
works together to set goals and establish deadlines for the various
aspects of the job.
Call on the team members to meet together periodically to
check on progress. If possible switch jobs among team members if
necessary. Everyone needs to pitch in to be sure the job is done
correctly and on time. Always remember the golden rule. You have
no monopoly of knowledge.
A.3. Practice Career Professionalism
Everyone wants to become a "professional" these days or to work
in a professionally managed organization. While being professional may
be a virtue, what exactly is implied by being a professional is often found
lacking in individuals and companies. In fact, some family owned
companies have higher professional standards than our so-called
professionally managed companies. Many people still think that one can
become a professional simply by acquiring a degree and many companies
have the mistaken belief that they can claim to be professional by hiring a
certain number of MBAs, and PhD’s.
Let’s define professionalism first.
Professionalism is defined by the dictionaries as the ―expertness
characteristic of a professional‖ or the ―pursuit of an activity as an
occupation‖.
On the other hand:
The term 'career' was traditionally associated with paid
employment and referred to a single occupation. In today's world of
work the term 'career' is seen as a continuous process of learning and
development. Contributions to a career can include:
 Work experience
 Community involvement
 Employment
 Life roles
 Enterprise activities
 Cultural activities
Professional Electronics Institute Inc. – Iloilo City - 5 -
Computer Hardware Servicing NC II Prepared by: O.C. Cabillos
 Training
 Education
 Interests
 Sport
 Volunteer work.
Practicing career professionalism depends on the various
institutions which you are in. Different organizations implement
different style of code and conduct for their employees. It does not
mean however, that finishing a course in college will classify you as a
holistic professional.
Upon entry to an institution, try to put the following in your
mind:
1. Know their code of ethics and conducts for professionals.
2. A background of their SOPs (standard operating
procedures) is also a good start to have a better glimpse of
the company.
3. Know the company’s policies, operations, and the followed
procedures and standards.
4. Don’t forget the fundamental rights at work including
gender sensitivity.
5. Personal hygiene also matters most in some companies.
Don’t take this for granted.
6. Last but not the least, don’t forget the golden rule. It states
“that one has a right to just treatment, and a responsibility
to ensure justice for others”.
A.4. Practice Occupational Health and Safety Procedures
Occupational health and safety (OHS) refers to the legislation,
policies, procedures and activities that aim to protect the health, safety
and welfare of all people at the workplace.
In the website of the Department of Labor and Employment,
the definition is: ―OSH Standards are mandatory rules and standards
set and enforced to eliminate or reduce occupational safety and health
hazards in the workplace.‖
Safety is an issue in every profession. PC technicians must be
aware of the potential hazards to personnel and equipment encountered
when working with lasers, high-voltage equipment, and moving parts.
They must also be aware of the potential causes and damaging effects
of electrostatic discharge (ESD) so that they can prevent its
occurrence. Many of the materials used in the construction of
computer-related equipment can be ecologically harmful. Also, many
of the products used to service computer equipment can have an
adverse effect on the environment. Therefore, the technician should be
aware of requirements associated with the disposal of this equipment
Professional Electronics Institute Inc. – Iloilo City - 6 -
Computer Hardware Servicing NC II Prepared by: O.C. Cabillos
and these materials.
What is the purpose of OSH Standards?
OSH Standards aim to provide at least the minimum
acceptable degree of protection that must be afforded to every worker
in relation to the working conditions and dangers of injury, sickness or
death that may arise by reason of his or her occupation. The provision
of OSH Standards by the State is an exercise of the police power, with
the intention of promoting the welfare and well-being of workers.
What are covered by the General OSH Standards?
All establishments, workplaces and other undertakings are
covered, including agricultural enterprises whether operating for profit
or not, except:
 Residential places exclusively devoted to dwelling purposes;
 Those directly engaged in land, sea and air transportation,
except their dry dockers, garages, hangers and maintenance,
and repair shops and offices;
 The activities of a lessee regarding the safety of the mining
claim or lease, including mines safety, mineral conservation
and pollution in establishments or work places falling under
mining industry.
What are the duties and responsibilities of the employers and the
employees in relation to enforcement and compliance with OSH
Standards in the workplace?
Duties of the employers
 Adopt administrative policies on safety in accordance with the
provisions of the Standards;
 Report to the Regional Director or his/her duly authorized
representative the policies adopted and the safety organization
established;
 Submit report to the Regional Director or his/her duly
authorized representative once in every three months on the
safety performance, safety committee meetings and its
recommendations and measures taken to implement the
recommendation;
 Act on recommended safety measures;
 Provide access to appropriate authorities.
Duties of the employees
Professional Electronics Institute Inc. – Iloilo City - 7 -
Computer Hardware Servicing NC II Prepared by: O.C. Cabillos
 Follow safety policies;
 Report unsafe conditions and practices to the Supervisor;
 Serve as member of the Health and Safety Committee;
 Cooperate with Health and Safety Committee
As the number of computers increases in the companies here in the
Philippines, the demand for a high skilled technical people also increases.
With a properly trained technician, owners of these institutions are assured of
a safe working technical environment.
Below is a list of common things for the technical people to remember
when dealing with electronic equipments like computers.
1. Eating and drinking is not allowed on the electronic workplace.
2. Always read any safety warnings that pertain to your equipment.
3. Make sure the laboratory or the place where you are fixing
electronic equipments is well protected with circuit breakers.
4. A fire extinguisher (class C – CO2) is also a must in every
computer laboratory for use in case of fire
5. If possible, minimize daisy-chaining connections with just one
outlet to prevent overload.
6. Be sure any system you are working on is completely unplugged
from the wall outlet.
7. When working with electronic equipments especially computer
units, make sure you prevent damage from electrostatic discharge
(ESD) by using an anti-static wrist strap. Without this device,
ground yourself first by touching the casing of the computer unit
before touching any electronic components inside the system unit.
8. The use of an automatic voltage regulator (AVR) or an
uninterruptible power supply (UPS) is also an advantage as these
equipments help you stay away from danger of unsafe power
fluctuations.
9. Know how to organize and run cables in a safe manner.
10. When dealing with emergencies on electronic components, make
sure to immediately shut down the power of the device to prevent
fire.
11. Finally, use your senses. Whenever a problem arises, you have
your senses to dictate whether something wrong is happening or
not. The most important thing is, “your common sense”.
Hereunder are the hand and power tools safety measures:
1. Know the precise purpose for each tool in your toolbox, and use it only for
the specific task it was designed to do.
2. Never use any hand tool or power tool unless you are trained to do so.
3. Inspect tools before each use, replace or repair tools if work or damaged.
4. Never test a cutting edge with your fingers, instead test it on a scrap
material.
Professional Electronics Institute Inc. – Iloilo City - 8 -
Computer Hardware Servicing NC II Prepared by: O.C. Cabillos
5. Select the right size of tool for the job, don’t use cheaters. A cheater is a tool
that will do the job, but is the wrong tool for the job to be performed.
6. Carry tools correctly, never place sharp or pointed tools in your pocket.
7. When carrying tools by hand, point cutting edges away from you and towards
the ground.
8. Wear personal protective equipment, such as safety goggles, face shields, and
gloves as required.
9. When working with any tool, make sure to follow the manufacturer’s
recommended directions.
10. Be sure to wear clothing that doesn’t hang loosely or dangle.
Professional Electronics Institute Inc. – Iloilo City - 9 -
Computer Hardware Servicing NC II Prepared by: O.C. Cabillos
B. COMMON COMPETENCIES
B.1. Apply Quality Standards
Quality - an inherent or distinguishing characteristic; a property.
Standards - an acknowledged measure of comparison for quantitative
or qualitative value; a criterion.
Applying quality standards means one thing, to make sure that
everything follows a specific, acceptable output recognized by a specific
industry or institution.
As a technical person, parts of your tasks are the following:
1. Checking of a quality hardware/software.
Newly acquired hardware should be check against their
documentation. Check for accurate specifications as indicated in the
warranty card/sticker. Make sure they all work based on the accepted
specifications of your company. Note all discrepancies and report
immediately to your immediate supervisor. Make an incident report if
necessary. Do the same with your software.
2. Check for a stable supply of power.
A stable supply of power ensures quality of work. During
troubleshooting, diagnosis and repair is implemented faster with a
steady supply of power. Otherwise, it may lead to more trouble and
danger to the worst.
3. Check for tools and equipments availability.
Correct tools and equipments used in the laboratory when
diagnosing computers enable proper identification of faults. Not only
you make sure that you perform your work with superior quality but
also it enables you to stay out of danger.
4. Follow the prescribed OHS procedures of your company.
By following the prescribed OHS procedures, you make sure
that everyone is away from danger, making sure each personnel
perform his work with quality and quantity at the same time.
5. Don’t forget your Personal Protective Equipments (PPE)
An ounce of prevention is better than a pound of cure. Always
remember this golden rule. Provide yourself with safety gears that
Professional Electronics Institute Inc. – Iloilo City - 10 -
Computer Hardware Servicing NC II Prepared by: O.C. Cabillos
make computing and troubleshooting at the same time, safer. By
maintaining this habit in your workplace, you are sure of a safe
working environment and an accident-free laboratory.
B.2. Perform Computer Operations
Before performing successful computer operations, one must be able
to identify the basic components of the computer’s hardware and software.
A basic computer system has the following hardware and software
components:
1. System Unit – the main component of your computer hardware. Most
non-technical people refer to this thing as the ―cpu‖ but actually it’s not.
It’s actually a motherboard with the central processing unit chip (cpu)
inside, together with the other peripherals enclosed in a metallic casing.
This casing houses the most important circuitry of your computer
hardware system including the buttons and switches for turning its
power.
2. Keyboard - the most familiar computer input device, the keyboard is
used to introduce characters and commands into the system.
3. Mouse—an input device used with graphical user interfaces to point to,
select, or activate images on the video monitor. By moving the mouse
along a surface, the user can cause a cursor on the display to move in a
corresponding manner.
Professional Electronics Institute Inc. – Iloilo City - 11 -
Computer Hardware Servicing NC II Prepared by: O.C. Cabillos
4. Video display—a visual output device that displays characters and
graphics on a screen. Video displays are sometimes referred as computer
monitor, computer screen, display terminal or crt.
5. Printer - a hard copy output device that applies data to paper. Normally,
methods of placing information on a page include dot-matrix printer, inkjet
printer, or laser printer.
Professional Electronics Institute Inc. – Iloilo City - 12 -
Computer Hardware Servicing NC II Prepared by: O.C. Cabillos
6. Speakers—Audio output devices used to deliver voice, music, and coded
messages.
7. Desktop - It is the background for all programs and contains the
commands needed for accessing those programs. Desktops vary from one
operating system (OS) to another, and even vary somewhat from version to
version of a particular OS. Whatever type of OS you use, it is very
important to learn how to use the desktop correctly, since it is the base for
all computer operations.
8. The Start button - In Windows XP, the 'start' button is used to access
programs and support documentation. It also has links for the most
commonly used folders, 'my computer' and 'my network places'.
Professional Electronics Institute Inc. – Iloilo City - 13 -
Computer Hardware Servicing NC II Prepared by: O.C. Cabillos
9. Internet Explorer – is an example of a browser like Mozilla Firefox. A
'browser' is simply a piece of software that lets you explore the internet. In
Windows XP, there are several ways to open IE (Internet Explorer). The
easiest is to use the IE icon (the blue lower case letter 'e') in the QL (Quick
Launch) toolbar. If you have not activated the QL toolbar, you can launch
IE from the start menu: START >> INTERNET EXPLORER. If there is
an IE icon on the desktop, you can use either the 'show desktop' icon in the
QL toolbar or you can right-click on a clear area of the taskbar and select
'show the desktop' to allow access to the desktop. If you don't have an IE
icon on the desktop and you want one there. Go to START >> ALL
PROGRAMS >> locate Internet Explorer in the program list >> RIGHT-
click on INTERNET EXPLORER and select SEND TO >> DESKTOP.
Internet
Explorer
Mozilla
Firefox
Professional Electronics Institute Inc. – Iloilo City - 14 -
Computer Hardware Servicing NC II Prepared by: O.C. Cabillos
10. Microsoft Word - is a word processor/text editor. Other similar programs
are Windows' Notepad and Windows' Word Pad. Word is by far the most
powerful of the three. When a user wants to type something and
manipulate the text within the document, this software is one of the best
choices. Below is an example of a Microsoft Word screen.
11. Microsoft Excel - is a spreadsheet programs that is primarily used for
calculation and analysis. It is a very powerful tool. It allows you to
perform numerous calculations in a short period of time.
Professional Electronics Institute Inc. – Iloilo City - 15 -
Computer Hardware Servicing NC II Prepared by: O.C. Cabillos
12. Windows Explorer - is the file manager application for the Windows
operating system. It can be accessed in a number of ways. If you get to it
through 'My Computer', it will start with a list of the drives on your
computer and will look similar to the following image:
If you want to see the full hierarchical structure, look at the image
below. The 'My Documents' section at the top of the left pane is essentially a
shortcut to the 'my documents' folder shown in the expanded view of the
Professional Electronics Institute Inc. – Iloilo City - 16 -
Computer Hardware Servicing NC II Prepared by: O.C. Cabillos
folders below it. If you access Windows Explorer by going to START >>
ALL PROGRAMS >> ACCESSORIES >> WINDOWS EXPLORER, it
will look much like this image.
Professional Electronics Institute Inc. – Iloilo City - 17 -
Computer Hardware Servicing NC II Prepared by: O.C. Cabillos
C. CORE COMPETENCIES
C.1. Install Computer Systems and Networks
Before you install computer systems and networks, make sure you
have hand tools and equipments which you will use to accomplish
certain tasks.
Here are the list of common tools and equipments necessary for
computer and network installation, repair and maintenance:
1. Electrostatic discharge (ESD) protection kit. This includes a wrist
strap and mat and prevents static damage to the components on
which you are working. These kits consist of a wrist strap with a
ground wire and especially conductive mat with its own ground wire.
You also can get just the wrist strap or the antistatic mat separately.
In areas or times of the season when there is low humidity, static
charges are much more likely to build up as you move, increasing the
need for ESD protection.
2. Needle-nose pliers and hemostats (curved and straight). These are
great for gripping small items and jumpers, straightening bent pins,
and so on.
3. Electric screwdriver. Combined with hex, Phillips, standard, and
Torx bit sets, this tool really speeds up repetitive
disassembly/assembly.
Professional Electronics Institute Inc. – Iloilo City - 18 -
Computer Hardware Servicing NC II Prepared by: O.C. Cabillos
4. Flashlight. You should preferably use a high-tech LED unit which
enable you to see inside dark systems and are easy on batteries.
5. Wire cutter or stripper. This is useful for making or repairing
cables or wiring. For example, you'd need this (along with a
crimping tool) to make 10BASE-T Ethernet cables using UTP cable
and RJ-45 connectors.
6. Vise or clamp. This is used to install connectors on cables, crimp
cables to the shape you want, and hold parts during delicate
operations. This type of device is very useful for making cables or
for other delicate operations during which an extra set of hands to
hold something might be useful.
7. Metal file. This is used to smooth rough metal edges on cases and
chassis and to trim the face-plates on disk drives for a perfect fit.
Professional Electronics Institute Inc. – Iloilo City - 19 -
Computer Hardware Servicing NC II Prepared by: O.C. Cabillos
8. Markers, pens, and notepads. Use these for taking notes, marking
cables, and so on.
9. Windows 98/98SE or Me startup floppy. These disks have DOS
7.1 or 8.0 and real-mode CD ROM/DVD drivers, which can be used
to boot, test the system and possibly load other software.
10. Windows 2000/XP original (bootable) CD. This can be used to
boot test the system from a CD-ROM/DVD drive, attempt system
recovery, OS installation, or to run other software. Microsoft also has
a downloadable set of floppy disks (six disks for Windows XP)
available at support.microsoft.com; however, most systems capable
of running Windows 2000 or XP should be able to boot from the CD.
11. Diagnostics software. This commercial, shareware, or freeware
software can be used for PC hardware verification and testing.
12. Power on self test (POST) card such as the Post Probe. This is used
for displaying POST diagnostics codes on systems with fatal errors.
Professional Electronics Institute Inc. – Iloilo City - 20 -
Computer Hardware Servicing NC II Prepared by: O.C. Cabillos
13. Nylon cable-ties. These are used to help in routing and securing
cables; neatly routed cables help to improve airflow in the system.
14. Digital pocket multi-meter. This is used for checking power supply
voltages, connectors, and cables for continuity. A special type of
tester called Network/LAN tester is used to check cable continuity
in a Local Area Network.
15. Cleaning swabs, canned air (dust blower), and contact cleaner
chemicals. These are used for cleaning, lubricating, and enhancing
contacts on circuit boards and cable connections.
16. Data transfer cables and adapters. These are used for quickly
connecting two systems and transferring data from one system to
another. This includes serial and parallel cables (often called Laplink,
Interlink, or Direct Cable Connect cables); Ethernet crossover cables;
Professional Electronics Institute Inc. – Iloilo City - 21 -
Computer Hardware Servicing NC II Prepared by: O.C. Cabillos
as well as more specialized USB-to-Ethernet, USB-to-USB, or USB-
to-parallel adapters.
17. 2 1/2" ATA drive cables and adapters. These are used for
connecting 2 1/2" ATA drives to laptop or desktop systems for
transferring or recovering data. This includes 44-pin (2 1/2") ATA-
to-40-pin (3 1/2") ATA ribbon cable/power adapters, 44-pin ATA-to-
USB/FireWire adapters, and 2 1/2" USB/FireWire external drive
enclosures.
18. External mouse, keyboard, and keyboard/mouse PS/2 Y adapter.
These are useful for operating a system in which the existing
keyboard or pointing device is defective or difficult to use. The Y
adapter is required on most laptops to use an external PS/2 keyboard
alone or a PS/2 keyboard and mouse together.
Professional Electronics Institute Inc. – Iloilo City - 22 -
Computer Hardware Servicing NC II Prepared by: O.C. Cabillos
19. USB powered hub, USB/FireWire cable adapter. This is useful for
connecting external USB devices, especially USB keyboards, mice,
and external drives. The cable adapters and gender changers are
recommended for connecting different types of USB and FireWire
devices.
20. Spare screws, jumpers, standoffs, and so on. These are used in case
some go missing or are lost from the system you are working on.
21. Spare CR-2032 lithium coin cell batteries. These are used as the
CMOS RAM batteries in most systems, so it is a good idea to have a
replacement or two on hand. Although a number of CR20xx battery
types are available, most systems use the CR2032.
Installing computer systems and networks require two major
components: the computer and the network peripherals. Whether
you are going to purchase an assembled computer with all the
peripherals or assemble it on your own, it is important to take note of
the following components. The more you know them and how they
work, the better is your chance of having a nearly perfect personal
computer when it comes to performance and durability.
The components of building a typical personal computer are as
follows:
Professional Electronics Institute Inc. – Iloilo City - 23 -
Computer Hardware Servicing NC II Prepared by: O.C. Cabillos
1. Casing and power supply
2. Motherboard
3. Processor with heat-sink and fan
4. Memory
5. Video Card and display
6. Keyboard and Mouse
7. Optical Drive (CD/DVD)
8. Floppy drive (optional)
9. Modem (optional)
10. Sound Card & Speaker (optional)
11. Cables
12. Other Hardware (nuts, bolts, stand-offs, braces)
13. Operating System
14. Application Software
For the networking side, you need:
1. Network Interface Card (NIC/LAN Card)
2. RJ-45 Connectors
3. UTP-Category 5 (the most common)
4. Hub/Switch (Switch is recommended)
5. Router (Wireless for WI-FI, optional)
6. Crimping Tool
7. Network/LAN Tester
These are the basic hardware and software for you to be able to
have a typical personal computer with software. Also, typical needs
for a computer to be connected to the local area network are being
enumerated for your convenience. Optional components need not to
be present for the typical computer to work.
A. Casing and the Power Supply – most casing and power
supply are sold as unit although vendors may sell them
separately. You can choose from among the many designs
and styles of your liking. Just keep something in mind, to buy
only those that follow the standard form factors and wattage
rating should match the demands of your hardware. The
newer your hardware with most components, the higher the
power supply wattage is recommended.
The most popular form factors of the casing are:
Professional Electronics Institute Inc. – Iloilo City - 24 -
Computer Hardware Servicing NC II Prepared by: O.C. Cabillos
 Full tower
 Mid or mini- tower
 Desktop
 Low-profile (also called Slimline)
Don’t forget that your choice of the casing should always
match the form factor of the motherboard. Make sure you
know exactly the form factor of the motherboard.
B. Processor – both Intel and AMD sell
their processors in two ways: boxed or
OEM. These two ways of selling
processors may have the same
specifications, but may vary in some
aspect like warranties, packaging and
other supplemental components. If you
want more information on the
difference between the two, ask your vendor about it.
The motherboards you consider to buy should have one of the
following sockets or slots:
 Socket 1366 – supports the new Intel I7 Processors
 Socket 775 - supports the third-generation Intel Pentium
4 processors, including the newer Pentium 4 EE
(Extreme Edition), Pentium D, and Pentium 4 E.
 Socket 939 - supports the second-generation Athlon 64
FX processors, including the newer Athlon 64 X2.
 Socket 754 - supports the Athlon 64 processors
The following socket types belong to the older Pentium 4. If
you decide to purchase them, you will have a limited upgrade
option for your processor.
 Socket 478. Supports the second- and third-generation
Intel Pentium 4 and compatible Celeron processors
 Socket A (462). Supports the AMD Athlon, Athlon XP,
and Duron processors
 Socket 370 (also called PGA370). Supports the PGA
versions of the Intel Pentium III and compatible Celeron
processors
Professional Electronics Institute Inc. – Iloilo City - 25 -
Computer Hardware Servicing NC II Prepared by: O.C. Cabillos
Depending on the type of motherboard you select, there are
cases where jumpers are being used to give the proper voltage
power to the processor. Read the motherboard manual
carefully. Unlike in newer motherboards, were power to the
processor is being automatically regulated by a chip called
voltage regulator module (VRM), the older processor require
jumpers or DIP switch settings. If you fail to set the correct
voltage to the processor using the jumpers, you might end
damaging the processor as well as the motherboard.
C. Motherboards – is the main board or the system board of
your personal computer. It houses most of the ic’s and chips
of the computer including slots.
Several compatible form factors are used for motherboards.
The form factor refers to the physical dimensions and size of
the board and dictates into which type of case the board will fit.
The types of compatible industry-standard motherboard form
factors generally available for system builders are as follows:
Modern Form Factors are:
* BTX * ATX *
MicroATX
* FlexATX * NLX * MiniITX
D. Memory - is installed in the form of dual inline memory
modules (DIMMs). Three physical types of main memory
modules are commonly used in PC systems today, with several
variations of each. The main types are as follows:p
 168-pin SDRAM DIMMs
 184-pin DDR DIMMs
 240-pin DDR DIMMs
The 168-pin SDRAM DIMMs are found only in older or lower-
end systems today. DIMMs have become popular because they
are 64 bits wide and can be used as a single bank on a Pentium
or higher-class processor that has a 64-bit external data bus.
Professional Electronics Institute Inc. – Iloilo City - 26 -
Computer Hardware Servicing NC II Prepared by: O.C. Cabillos
Double data rate (DDR) SDRAM memory is a newer variation
on SDRAM in which data is transferred twice as quickly, and it
is the most common type of memory used in recent systems.
DDR2 DIMMs came out in new systems during 2004 and are
fast becoming the most common type of memory in new
systems.
Current systems using a 64-bit CPU bus require a single DIMM
(64 bits wide) to make a single bank. Systems using DDR or
DDR2 DIMMs can also use dual-channel memory, in which
pairs of matching DIMMs enable double the memory
throughput.
E. I/O Ports – all motherboard has several I/O ports for the
various needs of the users. If in case you encountered a
motherboard without your desired port, it is usually provided as
an external device which is plug-in on the vacant slot of the
motherboard (ISA,PCI,AGP, PCI-E). Newer systems usually
has the following ports embedded on them:
 PS/2 Keyboard connector (mini-DIN type)
 PS/2 Mouse port (mini-DIN type)
 One or two serial ports
 Parallel port
 Four or more USB ports
 Two or more FireWire ports
 One or two analog VGA or DVI video connectors
(integrated video)
 RJ-45 port for 10/100 or 10/100/1000 Ethernet
 Audio connectors (speakers, microphone, and so on)
 Two or more serial ATA ports
There are modern motherboards that lack the legacy ports
(serial, parallel, keyboard and mouse) because they rely on
USB for connections.
The choice for motherboard still depends on the need and the
budget of the user. Usually high-end and expensive
motherboards do not have a built-in video and sound card.
Disadvantages of boards with built-in ports include no choice
of the features of the specific port (vga, LAN, sound), and
Professional Electronics Institute Inc. – Iloilo City - 27 -
Computer Hardware Servicing NC II Prepared by: O.C. Cabillos
when an onboard item is damage, sometimes, it also include
other parts of the motherboard.
F. Hard Disk Drives – sometimes referred as fixed disk or
―Winchester drive‖ (by IBM), is now considered a requirement
of today’s pc. At least a minimum of 80 Gb of storage space is
needed in today’s modern pc. The need of a large amount of
hard disk capacity depends on the user’s needs. Today, hard
disk ranges from 40 Gb (considered obsolete) to 1.5 Tb. Hard
disk may come as internal or external in form. They may be
using the older IDE/EIDE interface (PATA) or the more
common in today’s system which is the SATA.
Most systems have USB 2.0,
and more and more systems
have IEEE 1394 (FireWire)
built in to the motherboard or
added as PCI expansion
cards. Although FireWire and
USB 2.0 based drives have
performance similar to ATA
drives and can be moved
from system to system, they
are not recommended as
primary drives. However,
they can be used for
Professional Electronics Institute Inc. – Iloilo City - 28 -
Computer Hardware Servicing NC II Prepared by: O.C. Cabillos
additional portable storage or system backup.
Several brands of high-quality hard disk drives are available
from which to choose, and most offer similar performance
within their price and capacity categories. In fact, you might
notice that the capacities and specifications of the various
PATA and SATA drives certain manufacturers offer are
remarkably similar. This is because a single drive assembly is
manufactured for use with both interfaces. Popular hard disk
manufacturers include Seagate, Maxtor, Western Digital,
Toshiba, Quantum and others.
G. Video Card and Display – a system will be incomplete
without a working video card and a display (monitor). In
today’s system, the video card is already on-board or built-in.
If there is no VGA connecter at the motherboard, you don’t
have a choice but to buy a video card. Make sure the video
card will match the bus type of your motherboard (PCI, AGP,
PCI-E). With the video card comes its partner, the computer
monitor or display. Long ago, the most common is the CRT
(cathode ray tube), but nowadays, LCD (liquefied crystal
display) prices drop so much that many people can afford such
high quality display. Still your choice is yours. LCD is priced
higher than its CRT counterpart. But if you want high quality
display without worrying about the price, you may purchase
LCD.
PCI
Professional Electronics Institute Inc. – Iloilo City - 29 -
Computer Hardware Servicing NC II Prepared by: O.C. Cabillos
H. Network Interface Card (NIC) – otherwise known as the
LAN card or simply network card is a hardware that facilitates
communication between a computer and the networking
medium. In modern PCs, it is usually in the form of RJ-45 port
with a speed between 10-1000 mbps. If there is no on-board
RJ-45 connector, you have to purchase a separate LAN card.
Common brands are 3COM, Planet, LinkSys, DLink and Cisco.
LAN cards that facilitate connection in the network without
using cables are called WLAN Card or the wireless LAN card.
I. Hub/Switch – a device found at the center of a bus topology.
It is used to connect all the nodes within the network. There
are generally two types of hub, an active and a passive. An
active hub is a type of hub that regenerates the signal as it
enters the device and broadcast it, while a passive hub just pass
the signal receive to its destination node. Switch is preferred as
compared to a hub as it allows faster speed of communication
between nodes due to its internal design circuitry.
AGP
PCI
Express
Professional Electronics Institute Inc. – Iloilo City - 30 -
Computer Hardware Servicing NC II Prepared by: O.C. Cabillos
J. Router – this device connects networks with different physical
media and translates between different network architecture
such as token ring and Ethernet. A wireless router on the other
hand, has the functionality of the ordinary router, plus it allows
wireless devices to be connected through the network usually
following the WI-FI standards.
K. UTP Category 5 and RJ-45 – unshielded twisted pair category
5 is the most common networking cable being used in most
companies. Aside from its ease of installation, its less
expensive and is easier to maintain. At the end of both cables,
the connector being used is the RJ-45.
Professional Electronics Institute Inc. – Iloilo City - 31 -
Computer Hardware Servicing NC II Prepared by: O.C. Cabillos
L. Software – may be classified into two: system and application.
Examples of a system software is the operating system like
Microsoft Windows (95, 98, ME, 2K, XP, Vista, Version 7) or
the open-source versions like the Linux (Ubuntu, Red Hat,
Debian). Examples of an application system are word
processor like Microsoft Word, spreadsheet like Microsoft
Excel, presentation software like Microsoft Powerpoint and
many others.
Professional Electronics Institute Inc. – Iloilo City - 32 -
Computer Hardware Servicing NC II Prepared by: O.C. Cabillos
Now, with all the hardware and software requirements ready
we are now ready to assemble our personal computer. Make sure to
check all the necessary requirements for both the software and
hardware materials.
1. Assembly preparation
You have to take note of some important tools to use in pc
assembly. You will have to use the following: a 1/4" nut driver or
Phillips-head screwdriver for the external screws that hold the
cover in place and a 3/16" nut driver or Phillips-head screwdriver
for all the other screws. Needle-nose pliers can also help in
removing motherboard standoffs, jumpers, and stubborn cable
connectors. Because of the current market standardization, be
aware of the size of the screw as well as the tools you are going to
use for your assembly and disassembly process. Lay all the
hardware needed in your assembly area like the one shown below:
Professional Electronics Institute Inc. – Iloilo City - 33 -
Computer Hardware Servicing NC II Prepared by: O.C. Cabillos
After the peripherals and other components of a pc are
assembled, your work should resemble the one shown below.
Other materials you need after you assemble the hardware are
software related. The first software you need is the operating
system. Whether you will be using a window-based operating
system or a Linux-based, both come in a bootable cd form. In an
older Windows-98, you have an option of using a bootable floppy
disk to start your work. Make sure you know a lot of dos-based
commands.
2. Record Physical configuration
While you are doing the assembly, make sure you record the
entire physical configuration, including the jumper and dip switch
settings, cable orientation and placement, ground wire and even
adapter locations. You can use a small notebook for this need or
better create a simple database or worksheet for this information.
During the CHS NC2 assessment, one task is to list down all
hardware components you have together with a description of each.
A sample listing is shown below:
Professional Electronics Institute Inc. – Iloilo City - 34 -
Computer Hardware Servicing NC II Prepared by: O.C. Cabillos
The above table is just a representation of the actual
inventory you are going to make. Other entries may vary
depending on the actual hardware you have. The most important
thing is, you know how to identify and describe each of the
hardware you are dealing with.
3. Install the Motherboard
Inspect the motherboard. If it is new, check the contents of
the package as indicated. It should contain the motherboard itself,
signal cables, I/O shield, stand-offs, manual, and the cd-driver
installer. If it is a second-hand motherboard, make sure you do a
test on the hardware on your vendor and see to it that it is working
before purchasing it.
a. Prepare the motherboard. Take it out of its package
and out of the anti-static plastic or bag and place it
above the plastic. Make sure you are working on a flat
surface otherwise you might damage the motherboard
when applying pressure when it’s laid off on an uneven
surface.
b. Install the processor first. Try to locate pin 1 on the
processor. It is usually indicated by a corner on the
chip marked by a dot or bevel. Be sure the pins on the
processor are straight and not bent. If it is bent, use
small needle-nose pliers to straighten the bent pins but
do it carefully as you might end breaking the pin
causing damage to the chip. On processors using LGA-
775 sockets, the precautionary measures should apply
to the socket as the processor has no pins to be bent.
Usually, the processor will not fit on the socket if it is
in the wrong orientation, so don’t force the processor if
Hardware Serial Number Description/Remarks
1. Main board 12345URKH-943 Compaq 0648H
2. Processor 5787364784EUIL Intel Pentium III 1.00 Ghz
3. Memory SDRAM – 256 MB
4. Video Card NVIDIA G-Force2 MX/MX
400 64 Mb
5. Hard Disk ST1234568 Seagate ST9870 80Mb
PATA
6. Power Supply ATX 500-Watts SZ-500w
6. DVD Rom LG-123HJ Dual Layer
DVD
7. Floppy Drive Panasonic, 1.44Mb, 3.5‖
8. Keyboard PS/2 101/102 Keyboard
9. Mouse Genius USB Optical Mouse
Professional Electronics Institute Inc. – Iloilo City - 35 -
Computer Hardware Servicing NC II Prepared by: O.C. Cabillos
you feel resistance when installing it. Insert the CPU
into the ZIF socket by lifting the release lever until it is
vertical. Then, align the pins on the processor with the
holes in the socket and drop it down into place. When
the processor is fully seated in the socket, push the
locking lever on the socket down until it latches to
secure the processor
c. Attach the heatsink. Most heatsinks clip to the socket
with one or more retainer clips.. Be careful when
attaching the clip to the socket; you don't want it to
scrape against the motherboard, which can damage
circuit traces or components. You also need to keep the
heatsink steady on the chip while attaching the clips, so
do not move, tilt, or slide the heatsink while you attach
it. Most heatsinks have a pre-applied thermal pad;
otherwise, you will need to put a dab of heatsink
thermal transfer compound (normally a white- or silver-
colored grease) on the CPU before installing the
heatsink. This prevents any air gaps and enables the
heatsink to work more efficiently. If the CPU has an
active heatsink (with a fan), plug the fan power
connector into one of the fan connectors supplied on
the motherboard. Optionally, some heatsinks use a disk
drive power connector for fan power.
Professional Electronics Institute Inc. – Iloilo City - 36 -
Computer Hardware Servicing NC II Prepared by: O.C. Cabillos
In newer systems, heatsinks do not require a
clip. Instead, they are using screw at four areas. You
have to use a flat screw-driver to twist the screw
according to the direction of the arrow of the screw to
tighten it.
d. Configure the motherboard jumpers. In older systems, you
have to configure the motherboard jumpers or dip switches so
that proper voltage will be provided to the microprocessor. If
this is the case, consult the motherboard manual on how to do
this. In newer systems however, the automatic voltage
regulator module chip together with the BIOS do this
automatically. Just take a look at the manual for more
information and safe installation.
4. Installing Memory Module
Installing the memory module is one of the most important
things to consider as there were already many burned memory
chips in the past due to improper installation. Your computer
system will not be complete without memory modules. The
common memory modules are in the form of DDR and DDR2
DIMMS. On the other hand, DDR3 is used on the latest Intel
Processor – the i7. Not all types of memory can be installed in the
same manner. Consult your motherboard for the proper procedures
on how to do it. Just remember that memory modules should only
Professional Electronics Institute Inc. – Iloilo City - 37 -
Computer Hardware Servicing NC II Prepared by: O.C. Cabillos
be installed in one way that is following the proper keyed position
with the notch on the slot as shown below. Otherwise, forcing it to
install in the wrong orientation will result in damaging the memory
and sometimes the motherboard.
Be careful not to damage the connector. If you damage the
motherboard memory connector, you could be facing an expensive
repair. Never force the module; it should come out easily. If it
doesn't, you are doing something wrong.
5. Mounting the new motherboard in the case
The motherboard attaches to the case with standoffs.
Different casing offers different standoffs. The purpose of these
standoffs is to leave a space and serve as insulator between the
motherboard and the casing itself. There are plastic and other types
of standoffs in the market today.
Follow the following procedures when installing the
motherboard to the case:
a. Find the holes in the new motherboard for the
metal spacers and plastic standoffs. You should
use metal spacers wherever there is a ring of
solder around the hole. Use plastic standoffs
where there is no ring of solder
Professional Electronics Institute Inc. – Iloilo City - 38 -
Computer Hardware Servicing NC II Prepared by: O.C. Cabillos
b. Screw any metal spacers into the new case in
the proper positions to align with the screw
holes in the motherboard
,
c. Most motherboards today attach directly to the
chassis or to a removable motherboard tray with
screws that thread into brass standoffs attached
to the chassis or tray. Below are three types of
Professional Electronics Institute Inc. – Iloilo City - 39 -
Computer Hardware Servicing NC II Prepared by: O.C. Cabillos
standoffs, including two brass types and one
plastic. One screws directly to the chassis or
tray, whereas the others attach to the
motherboard and then slide into notches in the
case or tray.
d. Install the I/O shield (if used) into the chassis
by snapping it into place
Professional Electronics Institute Inc. – Iloilo City - 40 -
Computer Hardware Servicing NC II Prepared by: O.C. Cabillos
e. Install the new motherboard into the case or
motherboard tray. Either screw it directly to the
standoffs or slide the standoffs already attached
to the board by sliding the entire board into
position. Be sure you align the I/O shield with
the case or the ports on the back of the board
with the I/O shield already in the case. Often,
you will have to set the board into the case and
slide it sideways to engage the standoffs into
the slots in the case. When the board is in the
proper position, the screw holes in the board
should be aligned with all the metal spacers or
screw holes in the case
.
f. Take the screws and any plastic washers that
were supplied with the new motherboard and
screw the board into the case
Professional Electronics Institute Inc. – Iloilo City - 41 -
Computer Hardware Servicing NC II Prepared by: O.C. Cabillos
6. Mounting the Power Supply
The power supply is very easy to install, and it usually
attaches to the chassis with four screws. There are many ways on
how to slide down the power supply into the casing. Use the best
way possible without damaging the components of the
motherboard. However, there are cases that mounting the power
supply first is easier than having it next after the motherboard.
Please always remember that the power supply is very
dangerous as it is connected to the main outlet. It bears a large
amount of power. Be always careful when dealing with this type
of hardware as improper handling may result in an accident or
further damage to you and other properties.
ATX-style
motherboards have a
single power connector
that can go on only one
way and an optional
secondary connector
that is also keyed. ATX
supplies can also be
used in a standard BTX
case (but not
Pico/Micro). Baby-AT
and other old-style
board designs such as LPX usually have two separate six-wire
power connectors from the power supply to the board, which might
not be keyed and therefore might be interchangeable. Even though
you might be able to insert them several ways, only one way is
correct! These power leads usually are labeled P8 and P9 in most
systems. The order in which you connect them to the board is
Professional Electronics Institute Inc. – Iloilo City - 42 -
Computer Hardware Servicing NC II Prepared by: O.C. Cabillos
crucial; if you install them backward, you can damage the
motherboard when you power it up.
Connecting I/O and Other Cables to the Motherboard
Several connections must be made between a motherboard and the
case. These include LEDs for the hard disk and power, an internal
speaker connection, a reset button, and a power button. Most
modern motherboards also have several built-in I/O ports that have
to be connected. This includes dual IDE host adapters, a floppy
controller, and front-mounted USB or IEEE 1394 ports. Some
boards also include additional items such as built-in video, sound,
or SCSI adapters.
If the board is an ATX type, the connectors for all the external I/O
ports are already built in to the rear of the board. If you are using a
legacy Baby ATtype board, you might have to install cables and
brackets to run the serial, parallel, and other external I/O ports to
the rear of the case.
If your motherboard has onboard I/O (nearly all PCs today use
onboard I/O), use the following procedure to connect the cables:
1) Connect the floppy cable between the floppy drives and the
34-pin floppy controller connector on the motherboard.
2) Connect the IDE cables between the hard disk, IDE CD-
ROM, and 40-pin primary and secondary IDE connectors
on the motherboard. Typically, you will use the primary
IDE channel connector for hard disks only and the
Professional Electronics Institute Inc. – Iloilo City - 43 -
Computer Hardware Servicing NC II Prepared by: O.C. Cabillos
secondary IDE channel connector to attach an IDE CD-
ROM or other device, such as a tape drive. If you have a
Serial ATA hard disk and a Serial ATA host adapter on the
motherboard, connect the Serial ATA cable from the hard
disk to the host adapter connection on the motherboard.
3) On non-ATX boards, a 25-pin female cable port bracket is
used for the parallel port. Usually two serial ports exist: a 9-
pin and either another 9-pin or a 25-pin male connector
port. Align pin 1 on the serial and parallel port cables with
pin 1 on the motherboard connector, and then plug them in.
4) If the ports don't have card slot type brackets or if you need
all your expansion slots, the back of the case might have
port knockouts you can use instead. Find ones that fit the
ports, and push them out, removing the metal piece
covering the hole. Unscrew the hex nuts on each side of the
port connector, and position the connector in the hole.
Install the hex nuts back in through the case to hold the port
connector in place.
5) Most new motherboards also include a built-in mouse port.
If the connector for this port is not built in to the back of the
motherboard (typically next to the keyboard connector),
you probably have a card bracket type connector to install.
In that case, plug the cable into the motherboard mouse
connector, and then attach the external mouse connector
bracket to the case.
6) Attach the front-panel switch, LED, internal speaker wires,
and front-mounted ports such as USB and IEEE 1394 from
the case front panel to the motherboard. If they are not
marked on the board, check where each one is on the
diagram in the motherboard manual.
Professional Electronics Institute Inc. – Iloilo City - 44 -
Computer Hardware Servicing NC II Prepared by: O.C. Cabillos
Professional Electronics Institute Inc. – Iloilo City - 45 -
Computer Hardware Servicing NC II Prepared by: O.C. Cabillos
Installing the Drives
Nowadays, there are many drives to consider when
assembling a new system. New system supports many types of
drives. At this point, we will cover the basic drives on a
standard personal computer which include an optical drive, a
hard drive, and an optional floppy drive.
Follow the procedures below to setup these standard devices:
1. Remove the drive bay plates (if needed). Simply bend
or knock the plate out of the way. Sometimes you have
to remove the plastic cover outside of the casing to
make sure that the metallic plates can be removed freely
out of its actual position.
2. To install a CD drive, simply slide the drive into the
chassis. Note that it is easier to connect the IDE cable to
the rear of the drive and make jumper selections before
mounting the drive. Note that some cases come with
rails that must be added to 5 1/4" wide drives, such as
an optical drive. In such cases, use the screws from step
3 for the drive rails.
3. After the drive is in the bay, line up the drive-mounting
screw holes on the drive with the holes in the case
chassis. Secure the drive with four screws, using the
ones that came with your case or the drive you are
installing. If the drive uses rails, the rails hold the drive
in place.
4. Connect the other end of the IDE cable to your
motherboard's IDE connector or to the back of another
IDE device if you are chaining drives.
5. If your system has a removable drive cage, for floppy
and hard disk drives, you should remove the cage.
Professional Electronics Institute Inc. – Iloilo City - 46 -
Computer Hardware Servicing NC II Prepared by: O.C. Cabillos
6. To install floppy and hard drives, slide your drives into
the drive cage and secure them with the screws that
came with your case or with the drive you are installing.
As with an optical drive, it's easier to connect the floppy
and IDE cables to the rear of the drives and make any
jumper selections prior to placing the drives or the drive
cage into the chassis.
7. If your system has a removable drive cage, slide the
drive cage back into the PC and secure it to the chassis
using the screws provided with your case.
Professional Electronics Institute Inc. – Iloilo City - 47 -
Computer Hardware Servicing NC II Prepared by: O.C. Cabillos
8. Connect the drive cables to the appropriate locations on
your motherboard.
Installing the New Video Card and Driver Software
Follow these steps to install a new video card into a system:
1. If necessary, remove the screw and slot cover behind
the expansion slot you want to use for the new video
card.
2. Slide the video card straight down into the slot where it
will be installed (typically an AGP or a PCI Express
slot).
3. Push the card down into the slot, using a front-to-back
rocking motion if necessary to get the edge connector to
slide into the slot.
4. Use either the screw you removed during removal of the
old card or the screw used in step 1 to fasten the card
into place.
5. Attach the video cable from the monitor to the proper
connector at the rear of the monitor. If the new card
uses a DVI-I connector and the monitor uses the
standard 15-pin VGA connector, use a DVI-to-VGA
adapter (usually provided with the video card or
available separately from stores that stock computer
parts). If you're building a dual-display system, be sure
to plug in your primary and secondary displays to the
appropriate connectors.
Note
If you are replacing an existing video card (or
switching from onboard video to an add-in video card), you
should remove the existing installed video driver before
powering down to install the new card. This helps prevent
the system from improperly identifying the new video card
and makes for a smoother upgrade. To do this, open the
Windows Device Manager, select the existing display
adapter, and select Remove or Uninstall. Do not reboot the
system if asked; instead, you can power down and remove
the existing video card.
Professional Electronics Institute Inc. – Iloilo City - 48 -
Computer Hardware Servicing NC II Prepared by: O.C. Cabillos
Installing Additional Expansion Cards
Expansion cards offer more power to your personal
computers. It may come in the form of a network card, video
card, sound card, fax/modem card, wireless network card or
any other cards you need. These cards are inserted on the bus
slots available in your pc. It may be an ISA (Industry Standard
Architecture), PCI (Peripheral Component Interconnect), AGP
(Accelerated/Advanced Graphics Port) or PCI-Express bus
type. For more details please see the user’s manual of both the
motherboard as well as the expansion card.
Follow the procedures enumerated below to install these cards:
1. Insert each card by holding it carefully by the edges, being
sure not to touch the chips and circuitry. Put the bottom-
edge finger connector into the appropriate open slot
(usually PCI or PCI Express). Firmly press down on the top
of the card, exerting even pressure, until it snaps into place.
2. Secure each card bracket with a screw.
3. Attach any internal cables you might have removed earlier
from the cards.
Professional Electronics Institute Inc. – Iloilo City - 49 -
Computer Hardware Servicing NC II Prepared by: O.C. Cabillos
Replacing the Cover and Connecting External Cables
You will have your system nearly assembled. Double-
check your work and make a visual inspection of what you
have done. It’s worth the effort of visually inspecting all the
things you’ve assembled. Do not close the casing as you might
discover later that you miss some or many things in the system.
Try to turn on the computer and observed if the POST (Power
On Self-Test) has been completed successfully. To wind up
your work, use the following procedures to complete the
assembly.
1. Slide the cover onto the case.
2. Before powering up the system, connect any external
cables. Most of the connectors are D-shaped and go in only
one way.
3. Plug the 15-pin monitor cable into the video card female
connector.
4. Attach the phone cord to the modem, if any.
5. Plug the round keyboard cable into the keyboard connector,
and plug the mouse into the mouse port or serial port (if you
are using a serial mouse). If you're using a USB keyboard
or mouse, plug it into any free USB port.
6. If you have any other external cabling, such as joystick or
audio jacks to a sound card, attach them now.
Running the Motherboard BIOS Setup Program (CMOS
Setup)
Professional Electronics Institute Inc. – Iloilo City - 50 -
Computer Hardware Servicing NC II Prepared by: O.C. Cabillos
One of the most important aspects of assembly is the
BIOS set-up program. As a technician, the first program you
should see after the assembly is the BIOS itself. You can see
here whether the hardware has been properly identified or not.
You may also want to check whether the system has a correct
date and time settings. To help you out, follow the procedures
below:
1. Power on the monitor first followed by the system unit.
Observe the operation via the screen and listen for any
beeps from the system speaker.
2. The system should automatically go through a power on
self test (POST) consisting of video BIOS checking, a
RAM test, and usually an installed component report. If a
fatal error occurs during the POST, you might not see
anything onscreen and the system might beep several times,
indicating a specific problem. Check the motherboard or
BIOS documentation to determine what the beep codes
mean.
3. If there are no fatal errors, you should see the POST display
onscreen. Depending on the type of motherboard BIOS,
such as Phoenix, AMI, Award, or others, you have to press
a key or series of keys to interrupt the normal boot
sequence and get to the Setup program screens that enable
you to enter important system information. Normally, the
system indicates via the onscreen display which key to
press to activate the BIOS Setup program during the POST,
but if not, check the motherboard manual for the key(s) to
press to enter the BIOS Setup. Common keys used to enter
BIOS Setup are F1, F2, F10, Esc, Ins, and Del.
4. After the Setup program is running, use the Setup program
menus to enter the current date and time, your hard drive
settings, floppy drive types, video cards, keyboard settings,
Professional Electronics Institute Inc. – Iloilo City - 51 -
Computer Hardware Servicing NC II Prepared by: O.C. Cabillos
and so on. The major vendors have standardized the
following keystrokes to enter the BIOS set-up of the
different manufacturers. Please find the list below and
determine which vendor is implemented on your
motherboard:
 AMI BIOS. Press Delete during POST.
 Phoenix BIOS (FirstBIOS Pro). Press F2 during
POST.
 Award BIOS (FirstBIOS). Press Delete or
Ctrl+Alt+Esc during POST.
 Microid Research (MR) BIOS. Press Esc during
POST.
If your system does not respond to any keystroke as
mentioned above, you might have a branded type of
personal computer that follow specific key configuration
during the start-up.
1. IBM Aptiva/Valuepoint or ThinkPad. Press F1
during POST or while powering on the system.
2. Toshiba notebook/laptop. Press Esc while powering
on the system; then press F1 when prompted.
3. Older Phoenix BIOS. Boot to a safe mode DOS
command prompt, and then press Ctrl+Alt+Esc or
Ctrl+Alt+S.
4. Compaq. Press F10 during POST.
5. After you have checked all the settings in the BIOS Setup,
follow the instructions onscreen or in the motherboard
manual to save the settings and exit the Setup menu. A
word of caution, before you make any changes in the BIOS,
makes sure you know what you are doing. Otherwise, you
will render the entire system unusable unless you will do a
major reprogram of your BIOS. Consult the BIOS manual
for more details. Usually this is included in your
motherboard manual.
Below is a typical BIOS Menu set-up.
Professional Electronics Institute Inc. – Iloilo City - 52 -
Computer Hardware Servicing NC II Prepared by: O.C. Cabillos
Typical BIOS Setup Menus
Setup Menu
Screen Description
Maintenance Specifies the processor speed and clears the setup passwords. This
menu is available only in Configure mode, set by a jumper on the
board.
Main Allocates resources for hardware components.
Advanced Specifies advanced features available through the chipset.
Security Specifies passwords and security features.
Power Specifies power management features.
Boot Specifies boot options and power supply controls.
Exit Saves or discards changes to the setup program options.
Settings based on the BIOS used in the Intel D875PBZ motherboard. Used by
permission of Intel Corporation.
Professional Electronics Institute Inc. – Iloilo City - 53 -
Computer Hardware Servicing NC II Prepared by: O.C. Cabillos
REVIEW OF THE BASICS
What is a computer network?
Computer network is an interconnection of computers and other electronic
devices with the main goal of sharing expensive peripherals. Also, it aims to share
information and other resources vital for communications.
Classification of computer networks
1. Local Area Network (LAN) – a collection of computers and other devices
located in a small geographical area.
2. Metropolitan Area Network (MAN) – a collection of LAN usually
occupying an area larger that of the LAN.
3. Wide Area Network (WAN) – a collection of LAN and MAN usually
spanning across the country and the globe.
Network Topologies
Network topology refers to the actual physical layout of the network and other
devices including the cable, the computers attached and other electronic devices.
1. Bus – a network topology in which the computers are connected to a common
cable called a backbone or bus to form a straight line.
Professional Electronics Institute Inc. – Iloilo City - 54 -
Computer Hardware Servicing NC II Prepared by: O.C. Cabillos
2. Star topology – a network topology in which computers connect through a
central connecting point usually a hub, switch or an access point.
3. Ring topology – a network topology consisting of computers connected in a
circle, forming a closed ring.
Professional Electronics Institute Inc. – Iloilo City - 55 -
Computer Hardware Servicing NC II Prepared by: O.C. Cabillos
Types of Connections
1. As to access to the network
a. Physical connection – this refers to the actual physical contact of the
network devices which include the cable, connectors, network card and
other network devices.
b. Logical connection – this refers to the access of network resources after
using a valid name and a valid password to gain access to the network.
2. As to role of the computer
a. Peer-to-peer – a type of networking in which each computer can be a
client to others computers and also act as a server.
b. Client-Server – a model for computing in which some computers (clients)
request services and other computers (servers) respond to request for
services. Applications are sometimes divided across the networks so that a
client-side component runs on the user’s machine and supplies request and
display services, and a server-side component runs on an application
server and handles data processing or other computation-intensive services
on the user’s behalf.
Professional Electronics Institute Inc. – Iloilo City - 56 -
Computer Hardware Servicing NC II Prepared by: O.C. Cabillos
Transmission Media
In communicating, there must be two sides involve for communication takes
place. Communication and transfer of information will happen only with a
transmission media. Transmission media enable computers to send and receive
messages but do not guarantee that the messages will be understood.
1. Copper – usually in the form of a cable like coaxial and twisted pair.
Twisted-pair cabling used in a LAN is similar to the cabling used to connect
your telephone to the wall outlet. Network coaxial cabling, on the other hand,
is similar to the cable used to connect your television set to the cable TV
outlet.
Classifications of Twisted Pair
The following are the cable types specified in ANSI/TIA/EIA 568-A:
 Category 1—Cat 1 cable was originally designed for voice telephony only,
but thanks to some new techniques, long-range Ethernet and DSL, operating at
10Mbps and even faster, can be deployed over Cat 1.
 Category 2—Cat 2 cable can accommodate up to 4Mbps and is associated
with token-ring LANs.
 Category 3—Cat 3 cable operates over a bandwidth of 16MHz on UTP and
supports up to 10Mbps over a range of 330 feet (100 m). Key LAN
applications include 10Mbps Ethernet and 4Mbps token-ring LANs.
 Category 4—Cat 4 cable operates over a bandwidth of 20MHz on UTP and
can carry up to 16Mbps over a range of 330 feet (100 m). The key LAN
application is 16Mbps token ring.
 Category 5—Cat 5 cable operates over a bandwidth of 100MHz on UTP and
can handle up to 100Mbps over a range of 330 feet (100m). Cat 5 cable is
typically used for Ethernet networks running at 10Mbps or 100Mbps. Key
LAN applications include 100BASE-TX, ATM, CDDI, and 1000BASE-T. It
is no longer supported, having been replaced by Cat 5e.
 Category 5e—Cat 5e (enhanced) operates over a bandwidth of 100MHz on
UTP, with a range of 330 feet (100 m). The key LAN application is
1000BASE-T. The Cat 5e standard is largely the same as Category 5, except
Professional Electronics Institute Inc. – Iloilo City - 57 -
Computer Hardware Servicing NC II Prepared by: O.C. Cabillos
that it is made to somewhat more stringent standards. Category 5e is
recommended for all new installations and was designed for transmission
speeds of up to 1Gbps (Gigabit Ethernet). Although Cat 5e can support
Gigabit Ethernet, it is not currently certified to do so.
 Category 6—Cat 6, specified under ANSI/TIA/EIA-568-B.2-1, operates over
a bandwidth of up to 400MHz and supports up to 1Gbps over a range of 330
feet (100 m). It is a cable standard for Gigabit Ethernet and other network
protocols that is backward compatible with the Cat 5/5e and Cat 3 cable
standards. Cat 6 features more stringent specifications for crosstalk and system
noise. Cat 6 is suitable for 10BASE-T/100BASE-TX and 1000BASE-T
(Gigabit Ethernet) connections.
 Category 7—Cat 7 is specified in the frequency range of 1MHz to 600MHz.
ISO/IEC11801:2002 Category 7/Class F is a cable standard for Ultra Fast
Ethernet and other interconnect technologies that can be made backward
compatible with traditional Cat 5 and Cat 6 Ethernet cable. Cat 7, which is
based on four twisted copper pairs, features even more stringent specifications
for crosstalk and system noise than Cat 6. To achieve this, shielding has been
added for individual wire pairs and the cable as a whole.
Advantages and Disadvantages of Twisted-Pair
Twisted-pair has several key advantages:
 High availability—More than 1 billion telephone subscriber lines based on
twisted-pair have been deployed, and because it's already in the ground, the
telcos will use it. Some say that the telcos are trapped in their copper cages;
rather than build an infrastructure truly designed for tomorrow's applications,
they hang on to protecting their existing investment. It is a huge investment:
More than US$250 billion in terms of book value is associated with the
twisted-pair deployed worldwide. This can be construed as both an advantage
and a disadvantage.
 Low cost of installation on premises—The cost of installing twisted-pair on
premises is very low.
 Low cost for local moves, adds, and changes in places—An individual can
simply pull out the twisted-pair terminating on a modular plug and replace it
in another jack in the enterprise, without requiring the intervention of a
technician. Of course, this assumes that the wiring is already in place;
otherwise, there is the additional cost of a new installation.
Twisted-pair has the following disadvantages:
 Limited frequency spectrum—The total usable frequency spectrum of
twisted-pair copper cable is about 1MHz.
 Limited data rates—The longer a signal has to travel over twisted-pair, the
lower the data rate. At 30 feet (100 m), twisted-pair can carry 100Mbps, but at
3.5 miles (5.5 km), the data rate drops to 2Mbps or less.
 Short distances required between repeaters—More components need to be
maintained, and those components are places where trouble can arise, which
leads to higher long-term operational costs.
Professional Electronics Institute Inc. – Iloilo City - 58 -
Computer Hardware Servicing NC II Prepared by: O.C. Cabillos
 High error rate—Twisted-pair is highly susceptibility to signal interference
such as EMI and RFI.
2. Fiber Optics - consisting of a number of glass or high-grade plastic optical
strands surrounded by a tough cloth-and-plastic wrap, fiber-optic cables
resemble coaxial cables from the outside. Fiber-optic network cabling is
similar to the fiber-optic strand used in the fiber-optic lamps found in novelty
stores, in which colored lights feed into optical strands to create the
appearance of dozens of pinpoints of light.
Fiber offers enormous bandwidth, immunity to many types of
interference and noise, and improved security. Therefore, fiber provides very
clear communications and a relatively noise-free environment. The downside
of fiber is that it is costly to purchase and deploy because it requires
specialized equipment and techniques.
3. Wireless - media include radio frequencies, microwave, satellite, and infrared.
Deployment of wireless media is faster and less costly than deployment of
cable, particularly where there is little or no existing infrastructure (e.g.,
Africa, Asia-Pacific, Latin America, eastern and central Europe). Wireless is
also useful where environmental circumstances make it impossible or cost-
prohibitive to use cable (e.g., in the Amazon, in the Empty Quarter in Saudi
Arabia, on oil rigs).
Professional Electronics Institute Inc. – Iloilo City - 59 -
Computer Hardware Servicing NC II Prepared by: O.C. Cabillos
There are a few disadvantages associated with wireless, however.
Historically, wireless solutions support much lower data rates than do wired
solutions, although with new developments in wireless broadband, that is
becoming less of an issue (see Part IV, "Wireless Communications"). Wireless
is also greatly affected by external impairments, such as the impact of adverse
weather, so reliability can be difficult to guarantee. However, new
developments in laser-based communications—such as virtual fiber—can
improve this situation. Of course, one of the biggest concerns with wireless is
security: Data must be secured in order to ensure privacy.
Professional Electronics Institute Inc. – Iloilo City - 60 -
Computer Hardware Servicing NC II Prepared by: O.C. Cabillos
IP Addressing
Internet Protocol Address (I.P. Address) – is a unique number assigned to every
device connected to a computer network. It is sometimes called a dotted decimal. It
is made up of four octets. The value range is 0-255.
An IP address serves two principal functions: host or network interface identification
and location addressing. Its role has been characterized as follows: "A name indicates
what we seek. An address indicates where it is. A route indicates how to get there."
Two versions of the Internet Protocol (IP) are in use: IP Version 4 and IP Version 6.
Each version defines an IP address differently. Because of its prevalence, the generic
term IP address typically still refers to the addresses defined by IPv4. The gap in
version sequence between IPv4 and IPv6 resulted from the assignment of number 5 to
the experimental Internet Stream Protocol in 1979, which however was never referred
to as IPv5.
There are two standards for IP addresses: IP Version 4 (IPv4) and IP Version 6
(IPv6). All computers with IP addresses have an IPv4 address, and many are starting
to use the new IPv6 address system as well. Here's what these two address types
mean:
IPv4 uses 32 binary bits to create a single unique address on the network. An IPv4
address is expressed by four numbers separated by dots. Each number is the decimal
(base-10) representation for an eight-digit binary (base-2) number, also called an
octet. For example: 216.27.61.137
IPv6 uses 128 binary bits to create a single unique address on the network. An IPv6
address is expressed by eight groups of hexadecimal (base-16) numbers separated by
colons, as in 2001:cdba:0000:0000:0000:0000:3257:9652. Groups of numbers that
contain all zeros are often omitted to save space, leaving a colon separator to mark the
gap (as in 2001:cdba::3257:9652).
Classes of IP Address
Reserved IP Addresses as recognized by the Internet Assigned Numbers Authority
(IANA). Four specific reservations include the following:
 0.0.0.0 -- This represents the default network, which is the abstract concept of
just being connected to a TCP/IP network.
 255.255.255.255 -- This address is reserved for network broadcasts, or
messages that should go to all computers on the network.
 127.0.0.1 -- This is called the loopback address, meaning your computer's way
of identifying itself, whether or not it has an assigned IP address.
 169.254.0.1 to 169.254.255.254 -- This is the Automatic Private IP
Addressing (APIPA) range of addresses assigned automatically when a
computer's unsuccessful getting an address from a DHCP server.
The other IP address reservations are for subnet classes. A subnet is a smaller network
of computers connected to a larger network through a router. The subnet can have its
own address system so computers on the same subnet can communicate quickly
Professional Electronics Institute Inc. – Iloilo City - 61 -
Computer Hardware Servicing NC II Prepared by: O.C. Cabillos
without sending data across the larger network. A router on a TCP/IP network,
including the Internet, is configured to recognize one or more subnets and route
network traffic appropriately. The following are the IP addresses reserved for subnets:
 10.0.0.0 to 10.255.255.255 -- This falls within the Class A address range of
1.0.0.0 to 127.0.0.0, in which the first bit is 0.
 172.16.0.0 to 172.31.255.255 -- This falls within the Class B address range of
128.0.0.0 to 191.255.0.0, in which the first two bits are 10.
 192.168.0.0 to 192.168.255.255 -- This falls within the Class C range of
192.0.0.0 through 223.255.255.0, in which the first three bits are 110.
 Multicast (formerly called Class D) -- The first four bits in the address are
1110, with addresses ranging from 224.0.0.0 to 239.255.255.255.
 Reserved for future/experimental use (formerly called Class E) -- addresses
240.0.0.0 to 254.255.255.254.
Private IP Addresses
Computers not connected to the Internet, such as factory machines that communicate
only with each other via TCP/IP, need not have globally unique IP addresses. Three
ranges of IPv4 addresses for private networks were reserved in RFC 1918. These
addresses are not routed on the Internet and thus their use need not be coordinated
with an IP address registry.
Today, when needed, such private networks typically connect to the Internet
through network address translation (NAT).
IANA-reserved private IPv4 network ranges
Start End
No. of
addresses
24-bit block (/8 prefix, 1 × A) 10.0.0.0 10.255.255.255 16777216
20-bit block (/12 prefix, 16 × B) 172.16.0.0 172.31.255.255 1048576
16-bit block (/16 prefix, 256 × C) 192.168.0.0 192.168.255.255 65536
Class A 0 8 24 128 (27
) 16,777,216 (224
) 2,147,483,648 (231
) 0.0.0.0 127.255.255.255
Class B 10 16 16 16,384 (214
) 65,536 (216
) 1,073,741,824 (230
) 128.0.0.0 191.255.255.255
Class C 110 24 8 2,097,152 (221
) 256 (28
) 536,870,912 (229
) 192.0.0.0 223.255.255.255
Class D
(multicast) 1110 not defined not defined not defined not defined 268,435,456 (228
) 224.0.0.0 239.255.255.255
Class E
(reserved) 1111 not defined not defined not defined not defined 268,435,456 (228
) 240.0.0.0 255.255.255.255
Class
Start
address
End addressLeading bits
Size of
network
Size of rest
bit field
Number of
networks
Addresses per
network
Total addresses in class
Professional Electronics Institute Inc. – Iloilo City - 62 -
Computer Hardware Servicing NC II Prepared by: O.C. Cabillos
IP Address Implementation
1. Dynamic – an IP Address usually implemented by the router, using the Dynamic
Host Control Protocol (DHCP), usually not permanent. It is commonly used
nowadays, to minimize the administrative burden of assigning IP Address to
seldom used devices connected to the network. Dynamic IP configuration is
enabled by default to most personal computers nowadays, to let the users connect
the network immediately. Aside from DHCP, broadband networks also use
dynamic IP addressing using the Point-to-Point (P2P) protocol.
2. Static – an IP Address usually assigned by network administrators to individual
devices attached to the network. This is usually permanent. This type of
addressing allows the network administrator to monitor closely each of the
devices connected to the network.
Professional Electronics Institute Inc. – Iloilo City - 63 -
Computer Hardware Servicing NC II Prepared by: O.C. Cabillos
COMMONLY USED ACRONYMS in CHS
A. Motherboard
1. BIOS – Basic Input Output
System
2. CMOS – Complimentary Metal
Oxide Semi-Conductor
3. IDE – Integrated Device/Drive
Electronics
4. SCSI – Small Computer System
Interface
5. AHCI – Advance Host Control
Interface
6. USB – Universal Serial Bus
7. PS/2 – Personal System 2
8. LPT – Line PrinTer
9. FSB – Front Side Bus
10. ISA – Industry Standard
Architecture
11. PCI – Peripheral Component
Interconnect
12. PCI-E – Peripheral Component
Interconnect Express
13. AGP – Advance Graphics Port
14. AMR – Audio Modem Riser
15. CNR – Communications and
Network Riser
16. ZIF – Zero Insertion Force
17. PGA – Pin Grid Array
18. LGA – Land Grid Array
19. CPU – Central Processing Unit
20. RTC – Real Time Clock
21. POST – Power On Self Test
22. DIP – Dual Inline Package
23. MMX – Multi Media eXtensio
24. EIDE – Enhanced Integrated
Device/Drive Electronics
25. ALU – Arithmetic Logic Unit
26. CU – Control Unit
27. RPM – Revolutions per Minute
B. DISPLAY
1. VGA – Video Graphics Array
2. SVGA – Super Video Graphics
Adapter
3. CGA – Color Graphics Adapter
4. GPU – Graphics Processing Unit
5. DVI – Digital Video Interface
6. CRT – Cathode Ray Tube
7. LCD – Liquid Crystal Display
8. RGB – Red Green Blue
9. EGA – Enhance Graphics
Adapter
10. LED – Light Emitting Diode
C. SECONDARY STORAGE
1. HDD – Hard Disk Drive
2. SATA – Serial Advanced
Technology Attachment
3. PATA – Parallel Advanced
Technology Attachment
4. CD-ROM – Compact Disc Read
Only Memory
5. DVD – Digital Versatile/Video
Disc
6. RAID – Redundant Array of
Independent/Inexpensive Disks
D. MULTI-MEDIA
1. HDMI – High Definition Multi-
media Interface
2. MIDI – Musical Instrument
Digital Interface
3. JPEG – Junior Photographer
Expert Group
4. MPEG – Motion Pictures Expert
Group
5. GIF – Graphic Interchange
Format
E. PRIMARY STORAGE
1. RAM – Random Access
Memory
2. DMA – Direct Memory Access
3. Read Only Memory
4. SIMM – Single In-Line Memory
Module
5. DIMM – Dual In-Line Memory
Module
Professional Electronics Institute Inc. – Iloilo City - 64 -
Computer Hardware Servicing NC II Prepared by: O.C. Cabillos
6. SDRAM – Synchronous
Dynamic Random Access
Memory
7. DDR – Double/Dual Data Rate
8. EEPROM – Electronically
Erasable Programmable Read-
Only Memory
9. EMS – Expanded Memory
Specifications
10. XMS – eXtended Memory
Specifications
11. UMB – Upper Memory Blocks
F. SOFTWARE
1. OS – Operating System
2. NTFS – New Technology File
System
3. FAT – File Allocation Table
4. IRQ – Interrupt Request
5. EULA – End User’s License
Agreement
6. OEM – Original Equipment
Manufacturer
7. DOS – Disk Operating System
8. NOS – Network Operating
System
G. NETWORKING
1. LAN – Local Area Network
2. MODEM – Modulator
DEModulator
3. NIC – Network Interface Card
4. MAN – Metropolitan Area
Network
5. WAN – Wide Area Network
6. WiFi – Wireless Fidelity
7. UTP – Unshielded Twisted Pair
8. STP – Shielded Twisted Pair
9. RJ – Radio Jack
10. ADSL – Asymmetric Digital
Subscriber Line
11. Mbps – Mega bits per second
12. ISP – Internet Service Provider
13. AP – Access Point
14. FTP – File Transfer Protocol
15. ISDN – Integrated Services
Digital Network
16. TCP/IP – Transmission Control
Protocol / Internetwork
Protocol
17. I.P. – Internet Protocol
18. NAT – Network Address
Translation
19. PAT – Port Address Translation
20. DNS – Domain Name System
21. MAC – Media Access Control
22. EMI – Electro Magnetic
Interference
23. RFI – Radio Frequency
Interference
H. OTHERS
1. ISO – International Standards
Organization
2. IEEE – Institute of Electrical &
Electronic Engineers
3. ANSI – American National
Standards Institute
4. ASCII – American Standards of
Codes for Information
Interchange
5. IBM – International Business
Machine
6. AMD – American Micro
Devices
7. ESD – Electro-Static Discharge
8. PPE – Personal Protective
Equipment
9. OHS – Occupational Health &
Safety
10. LASER – Light Amplification of
Simulated Emission of
Radiation
11. PSU – Power Supply Unit
12. AVR – Automatic Voltage
Regulator
13. UPS – Uninterruptible Power
Supply
Professional Electronics Institute Inc. – Iloilo City - 65 -
Computer Hardware Servicing NC II Prepared by: O.C. Cabillos
STEP by STEP Guide in Windows XP Installation.
1. Allow the computer to perform the Power On Self Test (POST).
2. Access the BIOS/CMOS set-up by pressing DEL (the most common,
depending on the BIOS MANUFACTURER), others uses F1 or F10.
3. Find the BOOT SEQUENCE/ORDER in the CMOS set-up, then make sure
that the FIRST BOOT DEVICE IS CD ROM, if not CHANGE IT
ACCORDINGLY.
4. Insert your BOOTABLE WINDOWS XP installer in the CD-ROM Drive.
5. Press F10 to save changes to the CMOS and EXIT from the BIOS and allow
the computer to restart.
6. After the RESTART procedure, the computer will read your CD-ROM and
will display the message: ―Press any to boot from cd...‖, PRESS ANY KEY
TO start the windows xp installation.
7. Follow the on-screen instructions, PLEASE TAKE NOTE OF THE
MESSAGES ON THE STATUS BAR displayed while installing windows.
The status bar is at the bottom on of your screen.
8. At this moment, press ENTER to continue.
9. Press F8 to accept the End User’s License Agreement (EULA).
10. If there’s an option to REPAIR/DON’T REPAIR, select ESC to perform
DON’T REPAIR.
11. If there exist partitions, delete current partition (MAKE SURE BEFORE
DELETION OF THE PARITITION YOU MADE A BACK-UP OF YOUR
FILES) by doing the next successive steps:
12. If no partition exist, go to instruction number
13. Press D to delete the current partition.
14. Press ENTER to continue.
15. Press L to confirm the deletion. The the same thing if there are other existing
partitions.
16. After all partitions has been deleted, press C to create partition.
17. Use BACKSPACE to erase the number, enter the appropriate number for the
size of the partition, say 10,000 for 10 Gb, 20,000 for 20Gb and so on.
18. Press ENTER to install.
19. Press arrow up to select QUICK FORMAT (NTFS).
20. Please wait while windows is formatting your hard drive and some important
files are being copied.
21. Press ENTER to immediately restart the system if such message is displayed.
22. After restarting, windows will do the POST, this time, DO NOT PRESS ANY
KEY, if a message: ―Press any key to boot from cd...‖ is displayed.
23. Windows is now continuing with the set-up in GRAPHICAL MODE.
24. Click Next to continue.
25. Type your PRODUCT KEY in the box as provided, click next.
26. Type your NAME & ORGANIZATION and click next.
27. Type a valid computer name, say, JOSE-PC then click next.
28. Select the Time Zone, in the Philippines, you may choose any of the +8, then
click next.
29. Click Finish when done and remove your WINDOWS XP bootable cd from
cd-rom and allow the computer to RESTART.
30. Click next on the NETWORK identification wizard.
31. Click Next to continue.
Professional Electronics Institute Inc. – Iloilo City - 66 -
Computer Hardware Servicing NC II Prepared by: O.C. Cabillos
32. Remove the check on the check box, and then click next to exit the installation
for the desktop to be displayed.
33. Install hardware drivers to make sure that all the hardware installed will be
functioning.
Professional Electronics Institute Inc. – Iloilo City - 67 -
Computer Hardware Servicing NC II Prepared by: O.C. Cabillos
SUMMARY
Below is a summary on the skill assessment exam of those who wanted to get a
certificate on Computer Hardware Servicing NC II from Technical Education and
Skills Development Authority (TESDA, Philippines). It is assumed that you have the
prior basic knowledge on computer hardware and software operations. This is not a
comprehensive one but provides examples, hints and basic outline of the exam:
1. List of Tools and Materials/Inventory (written):
2. Occupational Health and Safety Procedure (OHS) (written):
1. Contingency measures during workplace accidents, fire and other
emergencies are recognized.
2. Personal protective equipment are correctly used in accordance with
organization OHS procedures and practices.
3. Hazard/risks in the workplace and their corresponding indicators are
identified to minimize or eliminate risk to co-workers, workplace and
environment.
4. Take necessary precautions to protect the components of the computer
from damage caused by ESD (Electrostatic Discharge).
5. Hold the components by the edges and do not touch the IC’s.
6. Read and follow instructions on the manual carefully.
7. Do not use excessive force if things don’t quite slip into place.
Professional Electronics Institute Inc. – Iloilo City - 68 -
Computer Hardware Servicing NC II Prepared by: O.C. Cabillos
3. Disassembly / Assembly of System Unit (manual):
PROPER DISASSEMBLING PROCEDURE:
1. Before you start to disassemble, make sure the computer itself is working
properly, then perform a shutdown.
2. Place the system unit on the top of the table where you are going to perform
disassembly.
3. Use a personal protective equipment to prevent damage from ESD such as the
Anti-Static wrist strap. In the absence of such, ground yourself first by touching
any metallic component around you or casing itself to release the static electricity
from your body.
4. Open the system unit to expose the inner contents.
5. Remove all the connections of the power supply to other components such as the
motherboard power connector, the CPU power connector, the power supply to the
hard drives and the optical drives.
6. Remove the screw of all the drives, and gently pull out all the drives one by one
from the system unit (optical, hard and floppy drives).
7. Pull out all expansion cards (ISA, PCI, AGP, PCI-E).
8. Detach the memory from the motherboard.
9. Detach the following connections from the motherboard if necessary: audio, usb,
front panel connections.
10. Remove all the screw that holds the motherboard to the casing in an X manner.
Gently pull out the motherboard from the casing.
11. Remove all the screw that holds the power supply unit to the casing in an X
manner. Gently pull out the power supply unit from the casing.
12. Place the motherboard on a table with a rubber mat; remove the heat sink
(depending on the type).
13. Remove the processor by following instructions from your trainer, depending on
the CPU type.
PROPER ASSEMBLING PROCEDURE: (follow last out-first in if possible)
1. Install the processor on the motherboard, following proper orientation, using the
PIN #1 of the processor as guide.
2. Install the heat sink properly on the top of the processor. Make sure that it’s tight
enough, as loose installation may cause overheating of the processor, making it
unstable.
3. Install the memory modules back to the motherboard observing proper orientation.
Remember, improperly placed memory modules on the motherboard will cause
irreparable damage.
4. Install the power supply unit back to the casing, observing the X method of
installing the screw.
5. Inspect a properly oriented stand-offs on the motherboard. Correct it if
disoriented.
6. Install the motherboard back to the casing, observing the X method of installing
the screw.
Professional Electronics Institute Inc. – Iloilo City - 69 -
Computer Hardware Servicing NC II Prepared by: O.C. Cabillos
7. Connect the following, audio, usb, front-panel headers, cpu power supply and the
motherboard power supply.
8. Install expansion cards on its designated expansion slots.
9. Install the drives and screw (optical, hard, floppy).
10. Connect power connectors to the drives already installed.
11. Double check all connections to the motherboard and to the power supply unit.
Check also your memory modules and expansion cards.
12. Connect all other peripherals from the outside to its designated ports and test your
system unit.
4. Install Operating Systems (OS- XP/98, dual boot), Device Drivers, LAN Cable
(manual).
For LAN cable color coding, memorize the pairings below:
Professional Electronics Institute Inc. – Iloilo City - 70 -
Computer Hardware Servicing NC II Prepared by: O.C. Cabillos
5. Configure and Print (manual):
1. Click on the Start menu, then click on Control Panel
2. When the Control Panel window opens you will see items in either Category
View (continue with step #3) or Classic View (skip to item #4)
3. Find and double-click on the Network and Internet Connection icon.
4. Next, find and double-click on the Network Connections icon, a window will
open with all network connections available on the computer (wired and wireless)
5. Find the network connection you want to manually configure, right-click on it and
select Properties from the pop-up menu
6. In the Connection Properties window, under the section labeled This connection
uses the following items:find the Internet Protocol (TCP/IP) item and double-
click it.
7. A new window will open, select the second radio button which is labeled Use the
following IP address
8. Enter the appropriate IP address (192.168.0.1); subnet mask (usually
255.255.255.0); and gateway (the router or proxy server address)
9. The next part of the windows will now have a radio button selected which is
labeled Use the following DNS server addresse.
10. If you need to access the Internet, enter the DNS addresses provided by your ISP;
if you do not have that information you can use the OpenDNS server. Their DNS
addresses are: 208.67.222.222 and208.67.220.220
11. After entering the required information, click the OK button twice and close the
Control Panel window.
Professional Electronics Institute Inc. – Iloilo City - 71 -
Computer Hardware Servicing NC II Prepared by: O.C. Cabillos
Changing Workgroup and Computer Name
- Start > Settings > Control Panel > System > Computer Name Tab > Change Tab
>Type New Computer Name and Workgroup > OK..OK..OK..Restart
Installing Network Printer
- Start > Settings > Control Panel > Printers and Faxes > Add Printer (Printers Tasks)
> (Add Printer Wizard) Next > Select ―A Network Printer, or …..‖ > Next >
Browse Printer > Next > Select Installed Network Printer > Next >Yes..Finish!
Note: Turn-off your firewall before installing network printer.
File/Folder Sharing
- Right-Click Folder to Share > Properties > Sharing Tab > Network Sharing and
Security (Click ―If you understand the security Risk….‖) > Just Enable Sharing >
OK > Select Share this folder on the network > OK
Sharing Printer
Start > Settings > Control Panel > Printers and Faxes > Right-click Installed Printer >
Sharing > Share this Printer > OK
6. Questioning/Interview (oral):
Most of the questions will be on troubleshooting but anything around the subject
matter can be asked. You also need to master the parts of the computer
particularly of the Main Circuit Board or the Mother Board and their specific
functions, cable color-coding as shown above.
Professional Electronics Institute Inc. – Iloilo City - 72 -
Computer Hardware Servicing NC II Prepared by: O.C. Cabillos
1) How many pins does a SIMM have?
a) 50
b) 64
c) 30 or 72
d) 168
Show Answer
2) The various cards in a PC requires _______ voltage to function.
a) AC
b) DC
Show Answer
3) What type of hard disk formatting creates FAT (File Allocation Table) ?
a) High Level
b) Low Level
Show Answer
4) What is the name of the printed circuit board?
a) Ram
b) Mother Board
Show Answer
5) Which Component of pc maintains data and time
a) CMOS RAM
b) vRAM
Show Answer
6) IRQ 1 is commonly assigned to:
a) it's usually open
b) system timer
c) real time clock
d) keyboard
Show Answer
7) LCD monitor is also known as___________
a) TFT
b) CRT
Professional Electronics Institute Inc. – Iloilo City - 73 -
Computer Hardware Servicing NC II Prepared by: O.C. Cabillos
Show Answer
8) How can you tell that a particular ribbon cable should only be used to connect a floppy drive?
a) it
b) it has a red line along one edge
c) it
d) it has a twist in it
Show Answer
9) Data stored in a ROM cannot be changed by user of a computer?
a) TRUE
b) FALSE
Show Answer
10) Is the data in a RAM stored on a permanent or temporary basis
a) Temporary
b) Permanent
Show Answer
11) Winchester drive is also called:
a) Hard Disk Drive
b) Floppy Disk Drive
Show Answer
12) TO write, erase, rewrite data on a CD RAM what type of CD ROM you should use?
a) CD-RW
b) CD R
Show Answer
13) A byte is equivalent to...?
a) 8 bits
b) 10 bits
Show Answer
14) SMPS stands for:
a) Switch Mode Power Supply
b) Simple Mode Power Supply
Show Answer
Professional Electronics Institute Inc. – Iloilo City - 74 -
Computer Hardware Servicing NC II Prepared by: O.C. Cabillos
15) Which of the following is NOT a type of motherboard expansion slot?
a) ISA
b) PCI
c) AGP
d) ATX
Show Answer
16) Which IRQ does LPT1 commonly use?
a) 1
b) 4
c) 5
d) 7
Show Answer
17) How much data will a high density (HD) floppy disk hold?
a) 124 KB
b) 640 KB
c) 1.44 MB
d) 2.88MB
Show Answer
18) What is the name of the spec for the holes in a monitor's aperture grill?
a) dot pitch
b) space holes
Show Answer
19) Which is the best hard disk seek time?
a) 3ms
b) 5ms
Show Answer
20) Fragmentation of data on computer hard disk causes it to work faster than before?
a) FALSE
b) TRUE
Show Answer
Professional Electronics Institute Inc. – Iloilo City - 75 -
Computer Hardware Servicing NC II Prepared by: O.C. Cabillos
21) What is the name of the card that controls read, write head and motor in the hard disk
a) Network Card
b) Disc Controller Card
Show Answer
22) Which of the following retains the information it's storing when the power to the system is turned off?
a) CPU
b) ROM
c) DRAM
d) DIMM
Show Answer
23) Acronym of HDD?
a) Hard Disk Drive
b) Hard Drive Disk
Show Answer
24)A program written using binary codes is called:
a) Software language
b) Machine language
Show Answer
25) How many bytes a sector of hard disk holds?
a) 512 Bytes
b) 1024 Bytes
Show Answer
26) To be bootable a DOS partition must be:
a) active
b) copied
Show Answer
27) What does FDISK do?
a) performs low-level formatting of the hard drive
b) fixes bad sectors on the hard drive
c) recovers lost clusters on the hard drive
d) creates partitions on the hard drive
Show Answer
CHS NC 2 Guide for Instructors

More Related Content

What's hot

CSS NC II Module : Set-up Computer Networks
CSS NC II Module : Set-up Computer NetworksCSS NC II Module : Set-up Computer Networks
CSS NC II Module : Set-up Computer NetworksEric Talamisan
 
Computer Assembly and Disassembly (2nd Lesson part 2).ppt
Computer Assembly and Disassembly (2nd Lesson part 2).pptComputer Assembly and Disassembly (2nd Lesson part 2).ppt
Computer Assembly and Disassembly (2nd Lesson part 2).pptJonathanOcampo23
 
CSS L03 - Mensuration and Calculation in CSS
CSS L03 - Mensuration and Calculation in CSSCSS L03 - Mensuration and Calculation in CSS
CSS L03 - Mensuration and Calculation in CSSMarvin Bronoso
 
Computer systems servicing cbc
Computer systems servicing cbcComputer systems servicing cbc
Computer systems servicing cbcHanzel Metrio
 
CSS NC II learning Module
CSS NC II learning ModuleCSS NC II learning Module
CSS NC II learning ModuleEdmund Blanco
 
TLE ICT 10 CSS MELC (UNOFFICIAL)
TLE ICT 10 CSS MELC (UNOFFICIAL)TLE ICT 10 CSS MELC (UNOFFICIAL)
TLE ICT 10 CSS MELC (UNOFFICIAL)Leonel Rivas
 
CSS L01 - Introduction to Computer System Servicing (NCII)
CSS L01 - Introduction to Computer System Servicing (NCII)CSS L01 - Introduction to Computer System Servicing (NCII)
CSS L01 - Introduction to Computer System Servicing (NCII)Marvin Bronoso
 
CSS L15 - CRIMPING ETHERNET AND RJ-45
CSS L15  - CRIMPING ETHERNET AND RJ-45CSS L15  - CRIMPING ETHERNET AND RJ-45
CSS L15 - CRIMPING ETHERNET AND RJ-45Marvin Bronoso
 
Kto12 tle ict computer hardware servicing
Kto12 tle ict computer hardware servicingKto12 tle ict computer hardware servicing
Kto12 tle ict computer hardware servicingAlvin Francisco
 
PC Assembly and Disassembly.pptx
PC Assembly and Disassembly.pptxPC Assembly and Disassembly.pptx
PC Assembly and Disassembly.pptxErwinIruma
 
Ict 9 module 3, lesson 2.1 safety precautions
Ict 9 module 3, lesson 2.1 safety precautionsIct 9 module 3, lesson 2.1 safety precautions
Ict 9 module 3, lesson 2.1 safety precautionsYonel Cadapan
 
How to prepare a portable bootable devices
How to prepare a portable bootable devicesHow to prepare a portable bootable devices
How to prepare a portable bootable devicesiankeithsomoza
 
Lesson 3 using hand tools
Lesson 3   using hand toolsLesson 3   using hand tools
Lesson 3 using hand toolsMelvin Punzalan
 
Inspect and test the configured computer systems and networks
Inspect and test the configured computer systems and networksInspect and test the configured computer systems and networks
Inspect and test the configured computer systems and networksBrian Magan
 
CSS L04 - Integral Parts of the Computer System
CSS L04 - Integral Parts of the Computer SystemCSS L04 - Integral Parts of the Computer System
CSS L04 - Integral Parts of the Computer SystemMarvin Bronoso
 
Performing Computer Operations [Autosaved].pptx
Performing Computer Operations [Autosaved].pptxPerforming Computer Operations [Autosaved].pptx
Performing Computer Operations [Autosaved].pptxMaryGraceHeredero3
 
Performing Computer Operations (PCO)
Performing Computer Operations (PCO)Performing Computer Operations (PCO)
Performing Computer Operations (PCO)Walden Macabuhay
 

What's hot (20)

CSS NC II Module : Set-up Computer Networks
CSS NC II Module : Set-up Computer NetworksCSS NC II Module : Set-up Computer Networks
CSS NC II Module : Set-up Computer Networks
 
1st quarter css week 1
1st quarter css week 11st quarter css week 1
1st quarter css week 1
 
Computer Assembly and Disassembly (2nd Lesson part 2).ppt
Computer Assembly and Disassembly (2nd Lesson part 2).pptComputer Assembly and Disassembly (2nd Lesson part 2).ppt
Computer Assembly and Disassembly (2nd Lesson part 2).ppt
 
CSS L03 - Mensuration and Calculation in CSS
CSS L03 - Mensuration and Calculation in CSSCSS L03 - Mensuration and Calculation in CSS
CSS L03 - Mensuration and Calculation in CSS
 
Computer systems servicing cbc
Computer systems servicing cbcComputer systems servicing cbc
Computer systems servicing cbc
 
CSS NC II learning Module
CSS NC II learning ModuleCSS NC II learning Module
CSS NC II learning Module
 
TLE ICT 10 CSS MELC (UNOFFICIAL)
TLE ICT 10 CSS MELC (UNOFFICIAL)TLE ICT 10 CSS MELC (UNOFFICIAL)
TLE ICT 10 CSS MELC (UNOFFICIAL)
 
CSS L01 - Introduction to Computer System Servicing (NCII)
CSS L01 - Introduction to Computer System Servicing (NCII)CSS L01 - Introduction to Computer System Servicing (NCII)
CSS L01 - Introduction to Computer System Servicing (NCII)
 
CSS L15 - CRIMPING ETHERNET AND RJ-45
CSS L15  - CRIMPING ETHERNET AND RJ-45CSS L15  - CRIMPING ETHERNET AND RJ-45
CSS L15 - CRIMPING ETHERNET AND RJ-45
 
Kto12 tle ict computer hardware servicing
Kto12 tle ict computer hardware servicingKto12 tle ict computer hardware servicing
Kto12 tle ict computer hardware servicing
 
PC Assembly and Disassembly.pptx
PC Assembly and Disassembly.pptxPC Assembly and Disassembly.pptx
PC Assembly and Disassembly.pptx
 
Quarter ii css 9
Quarter ii css 9Quarter ii css 9
Quarter ii css 9
 
Ict 9 module 3, lesson 2.1 safety precautions
Ict 9 module 3, lesson 2.1 safety precautionsIct 9 module 3, lesson 2.1 safety precautions
Ict 9 module 3, lesson 2.1 safety precautions
 
Disassembling a PC
Disassembling a PCDisassembling a PC
Disassembling a PC
 
How to prepare a portable bootable devices
How to prepare a portable bootable devicesHow to prepare a portable bootable devices
How to prepare a portable bootable devices
 
Lesson 3 using hand tools
Lesson 3   using hand toolsLesson 3   using hand tools
Lesson 3 using hand tools
 
Inspect and test the configured computer systems and networks
Inspect and test the configured computer systems and networksInspect and test the configured computer systems and networks
Inspect and test the configured computer systems and networks
 
CSS L04 - Integral Parts of the Computer System
CSS L04 - Integral Parts of the Computer SystemCSS L04 - Integral Parts of the Computer System
CSS L04 - Integral Parts of the Computer System
 
Performing Computer Operations [Autosaved].pptx
Performing Computer Operations [Autosaved].pptxPerforming Computer Operations [Autosaved].pptx
Performing Computer Operations [Autosaved].pptx
 
Performing Computer Operations (PCO)
Performing Computer Operations (PCO)Performing Computer Operations (PCO)
Performing Computer Operations (PCO)
 

Viewers also liked

Computer Hardware Servicing NC-II
Computer Hardware Servicing NC-IIComputer Hardware Servicing NC-II
Computer Hardware Servicing NC-IIJeffrey Esmundo
 
Tools Used In PC Hardware Servicing
Tools Used In PC Hardware ServicingTools Used In PC Hardware Servicing
Tools Used In PC Hardware ServicingBrian Mary
 
Use of tools in PC hardware servicing
Use of tools in PC hardware servicingUse of tools in PC hardware servicing
Use of tools in PC hardware servicingCupay Dabu
 
Personal Entrepreneurial Competencies
Personal Entrepreneurial CompetenciesPersonal Entrepreneurial Competencies
Personal Entrepreneurial Competenciesveevee2127
 
CBLM - Set Up Computer Network (CSS)
CBLM - Set Up Computer Network (CSS)CBLM - Set Up Computer Network (CSS)
CBLM - Set Up Computer Network (CSS)Jean_SHS DepEd
 
Computer system servicing
Computer system servicingComputer system servicing
Computer system servicingLindyl Geral
 
Computer Hardware Servicing Learning Module v.2.0
Computer Hardware Servicing Learning Module v.2.0Computer Hardware Servicing Learning Module v.2.0
Computer Hardware Servicing Learning Module v.2.0Bogs De Castro
 

Viewers also liked (10)

Fls presentation
Fls presentationFls presentation
Fls presentation
 
Computer Hardware Servicing NC-II
Computer Hardware Servicing NC-IIComputer Hardware Servicing NC-II
Computer Hardware Servicing NC-II
 
Tools Used In PC Hardware Servicing
Tools Used In PC Hardware ServicingTools Used In PC Hardware Servicing
Tools Used In PC Hardware Servicing
 
Use of tools in PC hardware servicing
Use of tools in PC hardware servicingUse of tools in PC hardware servicing
Use of tools in PC hardware servicing
 
Proper tools selection
Proper tools selectionProper tools selection
Proper tools selection
 
Personal Entrepreneurial Competencies
Personal Entrepreneurial CompetenciesPersonal Entrepreneurial Competencies
Personal Entrepreneurial Competencies
 
For print final
For print finalFor print final
For print final
 
CBLM - Set Up Computer Network (CSS)
CBLM - Set Up Computer Network (CSS)CBLM - Set Up Computer Network (CSS)
CBLM - Set Up Computer Network (CSS)
 
Computer system servicing
Computer system servicingComputer system servicing
Computer system servicing
 
Computer Hardware Servicing Learning Module v.2.0
Computer Hardware Servicing Learning Module v.2.0Computer Hardware Servicing Learning Module v.2.0
Computer Hardware Servicing Learning Module v.2.0
 

Similar to CHS NC 2 Guide for Instructors

CSS Basic Competencies
CSS Basic CompetenciesCSS Basic Competencies
CSS Basic CompetenciesJean_SHS DepEd
 
FirstTake a look at the ADRRESSING Framework, and locate a rank.docx
FirstTake a look at the ADRRESSING Framework, and locate a rank.docxFirstTake a look at the ADRRESSING Framework, and locate a rank.docx
FirstTake a look at the ADRRESSING Framework, and locate a rank.docxclydes2
 
Question 3 whs activity one ca
Question 3 whs activity one ca Question 3 whs activity one ca
Question 3 whs activity one ca Bluecare
 
Creating a Culture of Operational Discipline that leads to Operational Excell...
Creating a Culture of Operational Discipline that leads to Operational Excell...Creating a Culture of Operational Discipline that leads to Operational Excell...
Creating a Culture of Operational Discipline that leads to Operational Excell...Christopher Seifert
 
Creating a Culture of Operational Discipline that leads to Operational Excell...
Creating a Culture of Operational Discipline that leads to Operational Excell...Creating a Culture of Operational Discipline that leads to Operational Excell...
Creating a Culture of Operational Discipline that leads to Operational Excell...Wilson Perumal and Company
 
Ingl 3116 vocabulary chap 1, 4, 15, 16
Ingl 3116 vocabulary chap 1, 4, 15, 16Ingl 3116 vocabulary chap 1, 4, 15, 16
Ingl 3116 vocabulary chap 1, 4, 15, 16aramnoemi
 
Professional Ethics Module 1 Notes
Professional Ethics Module 1 NotesProfessional Ethics Module 1 Notes
Professional Ethics Module 1 NotesBella Meraki
 
Why I Want To Go To College Essay Sample
Why I Want To Go To College Essay SampleWhy I Want To Go To College Essay Sample
Why I Want To Go To College Essay SampleSusan Moon
 
CHAPTER 1 - PROFESSIONAL ISSUES (Lecture 1.3).pptx
CHAPTER 1 - PROFESSIONAL ISSUES (Lecture 1.3).pptxCHAPTER 1 - PROFESSIONAL ISSUES (Lecture 1.3).pptx
CHAPTER 1 - PROFESSIONAL ISSUES (Lecture 1.3).pptxRogerPrimo2
 
A Review of Professional Practices for Computer Sciences Students in Academics
A Review of Professional Practices for Computer Sciences  Students in AcademicsA Review of Professional Practices for Computer Sciences  Students in Academics
A Review of Professional Practices for Computer Sciences Students in Academicssyedhamza71
 
P.practices-week1.pptx
P.practices-week1.pptxP.practices-week1.pptx
P.practices-week1.pptxsairakulsoom
 
Challenges and Evolution of Organizational Behaviour
Challenges and Evolution of Organizational BehaviourChallenges and Evolution of Organizational Behaviour
Challenges and Evolution of Organizational BehaviourBhartiSharma238
 
Fundamental managerial skills for entrepreneurs
Fundamental managerial skills for entrepreneurs Fundamental managerial skills for entrepreneurs
Fundamental managerial skills for entrepreneurs Dr. Trilok Kumar Jain
 
Essential Business Law For Entrepreneurs
Essential  Business  Law For  EntrepreneursEssential  Business  Law For  Entrepreneurs
Essential Business Law For EntrepreneursDr. Trilok Kumar Jain
 
English Communication (AEC-01).pdf
English Communication (AEC-01).pdfEnglish Communication (AEC-01).pdf
English Communication (AEC-01).pdfssuserf7cd2b
 

Similar to CHS NC 2 Guide for Instructors (20)

CSS Basic Competencies
CSS Basic CompetenciesCSS Basic Competencies
CSS Basic Competencies
 
FirstTake a look at the ADRRESSING Framework, and locate a rank.docx
FirstTake a look at the ADRRESSING Framework, and locate a rank.docxFirstTake a look at the ADRRESSING Framework, and locate a rank.docx
FirstTake a look at the ADRRESSING Framework, and locate a rank.docx
 
Company data
Company dataCompany data
Company data
 
Question 3 whs activity one ca
Question 3 whs activity one ca Question 3 whs activity one ca
Question 3 whs activity one ca
 
13824518.ppt
13824518.ppt13824518.ppt
13824518.ppt
 
Creating a Culture of Operational Discipline that leads to Operational Excell...
Creating a Culture of Operational Discipline that leads to Operational Excell...Creating a Culture of Operational Discipline that leads to Operational Excell...
Creating a Culture of Operational Discipline that leads to Operational Excell...
 
Creating a Culture of Operational Discipline that leads to Operational Excell...
Creating a Culture of Operational Discipline that leads to Operational Excell...Creating a Culture of Operational Discipline that leads to Operational Excell...
Creating a Culture of Operational Discipline that leads to Operational Excell...
 
Ingl 3116 vocabulary chap 1, 4, 15, 16
Ingl 3116 vocabulary chap 1, 4, 15, 16Ingl 3116 vocabulary chap 1, 4, 15, 16
Ingl 3116 vocabulary chap 1, 4, 15, 16
 
MUDA.pptx
MUDA.pptxMUDA.pptx
MUDA.pptx
 
Professional Ethics Module 1 Notes
Professional Ethics Module 1 NotesProfessional Ethics Module 1 Notes
Professional Ethics Module 1 Notes
 
Why I Want To Go To College Essay Sample
Why I Want To Go To College Essay SampleWhy I Want To Go To College Essay Sample
Why I Want To Go To College Essay Sample
 
CHAPTER 1 - PROFESSIONAL ISSUES (Lecture 1.3).pptx
CHAPTER 1 - PROFESSIONAL ISSUES (Lecture 1.3).pptxCHAPTER 1 - PROFESSIONAL ISSUES (Lecture 1.3).pptx
CHAPTER 1 - PROFESSIONAL ISSUES (Lecture 1.3).pptx
 
A Review of Professional Practices for Computer Sciences Students in Academics
A Review of Professional Practices for Computer Sciences  Students in AcademicsA Review of Professional Practices for Computer Sciences  Students in Academics
A Review of Professional Practices for Computer Sciences Students in Academics
 
Chapter 1- Lesson 3 Notes.pdf
Chapter 1- Lesson 3 Notes.pdfChapter 1- Lesson 3 Notes.pdf
Chapter 1- Lesson 3 Notes.pdf
 
P.practices-week1.pptx
P.practices-week1.pptxP.practices-week1.pptx
P.practices-week1.pptx
 
Challenges and Evolution of Organizational Behaviour
Challenges and Evolution of Organizational BehaviourChallenges and Evolution of Organizational Behaviour
Challenges and Evolution of Organizational Behaviour
 
Fundamental managerial skills for entrepreneurs
Fundamental managerial skills for entrepreneurs Fundamental managerial skills for entrepreneurs
Fundamental managerial skills for entrepreneurs
 
Essential Business Law For Entrepreneurs
Essential  Business  Law For  EntrepreneursEssential  Business  Law For  Entrepreneurs
Essential Business Law For Entrepreneurs
 
How To Face Interview
How To Face InterviewHow To Face Interview
How To Face Interview
 
English Communication (AEC-01).pdf
English Communication (AEC-01).pdfEnglish Communication (AEC-01).pdf
English Communication (AEC-01).pdf
 

Recently uploaded

The State of Passkeys with FIDO Alliance.pptx
The State of Passkeys with FIDO Alliance.pptxThe State of Passkeys with FIDO Alliance.pptx
The State of Passkeys with FIDO Alliance.pptxLoriGlavin3
 
The Fit for Passkeys for Employee and Consumer Sign-ins: FIDO Paris Seminar.pptx
The Fit for Passkeys for Employee and Consumer Sign-ins: FIDO Paris Seminar.pptxThe Fit for Passkeys for Employee and Consumer Sign-ins: FIDO Paris Seminar.pptx
The Fit for Passkeys for Employee and Consumer Sign-ins: FIDO Paris Seminar.pptxLoriGlavin3
 
Rise of the Machines: Known As Drones...
Rise of the Machines: Known As Drones...Rise of the Machines: Known As Drones...
Rise of the Machines: Known As Drones...Rick Flair
 
Assure Ecommerce and Retail Operations Uptime with ThousandEyes
Assure Ecommerce and Retail Operations Uptime with ThousandEyesAssure Ecommerce and Retail Operations Uptime with ThousandEyes
Assure Ecommerce and Retail Operations Uptime with ThousandEyesThousandEyes
 
Sample pptx for embedding into website for demo
Sample pptx for embedding into website for demoSample pptx for embedding into website for demo
Sample pptx for embedding into website for demoHarshalMandlekar2
 
A Journey Into the Emotions of Software Developers
A Journey Into the Emotions of Software DevelopersA Journey Into the Emotions of Software Developers
A Journey Into the Emotions of Software DevelopersNicole Novielli
 
Data governance with Unity Catalog Presentation
Data governance with Unity Catalog PresentationData governance with Unity Catalog Presentation
Data governance with Unity Catalog PresentationKnoldus Inc.
 
Merck Moving Beyond Passwords: FIDO Paris Seminar.pptx
Merck Moving Beyond Passwords: FIDO Paris Seminar.pptxMerck Moving Beyond Passwords: FIDO Paris Seminar.pptx
Merck Moving Beyond Passwords: FIDO Paris Seminar.pptxLoriGlavin3
 
The Role of FIDO in a Cyber Secure Netherlands: FIDO Paris Seminar.pptx
The Role of FIDO in a Cyber Secure Netherlands: FIDO Paris Seminar.pptxThe Role of FIDO in a Cyber Secure Netherlands: FIDO Paris Seminar.pptx
The Role of FIDO in a Cyber Secure Netherlands: FIDO Paris Seminar.pptxLoriGlavin3
 
(How to Program) Paul Deitel, Harvey Deitel-Java How to Program, Early Object...
(How to Program) Paul Deitel, Harvey Deitel-Java How to Program, Early Object...(How to Program) Paul Deitel, Harvey Deitel-Java How to Program, Early Object...
(How to Program) Paul Deitel, Harvey Deitel-Java How to Program, Early Object...AliaaTarek5
 
Genislab builds better products and faster go-to-market with Lean project man...
Genislab builds better products and faster go-to-market with Lean project man...Genislab builds better products and faster go-to-market with Lean project man...
Genislab builds better products and faster go-to-market with Lean project man...Farhan Tariq
 
Emixa Mendix Meetup 11 April 2024 about Mendix Native development
Emixa Mendix Meetup 11 April 2024 about Mendix Native developmentEmixa Mendix Meetup 11 April 2024 about Mendix Native development
Emixa Mendix Meetup 11 April 2024 about Mendix Native developmentPim van der Noll
 
From Family Reminiscence to Scholarly Archive .
From Family Reminiscence to Scholarly Archive .From Family Reminiscence to Scholarly Archive .
From Family Reminiscence to Scholarly Archive .Alan Dix
 
Time Series Foundation Models - current state and future directions
Time Series Foundation Models - current state and future directionsTime Series Foundation Models - current state and future directions
Time Series Foundation Models - current state and future directionsNathaniel Shimoni
 
So einfach geht modernes Roaming fuer Notes und Nomad.pdf
So einfach geht modernes Roaming fuer Notes und Nomad.pdfSo einfach geht modernes Roaming fuer Notes und Nomad.pdf
So einfach geht modernes Roaming fuer Notes und Nomad.pdfpanagenda
 
Decarbonising Buildings: Making a net-zero built environment a reality
Decarbonising Buildings: Making a net-zero built environment a realityDecarbonising Buildings: Making a net-zero built environment a reality
Decarbonising Buildings: Making a net-zero built environment a realityIES VE
 
Enhancing User Experience - Exploring the Latest Features of Tallyman Axis Lo...
Enhancing User Experience - Exploring the Latest Features of Tallyman Axis Lo...Enhancing User Experience - Exploring the Latest Features of Tallyman Axis Lo...
Enhancing User Experience - Exploring the Latest Features of Tallyman Axis Lo...Scott Andery
 
Potential of AI (Generative AI) in Business: Learnings and Insights
Potential of AI (Generative AI) in Business: Learnings and InsightsPotential of AI (Generative AI) in Business: Learnings and Insights
Potential of AI (Generative AI) in Business: Learnings and InsightsRavi Sanghani
 
Use of FIDO in the Payments and Identity Landscape: FIDO Paris Seminar.pptx
Use of FIDO in the Payments and Identity Landscape: FIDO Paris Seminar.pptxUse of FIDO in the Payments and Identity Landscape: FIDO Paris Seminar.pptx
Use of FIDO in the Payments and Identity Landscape: FIDO Paris Seminar.pptxLoriGlavin3
 
Transcript: New from BookNet Canada for 2024: Loan Stars - Tech Forum 2024
Transcript: New from BookNet Canada for 2024: Loan Stars - Tech Forum 2024Transcript: New from BookNet Canada for 2024: Loan Stars - Tech Forum 2024
Transcript: New from BookNet Canada for 2024: Loan Stars - Tech Forum 2024BookNet Canada
 

Recently uploaded (20)

The State of Passkeys with FIDO Alliance.pptx
The State of Passkeys with FIDO Alliance.pptxThe State of Passkeys with FIDO Alliance.pptx
The State of Passkeys with FIDO Alliance.pptx
 
The Fit for Passkeys for Employee and Consumer Sign-ins: FIDO Paris Seminar.pptx
The Fit for Passkeys for Employee and Consumer Sign-ins: FIDO Paris Seminar.pptxThe Fit for Passkeys for Employee and Consumer Sign-ins: FIDO Paris Seminar.pptx
The Fit for Passkeys for Employee and Consumer Sign-ins: FIDO Paris Seminar.pptx
 
Rise of the Machines: Known As Drones...
Rise of the Machines: Known As Drones...Rise of the Machines: Known As Drones...
Rise of the Machines: Known As Drones...
 
Assure Ecommerce and Retail Operations Uptime with ThousandEyes
Assure Ecommerce and Retail Operations Uptime with ThousandEyesAssure Ecommerce and Retail Operations Uptime with ThousandEyes
Assure Ecommerce and Retail Operations Uptime with ThousandEyes
 
Sample pptx for embedding into website for demo
Sample pptx for embedding into website for demoSample pptx for embedding into website for demo
Sample pptx for embedding into website for demo
 
A Journey Into the Emotions of Software Developers
A Journey Into the Emotions of Software DevelopersA Journey Into the Emotions of Software Developers
A Journey Into the Emotions of Software Developers
 
Data governance with Unity Catalog Presentation
Data governance with Unity Catalog PresentationData governance with Unity Catalog Presentation
Data governance with Unity Catalog Presentation
 
Merck Moving Beyond Passwords: FIDO Paris Seminar.pptx
Merck Moving Beyond Passwords: FIDO Paris Seminar.pptxMerck Moving Beyond Passwords: FIDO Paris Seminar.pptx
Merck Moving Beyond Passwords: FIDO Paris Seminar.pptx
 
The Role of FIDO in a Cyber Secure Netherlands: FIDO Paris Seminar.pptx
The Role of FIDO in a Cyber Secure Netherlands: FIDO Paris Seminar.pptxThe Role of FIDO in a Cyber Secure Netherlands: FIDO Paris Seminar.pptx
The Role of FIDO in a Cyber Secure Netherlands: FIDO Paris Seminar.pptx
 
(How to Program) Paul Deitel, Harvey Deitel-Java How to Program, Early Object...
(How to Program) Paul Deitel, Harvey Deitel-Java How to Program, Early Object...(How to Program) Paul Deitel, Harvey Deitel-Java How to Program, Early Object...
(How to Program) Paul Deitel, Harvey Deitel-Java How to Program, Early Object...
 
Genislab builds better products and faster go-to-market with Lean project man...
Genislab builds better products and faster go-to-market with Lean project man...Genislab builds better products and faster go-to-market with Lean project man...
Genislab builds better products and faster go-to-market with Lean project man...
 
Emixa Mendix Meetup 11 April 2024 about Mendix Native development
Emixa Mendix Meetup 11 April 2024 about Mendix Native developmentEmixa Mendix Meetup 11 April 2024 about Mendix Native development
Emixa Mendix Meetup 11 April 2024 about Mendix Native development
 
From Family Reminiscence to Scholarly Archive .
From Family Reminiscence to Scholarly Archive .From Family Reminiscence to Scholarly Archive .
From Family Reminiscence to Scholarly Archive .
 
Time Series Foundation Models - current state and future directions
Time Series Foundation Models - current state and future directionsTime Series Foundation Models - current state and future directions
Time Series Foundation Models - current state and future directions
 
So einfach geht modernes Roaming fuer Notes und Nomad.pdf
So einfach geht modernes Roaming fuer Notes und Nomad.pdfSo einfach geht modernes Roaming fuer Notes und Nomad.pdf
So einfach geht modernes Roaming fuer Notes und Nomad.pdf
 
Decarbonising Buildings: Making a net-zero built environment a reality
Decarbonising Buildings: Making a net-zero built environment a realityDecarbonising Buildings: Making a net-zero built environment a reality
Decarbonising Buildings: Making a net-zero built environment a reality
 
Enhancing User Experience - Exploring the Latest Features of Tallyman Axis Lo...
Enhancing User Experience - Exploring the Latest Features of Tallyman Axis Lo...Enhancing User Experience - Exploring the Latest Features of Tallyman Axis Lo...
Enhancing User Experience - Exploring the Latest Features of Tallyman Axis Lo...
 
Potential of AI (Generative AI) in Business: Learnings and Insights
Potential of AI (Generative AI) in Business: Learnings and InsightsPotential of AI (Generative AI) in Business: Learnings and Insights
Potential of AI (Generative AI) in Business: Learnings and Insights
 
Use of FIDO in the Payments and Identity Landscape: FIDO Paris Seminar.pptx
Use of FIDO in the Payments and Identity Landscape: FIDO Paris Seminar.pptxUse of FIDO in the Payments and Identity Landscape: FIDO Paris Seminar.pptx
Use of FIDO in the Payments and Identity Landscape: FIDO Paris Seminar.pptx
 
Transcript: New from BookNet Canada for 2024: Loan Stars - Tech Forum 2024
Transcript: New from BookNet Canada for 2024: Loan Stars - Tech Forum 2024Transcript: New from BookNet Canada for 2024: Loan Stars - Tech Forum 2024
Transcript: New from BookNet Canada for 2024: Loan Stars - Tech Forum 2024
 

CHS NC 2 Guide for Instructors

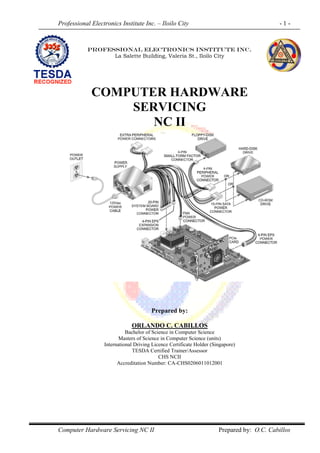
  • 1. Professional Electronics Institute Inc. – Iloilo City - 1 - Computer Hardware Servicing NC II Prepared by: O.C. Cabillos PROFESSIONAL ELECTRONICS INSTITUTE INC. La Salette Building, Valeria St., Iloilo City COMPUTER HARDWARE SERVICING NC II Prepared by: ORLANDO C. CABILLOS Bachelor of Science in Computer Science Masters of Science in Computer Science (units) International Driving Licence Certificate Holder (Singapore) TESDA Certified Trainer/Assessor CHS NCII Accreditation Number: CA-CHS0206011012001
  • 2. Professional Electronics Institute Inc. – Iloilo City - 2 - Computer Hardware Servicing NC II Prepared by: O.C. Cabillos A. BASIC COMPETENCIES A.1. Participate in Workplace Communication Workplace – the American Heritage Dictionary defines workplace as a place, such as an office or factory, where people are employed. In other words this is the common working place of employees. Communication – is the transfer of information such as though or messages through a medium between two or more subjects. Workplace communication – a communication that is taking place in the workplace that involve people of the different levels. This type of communication is very important as it contributes many aspects in the growth of a certain institution. For an effective workplace communication, an employee should: 1. Know that… –included here are facts about your organization and their specific job – what business you are in, who your customers are, specific details about your product or service, where forms are located, who to see when there is a problem ... 2. Master that… –included here are the practical skills required to do their job well – repairing a machine, filling out an invoice, designing a building, writing a software program ... 3. Feel that… –included here are the interactions that give them a sense of belonging and self-worth – being listened to, respected, trusted, valued ... Communication may be working effectively at the higher level but fails on the lower level or vise versa. Gone are the days when departments could stand as silos, isolated from the rest of the organization by impenetrable barriers. Intra-national and international competition is now so fierce that everyone in the organization needs to collaborate closely on solving organizational challenges and on achieving agreed strategic objectives. As a member of an organization’s technical team, it’s very important that communication between you and the next higher level of persons in authority should have a very well established form of communication. A.2. Work in a Team Environment
  • 3. Professional Electronics Institute Inc. – Iloilo City - 3 - Computer Hardware Servicing NC II Prepared by: O.C. Cabillos The key to working well in teams is to have great communication among everyone involved. As a team member, communication is critically important. If you have a problem with other team members, talk to them directly. If you can't talk and listen to other team members you might as well be working individually. Communicating effectively can also make your team, as a whole, work better and accomplish your given tasks quicker. Here are some other ideas to help you work well with team members: 1. First focus on the work assigned to you. If you finish with your task before other team members, ask other members if they need your help. 2. Meet your deadlines. If you must miss a deadline, apologize for not meeting it, tell your team when they'll have your part, and then make sure you meet that deadline. The rest of the team will respect you more for owning up to your problem rather than blaming someone else. 3. Be supportive of your team members. When discussing ideas for the project you're working on, be sure to consider other team members' suggestions, even if you don't think they'll work. Considering other ideas shows you're interested in someone else's opinion. 4. Realize the project is a collaborative effort. It doesn't belong to any one person. It's important that each team member can claim ownership of some part of the project. By having ownership they're more likely to put forth the effort to make the project a success. 5. If you're leading the team, let the team members know what's expected of them. Establish clear objectives and how each person will contribute. Be open to making changes if someone else can do a certain aspect of the job better than the person you assigned to do it. 6. Motivate the team.
  • 4. Professional Electronics Institute Inc. – Iloilo City - 4 - Computer Hardware Servicing NC II Prepared by: O.C. Cabillos Work on establishing and maintaining each team member's morale and their motivation to succeed as a team. Give them a reason to want the team to succeed rather than riding off into the project sunset like the Lone Ranger. 7. Work together on the plan. The team will feel more ownership of the project if everyone works together to set goals and establish deadlines for the various aspects of the job. Call on the team members to meet together periodically to check on progress. If possible switch jobs among team members if necessary. Everyone needs to pitch in to be sure the job is done correctly and on time. Always remember the golden rule. You have no monopoly of knowledge. A.3. Practice Career Professionalism Everyone wants to become a "professional" these days or to work in a professionally managed organization. While being professional may be a virtue, what exactly is implied by being a professional is often found lacking in individuals and companies. In fact, some family owned companies have higher professional standards than our so-called professionally managed companies. Many people still think that one can become a professional simply by acquiring a degree and many companies have the mistaken belief that they can claim to be professional by hiring a certain number of MBAs, and PhD’s. Let’s define professionalism first. Professionalism is defined by the dictionaries as the ―expertness characteristic of a professional‖ or the ―pursuit of an activity as an occupation‖. On the other hand: The term 'career' was traditionally associated with paid employment and referred to a single occupation. In today's world of work the term 'career' is seen as a continuous process of learning and development. Contributions to a career can include:  Work experience  Community involvement  Employment  Life roles  Enterprise activities  Cultural activities
  • 5. Professional Electronics Institute Inc. – Iloilo City - 5 - Computer Hardware Servicing NC II Prepared by: O.C. Cabillos  Training  Education  Interests  Sport  Volunteer work. Practicing career professionalism depends on the various institutions which you are in. Different organizations implement different style of code and conduct for their employees. It does not mean however, that finishing a course in college will classify you as a holistic professional. Upon entry to an institution, try to put the following in your mind: 1. Know their code of ethics and conducts for professionals. 2. A background of their SOPs (standard operating procedures) is also a good start to have a better glimpse of the company. 3. Know the company’s policies, operations, and the followed procedures and standards. 4. Don’t forget the fundamental rights at work including gender sensitivity. 5. Personal hygiene also matters most in some companies. Don’t take this for granted. 6. Last but not the least, don’t forget the golden rule. It states “that one has a right to just treatment, and a responsibility to ensure justice for others”. A.4. Practice Occupational Health and Safety Procedures Occupational health and safety (OHS) refers to the legislation, policies, procedures and activities that aim to protect the health, safety and welfare of all people at the workplace. In the website of the Department of Labor and Employment, the definition is: ―OSH Standards are mandatory rules and standards set and enforced to eliminate or reduce occupational safety and health hazards in the workplace.‖ Safety is an issue in every profession. PC technicians must be aware of the potential hazards to personnel and equipment encountered when working with lasers, high-voltage equipment, and moving parts. They must also be aware of the potential causes and damaging effects of electrostatic discharge (ESD) so that they can prevent its occurrence. Many of the materials used in the construction of computer-related equipment can be ecologically harmful. Also, many of the products used to service computer equipment can have an adverse effect on the environment. Therefore, the technician should be aware of requirements associated with the disposal of this equipment
  • 6. Professional Electronics Institute Inc. – Iloilo City - 6 - Computer Hardware Servicing NC II Prepared by: O.C. Cabillos and these materials. What is the purpose of OSH Standards? OSH Standards aim to provide at least the minimum acceptable degree of protection that must be afforded to every worker in relation to the working conditions and dangers of injury, sickness or death that may arise by reason of his or her occupation. The provision of OSH Standards by the State is an exercise of the police power, with the intention of promoting the welfare and well-being of workers. What are covered by the General OSH Standards? All establishments, workplaces and other undertakings are covered, including agricultural enterprises whether operating for profit or not, except:  Residential places exclusively devoted to dwelling purposes;  Those directly engaged in land, sea and air transportation, except their dry dockers, garages, hangers and maintenance, and repair shops and offices;  The activities of a lessee regarding the safety of the mining claim or lease, including mines safety, mineral conservation and pollution in establishments or work places falling under mining industry. What are the duties and responsibilities of the employers and the employees in relation to enforcement and compliance with OSH Standards in the workplace? Duties of the employers  Adopt administrative policies on safety in accordance with the provisions of the Standards;  Report to the Regional Director or his/her duly authorized representative the policies adopted and the safety organization established;  Submit report to the Regional Director or his/her duly authorized representative once in every three months on the safety performance, safety committee meetings and its recommendations and measures taken to implement the recommendation;  Act on recommended safety measures;  Provide access to appropriate authorities. Duties of the employees
  • 7. Professional Electronics Institute Inc. – Iloilo City - 7 - Computer Hardware Servicing NC II Prepared by: O.C. Cabillos  Follow safety policies;  Report unsafe conditions and practices to the Supervisor;  Serve as member of the Health and Safety Committee;  Cooperate with Health and Safety Committee As the number of computers increases in the companies here in the Philippines, the demand for a high skilled technical people also increases. With a properly trained technician, owners of these institutions are assured of a safe working technical environment. Below is a list of common things for the technical people to remember when dealing with electronic equipments like computers. 1. Eating and drinking is not allowed on the electronic workplace. 2. Always read any safety warnings that pertain to your equipment. 3. Make sure the laboratory or the place where you are fixing electronic equipments is well protected with circuit breakers. 4. A fire extinguisher (class C – CO2) is also a must in every computer laboratory for use in case of fire 5. If possible, minimize daisy-chaining connections with just one outlet to prevent overload. 6. Be sure any system you are working on is completely unplugged from the wall outlet. 7. When working with electronic equipments especially computer units, make sure you prevent damage from electrostatic discharge (ESD) by using an anti-static wrist strap. Without this device, ground yourself first by touching the casing of the computer unit before touching any electronic components inside the system unit. 8. The use of an automatic voltage regulator (AVR) or an uninterruptible power supply (UPS) is also an advantage as these equipments help you stay away from danger of unsafe power fluctuations. 9. Know how to organize and run cables in a safe manner. 10. When dealing with emergencies on electronic components, make sure to immediately shut down the power of the device to prevent fire. 11. Finally, use your senses. Whenever a problem arises, you have your senses to dictate whether something wrong is happening or not. The most important thing is, “your common sense”. Hereunder are the hand and power tools safety measures: 1. Know the precise purpose for each tool in your toolbox, and use it only for the specific task it was designed to do. 2. Never use any hand tool or power tool unless you are trained to do so. 3. Inspect tools before each use, replace or repair tools if work or damaged. 4. Never test a cutting edge with your fingers, instead test it on a scrap material.
  • 8. Professional Electronics Institute Inc. – Iloilo City - 8 - Computer Hardware Servicing NC II Prepared by: O.C. Cabillos 5. Select the right size of tool for the job, don’t use cheaters. A cheater is a tool that will do the job, but is the wrong tool for the job to be performed. 6. Carry tools correctly, never place sharp or pointed tools in your pocket. 7. When carrying tools by hand, point cutting edges away from you and towards the ground. 8. Wear personal protective equipment, such as safety goggles, face shields, and gloves as required. 9. When working with any tool, make sure to follow the manufacturer’s recommended directions. 10. Be sure to wear clothing that doesn’t hang loosely or dangle.
  • 9. Professional Electronics Institute Inc. – Iloilo City - 9 - Computer Hardware Servicing NC II Prepared by: O.C. Cabillos B. COMMON COMPETENCIES B.1. Apply Quality Standards Quality - an inherent or distinguishing characteristic; a property. Standards - an acknowledged measure of comparison for quantitative or qualitative value; a criterion. Applying quality standards means one thing, to make sure that everything follows a specific, acceptable output recognized by a specific industry or institution. As a technical person, parts of your tasks are the following: 1. Checking of a quality hardware/software. Newly acquired hardware should be check against their documentation. Check for accurate specifications as indicated in the warranty card/sticker. Make sure they all work based on the accepted specifications of your company. Note all discrepancies and report immediately to your immediate supervisor. Make an incident report if necessary. Do the same with your software. 2. Check for a stable supply of power. A stable supply of power ensures quality of work. During troubleshooting, diagnosis and repair is implemented faster with a steady supply of power. Otherwise, it may lead to more trouble and danger to the worst. 3. Check for tools and equipments availability. Correct tools and equipments used in the laboratory when diagnosing computers enable proper identification of faults. Not only you make sure that you perform your work with superior quality but also it enables you to stay out of danger. 4. Follow the prescribed OHS procedures of your company. By following the prescribed OHS procedures, you make sure that everyone is away from danger, making sure each personnel perform his work with quality and quantity at the same time. 5. Don’t forget your Personal Protective Equipments (PPE) An ounce of prevention is better than a pound of cure. Always remember this golden rule. Provide yourself with safety gears that
  • 10. Professional Electronics Institute Inc. – Iloilo City - 10 - Computer Hardware Servicing NC II Prepared by: O.C. Cabillos make computing and troubleshooting at the same time, safer. By maintaining this habit in your workplace, you are sure of a safe working environment and an accident-free laboratory. B.2. Perform Computer Operations Before performing successful computer operations, one must be able to identify the basic components of the computer’s hardware and software. A basic computer system has the following hardware and software components: 1. System Unit – the main component of your computer hardware. Most non-technical people refer to this thing as the ―cpu‖ but actually it’s not. It’s actually a motherboard with the central processing unit chip (cpu) inside, together with the other peripherals enclosed in a metallic casing. This casing houses the most important circuitry of your computer hardware system including the buttons and switches for turning its power. 2. Keyboard - the most familiar computer input device, the keyboard is used to introduce characters and commands into the system. 3. Mouse—an input device used with graphical user interfaces to point to, select, or activate images on the video monitor. By moving the mouse along a surface, the user can cause a cursor on the display to move in a corresponding manner.
  • 11. Professional Electronics Institute Inc. – Iloilo City - 11 - Computer Hardware Servicing NC II Prepared by: O.C. Cabillos 4. Video display—a visual output device that displays characters and graphics on a screen. Video displays are sometimes referred as computer monitor, computer screen, display terminal or crt. 5. Printer - a hard copy output device that applies data to paper. Normally, methods of placing information on a page include dot-matrix printer, inkjet printer, or laser printer.
  • 12. Professional Electronics Institute Inc. – Iloilo City - 12 - Computer Hardware Servicing NC II Prepared by: O.C. Cabillos 6. Speakers—Audio output devices used to deliver voice, music, and coded messages. 7. Desktop - It is the background for all programs and contains the commands needed for accessing those programs. Desktops vary from one operating system (OS) to another, and even vary somewhat from version to version of a particular OS. Whatever type of OS you use, it is very important to learn how to use the desktop correctly, since it is the base for all computer operations. 8. The Start button - In Windows XP, the 'start' button is used to access programs and support documentation. It also has links for the most commonly used folders, 'my computer' and 'my network places'.
  • 13. Professional Electronics Institute Inc. – Iloilo City - 13 - Computer Hardware Servicing NC II Prepared by: O.C. Cabillos 9. Internet Explorer – is an example of a browser like Mozilla Firefox. A 'browser' is simply a piece of software that lets you explore the internet. In Windows XP, there are several ways to open IE (Internet Explorer). The easiest is to use the IE icon (the blue lower case letter 'e') in the QL (Quick Launch) toolbar. If you have not activated the QL toolbar, you can launch IE from the start menu: START >> INTERNET EXPLORER. If there is an IE icon on the desktop, you can use either the 'show desktop' icon in the QL toolbar or you can right-click on a clear area of the taskbar and select 'show the desktop' to allow access to the desktop. If you don't have an IE icon on the desktop and you want one there. Go to START >> ALL PROGRAMS >> locate Internet Explorer in the program list >> RIGHT- click on INTERNET EXPLORER and select SEND TO >> DESKTOP. Internet Explorer Mozilla Firefox
  • 14. Professional Electronics Institute Inc. – Iloilo City - 14 - Computer Hardware Servicing NC II Prepared by: O.C. Cabillos 10. Microsoft Word - is a word processor/text editor. Other similar programs are Windows' Notepad and Windows' Word Pad. Word is by far the most powerful of the three. When a user wants to type something and manipulate the text within the document, this software is one of the best choices. Below is an example of a Microsoft Word screen. 11. Microsoft Excel - is a spreadsheet programs that is primarily used for calculation and analysis. It is a very powerful tool. It allows you to perform numerous calculations in a short period of time.
  • 15. Professional Electronics Institute Inc. – Iloilo City - 15 - Computer Hardware Servicing NC II Prepared by: O.C. Cabillos 12. Windows Explorer - is the file manager application for the Windows operating system. It can be accessed in a number of ways. If you get to it through 'My Computer', it will start with a list of the drives on your computer and will look similar to the following image: If you want to see the full hierarchical structure, look at the image below. The 'My Documents' section at the top of the left pane is essentially a shortcut to the 'my documents' folder shown in the expanded view of the
  • 16. Professional Electronics Institute Inc. – Iloilo City - 16 - Computer Hardware Servicing NC II Prepared by: O.C. Cabillos folders below it. If you access Windows Explorer by going to START >> ALL PROGRAMS >> ACCESSORIES >> WINDOWS EXPLORER, it will look much like this image.
  • 17. Professional Electronics Institute Inc. – Iloilo City - 17 - Computer Hardware Servicing NC II Prepared by: O.C. Cabillos C. CORE COMPETENCIES C.1. Install Computer Systems and Networks Before you install computer systems and networks, make sure you have hand tools and equipments which you will use to accomplish certain tasks. Here are the list of common tools and equipments necessary for computer and network installation, repair and maintenance: 1. Electrostatic discharge (ESD) protection kit. This includes a wrist strap and mat and prevents static damage to the components on which you are working. These kits consist of a wrist strap with a ground wire and especially conductive mat with its own ground wire. You also can get just the wrist strap or the antistatic mat separately. In areas or times of the season when there is low humidity, static charges are much more likely to build up as you move, increasing the need for ESD protection. 2. Needle-nose pliers and hemostats (curved and straight). These are great for gripping small items and jumpers, straightening bent pins, and so on. 3. Electric screwdriver. Combined with hex, Phillips, standard, and Torx bit sets, this tool really speeds up repetitive disassembly/assembly.
  • 18. Professional Electronics Institute Inc. – Iloilo City - 18 - Computer Hardware Servicing NC II Prepared by: O.C. Cabillos 4. Flashlight. You should preferably use a high-tech LED unit which enable you to see inside dark systems and are easy on batteries. 5. Wire cutter or stripper. This is useful for making or repairing cables or wiring. For example, you'd need this (along with a crimping tool) to make 10BASE-T Ethernet cables using UTP cable and RJ-45 connectors. 6. Vise or clamp. This is used to install connectors on cables, crimp cables to the shape you want, and hold parts during delicate operations. This type of device is very useful for making cables or for other delicate operations during which an extra set of hands to hold something might be useful. 7. Metal file. This is used to smooth rough metal edges on cases and chassis and to trim the face-plates on disk drives for a perfect fit.
  • 19. Professional Electronics Institute Inc. – Iloilo City - 19 - Computer Hardware Servicing NC II Prepared by: O.C. Cabillos 8. Markers, pens, and notepads. Use these for taking notes, marking cables, and so on. 9. Windows 98/98SE or Me startup floppy. These disks have DOS 7.1 or 8.0 and real-mode CD ROM/DVD drivers, which can be used to boot, test the system and possibly load other software. 10. Windows 2000/XP original (bootable) CD. This can be used to boot test the system from a CD-ROM/DVD drive, attempt system recovery, OS installation, or to run other software. Microsoft also has a downloadable set of floppy disks (six disks for Windows XP) available at support.microsoft.com; however, most systems capable of running Windows 2000 or XP should be able to boot from the CD. 11. Diagnostics software. This commercial, shareware, or freeware software can be used for PC hardware verification and testing. 12. Power on self test (POST) card such as the Post Probe. This is used for displaying POST diagnostics codes on systems with fatal errors.
  • 20. Professional Electronics Institute Inc. – Iloilo City - 20 - Computer Hardware Servicing NC II Prepared by: O.C. Cabillos 13. Nylon cable-ties. These are used to help in routing and securing cables; neatly routed cables help to improve airflow in the system. 14. Digital pocket multi-meter. This is used for checking power supply voltages, connectors, and cables for continuity. A special type of tester called Network/LAN tester is used to check cable continuity in a Local Area Network. 15. Cleaning swabs, canned air (dust blower), and contact cleaner chemicals. These are used for cleaning, lubricating, and enhancing contacts on circuit boards and cable connections. 16. Data transfer cables and adapters. These are used for quickly connecting two systems and transferring data from one system to another. This includes serial and parallel cables (often called Laplink, Interlink, or Direct Cable Connect cables); Ethernet crossover cables;
  • 21. Professional Electronics Institute Inc. – Iloilo City - 21 - Computer Hardware Servicing NC II Prepared by: O.C. Cabillos as well as more specialized USB-to-Ethernet, USB-to-USB, or USB- to-parallel adapters. 17. 2 1/2" ATA drive cables and adapters. These are used for connecting 2 1/2" ATA drives to laptop or desktop systems for transferring or recovering data. This includes 44-pin (2 1/2") ATA- to-40-pin (3 1/2") ATA ribbon cable/power adapters, 44-pin ATA-to- USB/FireWire adapters, and 2 1/2" USB/FireWire external drive enclosures. 18. External mouse, keyboard, and keyboard/mouse PS/2 Y adapter. These are useful for operating a system in which the existing keyboard or pointing device is defective or difficult to use. The Y adapter is required on most laptops to use an external PS/2 keyboard alone or a PS/2 keyboard and mouse together.
  • 22. Professional Electronics Institute Inc. – Iloilo City - 22 - Computer Hardware Servicing NC II Prepared by: O.C. Cabillos 19. USB powered hub, USB/FireWire cable adapter. This is useful for connecting external USB devices, especially USB keyboards, mice, and external drives. The cable adapters and gender changers are recommended for connecting different types of USB and FireWire devices. 20. Spare screws, jumpers, standoffs, and so on. These are used in case some go missing or are lost from the system you are working on. 21. Spare CR-2032 lithium coin cell batteries. These are used as the CMOS RAM batteries in most systems, so it is a good idea to have a replacement or two on hand. Although a number of CR20xx battery types are available, most systems use the CR2032. Installing computer systems and networks require two major components: the computer and the network peripherals. Whether you are going to purchase an assembled computer with all the peripherals or assemble it on your own, it is important to take note of the following components. The more you know them and how they work, the better is your chance of having a nearly perfect personal computer when it comes to performance and durability. The components of building a typical personal computer are as follows:
  • 23. Professional Electronics Institute Inc. – Iloilo City - 23 - Computer Hardware Servicing NC II Prepared by: O.C. Cabillos 1. Casing and power supply 2. Motherboard 3. Processor with heat-sink and fan 4. Memory 5. Video Card and display 6. Keyboard and Mouse 7. Optical Drive (CD/DVD) 8. Floppy drive (optional) 9. Modem (optional) 10. Sound Card & Speaker (optional) 11. Cables 12. Other Hardware (nuts, bolts, stand-offs, braces) 13. Operating System 14. Application Software For the networking side, you need: 1. Network Interface Card (NIC/LAN Card) 2. RJ-45 Connectors 3. UTP-Category 5 (the most common) 4. Hub/Switch (Switch is recommended) 5. Router (Wireless for WI-FI, optional) 6. Crimping Tool 7. Network/LAN Tester These are the basic hardware and software for you to be able to have a typical personal computer with software. Also, typical needs for a computer to be connected to the local area network are being enumerated for your convenience. Optional components need not to be present for the typical computer to work. A. Casing and the Power Supply – most casing and power supply are sold as unit although vendors may sell them separately. You can choose from among the many designs and styles of your liking. Just keep something in mind, to buy only those that follow the standard form factors and wattage rating should match the demands of your hardware. The newer your hardware with most components, the higher the power supply wattage is recommended. The most popular form factors of the casing are:
  • 24. Professional Electronics Institute Inc. – Iloilo City - 24 - Computer Hardware Servicing NC II Prepared by: O.C. Cabillos  Full tower  Mid or mini- tower  Desktop  Low-profile (also called Slimline) Don’t forget that your choice of the casing should always match the form factor of the motherboard. Make sure you know exactly the form factor of the motherboard. B. Processor – both Intel and AMD sell their processors in two ways: boxed or OEM. These two ways of selling processors may have the same specifications, but may vary in some aspect like warranties, packaging and other supplemental components. If you want more information on the difference between the two, ask your vendor about it. The motherboards you consider to buy should have one of the following sockets or slots:  Socket 1366 – supports the new Intel I7 Processors  Socket 775 - supports the third-generation Intel Pentium 4 processors, including the newer Pentium 4 EE (Extreme Edition), Pentium D, and Pentium 4 E.  Socket 939 - supports the second-generation Athlon 64 FX processors, including the newer Athlon 64 X2.  Socket 754 - supports the Athlon 64 processors The following socket types belong to the older Pentium 4. If you decide to purchase them, you will have a limited upgrade option for your processor.  Socket 478. Supports the second- and third-generation Intel Pentium 4 and compatible Celeron processors  Socket A (462). Supports the AMD Athlon, Athlon XP, and Duron processors  Socket 370 (also called PGA370). Supports the PGA versions of the Intel Pentium III and compatible Celeron processors
  • 25. Professional Electronics Institute Inc. – Iloilo City - 25 - Computer Hardware Servicing NC II Prepared by: O.C. Cabillos Depending on the type of motherboard you select, there are cases where jumpers are being used to give the proper voltage power to the processor. Read the motherboard manual carefully. Unlike in newer motherboards, were power to the processor is being automatically regulated by a chip called voltage regulator module (VRM), the older processor require jumpers or DIP switch settings. If you fail to set the correct voltage to the processor using the jumpers, you might end damaging the processor as well as the motherboard. C. Motherboards – is the main board or the system board of your personal computer. It houses most of the ic’s and chips of the computer including slots. Several compatible form factors are used for motherboards. The form factor refers to the physical dimensions and size of the board and dictates into which type of case the board will fit. The types of compatible industry-standard motherboard form factors generally available for system builders are as follows: Modern Form Factors are: * BTX * ATX * MicroATX * FlexATX * NLX * MiniITX D. Memory - is installed in the form of dual inline memory modules (DIMMs). Three physical types of main memory modules are commonly used in PC systems today, with several variations of each. The main types are as follows:p  168-pin SDRAM DIMMs  184-pin DDR DIMMs  240-pin DDR DIMMs The 168-pin SDRAM DIMMs are found only in older or lower- end systems today. DIMMs have become popular because they are 64 bits wide and can be used as a single bank on a Pentium or higher-class processor that has a 64-bit external data bus.
  • 26. Professional Electronics Institute Inc. – Iloilo City - 26 - Computer Hardware Servicing NC II Prepared by: O.C. Cabillos Double data rate (DDR) SDRAM memory is a newer variation on SDRAM in which data is transferred twice as quickly, and it is the most common type of memory used in recent systems. DDR2 DIMMs came out in new systems during 2004 and are fast becoming the most common type of memory in new systems. Current systems using a 64-bit CPU bus require a single DIMM (64 bits wide) to make a single bank. Systems using DDR or DDR2 DIMMs can also use dual-channel memory, in which pairs of matching DIMMs enable double the memory throughput. E. I/O Ports – all motherboard has several I/O ports for the various needs of the users. If in case you encountered a motherboard without your desired port, it is usually provided as an external device which is plug-in on the vacant slot of the motherboard (ISA,PCI,AGP, PCI-E). Newer systems usually has the following ports embedded on them:  PS/2 Keyboard connector (mini-DIN type)  PS/2 Mouse port (mini-DIN type)  One or two serial ports  Parallel port  Four or more USB ports  Two or more FireWire ports  One or two analog VGA or DVI video connectors (integrated video)  RJ-45 port for 10/100 or 10/100/1000 Ethernet  Audio connectors (speakers, microphone, and so on)  Two or more serial ATA ports There are modern motherboards that lack the legacy ports (serial, parallel, keyboard and mouse) because they rely on USB for connections. The choice for motherboard still depends on the need and the budget of the user. Usually high-end and expensive motherboards do not have a built-in video and sound card. Disadvantages of boards with built-in ports include no choice of the features of the specific port (vga, LAN, sound), and
  • 27. Professional Electronics Institute Inc. – Iloilo City - 27 - Computer Hardware Servicing NC II Prepared by: O.C. Cabillos when an onboard item is damage, sometimes, it also include other parts of the motherboard. F. Hard Disk Drives – sometimes referred as fixed disk or ―Winchester drive‖ (by IBM), is now considered a requirement of today’s pc. At least a minimum of 80 Gb of storage space is needed in today’s modern pc. The need of a large amount of hard disk capacity depends on the user’s needs. Today, hard disk ranges from 40 Gb (considered obsolete) to 1.5 Tb. Hard disk may come as internal or external in form. They may be using the older IDE/EIDE interface (PATA) or the more common in today’s system which is the SATA. Most systems have USB 2.0, and more and more systems have IEEE 1394 (FireWire) built in to the motherboard or added as PCI expansion cards. Although FireWire and USB 2.0 based drives have performance similar to ATA drives and can be moved from system to system, they are not recommended as primary drives. However, they can be used for
  • 28. Professional Electronics Institute Inc. – Iloilo City - 28 - Computer Hardware Servicing NC II Prepared by: O.C. Cabillos additional portable storage or system backup. Several brands of high-quality hard disk drives are available from which to choose, and most offer similar performance within their price and capacity categories. In fact, you might notice that the capacities and specifications of the various PATA and SATA drives certain manufacturers offer are remarkably similar. This is because a single drive assembly is manufactured for use with both interfaces. Popular hard disk manufacturers include Seagate, Maxtor, Western Digital, Toshiba, Quantum and others. G. Video Card and Display – a system will be incomplete without a working video card and a display (monitor). In today’s system, the video card is already on-board or built-in. If there is no VGA connecter at the motherboard, you don’t have a choice but to buy a video card. Make sure the video card will match the bus type of your motherboard (PCI, AGP, PCI-E). With the video card comes its partner, the computer monitor or display. Long ago, the most common is the CRT (cathode ray tube), but nowadays, LCD (liquefied crystal display) prices drop so much that many people can afford such high quality display. Still your choice is yours. LCD is priced higher than its CRT counterpart. But if you want high quality display without worrying about the price, you may purchase LCD. PCI
  • 29. Professional Electronics Institute Inc. – Iloilo City - 29 - Computer Hardware Servicing NC II Prepared by: O.C. Cabillos H. Network Interface Card (NIC) – otherwise known as the LAN card or simply network card is a hardware that facilitates communication between a computer and the networking medium. In modern PCs, it is usually in the form of RJ-45 port with a speed between 10-1000 mbps. If there is no on-board RJ-45 connector, you have to purchase a separate LAN card. Common brands are 3COM, Planet, LinkSys, DLink and Cisco. LAN cards that facilitate connection in the network without using cables are called WLAN Card or the wireless LAN card. I. Hub/Switch – a device found at the center of a bus topology. It is used to connect all the nodes within the network. There are generally two types of hub, an active and a passive. An active hub is a type of hub that regenerates the signal as it enters the device and broadcast it, while a passive hub just pass the signal receive to its destination node. Switch is preferred as compared to a hub as it allows faster speed of communication between nodes due to its internal design circuitry. AGP PCI Express
  • 30. Professional Electronics Institute Inc. – Iloilo City - 30 - Computer Hardware Servicing NC II Prepared by: O.C. Cabillos J. Router – this device connects networks with different physical media and translates between different network architecture such as token ring and Ethernet. A wireless router on the other hand, has the functionality of the ordinary router, plus it allows wireless devices to be connected through the network usually following the WI-FI standards. K. UTP Category 5 and RJ-45 – unshielded twisted pair category 5 is the most common networking cable being used in most companies. Aside from its ease of installation, its less expensive and is easier to maintain. At the end of both cables, the connector being used is the RJ-45.
  • 31. Professional Electronics Institute Inc. – Iloilo City - 31 - Computer Hardware Servicing NC II Prepared by: O.C. Cabillos L. Software – may be classified into two: system and application. Examples of a system software is the operating system like Microsoft Windows (95, 98, ME, 2K, XP, Vista, Version 7) or the open-source versions like the Linux (Ubuntu, Red Hat, Debian). Examples of an application system are word processor like Microsoft Word, spreadsheet like Microsoft Excel, presentation software like Microsoft Powerpoint and many others.
  • 32. Professional Electronics Institute Inc. – Iloilo City - 32 - Computer Hardware Servicing NC II Prepared by: O.C. Cabillos Now, with all the hardware and software requirements ready we are now ready to assemble our personal computer. Make sure to check all the necessary requirements for both the software and hardware materials. 1. Assembly preparation You have to take note of some important tools to use in pc assembly. You will have to use the following: a 1/4" nut driver or Phillips-head screwdriver for the external screws that hold the cover in place and a 3/16" nut driver or Phillips-head screwdriver for all the other screws. Needle-nose pliers can also help in removing motherboard standoffs, jumpers, and stubborn cable connectors. Because of the current market standardization, be aware of the size of the screw as well as the tools you are going to use for your assembly and disassembly process. Lay all the hardware needed in your assembly area like the one shown below:
  • 33. Professional Electronics Institute Inc. – Iloilo City - 33 - Computer Hardware Servicing NC II Prepared by: O.C. Cabillos After the peripherals and other components of a pc are assembled, your work should resemble the one shown below. Other materials you need after you assemble the hardware are software related. The first software you need is the operating system. Whether you will be using a window-based operating system or a Linux-based, both come in a bootable cd form. In an older Windows-98, you have an option of using a bootable floppy disk to start your work. Make sure you know a lot of dos-based commands. 2. Record Physical configuration While you are doing the assembly, make sure you record the entire physical configuration, including the jumper and dip switch settings, cable orientation and placement, ground wire and even adapter locations. You can use a small notebook for this need or better create a simple database or worksheet for this information. During the CHS NC2 assessment, one task is to list down all hardware components you have together with a description of each. A sample listing is shown below:
  • 34. Professional Electronics Institute Inc. – Iloilo City - 34 - Computer Hardware Servicing NC II Prepared by: O.C. Cabillos The above table is just a representation of the actual inventory you are going to make. Other entries may vary depending on the actual hardware you have. The most important thing is, you know how to identify and describe each of the hardware you are dealing with. 3. Install the Motherboard Inspect the motherboard. If it is new, check the contents of the package as indicated. It should contain the motherboard itself, signal cables, I/O shield, stand-offs, manual, and the cd-driver installer. If it is a second-hand motherboard, make sure you do a test on the hardware on your vendor and see to it that it is working before purchasing it. a. Prepare the motherboard. Take it out of its package and out of the anti-static plastic or bag and place it above the plastic. Make sure you are working on a flat surface otherwise you might damage the motherboard when applying pressure when it’s laid off on an uneven surface. b. Install the processor first. Try to locate pin 1 on the processor. It is usually indicated by a corner on the chip marked by a dot or bevel. Be sure the pins on the processor are straight and not bent. If it is bent, use small needle-nose pliers to straighten the bent pins but do it carefully as you might end breaking the pin causing damage to the chip. On processors using LGA- 775 sockets, the precautionary measures should apply to the socket as the processor has no pins to be bent. Usually, the processor will not fit on the socket if it is in the wrong orientation, so don’t force the processor if Hardware Serial Number Description/Remarks 1. Main board 12345URKH-943 Compaq 0648H 2. Processor 5787364784EUIL Intel Pentium III 1.00 Ghz 3. Memory SDRAM – 256 MB 4. Video Card NVIDIA G-Force2 MX/MX 400 64 Mb 5. Hard Disk ST1234568 Seagate ST9870 80Mb PATA 6. Power Supply ATX 500-Watts SZ-500w 6. DVD Rom LG-123HJ Dual Layer DVD 7. Floppy Drive Panasonic, 1.44Mb, 3.5‖ 8. Keyboard PS/2 101/102 Keyboard 9. Mouse Genius USB Optical Mouse
  • 35. Professional Electronics Institute Inc. – Iloilo City - 35 - Computer Hardware Servicing NC II Prepared by: O.C. Cabillos you feel resistance when installing it. Insert the CPU into the ZIF socket by lifting the release lever until it is vertical. Then, align the pins on the processor with the holes in the socket and drop it down into place. When the processor is fully seated in the socket, push the locking lever on the socket down until it latches to secure the processor c. Attach the heatsink. Most heatsinks clip to the socket with one or more retainer clips.. Be careful when attaching the clip to the socket; you don't want it to scrape against the motherboard, which can damage circuit traces or components. You also need to keep the heatsink steady on the chip while attaching the clips, so do not move, tilt, or slide the heatsink while you attach it. Most heatsinks have a pre-applied thermal pad; otherwise, you will need to put a dab of heatsink thermal transfer compound (normally a white- or silver- colored grease) on the CPU before installing the heatsink. This prevents any air gaps and enables the heatsink to work more efficiently. If the CPU has an active heatsink (with a fan), plug the fan power connector into one of the fan connectors supplied on the motherboard. Optionally, some heatsinks use a disk drive power connector for fan power.
  • 36. Professional Electronics Institute Inc. – Iloilo City - 36 - Computer Hardware Servicing NC II Prepared by: O.C. Cabillos In newer systems, heatsinks do not require a clip. Instead, they are using screw at four areas. You have to use a flat screw-driver to twist the screw according to the direction of the arrow of the screw to tighten it. d. Configure the motherboard jumpers. In older systems, you have to configure the motherboard jumpers or dip switches so that proper voltage will be provided to the microprocessor. If this is the case, consult the motherboard manual on how to do this. In newer systems however, the automatic voltage regulator module chip together with the BIOS do this automatically. Just take a look at the manual for more information and safe installation. 4. Installing Memory Module Installing the memory module is one of the most important things to consider as there were already many burned memory chips in the past due to improper installation. Your computer system will not be complete without memory modules. The common memory modules are in the form of DDR and DDR2 DIMMS. On the other hand, DDR3 is used on the latest Intel Processor – the i7. Not all types of memory can be installed in the same manner. Consult your motherboard for the proper procedures on how to do it. Just remember that memory modules should only
  • 37. Professional Electronics Institute Inc. – Iloilo City - 37 - Computer Hardware Servicing NC II Prepared by: O.C. Cabillos be installed in one way that is following the proper keyed position with the notch on the slot as shown below. Otherwise, forcing it to install in the wrong orientation will result in damaging the memory and sometimes the motherboard. Be careful not to damage the connector. If you damage the motherboard memory connector, you could be facing an expensive repair. Never force the module; it should come out easily. If it doesn't, you are doing something wrong. 5. Mounting the new motherboard in the case The motherboard attaches to the case with standoffs. Different casing offers different standoffs. The purpose of these standoffs is to leave a space and serve as insulator between the motherboard and the casing itself. There are plastic and other types of standoffs in the market today. Follow the following procedures when installing the motherboard to the case: a. Find the holes in the new motherboard for the metal spacers and plastic standoffs. You should use metal spacers wherever there is a ring of solder around the hole. Use plastic standoffs where there is no ring of solder
  • 38. Professional Electronics Institute Inc. – Iloilo City - 38 - Computer Hardware Servicing NC II Prepared by: O.C. Cabillos b. Screw any metal spacers into the new case in the proper positions to align with the screw holes in the motherboard , c. Most motherboards today attach directly to the chassis or to a removable motherboard tray with screws that thread into brass standoffs attached to the chassis or tray. Below are three types of
  • 39. Professional Electronics Institute Inc. – Iloilo City - 39 - Computer Hardware Servicing NC II Prepared by: O.C. Cabillos standoffs, including two brass types and one plastic. One screws directly to the chassis or tray, whereas the others attach to the motherboard and then slide into notches in the case or tray. d. Install the I/O shield (if used) into the chassis by snapping it into place
  • 40. Professional Electronics Institute Inc. – Iloilo City - 40 - Computer Hardware Servicing NC II Prepared by: O.C. Cabillos e. Install the new motherboard into the case or motherboard tray. Either screw it directly to the standoffs or slide the standoffs already attached to the board by sliding the entire board into position. Be sure you align the I/O shield with the case or the ports on the back of the board with the I/O shield already in the case. Often, you will have to set the board into the case and slide it sideways to engage the standoffs into the slots in the case. When the board is in the proper position, the screw holes in the board should be aligned with all the metal spacers or screw holes in the case . f. Take the screws and any plastic washers that were supplied with the new motherboard and screw the board into the case
  • 41. Professional Electronics Institute Inc. – Iloilo City - 41 - Computer Hardware Servicing NC II Prepared by: O.C. Cabillos 6. Mounting the Power Supply The power supply is very easy to install, and it usually attaches to the chassis with four screws. There are many ways on how to slide down the power supply into the casing. Use the best way possible without damaging the components of the motherboard. However, there are cases that mounting the power supply first is easier than having it next after the motherboard. Please always remember that the power supply is very dangerous as it is connected to the main outlet. It bears a large amount of power. Be always careful when dealing with this type of hardware as improper handling may result in an accident or further damage to you and other properties. ATX-style motherboards have a single power connector that can go on only one way and an optional secondary connector that is also keyed. ATX supplies can also be used in a standard BTX case (but not Pico/Micro). Baby-AT and other old-style board designs such as LPX usually have two separate six-wire power connectors from the power supply to the board, which might not be keyed and therefore might be interchangeable. Even though you might be able to insert them several ways, only one way is correct! These power leads usually are labeled P8 and P9 in most systems. The order in which you connect them to the board is
  • 42. Professional Electronics Institute Inc. – Iloilo City - 42 - Computer Hardware Servicing NC II Prepared by: O.C. Cabillos crucial; if you install them backward, you can damage the motherboard when you power it up. Connecting I/O and Other Cables to the Motherboard Several connections must be made between a motherboard and the case. These include LEDs for the hard disk and power, an internal speaker connection, a reset button, and a power button. Most modern motherboards also have several built-in I/O ports that have to be connected. This includes dual IDE host adapters, a floppy controller, and front-mounted USB or IEEE 1394 ports. Some boards also include additional items such as built-in video, sound, or SCSI adapters. If the board is an ATX type, the connectors for all the external I/O ports are already built in to the rear of the board. If you are using a legacy Baby ATtype board, you might have to install cables and brackets to run the serial, parallel, and other external I/O ports to the rear of the case. If your motherboard has onboard I/O (nearly all PCs today use onboard I/O), use the following procedure to connect the cables: 1) Connect the floppy cable between the floppy drives and the 34-pin floppy controller connector on the motherboard. 2) Connect the IDE cables between the hard disk, IDE CD- ROM, and 40-pin primary and secondary IDE connectors on the motherboard. Typically, you will use the primary IDE channel connector for hard disks only and the
  • 43. Professional Electronics Institute Inc. – Iloilo City - 43 - Computer Hardware Servicing NC II Prepared by: O.C. Cabillos secondary IDE channel connector to attach an IDE CD- ROM or other device, such as a tape drive. If you have a Serial ATA hard disk and a Serial ATA host adapter on the motherboard, connect the Serial ATA cable from the hard disk to the host adapter connection on the motherboard. 3) On non-ATX boards, a 25-pin female cable port bracket is used for the parallel port. Usually two serial ports exist: a 9- pin and either another 9-pin or a 25-pin male connector port. Align pin 1 on the serial and parallel port cables with pin 1 on the motherboard connector, and then plug them in. 4) If the ports don't have card slot type brackets or if you need all your expansion slots, the back of the case might have port knockouts you can use instead. Find ones that fit the ports, and push them out, removing the metal piece covering the hole. Unscrew the hex nuts on each side of the port connector, and position the connector in the hole. Install the hex nuts back in through the case to hold the port connector in place. 5) Most new motherboards also include a built-in mouse port. If the connector for this port is not built in to the back of the motherboard (typically next to the keyboard connector), you probably have a card bracket type connector to install. In that case, plug the cable into the motherboard mouse connector, and then attach the external mouse connector bracket to the case. 6) Attach the front-panel switch, LED, internal speaker wires, and front-mounted ports such as USB and IEEE 1394 from the case front panel to the motherboard. If they are not marked on the board, check where each one is on the diagram in the motherboard manual.
  • 44. Professional Electronics Institute Inc. – Iloilo City - 44 - Computer Hardware Servicing NC II Prepared by: O.C. Cabillos
  • 45. Professional Electronics Institute Inc. – Iloilo City - 45 - Computer Hardware Servicing NC II Prepared by: O.C. Cabillos Installing the Drives Nowadays, there are many drives to consider when assembling a new system. New system supports many types of drives. At this point, we will cover the basic drives on a standard personal computer which include an optical drive, a hard drive, and an optional floppy drive. Follow the procedures below to setup these standard devices: 1. Remove the drive bay plates (if needed). Simply bend or knock the plate out of the way. Sometimes you have to remove the plastic cover outside of the casing to make sure that the metallic plates can be removed freely out of its actual position. 2. To install a CD drive, simply slide the drive into the chassis. Note that it is easier to connect the IDE cable to the rear of the drive and make jumper selections before mounting the drive. Note that some cases come with rails that must be added to 5 1/4" wide drives, such as an optical drive. In such cases, use the screws from step 3 for the drive rails. 3. After the drive is in the bay, line up the drive-mounting screw holes on the drive with the holes in the case chassis. Secure the drive with four screws, using the ones that came with your case or the drive you are installing. If the drive uses rails, the rails hold the drive in place. 4. Connect the other end of the IDE cable to your motherboard's IDE connector or to the back of another IDE device if you are chaining drives. 5. If your system has a removable drive cage, for floppy and hard disk drives, you should remove the cage.
  • 46. Professional Electronics Institute Inc. – Iloilo City - 46 - Computer Hardware Servicing NC II Prepared by: O.C. Cabillos 6. To install floppy and hard drives, slide your drives into the drive cage and secure them with the screws that came with your case or with the drive you are installing. As with an optical drive, it's easier to connect the floppy and IDE cables to the rear of the drives and make any jumper selections prior to placing the drives or the drive cage into the chassis. 7. If your system has a removable drive cage, slide the drive cage back into the PC and secure it to the chassis using the screws provided with your case.
  • 47. Professional Electronics Institute Inc. – Iloilo City - 47 - Computer Hardware Servicing NC II Prepared by: O.C. Cabillos 8. Connect the drive cables to the appropriate locations on your motherboard. Installing the New Video Card and Driver Software Follow these steps to install a new video card into a system: 1. If necessary, remove the screw and slot cover behind the expansion slot you want to use for the new video card. 2. Slide the video card straight down into the slot where it will be installed (typically an AGP or a PCI Express slot). 3. Push the card down into the slot, using a front-to-back rocking motion if necessary to get the edge connector to slide into the slot. 4. Use either the screw you removed during removal of the old card or the screw used in step 1 to fasten the card into place. 5. Attach the video cable from the monitor to the proper connector at the rear of the monitor. If the new card uses a DVI-I connector and the monitor uses the standard 15-pin VGA connector, use a DVI-to-VGA adapter (usually provided with the video card or available separately from stores that stock computer parts). If you're building a dual-display system, be sure to plug in your primary and secondary displays to the appropriate connectors. Note If you are replacing an existing video card (or switching from onboard video to an add-in video card), you should remove the existing installed video driver before powering down to install the new card. This helps prevent the system from improperly identifying the new video card and makes for a smoother upgrade. To do this, open the Windows Device Manager, select the existing display adapter, and select Remove or Uninstall. Do not reboot the system if asked; instead, you can power down and remove the existing video card.
  • 48. Professional Electronics Institute Inc. – Iloilo City - 48 - Computer Hardware Servicing NC II Prepared by: O.C. Cabillos Installing Additional Expansion Cards Expansion cards offer more power to your personal computers. It may come in the form of a network card, video card, sound card, fax/modem card, wireless network card or any other cards you need. These cards are inserted on the bus slots available in your pc. It may be an ISA (Industry Standard Architecture), PCI (Peripheral Component Interconnect), AGP (Accelerated/Advanced Graphics Port) or PCI-Express bus type. For more details please see the user’s manual of both the motherboard as well as the expansion card. Follow the procedures enumerated below to install these cards: 1. Insert each card by holding it carefully by the edges, being sure not to touch the chips and circuitry. Put the bottom- edge finger connector into the appropriate open slot (usually PCI or PCI Express). Firmly press down on the top of the card, exerting even pressure, until it snaps into place. 2. Secure each card bracket with a screw. 3. Attach any internal cables you might have removed earlier from the cards.
  • 49. Professional Electronics Institute Inc. – Iloilo City - 49 - Computer Hardware Servicing NC II Prepared by: O.C. Cabillos Replacing the Cover and Connecting External Cables You will have your system nearly assembled. Double- check your work and make a visual inspection of what you have done. It’s worth the effort of visually inspecting all the things you’ve assembled. Do not close the casing as you might discover later that you miss some or many things in the system. Try to turn on the computer and observed if the POST (Power On Self-Test) has been completed successfully. To wind up your work, use the following procedures to complete the assembly. 1. Slide the cover onto the case. 2. Before powering up the system, connect any external cables. Most of the connectors are D-shaped and go in only one way. 3. Plug the 15-pin monitor cable into the video card female connector. 4. Attach the phone cord to the modem, if any. 5. Plug the round keyboard cable into the keyboard connector, and plug the mouse into the mouse port or serial port (if you are using a serial mouse). If you're using a USB keyboard or mouse, plug it into any free USB port. 6. If you have any other external cabling, such as joystick or audio jacks to a sound card, attach them now. Running the Motherboard BIOS Setup Program (CMOS Setup)
  • 50. Professional Electronics Institute Inc. – Iloilo City - 50 - Computer Hardware Servicing NC II Prepared by: O.C. Cabillos One of the most important aspects of assembly is the BIOS set-up program. As a technician, the first program you should see after the assembly is the BIOS itself. You can see here whether the hardware has been properly identified or not. You may also want to check whether the system has a correct date and time settings. To help you out, follow the procedures below: 1. Power on the monitor first followed by the system unit. Observe the operation via the screen and listen for any beeps from the system speaker. 2. The system should automatically go through a power on self test (POST) consisting of video BIOS checking, a RAM test, and usually an installed component report. If a fatal error occurs during the POST, you might not see anything onscreen and the system might beep several times, indicating a specific problem. Check the motherboard or BIOS documentation to determine what the beep codes mean. 3. If there are no fatal errors, you should see the POST display onscreen. Depending on the type of motherboard BIOS, such as Phoenix, AMI, Award, or others, you have to press a key or series of keys to interrupt the normal boot sequence and get to the Setup program screens that enable you to enter important system information. Normally, the system indicates via the onscreen display which key to press to activate the BIOS Setup program during the POST, but if not, check the motherboard manual for the key(s) to press to enter the BIOS Setup. Common keys used to enter BIOS Setup are F1, F2, F10, Esc, Ins, and Del. 4. After the Setup program is running, use the Setup program menus to enter the current date and time, your hard drive settings, floppy drive types, video cards, keyboard settings,
  • 51. Professional Electronics Institute Inc. – Iloilo City - 51 - Computer Hardware Servicing NC II Prepared by: O.C. Cabillos and so on. The major vendors have standardized the following keystrokes to enter the BIOS set-up of the different manufacturers. Please find the list below and determine which vendor is implemented on your motherboard:  AMI BIOS. Press Delete during POST.  Phoenix BIOS (FirstBIOS Pro). Press F2 during POST.  Award BIOS (FirstBIOS). Press Delete or Ctrl+Alt+Esc during POST.  Microid Research (MR) BIOS. Press Esc during POST. If your system does not respond to any keystroke as mentioned above, you might have a branded type of personal computer that follow specific key configuration during the start-up. 1. IBM Aptiva/Valuepoint or ThinkPad. Press F1 during POST or while powering on the system. 2. Toshiba notebook/laptop. Press Esc while powering on the system; then press F1 when prompted. 3. Older Phoenix BIOS. Boot to a safe mode DOS command prompt, and then press Ctrl+Alt+Esc or Ctrl+Alt+S. 4. Compaq. Press F10 during POST. 5. After you have checked all the settings in the BIOS Setup, follow the instructions onscreen or in the motherboard manual to save the settings and exit the Setup menu. A word of caution, before you make any changes in the BIOS, makes sure you know what you are doing. Otherwise, you will render the entire system unusable unless you will do a major reprogram of your BIOS. Consult the BIOS manual for more details. Usually this is included in your motherboard manual. Below is a typical BIOS Menu set-up.
  • 52. Professional Electronics Institute Inc. – Iloilo City - 52 - Computer Hardware Servicing NC II Prepared by: O.C. Cabillos Typical BIOS Setup Menus Setup Menu Screen Description Maintenance Specifies the processor speed and clears the setup passwords. This menu is available only in Configure mode, set by a jumper on the board. Main Allocates resources for hardware components. Advanced Specifies advanced features available through the chipset. Security Specifies passwords and security features. Power Specifies power management features. Boot Specifies boot options and power supply controls. Exit Saves or discards changes to the setup program options. Settings based on the BIOS used in the Intel D875PBZ motherboard. Used by permission of Intel Corporation.
  • 53. Professional Electronics Institute Inc. – Iloilo City - 53 - Computer Hardware Servicing NC II Prepared by: O.C. Cabillos REVIEW OF THE BASICS What is a computer network? Computer network is an interconnection of computers and other electronic devices with the main goal of sharing expensive peripherals. Also, it aims to share information and other resources vital for communications. Classification of computer networks 1. Local Area Network (LAN) – a collection of computers and other devices located in a small geographical area. 2. Metropolitan Area Network (MAN) – a collection of LAN usually occupying an area larger that of the LAN. 3. Wide Area Network (WAN) – a collection of LAN and MAN usually spanning across the country and the globe. Network Topologies Network topology refers to the actual physical layout of the network and other devices including the cable, the computers attached and other electronic devices. 1. Bus – a network topology in which the computers are connected to a common cable called a backbone or bus to form a straight line.
  • 54. Professional Electronics Institute Inc. – Iloilo City - 54 - Computer Hardware Servicing NC II Prepared by: O.C. Cabillos 2. Star topology – a network topology in which computers connect through a central connecting point usually a hub, switch or an access point. 3. Ring topology – a network topology consisting of computers connected in a circle, forming a closed ring.
  • 55. Professional Electronics Institute Inc. – Iloilo City - 55 - Computer Hardware Servicing NC II Prepared by: O.C. Cabillos Types of Connections 1. As to access to the network a. Physical connection – this refers to the actual physical contact of the network devices which include the cable, connectors, network card and other network devices. b. Logical connection – this refers to the access of network resources after using a valid name and a valid password to gain access to the network. 2. As to role of the computer a. Peer-to-peer – a type of networking in which each computer can be a client to others computers and also act as a server. b. Client-Server – a model for computing in which some computers (clients) request services and other computers (servers) respond to request for services. Applications are sometimes divided across the networks so that a client-side component runs on the user’s machine and supplies request and display services, and a server-side component runs on an application server and handles data processing or other computation-intensive services on the user’s behalf.
  • 56. Professional Electronics Institute Inc. – Iloilo City - 56 - Computer Hardware Servicing NC II Prepared by: O.C. Cabillos Transmission Media In communicating, there must be two sides involve for communication takes place. Communication and transfer of information will happen only with a transmission media. Transmission media enable computers to send and receive messages but do not guarantee that the messages will be understood. 1. Copper – usually in the form of a cable like coaxial and twisted pair. Twisted-pair cabling used in a LAN is similar to the cabling used to connect your telephone to the wall outlet. Network coaxial cabling, on the other hand, is similar to the cable used to connect your television set to the cable TV outlet. Classifications of Twisted Pair The following are the cable types specified in ANSI/TIA/EIA 568-A:  Category 1—Cat 1 cable was originally designed for voice telephony only, but thanks to some new techniques, long-range Ethernet and DSL, operating at 10Mbps and even faster, can be deployed over Cat 1.  Category 2—Cat 2 cable can accommodate up to 4Mbps and is associated with token-ring LANs.  Category 3—Cat 3 cable operates over a bandwidth of 16MHz on UTP and supports up to 10Mbps over a range of 330 feet (100 m). Key LAN applications include 10Mbps Ethernet and 4Mbps token-ring LANs.  Category 4—Cat 4 cable operates over a bandwidth of 20MHz on UTP and can carry up to 16Mbps over a range of 330 feet (100 m). The key LAN application is 16Mbps token ring.  Category 5—Cat 5 cable operates over a bandwidth of 100MHz on UTP and can handle up to 100Mbps over a range of 330 feet (100m). Cat 5 cable is typically used for Ethernet networks running at 10Mbps or 100Mbps. Key LAN applications include 100BASE-TX, ATM, CDDI, and 1000BASE-T. It is no longer supported, having been replaced by Cat 5e.  Category 5e—Cat 5e (enhanced) operates over a bandwidth of 100MHz on UTP, with a range of 330 feet (100 m). The key LAN application is 1000BASE-T. The Cat 5e standard is largely the same as Category 5, except
  • 57. Professional Electronics Institute Inc. – Iloilo City - 57 - Computer Hardware Servicing NC II Prepared by: O.C. Cabillos that it is made to somewhat more stringent standards. Category 5e is recommended for all new installations and was designed for transmission speeds of up to 1Gbps (Gigabit Ethernet). Although Cat 5e can support Gigabit Ethernet, it is not currently certified to do so.  Category 6—Cat 6, specified under ANSI/TIA/EIA-568-B.2-1, operates over a bandwidth of up to 400MHz and supports up to 1Gbps over a range of 330 feet (100 m). It is a cable standard for Gigabit Ethernet and other network protocols that is backward compatible with the Cat 5/5e and Cat 3 cable standards. Cat 6 features more stringent specifications for crosstalk and system noise. Cat 6 is suitable for 10BASE-T/100BASE-TX and 1000BASE-T (Gigabit Ethernet) connections.  Category 7—Cat 7 is specified in the frequency range of 1MHz to 600MHz. ISO/IEC11801:2002 Category 7/Class F is a cable standard for Ultra Fast Ethernet and other interconnect technologies that can be made backward compatible with traditional Cat 5 and Cat 6 Ethernet cable. Cat 7, which is based on four twisted copper pairs, features even more stringent specifications for crosstalk and system noise than Cat 6. To achieve this, shielding has been added for individual wire pairs and the cable as a whole. Advantages and Disadvantages of Twisted-Pair Twisted-pair has several key advantages:  High availability—More than 1 billion telephone subscriber lines based on twisted-pair have been deployed, and because it's already in the ground, the telcos will use it. Some say that the telcos are trapped in their copper cages; rather than build an infrastructure truly designed for tomorrow's applications, they hang on to protecting their existing investment. It is a huge investment: More than US$250 billion in terms of book value is associated with the twisted-pair deployed worldwide. This can be construed as both an advantage and a disadvantage.  Low cost of installation on premises—The cost of installing twisted-pair on premises is very low.  Low cost for local moves, adds, and changes in places—An individual can simply pull out the twisted-pair terminating on a modular plug and replace it in another jack in the enterprise, without requiring the intervention of a technician. Of course, this assumes that the wiring is already in place; otherwise, there is the additional cost of a new installation. Twisted-pair has the following disadvantages:  Limited frequency spectrum—The total usable frequency spectrum of twisted-pair copper cable is about 1MHz.  Limited data rates—The longer a signal has to travel over twisted-pair, the lower the data rate. At 30 feet (100 m), twisted-pair can carry 100Mbps, but at 3.5 miles (5.5 km), the data rate drops to 2Mbps or less.  Short distances required between repeaters—More components need to be maintained, and those components are places where trouble can arise, which leads to higher long-term operational costs.
  • 58. Professional Electronics Institute Inc. – Iloilo City - 58 - Computer Hardware Servicing NC II Prepared by: O.C. Cabillos  High error rate—Twisted-pair is highly susceptibility to signal interference such as EMI and RFI. 2. Fiber Optics - consisting of a number of glass or high-grade plastic optical strands surrounded by a tough cloth-and-plastic wrap, fiber-optic cables resemble coaxial cables from the outside. Fiber-optic network cabling is similar to the fiber-optic strand used in the fiber-optic lamps found in novelty stores, in which colored lights feed into optical strands to create the appearance of dozens of pinpoints of light. Fiber offers enormous bandwidth, immunity to many types of interference and noise, and improved security. Therefore, fiber provides very clear communications and a relatively noise-free environment. The downside of fiber is that it is costly to purchase and deploy because it requires specialized equipment and techniques. 3. Wireless - media include radio frequencies, microwave, satellite, and infrared. Deployment of wireless media is faster and less costly than deployment of cable, particularly where there is little or no existing infrastructure (e.g., Africa, Asia-Pacific, Latin America, eastern and central Europe). Wireless is also useful where environmental circumstances make it impossible or cost- prohibitive to use cable (e.g., in the Amazon, in the Empty Quarter in Saudi Arabia, on oil rigs).
  • 59. Professional Electronics Institute Inc. – Iloilo City - 59 - Computer Hardware Servicing NC II Prepared by: O.C. Cabillos There are a few disadvantages associated with wireless, however. Historically, wireless solutions support much lower data rates than do wired solutions, although with new developments in wireless broadband, that is becoming less of an issue (see Part IV, "Wireless Communications"). Wireless is also greatly affected by external impairments, such as the impact of adverse weather, so reliability can be difficult to guarantee. However, new developments in laser-based communications—such as virtual fiber—can improve this situation. Of course, one of the biggest concerns with wireless is security: Data must be secured in order to ensure privacy.
  • 60. Professional Electronics Institute Inc. – Iloilo City - 60 - Computer Hardware Servicing NC II Prepared by: O.C. Cabillos IP Addressing Internet Protocol Address (I.P. Address) – is a unique number assigned to every device connected to a computer network. It is sometimes called a dotted decimal. It is made up of four octets. The value range is 0-255. An IP address serves two principal functions: host or network interface identification and location addressing. Its role has been characterized as follows: "A name indicates what we seek. An address indicates where it is. A route indicates how to get there." Two versions of the Internet Protocol (IP) are in use: IP Version 4 and IP Version 6. Each version defines an IP address differently. Because of its prevalence, the generic term IP address typically still refers to the addresses defined by IPv4. The gap in version sequence between IPv4 and IPv6 resulted from the assignment of number 5 to the experimental Internet Stream Protocol in 1979, which however was never referred to as IPv5. There are two standards for IP addresses: IP Version 4 (IPv4) and IP Version 6 (IPv6). All computers with IP addresses have an IPv4 address, and many are starting to use the new IPv6 address system as well. Here's what these two address types mean: IPv4 uses 32 binary bits to create a single unique address on the network. An IPv4 address is expressed by four numbers separated by dots. Each number is the decimal (base-10) representation for an eight-digit binary (base-2) number, also called an octet. For example: 216.27.61.137 IPv6 uses 128 binary bits to create a single unique address on the network. An IPv6 address is expressed by eight groups of hexadecimal (base-16) numbers separated by colons, as in 2001:cdba:0000:0000:0000:0000:3257:9652. Groups of numbers that contain all zeros are often omitted to save space, leaving a colon separator to mark the gap (as in 2001:cdba::3257:9652). Classes of IP Address Reserved IP Addresses as recognized by the Internet Assigned Numbers Authority (IANA). Four specific reservations include the following:  0.0.0.0 -- This represents the default network, which is the abstract concept of just being connected to a TCP/IP network.  255.255.255.255 -- This address is reserved for network broadcasts, or messages that should go to all computers on the network.  127.0.0.1 -- This is called the loopback address, meaning your computer's way of identifying itself, whether or not it has an assigned IP address.  169.254.0.1 to 169.254.255.254 -- This is the Automatic Private IP Addressing (APIPA) range of addresses assigned automatically when a computer's unsuccessful getting an address from a DHCP server. The other IP address reservations are for subnet classes. A subnet is a smaller network of computers connected to a larger network through a router. The subnet can have its own address system so computers on the same subnet can communicate quickly
  • 61. Professional Electronics Institute Inc. – Iloilo City - 61 - Computer Hardware Servicing NC II Prepared by: O.C. Cabillos without sending data across the larger network. A router on a TCP/IP network, including the Internet, is configured to recognize one or more subnets and route network traffic appropriately. The following are the IP addresses reserved for subnets:  10.0.0.0 to 10.255.255.255 -- This falls within the Class A address range of 1.0.0.0 to 127.0.0.0, in which the first bit is 0.  172.16.0.0 to 172.31.255.255 -- This falls within the Class B address range of 128.0.0.0 to 191.255.0.0, in which the first two bits are 10.  192.168.0.0 to 192.168.255.255 -- This falls within the Class C range of 192.0.0.0 through 223.255.255.0, in which the first three bits are 110.  Multicast (formerly called Class D) -- The first four bits in the address are 1110, with addresses ranging from 224.0.0.0 to 239.255.255.255.  Reserved for future/experimental use (formerly called Class E) -- addresses 240.0.0.0 to 254.255.255.254. Private IP Addresses Computers not connected to the Internet, such as factory machines that communicate only with each other via TCP/IP, need not have globally unique IP addresses. Three ranges of IPv4 addresses for private networks were reserved in RFC 1918. These addresses are not routed on the Internet and thus their use need not be coordinated with an IP address registry. Today, when needed, such private networks typically connect to the Internet through network address translation (NAT). IANA-reserved private IPv4 network ranges Start End No. of addresses 24-bit block (/8 prefix, 1 × A) 10.0.0.0 10.255.255.255 16777216 20-bit block (/12 prefix, 16 × B) 172.16.0.0 172.31.255.255 1048576 16-bit block (/16 prefix, 256 × C) 192.168.0.0 192.168.255.255 65536 Class A 0 8 24 128 (27 ) 16,777,216 (224 ) 2,147,483,648 (231 ) 0.0.0.0 127.255.255.255 Class B 10 16 16 16,384 (214 ) 65,536 (216 ) 1,073,741,824 (230 ) 128.0.0.0 191.255.255.255 Class C 110 24 8 2,097,152 (221 ) 256 (28 ) 536,870,912 (229 ) 192.0.0.0 223.255.255.255 Class D (multicast) 1110 not defined not defined not defined not defined 268,435,456 (228 ) 224.0.0.0 239.255.255.255 Class E (reserved) 1111 not defined not defined not defined not defined 268,435,456 (228 ) 240.0.0.0 255.255.255.255 Class Start address End addressLeading bits Size of network Size of rest bit field Number of networks Addresses per network Total addresses in class
  • 62. Professional Electronics Institute Inc. – Iloilo City - 62 - Computer Hardware Servicing NC II Prepared by: O.C. Cabillos IP Address Implementation 1. Dynamic – an IP Address usually implemented by the router, using the Dynamic Host Control Protocol (DHCP), usually not permanent. It is commonly used nowadays, to minimize the administrative burden of assigning IP Address to seldom used devices connected to the network. Dynamic IP configuration is enabled by default to most personal computers nowadays, to let the users connect the network immediately. Aside from DHCP, broadband networks also use dynamic IP addressing using the Point-to-Point (P2P) protocol. 2. Static – an IP Address usually assigned by network administrators to individual devices attached to the network. This is usually permanent. This type of addressing allows the network administrator to monitor closely each of the devices connected to the network.
  • 63. Professional Electronics Institute Inc. – Iloilo City - 63 - Computer Hardware Servicing NC II Prepared by: O.C. Cabillos COMMONLY USED ACRONYMS in CHS A. Motherboard 1. BIOS – Basic Input Output System 2. CMOS – Complimentary Metal Oxide Semi-Conductor 3. IDE – Integrated Device/Drive Electronics 4. SCSI – Small Computer System Interface 5. AHCI – Advance Host Control Interface 6. USB – Universal Serial Bus 7. PS/2 – Personal System 2 8. LPT – Line PrinTer 9. FSB – Front Side Bus 10. ISA – Industry Standard Architecture 11. PCI – Peripheral Component Interconnect 12. PCI-E – Peripheral Component Interconnect Express 13. AGP – Advance Graphics Port 14. AMR – Audio Modem Riser 15. CNR – Communications and Network Riser 16. ZIF – Zero Insertion Force 17. PGA – Pin Grid Array 18. LGA – Land Grid Array 19. CPU – Central Processing Unit 20. RTC – Real Time Clock 21. POST – Power On Self Test 22. DIP – Dual Inline Package 23. MMX – Multi Media eXtensio 24. EIDE – Enhanced Integrated Device/Drive Electronics 25. ALU – Arithmetic Logic Unit 26. CU – Control Unit 27. RPM – Revolutions per Minute B. DISPLAY 1. VGA – Video Graphics Array 2. SVGA – Super Video Graphics Adapter 3. CGA – Color Graphics Adapter 4. GPU – Graphics Processing Unit 5. DVI – Digital Video Interface 6. CRT – Cathode Ray Tube 7. LCD – Liquid Crystal Display 8. RGB – Red Green Blue 9. EGA – Enhance Graphics Adapter 10. LED – Light Emitting Diode C. SECONDARY STORAGE 1. HDD – Hard Disk Drive 2. SATA – Serial Advanced Technology Attachment 3. PATA – Parallel Advanced Technology Attachment 4. CD-ROM – Compact Disc Read Only Memory 5. DVD – Digital Versatile/Video Disc 6. RAID – Redundant Array of Independent/Inexpensive Disks D. MULTI-MEDIA 1. HDMI – High Definition Multi- media Interface 2. MIDI – Musical Instrument Digital Interface 3. JPEG – Junior Photographer Expert Group 4. MPEG – Motion Pictures Expert Group 5. GIF – Graphic Interchange Format E. PRIMARY STORAGE 1. RAM – Random Access Memory 2. DMA – Direct Memory Access 3. Read Only Memory 4. SIMM – Single In-Line Memory Module 5. DIMM – Dual In-Line Memory Module
  • 64. Professional Electronics Institute Inc. – Iloilo City - 64 - Computer Hardware Servicing NC II Prepared by: O.C. Cabillos 6. SDRAM – Synchronous Dynamic Random Access Memory 7. DDR – Double/Dual Data Rate 8. EEPROM – Electronically Erasable Programmable Read- Only Memory 9. EMS – Expanded Memory Specifications 10. XMS – eXtended Memory Specifications 11. UMB – Upper Memory Blocks F. SOFTWARE 1. OS – Operating System 2. NTFS – New Technology File System 3. FAT – File Allocation Table 4. IRQ – Interrupt Request 5. EULA – End User’s License Agreement 6. OEM – Original Equipment Manufacturer 7. DOS – Disk Operating System 8. NOS – Network Operating System G. NETWORKING 1. LAN – Local Area Network 2. MODEM – Modulator DEModulator 3. NIC – Network Interface Card 4. MAN – Metropolitan Area Network 5. WAN – Wide Area Network 6. WiFi – Wireless Fidelity 7. UTP – Unshielded Twisted Pair 8. STP – Shielded Twisted Pair 9. RJ – Radio Jack 10. ADSL – Asymmetric Digital Subscriber Line 11. Mbps – Mega bits per second 12. ISP – Internet Service Provider 13. AP – Access Point 14. FTP – File Transfer Protocol 15. ISDN – Integrated Services Digital Network 16. TCP/IP – Transmission Control Protocol / Internetwork Protocol 17. I.P. – Internet Protocol 18. NAT – Network Address Translation 19. PAT – Port Address Translation 20. DNS – Domain Name System 21. MAC – Media Access Control 22. EMI – Electro Magnetic Interference 23. RFI – Radio Frequency Interference H. OTHERS 1. ISO – International Standards Organization 2. IEEE – Institute of Electrical & Electronic Engineers 3. ANSI – American National Standards Institute 4. ASCII – American Standards of Codes for Information Interchange 5. IBM – International Business Machine 6. AMD – American Micro Devices 7. ESD – Electro-Static Discharge 8. PPE – Personal Protective Equipment 9. OHS – Occupational Health & Safety 10. LASER – Light Amplification of Simulated Emission of Radiation 11. PSU – Power Supply Unit 12. AVR – Automatic Voltage Regulator 13. UPS – Uninterruptible Power Supply
  • 65. Professional Electronics Institute Inc. – Iloilo City - 65 - Computer Hardware Servicing NC II Prepared by: O.C. Cabillos STEP by STEP Guide in Windows XP Installation. 1. Allow the computer to perform the Power On Self Test (POST). 2. Access the BIOS/CMOS set-up by pressing DEL (the most common, depending on the BIOS MANUFACTURER), others uses F1 or F10. 3. Find the BOOT SEQUENCE/ORDER in the CMOS set-up, then make sure that the FIRST BOOT DEVICE IS CD ROM, if not CHANGE IT ACCORDINGLY. 4. Insert your BOOTABLE WINDOWS XP installer in the CD-ROM Drive. 5. Press F10 to save changes to the CMOS and EXIT from the BIOS and allow the computer to restart. 6. After the RESTART procedure, the computer will read your CD-ROM and will display the message: ―Press any to boot from cd...‖, PRESS ANY KEY TO start the windows xp installation. 7. Follow the on-screen instructions, PLEASE TAKE NOTE OF THE MESSAGES ON THE STATUS BAR displayed while installing windows. The status bar is at the bottom on of your screen. 8. At this moment, press ENTER to continue. 9. Press F8 to accept the End User’s License Agreement (EULA). 10. If there’s an option to REPAIR/DON’T REPAIR, select ESC to perform DON’T REPAIR. 11. If there exist partitions, delete current partition (MAKE SURE BEFORE DELETION OF THE PARITITION YOU MADE A BACK-UP OF YOUR FILES) by doing the next successive steps: 12. If no partition exist, go to instruction number 13. Press D to delete the current partition. 14. Press ENTER to continue. 15. Press L to confirm the deletion. The the same thing if there are other existing partitions. 16. After all partitions has been deleted, press C to create partition. 17. Use BACKSPACE to erase the number, enter the appropriate number for the size of the partition, say 10,000 for 10 Gb, 20,000 for 20Gb and so on. 18. Press ENTER to install. 19. Press arrow up to select QUICK FORMAT (NTFS). 20. Please wait while windows is formatting your hard drive and some important files are being copied. 21. Press ENTER to immediately restart the system if such message is displayed. 22. After restarting, windows will do the POST, this time, DO NOT PRESS ANY KEY, if a message: ―Press any key to boot from cd...‖ is displayed. 23. Windows is now continuing with the set-up in GRAPHICAL MODE. 24. Click Next to continue. 25. Type your PRODUCT KEY in the box as provided, click next. 26. Type your NAME & ORGANIZATION and click next. 27. Type a valid computer name, say, JOSE-PC then click next. 28. Select the Time Zone, in the Philippines, you may choose any of the +8, then click next. 29. Click Finish when done and remove your WINDOWS XP bootable cd from cd-rom and allow the computer to RESTART. 30. Click next on the NETWORK identification wizard. 31. Click Next to continue.
  • 66. Professional Electronics Institute Inc. – Iloilo City - 66 - Computer Hardware Servicing NC II Prepared by: O.C. Cabillos 32. Remove the check on the check box, and then click next to exit the installation for the desktop to be displayed. 33. Install hardware drivers to make sure that all the hardware installed will be functioning.
  • 67. Professional Electronics Institute Inc. – Iloilo City - 67 - Computer Hardware Servicing NC II Prepared by: O.C. Cabillos SUMMARY Below is a summary on the skill assessment exam of those who wanted to get a certificate on Computer Hardware Servicing NC II from Technical Education and Skills Development Authority (TESDA, Philippines). It is assumed that you have the prior basic knowledge on computer hardware and software operations. This is not a comprehensive one but provides examples, hints and basic outline of the exam: 1. List of Tools and Materials/Inventory (written): 2. Occupational Health and Safety Procedure (OHS) (written): 1. Contingency measures during workplace accidents, fire and other emergencies are recognized. 2. Personal protective equipment are correctly used in accordance with organization OHS procedures and practices. 3. Hazard/risks in the workplace and their corresponding indicators are identified to minimize or eliminate risk to co-workers, workplace and environment. 4. Take necessary precautions to protect the components of the computer from damage caused by ESD (Electrostatic Discharge). 5. Hold the components by the edges and do not touch the IC’s. 6. Read and follow instructions on the manual carefully. 7. Do not use excessive force if things don’t quite slip into place.
  • 68. Professional Electronics Institute Inc. – Iloilo City - 68 - Computer Hardware Servicing NC II Prepared by: O.C. Cabillos 3. Disassembly / Assembly of System Unit (manual): PROPER DISASSEMBLING PROCEDURE: 1. Before you start to disassemble, make sure the computer itself is working properly, then perform a shutdown. 2. Place the system unit on the top of the table where you are going to perform disassembly. 3. Use a personal protective equipment to prevent damage from ESD such as the Anti-Static wrist strap. In the absence of such, ground yourself first by touching any metallic component around you or casing itself to release the static electricity from your body. 4. Open the system unit to expose the inner contents. 5. Remove all the connections of the power supply to other components such as the motherboard power connector, the CPU power connector, the power supply to the hard drives and the optical drives. 6. Remove the screw of all the drives, and gently pull out all the drives one by one from the system unit (optical, hard and floppy drives). 7. Pull out all expansion cards (ISA, PCI, AGP, PCI-E). 8. Detach the memory from the motherboard. 9. Detach the following connections from the motherboard if necessary: audio, usb, front panel connections. 10. Remove all the screw that holds the motherboard to the casing in an X manner. Gently pull out the motherboard from the casing. 11. Remove all the screw that holds the power supply unit to the casing in an X manner. Gently pull out the power supply unit from the casing. 12. Place the motherboard on a table with a rubber mat; remove the heat sink (depending on the type). 13. Remove the processor by following instructions from your trainer, depending on the CPU type. PROPER ASSEMBLING PROCEDURE: (follow last out-first in if possible) 1. Install the processor on the motherboard, following proper orientation, using the PIN #1 of the processor as guide. 2. Install the heat sink properly on the top of the processor. Make sure that it’s tight enough, as loose installation may cause overheating of the processor, making it unstable. 3. Install the memory modules back to the motherboard observing proper orientation. Remember, improperly placed memory modules on the motherboard will cause irreparable damage. 4. Install the power supply unit back to the casing, observing the X method of installing the screw. 5. Inspect a properly oriented stand-offs on the motherboard. Correct it if disoriented. 6. Install the motherboard back to the casing, observing the X method of installing the screw.
  • 69. Professional Electronics Institute Inc. – Iloilo City - 69 - Computer Hardware Servicing NC II Prepared by: O.C. Cabillos 7. Connect the following, audio, usb, front-panel headers, cpu power supply and the motherboard power supply. 8. Install expansion cards on its designated expansion slots. 9. Install the drives and screw (optical, hard, floppy). 10. Connect power connectors to the drives already installed. 11. Double check all connections to the motherboard and to the power supply unit. Check also your memory modules and expansion cards. 12. Connect all other peripherals from the outside to its designated ports and test your system unit. 4. Install Operating Systems (OS- XP/98, dual boot), Device Drivers, LAN Cable (manual). For LAN cable color coding, memorize the pairings below:
  • 70. Professional Electronics Institute Inc. – Iloilo City - 70 - Computer Hardware Servicing NC II Prepared by: O.C. Cabillos 5. Configure and Print (manual): 1. Click on the Start menu, then click on Control Panel 2. When the Control Panel window opens you will see items in either Category View (continue with step #3) or Classic View (skip to item #4) 3. Find and double-click on the Network and Internet Connection icon. 4. Next, find and double-click on the Network Connections icon, a window will open with all network connections available on the computer (wired and wireless) 5. Find the network connection you want to manually configure, right-click on it and select Properties from the pop-up menu 6. In the Connection Properties window, under the section labeled This connection uses the following items:find the Internet Protocol (TCP/IP) item and double- click it. 7. A new window will open, select the second radio button which is labeled Use the following IP address 8. Enter the appropriate IP address (192.168.0.1); subnet mask (usually 255.255.255.0); and gateway (the router or proxy server address) 9. The next part of the windows will now have a radio button selected which is labeled Use the following DNS server addresse. 10. If you need to access the Internet, enter the DNS addresses provided by your ISP; if you do not have that information you can use the OpenDNS server. Their DNS addresses are: 208.67.222.222 and208.67.220.220 11. After entering the required information, click the OK button twice and close the Control Panel window.
  • 71. Professional Electronics Institute Inc. – Iloilo City - 71 - Computer Hardware Servicing NC II Prepared by: O.C. Cabillos Changing Workgroup and Computer Name - Start > Settings > Control Panel > System > Computer Name Tab > Change Tab >Type New Computer Name and Workgroup > OK..OK..OK..Restart Installing Network Printer - Start > Settings > Control Panel > Printers and Faxes > Add Printer (Printers Tasks) > (Add Printer Wizard) Next > Select ―A Network Printer, or …..‖ > Next > Browse Printer > Next > Select Installed Network Printer > Next >Yes..Finish! Note: Turn-off your firewall before installing network printer. File/Folder Sharing - Right-Click Folder to Share > Properties > Sharing Tab > Network Sharing and Security (Click ―If you understand the security Risk….‖) > Just Enable Sharing > OK > Select Share this folder on the network > OK Sharing Printer Start > Settings > Control Panel > Printers and Faxes > Right-click Installed Printer > Sharing > Share this Printer > OK 6. Questioning/Interview (oral): Most of the questions will be on troubleshooting but anything around the subject matter can be asked. You also need to master the parts of the computer particularly of the Main Circuit Board or the Mother Board and their specific functions, cable color-coding as shown above.
  • 72. Professional Electronics Institute Inc. – Iloilo City - 72 - Computer Hardware Servicing NC II Prepared by: O.C. Cabillos 1) How many pins does a SIMM have? a) 50 b) 64 c) 30 or 72 d) 168 Show Answer 2) The various cards in a PC requires _______ voltage to function. a) AC b) DC Show Answer 3) What type of hard disk formatting creates FAT (File Allocation Table) ? a) High Level b) Low Level Show Answer 4) What is the name of the printed circuit board? a) Ram b) Mother Board Show Answer 5) Which Component of pc maintains data and time a) CMOS RAM b) vRAM Show Answer 6) IRQ 1 is commonly assigned to: a) it's usually open b) system timer c) real time clock d) keyboard Show Answer 7) LCD monitor is also known as___________ a) TFT b) CRT
  • 73. Professional Electronics Institute Inc. – Iloilo City - 73 - Computer Hardware Servicing NC II Prepared by: O.C. Cabillos Show Answer 8) How can you tell that a particular ribbon cable should only be used to connect a floppy drive? a) it b) it has a red line along one edge c) it d) it has a twist in it Show Answer 9) Data stored in a ROM cannot be changed by user of a computer? a) TRUE b) FALSE Show Answer 10) Is the data in a RAM stored on a permanent or temporary basis a) Temporary b) Permanent Show Answer 11) Winchester drive is also called: a) Hard Disk Drive b) Floppy Disk Drive Show Answer 12) TO write, erase, rewrite data on a CD RAM what type of CD ROM you should use? a) CD-RW b) CD R Show Answer 13) A byte is equivalent to...? a) 8 bits b) 10 bits Show Answer 14) SMPS stands for: a) Switch Mode Power Supply b) Simple Mode Power Supply Show Answer
  • 74. Professional Electronics Institute Inc. – Iloilo City - 74 - Computer Hardware Servicing NC II Prepared by: O.C. Cabillos 15) Which of the following is NOT a type of motherboard expansion slot? a) ISA b) PCI c) AGP d) ATX Show Answer 16) Which IRQ does LPT1 commonly use? a) 1 b) 4 c) 5 d) 7 Show Answer 17) How much data will a high density (HD) floppy disk hold? a) 124 KB b) 640 KB c) 1.44 MB d) 2.88MB Show Answer 18) What is the name of the spec for the holes in a monitor's aperture grill? a) dot pitch b) space holes Show Answer 19) Which is the best hard disk seek time? a) 3ms b) 5ms Show Answer 20) Fragmentation of data on computer hard disk causes it to work faster than before? a) FALSE b) TRUE Show Answer
  • 75. Professional Electronics Institute Inc. – Iloilo City - 75 - Computer Hardware Servicing NC II Prepared by: O.C. Cabillos 21) What is the name of the card that controls read, write head and motor in the hard disk a) Network Card b) Disc Controller Card Show Answer 22) Which of the following retains the information it's storing when the power to the system is turned off? a) CPU b) ROM c) DRAM d) DIMM Show Answer 23) Acronym of HDD? a) Hard Disk Drive b) Hard Drive Disk Show Answer 24)A program written using binary codes is called: a) Software language b) Machine language Show Answer 25) How many bytes a sector of hard disk holds? a) 512 Bytes b) 1024 Bytes Show Answer 26) To be bootable a DOS partition must be: a) active b) copied Show Answer 27) What does FDISK do? a) performs low-level formatting of the hard drive b) fixes bad sectors on the hard drive c) recovers lost clusters on the hard drive d) creates partitions on the hard drive Show Answer