Control Hearing Aids with Your iOS Device
•
1 like•2,104 views

TruLink hearing control app userguide

Recommended
More Related Content
What's hot
What's hot (20)
Similar to Control Hearing Aids with Your iOS Device
Similar to Control Hearing Aids with Your iOS Device (20)
More from Starkey Hearing Technologies
More from Starkey Hearing Technologies (20)
Recently uploaded
Recently uploaded (20)
Control Hearing Aids with Your iOS Device
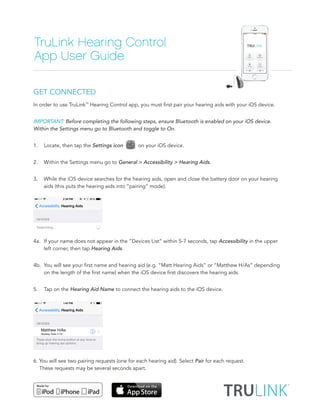
- 1. GET CONNECTED In order to use TruLink™ Hearing Control app, you must first pair your hearing aids with your iOS device. IMPORTANT: Before completing the following steps, ensure Bluetooth is enabled on your iOS device. Within the Settings menu go to Bluetooth and toggle to On. 1. Locate, then tap the Settings icon on your iOS device. 2. Within the Settings menu go to General > Accessibility > Hearing Aids. 3. While the iOS device searches for the hearing aids, open and close the battery door on your hearing aids (this puts the hearing aids into “pairing” mode). 4a. If your name does not appear in the “Devices List” within 5-7 seconds, tap Accessibility in the upper left corner, then tap Hearing Aids. 4b. You will see your first name and hearing aid (e.g. “Matt Hearing Aids” or “Matthew H/As” depending on the length of the first name) when the iOS device first discovers the hearing aids. 5. Tap on the Hearing Aid Name to connect the hearing aids to the iOS device. 6. You will see two pairing requests (one for each hearing aid). Select Pair for each request. These requests may be several seconds apart. TruLink Hearing Control App User Guide
- 2. 7. Pairing is complete. GENERAL The TruLink Hearing Control app provides advanced remote control functionality for your Made For iPhone Hearing Aid(s): • Control volume for audio that is streamed from the iOS device or picked up by the hearing aid(s) • Change between memories that have been programmed by your hearing professional • Create and modify memories for your unique listening situations • Tie memories to a specific location for automatic activation iOS device to hearing aid connection status Slidepad for simultaneous volume adjustment both hearing aids Individual right or left hearing aid volume adjustment Current memory Device Settings Coachmarks TruLink app functionality Mute hearing aid Hearing aid battery status Memory Shade
- 3. The TruLink Hearing Control app contains a help feature to explain the function of each screen. Tap on the Help icon to view the the ‘Coachmarks’. REMOTE SCREEN STATUS The Remote screen provides a status icon for the current battery level of each hearing aid and a status icon to show connection to your iOS device. HEARING AID VOLUME Increase/decrease the microphone volume level on your hearing aid(s) by dragging the volume slider for each side or by sliding your finger on the slidepad (between the left and right volume sliders) to adjust both sides simultaneously. MUTE Tap on the Mute button to mute the microphones on both hearing aids. Tap again on the Mute button to unmute the hearing aids and return the volume to the position prior to muting. MEMORY The current memory is displayed and can be changed in the memory shade at the top of the screen. To change memories, tap on or pull down the memory shade to see all available memory options. Tap on the name of the memory you want to use. The selected memory will be sent to the hearing aid, and the shade will retract. The new hearing aid memory name will be shown as the current memory.
- 4. TRULINK HEARING CONTROL APP MEMORY SETTINGS To access advanced memory features, tap on or pull down the memory shade, and then tap the Arrow icon to the right of the memory name. The app’s memory screen allows you to view a GPS map and select a physical location in order to add a geotag for the current memory. To add a geotag location to a memory, tap and hold on the screen in the desired location and a pin will appear. You can also name the memory by following the prompt. To change the name of a memory you have created, tap in the name field and the keyboard will come into view. Rename the memory, and tap Done. To remove a geotag, tap the X in the pin pop-up, and the geotag pin will be removed for the current memory in view. Auto Change causes your iOS device to automatically change to a geotagged memory when your iOS device GPS system detects arrival at the geotagged location. To turn on/off Auto Change for geotagged memories, tap the On/Off button. This will toggle on/off Auto Changing for the current memory in view.
- 5. To add a picture to a memory, tap on the Camera icon and follow the prompts to take or use a picture and save it for the current memory. To delete the current custom memory, tap on the Delete button and confirm that you want to delete the memory. SOUNDSPACE SCREEN The SoundSpace screen allows you to turn your iOS device into a personal settings adjustment tool for your hearing aid(s). It provides you the ability to modify the response for any of your professionally programmed memories to better suit a particular environment. Tap on the Start button to begin using SoundSpace. As you move your finger around the blank screen, the settings in your hearing aid(s) will temporarily change so you can listen to a variety of options.
- 6. Once you’ve found a spot that sounds good for the current listening environment, you can tap on the Save icon . Follow the prompts to save this as a new memory. To exit SoundSpace without saving a memory, just tap on the Cancel button . MICROPHONE SCREEN The Microphone screen enables you to use your iOS device as an extra microphone for receiving, recording, saving and delivering audio directly to your hearing aid(s). To access the Microphone screen, tap Microphone on the Remote screen. REMOTE MICROPHONE To turn the remote microphone on/off, tap the Power button on the Microphone screen. This will start/stop streaming of audio from the iOS device microphones to the hearing aids. If the iOS device is already streaming audio and you turn on the remote microphone, the current audio will stop streaming. When the remote microphone is on, a blue-colored waveform will show the current input to the iOS device microphone. A red-colored waveform will show when input is being recorded. Blue-colored waveform
- 7. RECORD The remote microphone can record and save audio picked up by your iOS device. Simply tap on the Record button , and all audio collected by your iOS device will be recorded until the Record button is tapped again. At that point, you will be prompted to name that recording. You can listen to a saved recording by tapping on the List icon to review and select a recording for playback. From the list view, you can email the recording by tapping on the Email icon. You can delete a recording by swiping it from right to left and tapping on the Delete button that appears. DEVICE SETTINGS The Device Settings area is accessed from the Remote screen by tapping on the gear-shaped Settings icon . The Device Settings area provides detailed information about Contact and Support, About (includes the app version number), App Settings, User Manual, Find My Hearing Aids and Troubleshooting.
- 8. APP SETTINGS App Settings includes an option for turning on/off the Automatic Car memory. If there is a memory labeled “Car” and the Automatic Car memory is set on, your iOS device will monitor vehicle speed and will automatically change to the car memory whenever your iOS device is traveling more than 10 mph. The memory will revert back to the previous memory as soon as your iOS device’s GPS system detects that it is traveling less than 10 mph for at least two minutes, or you enter a geotagged location. App Settings also includes a setting to Automatically Mute the hearing aid microphone when your iOS device is streaming audio of any kind (e.g., phone call, music, video). When this setting is on and an audio stream is detected, the hearing aid microphones will mute automatically. A few seconds after the stream stops, the microphones will unmute automatically. Another option within App Settings is to Show Memory Change Notifications. Turning on Show Memory Change Notifications will let the TruLink app provide iOS with notifications for memory changes. Notifications may be visible with banner notifications and in the Notification Center of your iOS device. There is a Demo Mode option in App Settings that allows you to use the TruLink Hearing Control app without hearing aids connected. Turn on Demo Mode and then shut down and restart the app. To shut down the app, double click the Home button and then swipe up on the TruLink app. Resetting the TruLink Hearing Control app is an option under App Settings and will delete all TruLink memories, geotags and audio recordings. All settings will be restored to default.
- 9. © 2014 Paradigm, Inc. All Rights Reserved. 3/14 MISC3068-01-EE-XX “Made for iPod,” “Made for iOS device,” and “Made for iPad” mean that an electronic accessory has been designed to connect specifically to iPod, iOS device, or iPad, respectively, and has been certified by the developer to meet Apple performance standards. Apple is not responsible for the operation of this device or its compliance with safety and regulatory standards. Please note that the use of this accessory with iPod, iOS device, or iPad may affect wireless performance. Apple, the Apple logo, iOS device, iPad and iPod touch are trademarks of Apple Inc., registered in the U.S. and other countries. App Store is a service mark of Apple Inc. FIND MY HEARING AIDS Find My Hearing Aids can help you locate a lost or misplaced hearing aid(s). The TruLink app monitors the wireless connection to your hearing aid(s) and remembers the last known location prior to a loss of connection. To find a lost hearing aid(s): • Tap on the Find My Hearing Aids tab in the Device Settings menu. • The TruLink app will change to a map screen with an icon indicating the location where your hearing aid(s) was last connected. • When you are in the area where your hearing aid(s) was last connected, the TruLink app will attempt to reconnect. (NOTE: the battery must be in the hearing aid.) You can tap on the Search button and use the signal strength monitor to find your hearing aid(s). APPLE’S iOS CONTROLS Your iOS device also features controls that allow you to adjust your hearing instruments without accessing the TruLink Hearing Control app. With this control you can quickly access the volume adjustment for your hearing aids without unlocking your iOS device. Just click your iOS device’s Home button three times for quick access to volume adjustment. Search view searching for hearing aids (not yet connected). Search view with iOS device next to hearing aids. Search view with iOS device away from hearing aids.