Gsm based borewell water level monitor
•
6 likes•10,115 views

If the water level in a borewell drops below the threshold level for pumping, its pump motor may get air-locked or even burn out due to dry running. It is inconvenient for farmers to walk all the way to their fields at night just to switch the pump motor ‘off.’ Besides, he may never get to know the problem This problem can be solved by using this GSM-based system that will automatically give the user a call on his mobile phone when the water level in the borewell drops below or rises to the threshold level for pumping. The user can also remotely switch on or switch off the pump motor by sending an SMS from his mobile phone. The system is simple, reliable, portable and affordable.

Recommended
Recommended
More Related Content
What's hot
What's hot (20)
Viewers also liked
Viewers also liked (20)
Similar to Gsm based borewell water level monitor
Similar to Gsm based borewell water level monitor (20)
Recently uploaded
Recently uploaded (20)
Gsm based borewell water level monitor
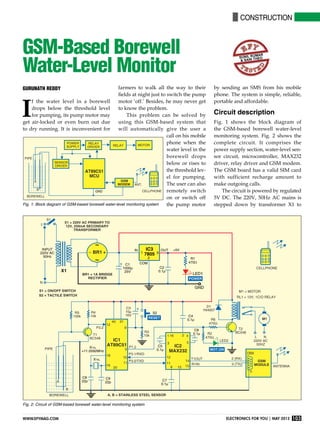
- 1. construction 103www.efymag.com Electronics For You | May 2012 GSM-Based Borewell Water-Level Monitor Gurunath Reddy farmers to walk all the way to their fields at night just to switch the pump motor ‘off.’ Besides, he may never get to know the problem. This problem can be solved by using this GSM-based system that will automatically give the user a call on his mobile phone when the water level in the borewell drops below or rises to the threshold lev- el for pumping. The user can also remotely switch on or switch off the pump motor by sending an SMS from his mobile phone. The system is simple, reliable, portable and affordable. Circuit description Fig. 1 shows the block diagram of the GSM-based borewell water-level monitoring system. Fig. 2 shows the complete circuit. It comprises the power supply section, water-level sen- sor circuit, microcontroller, MAX232 driver, relay driver and GSM modem. The GSM board has a valid SIM card with sufficient recharge amount to make outgoing calls. The circuit is powered by regulated 5V DC. The 220V, 50Hz AC mains is stepped down by transformer X1 to I f the water level in a borewell drops below the threshold level for pumping, its pump motor may get air-locked or even burn out due to dry running. It is inconvenient for Fig. 1: Block diagram of gsm-based borewell water-level monitoring system Fig. 2: Circuit of gsm-based borewell water-level monitoring system sunil kumar & Sani theo
- 2. construction 104 May 2012 | Electronics For You www.efymag.com deliver a secondary output of 12V, 250 mA. The transformer output is recti- fied by bridge rectifier br1, filtered by capacitor C1 and regulated by IC 7805 (IC3). Capacitor C2 bypasses ripples from the regulated supply. LED1 acts as the power-‘on’ indicator. Resistor R1 limits the current through LED1. The AT89C51 microcontroller is connected to the water-level sensor circuit, relay driver and MAX232. The microcontroller is programmed to take necessary actions. The mobile number used in the GSM modem is included in the code before burning the code into the microcontroller. The water-level sensor circuit comprises transistor T1 (BC548) as sensor driver and water sensors A and B dipped into the borewell along with the pipe. Sensor A is dipped to the threshold point for pumping and sen- sor B is dipped below the pipe to the bottom of the borewell. When water in the borewell fills to the threshold level, it is sensed by sen- sor A and you get a call on your mobile phone. Now you can turn the motor ‘on’ by sending the SMS “motor11 on” from your mobile phone to the SIM number in the GSM modem. You can also turn the motor ‘off’ by sending the SMS “motor11 off”. Sensor A is connected to the base of transistor T1 (BC548). When there is a high voltage at the base, T1 con- ducts and a low voltage is available at its collector. This low signal is fed to pin 12 (port pin p3.2) of the MCU. Similarly, for a low voltage input at the base, T1 stops conducting and a high voltage signal is available at its collector. So pin 12 of the MCU gets a high signal input. The high or low voltage signal at pin 12 is monitored and processed by the program in the MCU, and decision to turn the motor ‘off’ taken when the water level dips below sensor A. Pin 3 (port pin p1.2) of the MCU is the output pin. It is connected to relay-driver transistor T2 (BC548) and LED2. T2 drives relay RL1, which, in turn, activates the motor. LED2 glows to indicate the motor-‘on’ status. When water level in the borewell dips below sensor A, the conduct- ing path between sensors A and B breaks. Hence a signal is received by the microcontroller. The micro- controller turns the running motor ‘off’ and makes a call to the user’s cell phone through a GSM modem Fig. 3: GSM modem Table I Motor, Mobile and LED Status for Different Water Levels Borewell Water level Motor Mobile LED2 Remarks Full Above point A On Call from modem On SMS operation to turn on/off the motor Empty Below point A Off Call from modem Off SMS operation not allowed Table II Key Features of SIM300 Series Features Implementation Power supply Single supply voltage of 3.4V-4.5V Power saving Typical power consumption in SLEEP mode: 2.5 mA Frequency bands SIM300 tri-band (EGSM 900, DCS 1800, PCS 1900). The band can be set by AT COMMAND, and default band is EGSM 900 and DCS 1800 Compliant to GSM Phase 2/2+ SMS MT, MO, CB, text and PDU mode SMS storage: SIM card Supports transmission of SMS alternatively over CSD or GPRS. User can choose the preferred mode SIM interface Supported SIM card: 1.8V, 3V External antenna Connected via a 50-ohm antenna connector or antenna pad Two serial interfaces Serial port 1: Seven lines on the serial port interface Serial port 1 can be used for CSD FAX, GPRS and sending AT command of controlling module Serial port 1 can use multiplexing function, but you cannot use serial port 2 at the same time Autobauding supports baud rate of 1200 to 115,200 bps Serial port 2: Two lines on serial port interface, /TXD and /RXD Serial port 2 used only for transmitting AT command
- 3. construction 105www.efymag.com Electronics For You | May 2012 to indicate that the water level is too low to pump the water and the motor has been switched off. In this way, the motor is protected from airlocks and burnouts due to dry running. The status of motor, water level and LED2 are shown in Table I. The GSM modem used in this project is SIM300 V7.03 (refer Fig. 3). Its key features are listed in Table II. GSM modem SIM300 V7.03 The GSM module is a specialised type of modem which accepts a SIM card and operates on a subscriber’s mobile number over a network, just like a cel- lular phone. Basically, it is a cellphone without display. Modem SIM300 is a triband GSM/GPRS engine that works on EGSM 900MHz, DCS 1800MHz and PCS 1900MHz frequencies. GSM modem is RS232-logic-level compatible, i.e., it takes -3V to -15V as logic ‘high’ and +3V to +15V as logic ‘low’. MAX 232 is used to convert TTL into RS232 logic level and vice versa. Hence MAX232 is a voltage-level converter used between the microcon- troller and the GSM board. The signal at pin 11 of the micro- controller is sent to the GSM modem through pin 11 of MAX232. This signal is received at Pin 2 (RX) of the GSM Parts List Semiconductors: IC1 - AT89C51 microcontroller IC2 - MAX232 driver IC3 - 7805, 5V regulator BR1 - 1A bridge rectifier T1, T2 - BC548 npn transistor LED1, LED2 - 5mm light-emitting diode D1 - 1N4007 rectifier diode Resistors (all ¼-watt, ±5 per cent carbon): R1 - 1-kilo-ohm R2, R6 - 470-ohm R3, R4 - 10-kilo-ohm R5 - 100-kilo-ohm Capacitors: C1 - 1000µF, 25V electrolytic C2, C4-C7 - 0.1µF ceramic C3 - 10µF, 16V electrolytic C8, C9 - 22pF ceramic Miscellaneous: X1 - 220V AC primary to 12V, 250mA secondary transformer RL1 - 12V, 1C/O relay S1 - Tactile switch XTAL - 11.0592MHz crystal GSM modem - SIM300 V7.03 modem - Two water-level steel sensor rods Table III List of Commands Command Description AT Check whether the serial interface and GSM modem are working ATE0 Turn echo ‘off’ when there is less traffic on serial line AT+CNMI Display the new incoming SMS AT+CPMS Select SMS memory AT+CMGF SMS string format—how they are compressed AT+CMGR Read the new message from a given memory location AT+CMGS Send message to a given recipient AT+CMGD Delete message modem. The GSM modem transmits the signal from Pin 3 (TX) to the mi- crocontroller through MAX232, which is received at pin 10 of IC1. Software program The software program is written in ‘C’ language and compiled using Keil software. The AT commands listed in Table III are used in the code to receive the mobile signal. The hex code of the program is burnt into the MCU using Flash Magic software. Construction and testing An actual-size, single-side PCB layout of the GSM-based borewell water-level monitoring system is shown in Fig. 4 and its component layout in Fig. 5. Fig. 4: An actual-size, single-side PCB for the GSM-based borewell water-level monitoring system Fig. 5: Component layout for the PCB
- 4. construction 106 May 2012 | Electronics For You www.efymag.com Fig. 6: Author’s prototype For testing the circuit, proceed as follows: 1. After assembling all the com- ponents on the PCB, connect TX and RX pins of the GSM modem to pins 13 and 14 of MAX232, respectively. Insert a valid SIM in the card holder of the GSM modem. 2. Connect ground pin of the GSM modem to the ground rail of the cir- cuit. 3. Use two single-strand (hook-up) wires as sensor A and sensor B. (In the actual application, use of steel rods as sensors is recommended.) Hang the sensors into a bucket or mug such that sensor A is above sensor B. 4. Pour water into the bucket until the water level reaches sensor A. 5. Now switch on the circuit. You should get a call on your mobile phone. This indicates that you can turn the motor ‘on.’ 6. Send SMS “motor11 on” from any mobile phone to the SIM in the modem to turn the motor ‘on’. You can also turn the motor ‘off’ by send- ing “motor11 off” message from any mobile phone. 7. Now remove water from the bucket until the water level in the bucket dips below sensor A. The mo- tor should automatically switch off and you should receive a call from the modem simultaneously alerting you that the borewell (bucket in this case) is empty and the motor has been switched off. After testing the above steps, you can install the system in the borewell by inserting sensors A and B into the pipe with sensor B placed at the bot- tom of the borewell as shown in the circuit. Your borewell monitoring sys- tem is now ready for use. The author’s prototype is shown in Fig. 6. EFY note. The source code of this article is available on www.efymag. com. The author is a student of BE in electronics and telecommunications at SIT, Tumkur