Au digital-video-editing-imovie11
•Download as PPT, PDF•
1 like•774 views

A video editing tutorial for Dr Carolyn Guertin's MAIS 620: Digital Storytelling at Athabasca University, Canada. © 2012.

Recommended
More Related Content
What's hot
What's hot (18)
Viewers also liked
Viewers also liked (15)
Similar to Au digital-video-editing-imovie11
Similar to Au digital-video-editing-imovie11 (20)
More from Carolyn Guertin
More from Carolyn Guertin (20)
Recently uploaded
Recently uploaded (20)
Au digital-video-editing-imovie11
- 1. Digital Storytelling with Digital Video Carolyn Guertin, PhD • eLab • Athabasca University • 13 Oct 12
- 2. Digital storytelling is a short form of digital media production that allows everyday people to share aspects of their life story. The media used may include the digital equivalent of film techniques (full-motion video with sound), animation, stills, audio only, or any of the other forms of non-physical media (material that exists only as electronic files as opposed to actual paintings or photographs on paper, sounds stored on tape or disc, movies stored on film) which individuals can use to tell a story or present an idea. ~ Wikipedia
- 3. Digital storytelling is a form of autobiographical documentary told from a personal perspective usually lasting about 3 to 5 minutes. This is known as a reflexive documentary. Sarah Polley’s Stories We Tell (2012) is a feature-length reflexive documentary.
- 4. For background, remember that there are four types of documentary: observational, expository, reflexive, and poetic. NFB on the different types: http://blog.nfb.ca/blog/2014/08/04/types-of-documentary-films/ Still from Waiting for Fidel (1974)
- 5. Digital storytelling foregrounds the narrator’s story as the most important part of the narrative. • The form has a three-part structure: •An Introduction to the character (you or your situation) •A Conflict/Complication •A Resolution Watch A Short Video on Documentary Storytelling: https://www.youtube.com/watch?v=ISK0h0__WaU
- 6. You will find many examples of Digital Storytelling at: • The Center for Digital Storytelling: – http://www.storycenter.org/ • Digital Storytelling at the Queensland University of Technology: – http://digitalstorytelling.ci.qut.edu.au/
- 7. You can use whatever video editing software you have, but the two most popular are Windows Moviemaker and iMovie for Mac.
- 8. Video editing with Windows Live Movie Maker • 10 Windows Live Movie Maker Tutorials on YouTube: • http://bit.ly/1QKbCCg
- 9. Getting Started Tutorial: Windows Live Movie Maker http://www.youtube.com/watch?feature=player_embedded&v=3ZZij3NNyVg
- 10. KEEPVID.COM To download Creative Commons licensed clips or clips in the public domain, you can use:
- 11. Sources for film clips • Archive.org’s Internet Archive (moving images): http://www.archive.org/details/movies • Classic Film (especially foreign) http://home.comcast.net/~rtcee2/scatt/film_music_links/index_filmclips.html • Though Equipy Motion (royalty free clips): http://www.thoughtequity.com/ • Creatas Footage (royalty free stock): • http://www.royalty-free-stock-clips.com/
- 12. Digital Video Editing with iMovie ‘11 Carolyn Guertin, PhD • eLab • Athabasca University • 13 Oct 12
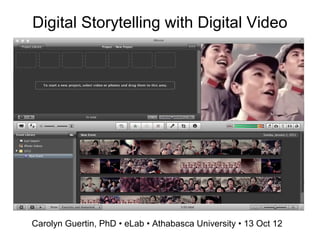
- 13. Stage or Timeline (this is your primary workspace) Click Project Library Arrow to reveal other Projects Filmstrip (Clips Preview) Events Library Playback Screen
- 14. Find your iMovie ‘11 icon in the dock
- 15. To import movies from a source other than your camera (like your desktop), select File > Import Movies… > and the source file
- 16. Uploading your movie clips from the camera 1. Connect the USB cable and plug it into the computer. 2. Open iMovie ‘11. 3. Make sure that the mode dial is set to the green solid arrow, video upload, or PC connect menu (depending on which menu your camera has). Turn on the camera.
- 17. iMovie will automatically open the import window and reveal thumbnails of your clips. If you want to upload everything, click ‘Import All’.
- 18. If only want to upload some of the clips, move the ‘Automatic’ toggle to ‘Manual’. Each clip will now have a selection box beneath it that can be checked or unchecked. Make your selection and click ‘Import Checked’. Set to ‘Manual’ Selection box
- 19. When your import is complete, you will get a dialogue box telling you what was imported. Click ‘OK’.
- 20. Naming a movie Click on the Project Library to open it, name your project and press return. Click on Edit Project arrow to close the Project Library again.
- 21. Creating a movie: Select each clip with your mouse from the filmstrip and drag to select the excerpt you want. Then drop it onto your timeline above.
- 22. Adding a clip: To drag a clip between two existing clips, drag it to the gap between them. A green line will appear and a plus sign on the clip itself. The ‘add selection to project’ button automatically adds a clip at the end of your movie.
- 23. To rearrange clips, click once to select them, and then drop them into place. To delete a clip you have chosen, click to select and press delete. The ‘add selection to project’ button automatically adds them at the end of your movie.
- 24. Skim through the assembled clips on the stage to review it or press the spacebar to play it all back in the right hand window. To play your film back from the beginning, select playback (on the right) or playback full screen (on the left).
- 25. When you are ready to create a new project, click the new project button , name it, select the format and your project is automatically added to the library. All projects are automatically saved in iMovie whenever you make a change.
- 26. iMovie ‘11 uses something called ‘skimming’. You can watch and hear a clip by running your cursor over it. Press the spacebar to play back from that point. Press the spacebar again to continue skimming. You can also turn off the audio while skimming The red line is the point of playback
- 27. Trimming a clip: If a clip is too long, drag a selection box to mark the portion of a clip you want to keep.
- 28. Trimming: Select Edit > Trim to Selection and it will preserve only the part within the selection box.
- 29. Trimming: Selecting the clip edit button will open the trimmer window so you can adjust the start and end points. Clip edit button Opens an editing window for that clip
- 30. To add background music or sound effects, grab your selection from the iLife library and hold it over the stage until the background turns green. Release et voilà.
- 31. If you drag an audio clip onto a single filmstrip, it will play for that segment only. Drag the audio ends to control when it starts and stops. It automatically snaps to the beginning and end of a clip. Adjust it manually to your liking.
- 32. Each clip has its own volume control. Select the clip, click to open and make your adjustments.
- 33. To separate audio from a clip, use the command+shift keys to make your selection and drag over another clip in your timeline. The sound will be added to that other clip.
- 34. To add a voiceover: Click the voiceover button , and choose the microphone you want to use (internal or external). Watch that the volume stays out of the red. Select voice enhancement for best quality. There will be a countdown from 3 to 1. Press the spacebar when finished. Drag the purple indicator until it is in the right position and click on it to adjust its volume.
- 35. Add titles in three steps: select template from library, and position over stage. 1. Select Title from library 2. Insert in desired position
- 36. 3. Choose fonts and add your text-- and your credits are done.
- 37. To add transitions between scenes, select one from the library and drop into position on the stage. Open window to transitions library
- 38. You can crop and rotate images Hover until crop icon appears, select area in window
- 39. Control Bar Overview Switch Between Event and Project Frames Import from camera Open/Close Project Window Playback Full Screen Playback in Viewer Create new project Increase/Decrease Thumbnail Size
- 40. Control Bar Overview Add Voiceover Add selected clip to project Add selection to favorites Unfavorite selection Delete selection Adjust Video Levels Crop and Rotate Adjust Audio Levels
- 41. Control Bar Overview Add Music or Sound Effects Mute Audio Playback Add Transitions Add Photos from iPhoto Library Add Titles
- 42. Saving your movie To export your media as a freestanding movie, select Share > Export Movie OR Share > Export using QuickTime To save your movie for use in other iLife programs, select Share > Media Browser
- 43. iMovie 10.1 Tutorial (2015 edition) http://bit.ly/1X523xs
Editor's Notes
- Welcome to the Digital Video Editing Workshop from the eLab at Athabasca University. I’m Carolyn Guertin.
- Welcome to the Digital Video Editing Workshop from the eLab at Athabasca University. I’m Carolyn Guertin.
- Naming a movie: Click on the Project Library to open it, name your project and press return. Click on Edit Project arrow to close the Project Library again.