SlideShare a Scribd company logo
1 of 7
Download to read offline
NICK HARRIS                   http://nickillus.co.uk

   A Walk-through of how this image was created in ArtRage 2.5
                   These few scant pages will          not teach you how to draw and paint.
      Just bring your style with you and see if any of the tips and techniques offer you something that you can use.


  T    he image was created for a challenge at
       Pixelbrush.com online forums. The theme was
      ‘MYTH’. Rather than have to choose one scene
  from the riches on offer, I elected to take two widely
  known characters, fairies and the Grim Reaper and
  assume they were unaware of each other’s
  existence. That being the case - What would a first
  meeting be like? That’s where the idea behind it
  came from.


  T   here is the temptation to think that you must have the most expensive,
      tool laden painting software to be able to create rich imagery. That
      may have been the case a few years ago, but I would argue that it is
  not so now, and wasn’t necessarily so even then.
    Today’s aspiring digital artist has a choice of free or low budget
   alternatives capable of marvellous results. It is one of these that we’ll
          look at today. This is a brief look at some of what it can do
           ArtRage is marketed for a nominal price by a software company called Ambient,
     who also run their own friendly and helpful forums dedicated to and for users of the product.
                               (http://www2.ambientdesign.com/forums/
  Originally aimed at the hobbyist market, it has begun blossoming into something with credentials
                            to attract the more serious minded digital artist.

                                     Some of the attractions include
                               Layers - layers with full ‘blending modes’
                           Stencils - Cut out masks - use rulers - add textures
                            Reference Images - can be pasted on the screen
                   Rotate the Canvas - as you wish to make drawing more comfortable

   I am using a graphics tablet with Windows XP Pro on a Pentium4 processor with 2gig RAM - This should be just as
                possible on a machineMac or PC with lesser specifications - Things may just take longer.
                        The essential for me is the graphics tablet - others may prefer a mouse!
LEVEL - Beginner-ish to Intermediate
The Object of this Exercise
   Is to show what a good example of a low budget software can be coaxed to do.
     We’ll look at a few of the tools and some things I’ve done with them in a particular image.
                       I don’t claim to be any kind of expert with this software.
                             This is just how I happened to use it this time.

                                                     Free starter edition to download - but a mere $25 for the full
                                                    software. $39.95 + shipping for the physical version with manual.
                                                    One of the things that often differentiates between top end
                                                    software and the budget offering is the size of the toolset. -
                                                    that and how much control you have over the marks they can
                                                    make. If you like mark making and experimenting though, a
                                                                               limited toolset can be an
                                                                               advantage.
      1                2            4           5                 6
                                                                              To the left is a basic visual record
                                                                              of some of the sorts of marks the
                                                                             ArtRage brushes will make. There
                                                                   1          are almost infinite variations
 7                 8             10           11
                                                                           2 available if you take into account
                                                                 5                individual brush controls and
                                                                        6           the ability to change paper
                                                                 9               3 settings.
                                                                     10     7         As if that wasn’t enough,
                                                                        11             there is the ability to import
 There are controls on all the brushes specific to each -                      8 4 any image to make a
 including three variations of the ‘Palette Knife’ (3).                  12
                                                                                        stencil of - which is a
 9 is a colour picker and 12 is the eraser.
                                                                              fantastic addition to the mark
     3                                                            Brush size making arsenal.
                                                                   control is
                                                                     here

                                                       Here’s a few such images gathered in a local cemetery.


  ONLINE TEXTURE
    RESOURCES
  To get you started

                                  It might be a good idea to point out some basic navigation features for
                                              moving about the image before we get any further.

                                                      You can zoom in and out using
                                               Ctrl/Cmd in combination with the + and - keys
                                           OR hold down Spbr and Shft while dragging left and right

                                    You can Move the image if you hold the Spacebar down and drag it.

                                Rotate the image by holding down Spbr and Alt/Opt and dragging around
     CGTextures
                                You can look at the image flipped horizontally (which is always a good test to
                                see how your right or left handedness has affected your drawing) by holding
 There are plenty more                                         the H key down.
 out there for you to find
         and use.                                     Hold the V key down for vertical flipping.

                                                 That should be enough to get you started,
                                             Remember that the full manual is built into the software,
                                                            to access at any time.
The whole point of this exercise is to encourage you to LEARN THROUGH PLAY. This is anything but a paint by
     numbers guide. I would urge you to explore and experiment as you go. You’ll absorb much more that way.

                                                         Fire upalter the image sizea through Edit/Rescale the
                                                          can
                                                                 ArtRage and create new default document. You

                                                         Painting or paper textures through Tools/Layer Options/Edit
                                                         Paper Settings if you feel like playing straight away. The
                                                         software comes with a full built in manual, so stuff like this
                                                         can be looked up at any time. Scan a sketch in if that’s your
       Tip                                               preferred way of working, but I usually draw straight in with
      You can contract the palettes to the
                                                         my tablet. ArtRage is nice to draw in, with good sensitivity. I
     sides by pressing TAB - or clear the
       the area completely by clicking                   prefer the ‘precise pencil tool option, but the standard more
     onscreen while holding the spacebar                 textural one is nice too.
     down (or right clicking on a PC) - Just             I add a few layers, by clicking the Add Layer button at the
      repeat in each case to return them.                bottom of the layer palette.
 1                                                       1     I sketch the figures on one layer with the precise pencil,
                                                               Block in a dark green base for the water with the roller,
                                                         as big as I can make it, on another, and
                                                                Paint some rough leaf shapes on a layer above with
                                                         the paintbrush

                                                         2       Add layers as you go for elements that may also need
                                                          to be isolated. WHY? It makes adding textures etc easier
                                                          without affecting everything near to that element. LAYER PALETTE
                                                                  I separate the ground
      I beef up the base green colour by                                      The ripples - 2 layers
      duplicating the layer ad working on the                                 Body colour of the characters.
      upper layer with the ‘Palette Knife‘                3       It’s possible to emulate ‘lighting effects’ by
                                                          using a layer on top with its blending mode set to
                                                         ‘Mulitply’ and working into it.
 2
                                                       Here I’ve filled the layer with blue/green, using
             the roller, and then painted into it with much lighter yellow - or rubbed it out with the
             eraser.

                                 BLENDING MODES
                                 Affect how layers interact with what’s below them.
                                 Depending on whether they are additive or
                                 subtractive they can darken or lighten in different
                                 ways. Some transform the colour in an almost
                                 psychedelic way. The best way to find out is to
                                 TRY them out.
                                 To change a layer blending mode in ArtRage -
                                 right click over it, and click in the window that
                                 says BLEND-Normal. I list of options will appear
                                 for you to select from
                                     You will find blending modes in far more
                                   expensive software like Photoshop and Painter

                                 Also be aware that you have total control over
                                 layer transparency. Simply right click over the
                                 layer and type a value in the appropriate box


                I add a bit of texture
                to the ‘gound in the
                top half of the image,
                using the ‘Glitter
                Brush and ‘Palette
                Knife‘ tools.


 3
Tip
You can Zoom in and out using Ctrl/Cmd and the +/- keys - or hold down Ctrl/Cmd and spacebar while dragging the cursor in the image


                                 4
                           Tip                                4       Ignoring the fact that I haven’t even resolved the
                         You can NAME layers by right         composition yet, I start working up the characters , because
                            clicking on them and editing
                               the default name given.
                                                              they will be the focal points of interest. This is done by
                          If you are using a lot of layers,   refining the drawing, body colour and ‘lighting’ layers. I use
                            this is VERY IMPORTANT,           mostly the Pencil, Chalk and Airbrush tools. I’ve added one
                         otherwise you’ll quickly get in a    more layer for bright edges that I name Glint, to sharpen up
                           tangle. I know - I do it all the   the highlights.
                                         time.
                                                              It’s about time I introduced to you a very powerful tool in this
                                                              application that I’ve begun employing as well - the STENCIL


                 Stencils can be combined by
                 overlaying one on top of another,
                 as I’ve done here to work on the
                 ground texture. You also have
                  options how your stencil will
                             behave.


   STENCILS
  When you click on the ‘Stencils’ tab you open up
  a whole world of possibilities.. Click on one and it              I drop some bright Autumnal eaves floating in the water
  will appear as a red shape in you image. The red                  to add interest in the foreground (forewater?)
  area represents what will be prevented from
  passing through onto the canvas when you apply
  paint. Chalk, whatever.. There are also rulers         5
  and geometric shapes should you need them. All
  are scaleable, rotatable and moveable.
  The most exciting part is the ability to add your           5     I’ve kept the main light-source in the image simple - the
  own to the libraries though.                                sun, and imagined it coming from top right It will make it
  EITHER - Right click on a layer and take the                easier to bring subtler lighting effects from the water and
  option to ‘Make a stencil form this layer’. Do this         fairy magic (!?) into the shadows later. The light is
  and right click over it so you can ‘Invert this
  Stencil’ to create a protective mask for the                           golden/yellow, so the shadows should be
  painting on that layer.                                                purple/blue, if I rely on simple complementaries like
  OR - Click the ‘Add New Stencil’ button in a                           I usually do. This mixed with the natural earth
  library to navigate to any image of acceptable                         tones of the leaves and ground should give the sort
  format (see guide) and open it for the stencil to
                                                                         of feel I’m after.
  be created. I use images of rock, ground etc to
  add textures that way.
      Tip
  You can transform stencils using the spacebar(move) Ctrl/Cmd(rotate) and Alt/Opt(scale) keys while dragging on it in the image
Tip
You can hide Stencils and leave them in place to use again later. (Right click - Hide Stencil) Open the ‘Active’ tab in the Stencils Palette
and click ‘show’ under its representation to make visible again


               Working on the Lighting Layer
                 through a texture stencil


        Lighting Layer switched OFF                                   Lighting Layer switched ON


 6           Switch layer visibility on and off to see
                                                              6      Continue to push the textures, using stencils and a
             how you’re doing.                                 combination of the various brushes. The Reaper’s head is a
             Click the ‘Eye Icon’ on each layer.               particularly attractive spot to play with this. The natural grain
                                                               of the chalk just adds to the effect. You can adjust how
                                                               much grain it has in its onscreen tool settings. Each tool has
                                                               its own set.
                                                               Don’t just think about adding grain on the solid paint layer.
                                                              You can also work through stencils on the semi-transparent
                                                              ‘Lighting Layer’ as well.


                                                              7       It’s long overdue that the composition be improved. It’s
                                                              strongly divided into two halves at the moment. The greatest
                                                              gift of digital is editability. Real media is far less forgiving,
                                                              and demands better planning if you are to maintain any sort
                                                              of control - Unless you are blessed with supreme confidence
 7                                                            and ability. I have neither. Just as well we’re in the digital
                                                              world then..
                                                              If I can put something eye-catching enough here, it’ll make a
                                                              more triangular composition, which should work better.

                                                              The leaf is OK but not a strong enough element to compete
                                                              with the two
                                                              characters.
                                                              I add a
                                                              swimming Fairy
                                                              on a couple of
                                                              new layers, and
                                                              group them so
                                                              that I can move
                                                              her about as a
                                                              unit.
Carry On - MORE OF THE SAME
     There are gradients included in the
     stencils - It’s a bit of a chore, but you                        If you work with dark tones through a
      can lay a flat wash using the roller                             texture stencil - think about inverting
              and a bit of patience.                                  it and using light tones to really push
                                                                                  the effect home.


                                                                                           You can crisp things up more by picking
                                                                                           out details on that ‘Glint’layer I mentioned
                                                                                                        a few pages ago.


 Using two radial gradient stencils I lay down a
‘magical’ turquoise glow in the shadowy areas,
 by laying a wash with the roller on a separate
 layer and reducing the opacity. Then I work
 back in eraser where it’s just too strong still.

                                                                                     I’ve left some of the original texture that the
                                                                                      chalk produced much earlier,to seem like
                                                                                      dust floating on tranquil water. That was
                                                                                     never planned, but I spotted it and thought it
                                                                                                       might work.

                                                                                    ALWAYS keep an eye open ‘happy accidents’
                                                                       rso   r
                                                              o   l cu
                                                    lle   r to
                                                 Ro
I add more layers to do my final
                                                                                         tweaking, still naming them to
                                                                                         avoid confusion.


   8
                                                       8 I’ve come to a point where having all these layers is
                                                       impeding me rather than helping. That’s why I decide to
                                                      ‘‘Merge All Layers’ which is an option on the layers palette.
                                                      This allows me to work in a much more holistic way again.
                                                      A quick technique for darkening the image is to duplicate the
                                                       image to another layer, set it to ‘multiply’ blending mode (or
       Duplicating the image and setting               another of the additive options) and adjust the opacity to
          to multiply blending mode                    taste. You can then go back in and gently erase lighter
                                                       areas on the upper layer to accentuate the contrast. Doing
                                                       this throws up a couple of areas I feel need attention. Some
                                                       hint of reflected leaves and a bit more colour and detail on
                                                       those floating.


                                                          FINISH      That’s about it. The rest is down to more
                                                       tweaking and fiddling (very technical terminology), using the
                                                       methods already covered. It’s far from the perfect image, but
                                                       then that wasn’t really the object here. Knowing me I’ll go
                                                       back in and tinker with it at a later date, when I have a fresh
                                                       perspective on it and some time to do that. For now it’ll have
                                                       to do.
        This is how the last tweak layers
       look with the visibility of the image           Here’s hoping that you can get something out of this brief
         at the bottom of the layer stack              look at a promising software. Just enjoy yourself with it, or
                     turned off                        whichever software you decide to or are limited to using.


                                            MY WEBSITE - http://nickillus.co.uk
This tutorial was put together using Serif PagePlusX3 (version 9 with pdf export available for under £10 at the time of writing this),
        and Traction Screengrab Pro (free)software. Try not to let budget be an excuse for not being able to tackle things.

                                    All artwork and design copyrighted to Nick Harris 2008

More Related Content

Viewers also liked

Public Speaking for Writers
Public Speaking for WritersPublic Speaking for Writers
Public Speaking for WritersDavid Keener
 
HSA Drama Symbolic Capital
HSA Drama Symbolic CapitalHSA Drama Symbolic Capital
HSA Drama Symbolic CapitalDimitris Tsingos
 
Prueba Funcionales Musculares
Prueba Funcionales MuscularesPrueba Funcionales Musculares
Prueba Funcionales Muscularesmiguellangell2002
 
Digital dependency and privacy2
Digital dependency and privacy2Digital dependency and privacy2
Digital dependency and privacy2Ashley Marty
 
Wps New Concept Overview Presentation 6 14 11 E
Wps New Concept Overview Presentation  6 14 11 EWps New Concept Overview Presentation  6 14 11 E
Wps New Concept Overview Presentation 6 14 11 Eragstowealth
 
Preview guide st852ifr1
Preview guide st852ifr1Preview guide st852ifr1
Preview guide st852ifr1lhghom
 
Actionable Strategies for Driving Sales and Increasing ROI
Actionable Strategies for Driving Sales and Increasing ROIActionable Strategies for Driving Sales and Increasing ROI
Actionable Strategies for Driving Sales and Increasing ROICitrix Online
 
Ful-FIG FASHIONISTA MAGAZINE
Ful-FIG FASHIONISTA MAGAZINEFul-FIG FASHIONISTA MAGAZINE
Ful-FIG FASHIONISTA MAGAZINEAMINAMACCADONNA
 
A tribute to Bishop Clemens Thottungal
A tribute to Bishop Clemens ThottungalA tribute to Bishop Clemens Thottungal
A tribute to Bishop Clemens Thottungalpatergiri
 
Συμμετοχή του 2ου ΕΠΑΛ Σερρών στον περσινό Διαγωνισμό Επιχειρηματικότητας με ...
Συμμετοχή του 2ου ΕΠΑΛ Σερρών στον περσινό Διαγωνισμό Επιχειρηματικότητας με ...Συμμετοχή του 2ου ΕΠΑΛ Σερρών στον περσινό Διαγωνισμό Επιχειρηματικότητας με ...
Συμμετοχή του 2ου ΕΠΑΛ Σερρών στον περσινό Διαγωνισμό Επιχειρηματικότητας με ...KESYPSERRON
 
Ilt in teaching and learning
Ilt in teaching and learningIlt in teaching and learning
Ilt in teaching and learningJames West
 
Library orientation
Library orientationLibrary orientation
Library orientationKVander
 

Viewers also liked (18)

DRMs lezione 31 3_2011
DRMs lezione 31 3_2011DRMs lezione 31 3_2011
DRMs lezione 31 3_2011
 
Cos'è e cosa fa the talkingvillage sept10
Cos'è e cosa fa the talkingvillage sept10Cos'è e cosa fa the talkingvillage sept10
Cos'è e cosa fa the talkingvillage sept10
 
Public Speaking for Writers
Public Speaking for WritersPublic Speaking for Writers
Public Speaking for Writers
 
HSA Drama Symbolic Capital
HSA Drama Symbolic CapitalHSA Drama Symbolic Capital
HSA Drama Symbolic Capital
 
Prueba Funcionales Musculares
Prueba Funcionales MuscularesPrueba Funcionales Musculares
Prueba Funcionales Musculares
 
Digital dependency and privacy2
Digital dependency and privacy2Digital dependency and privacy2
Digital dependency and privacy2
 
Wps New Concept Overview Presentation 6 14 11 E
Wps New Concept Overview Presentation  6 14 11 EWps New Concept Overview Presentation  6 14 11 E
Wps New Concept Overview Presentation 6 14 11 E
 
Ivy 09
Ivy  09Ivy  09
Ivy 09
 
Tutorial De Flixtime
Tutorial De FlixtimeTutorial De Flixtime
Tutorial De Flixtime
 
Preview guide st852ifr1
Preview guide st852ifr1Preview guide st852ifr1
Preview guide st852ifr1
 
Aol dam taxonomy
Aol dam taxonomyAol dam taxonomy
Aol dam taxonomy
 
Actionable Strategies for Driving Sales and Increasing ROI
Actionable Strategies for Driving Sales and Increasing ROIActionable Strategies for Driving Sales and Increasing ROI
Actionable Strategies for Driving Sales and Increasing ROI
 
Ful-FIG FASHIONISTA MAGAZINE
Ful-FIG FASHIONISTA MAGAZINEFul-FIG FASHIONISTA MAGAZINE
Ful-FIG FASHIONISTA MAGAZINE
 
A tribute to Bishop Clemens Thottungal
A tribute to Bishop Clemens ThottungalA tribute to Bishop Clemens Thottungal
A tribute to Bishop Clemens Thottungal
 
Συμμετοχή του 2ου ΕΠΑΛ Σερρών στον περσινό Διαγωνισμό Επιχειρηματικότητας με ...
Συμμετοχή του 2ου ΕΠΑΛ Σερρών στον περσινό Διαγωνισμό Επιχειρηματικότητας με ...Συμμετοχή του 2ου ΕΠΑΛ Σερρών στον περσινό Διαγωνισμό Επιχειρηματικότητας με ...
Συμμετοχή του 2ου ΕΠΑΛ Σερρών στον περσινό Διαγωνισμό Επιχειρηματικότητας με ...
 
Ilt in teaching and learning
Ilt in teaching and learningIlt in teaching and learning
Ilt in teaching and learning
 
Elvis Presley Vol 03
Elvis Presley Vol 03Elvis Presley Vol 03
Elvis Presley Vol 03
 
Library orientation
Library orientationLibrary orientation
Library orientation
 

More from codewarrior congrejo (18)

O W Overview
O W OverviewO W Overview
O W Overview
 
Maya_Nclothadvancedtechniques
Maya_NclothadvancedtechniquesMaya_Nclothadvancedtechniques
Maya_Nclothadvancedtechniques
 
Mayanclothadvancedtechniques2010
Mayanclothadvancedtechniques2010Mayanclothadvancedtechniques2010
Mayanclothadvancedtechniques2010
 
Mayamuscleadvancedtechniques
MayamuscleadvancedtechniquesMayamuscleadvancedtechniques
Mayamuscleadvancedtechniques
 
Mayamuscleadvancedtechniques2010
Mayamuscleadvancedtechniques2010Mayamuscleadvancedtechniques2010
Mayamuscleadvancedtechniques2010
 
Mayamatchmovertutorials
MayamatchmovertutorialsMayamatchmovertutorials
Mayamatchmovertutorials
 
Mayacompositeuserguide
MayacompositeuserguideMayacompositeuserguide
Mayacompositeuserguide
 
Mayacompositetutorials
MayacompositetutorialsMayacompositetutorials
Mayacompositetutorials
 
Maya2010installationlicensingguide
Maya2010installationlicensingguideMaya2010installationlicensingguide
Maya2010installationlicensingguide
 
Maya 2010 Getting Started
Maya 2010 Getting StartedMaya 2010 Getting Started
Maya 2010 Getting Started
 
Directconnect200808 Whatsnew Jp
Directconnect200808 Whatsnew JpDirectconnect200808 Whatsnew Jp
Directconnect200808 Whatsnew Jp
 
Directconnect200808 Whatsnew
Directconnect200808 WhatsnewDirectconnect200808 Whatsnew
Directconnect200808 Whatsnew
 
Directconnect200808 Install Jp
Directconnect200808 Install JpDirectconnect200808 Install Jp
Directconnect200808 Install Jp
 
Directconnect200808 Install
Directconnect200808 InstallDirectconnect200808 Install
Directconnect200808 Install
 
Directconnect200808 Help Jp
Directconnect200808 Help JpDirectconnect200808 Help Jp
Directconnect200808 Help Jp
 
Directconnect200808 Help
Directconnect200808 HelpDirectconnect200808 Help
Directconnect200808 Help
 
Autodeskmaya 2010 Faq7
Autodeskmaya 2010 Faq7Autodeskmaya 2010 Faq7
Autodeskmaya 2010 Faq7
 
Autodeskmaya 2010 Faq6
Autodeskmaya 2010 Faq6Autodeskmaya 2010 Faq6
Autodeskmaya 2010 Faq6
 

Recently uploaded

Injustice - Developers Among Us (SciFiDevCon 2024)
Injustice - Developers Among Us (SciFiDevCon 2024)Injustice - Developers Among Us (SciFiDevCon 2024)
Injustice - Developers Among Us (SciFiDevCon 2024)Allon Mureinik
 
How to Troubleshoot Apps for the Modern Connected Worker
How to Troubleshoot Apps for the Modern Connected WorkerHow to Troubleshoot Apps for the Modern Connected Worker
How to Troubleshoot Apps for the Modern Connected WorkerThousandEyes
 
[2024]Digital Global Overview Report 2024 Meltwater.pdf
[2024]Digital Global Overview Report 2024 Meltwater.pdf[2024]Digital Global Overview Report 2024 Meltwater.pdf
[2024]Digital Global Overview Report 2024 Meltwater.pdfhans926745
 
Finology Group – Insurtech Innovation Award 2024
Finology Group – Insurtech Innovation Award 2024Finology Group – Insurtech Innovation Award 2024
Finology Group – Insurtech Innovation Award 2024The Digital Insurer
 
WhatsApp 9892124323 ✓Call Girls In Kalyan ( Mumbai ) secure service
WhatsApp 9892124323 ✓Call Girls In Kalyan ( Mumbai ) secure serviceWhatsApp 9892124323 ✓Call Girls In Kalyan ( Mumbai ) secure service
WhatsApp 9892124323 ✓Call Girls In Kalyan ( Mumbai ) secure servicePooja Nehwal
 
Google AI Hackathon: LLM based Evaluator for RAG
Google AI Hackathon: LLM based Evaluator for RAGGoogle AI Hackathon: LLM based Evaluator for RAG
Google AI Hackathon: LLM based Evaluator for RAGSujit Pal
 
Maximizing Board Effectiveness 2024 Webinar.pptx
Maximizing Board Effectiveness 2024 Webinar.pptxMaximizing Board Effectiveness 2024 Webinar.pptx
Maximizing Board Effectiveness 2024 Webinar.pptxOnBoard
 
Handwritten Text Recognition for manuscripts and early printed texts
Handwritten Text Recognition for manuscripts and early printed textsHandwritten Text Recognition for manuscripts and early printed texts
Handwritten Text Recognition for manuscripts and early printed textsMaria Levchenko
 
Raspberry Pi 5: Challenges and Solutions in Bringing up an OpenGL/Vulkan Driv...
Raspberry Pi 5: Challenges and Solutions in Bringing up an OpenGL/Vulkan Driv...Raspberry Pi 5: Challenges and Solutions in Bringing up an OpenGL/Vulkan Driv...
Raspberry Pi 5: Challenges and Solutions in Bringing up an OpenGL/Vulkan Driv...Igalia
 
04-2024-HHUG-Sales-and-Marketing-Alignment.pptx
04-2024-HHUG-Sales-and-Marketing-Alignment.pptx04-2024-HHUG-Sales-and-Marketing-Alignment.pptx
04-2024-HHUG-Sales-and-Marketing-Alignment.pptxHampshireHUG
 
The 7 Things I Know About Cyber Security After 25 Years | April 2024
The 7 Things I Know About Cyber Security After 25 Years | April 2024The 7 Things I Know About Cyber Security After 25 Years | April 2024
The 7 Things I Know About Cyber Security After 25 Years | April 2024Rafal Los
 
SQL Database Design For Developers at php[tek] 2024
SQL Database Design For Developers at php[tek] 2024SQL Database Design For Developers at php[tek] 2024
SQL Database Design For Developers at php[tek] 2024Scott Keck-Warren
 
Transforming Data Streams with Kafka Connect: An Introduction to Single Messa...
Transforming Data Streams with Kafka Connect: An Introduction to Single Messa...Transforming Data Streams with Kafka Connect: An Introduction to Single Messa...
Transforming Data Streams with Kafka Connect: An Introduction to Single Messa...HostedbyConfluent
 
🐬 The future of MySQL is Postgres 🐘
🐬  The future of MySQL is Postgres   🐘🐬  The future of MySQL is Postgres   🐘
🐬 The future of MySQL is Postgres 🐘RTylerCroy
 
Strategies for Unlocking Knowledge Management in Microsoft 365 in the Copilot...
Strategies for Unlocking Knowledge Management in Microsoft 365 in the Copilot...Strategies for Unlocking Knowledge Management in Microsoft 365 in the Copilot...
Strategies for Unlocking Knowledge Management in Microsoft 365 in the Copilot...Drew Madelung
 
Enhancing Worker Digital Experience: A Hands-on Workshop for Partners
Enhancing Worker Digital Experience: A Hands-on Workshop for PartnersEnhancing Worker Digital Experience: A Hands-on Workshop for Partners
Enhancing Worker Digital Experience: A Hands-on Workshop for PartnersThousandEyes
 
From Event to Action: Accelerate Your Decision Making with Real-Time Automation
From Event to Action: Accelerate Your Decision Making with Real-Time AutomationFrom Event to Action: Accelerate Your Decision Making with Real-Time Automation
From Event to Action: Accelerate Your Decision Making with Real-Time AutomationSafe Software
 
Breaking the Kubernetes Kill Chain: Host Path Mount
Breaking the Kubernetes Kill Chain: Host Path MountBreaking the Kubernetes Kill Chain: Host Path Mount
Breaking the Kubernetes Kill Chain: Host Path MountPuma Security, LLC
 
Understanding the Laravel MVC Architecture
Understanding the Laravel MVC ArchitectureUnderstanding the Laravel MVC Architecture
Understanding the Laravel MVC ArchitecturePixlogix Infotech
 
A Call to Action for Generative AI in 2024
A Call to Action for Generative AI in 2024A Call to Action for Generative AI in 2024
A Call to Action for Generative AI in 2024Results
 

Recently uploaded (20)

Injustice - Developers Among Us (SciFiDevCon 2024)
Injustice - Developers Among Us (SciFiDevCon 2024)Injustice - Developers Among Us (SciFiDevCon 2024)
Injustice - Developers Among Us (SciFiDevCon 2024)
 
How to Troubleshoot Apps for the Modern Connected Worker
How to Troubleshoot Apps for the Modern Connected WorkerHow to Troubleshoot Apps for the Modern Connected Worker
How to Troubleshoot Apps for the Modern Connected Worker
 
[2024]Digital Global Overview Report 2024 Meltwater.pdf
[2024]Digital Global Overview Report 2024 Meltwater.pdf[2024]Digital Global Overview Report 2024 Meltwater.pdf
[2024]Digital Global Overview Report 2024 Meltwater.pdf
 
Finology Group – Insurtech Innovation Award 2024
Finology Group – Insurtech Innovation Award 2024Finology Group – Insurtech Innovation Award 2024
Finology Group – Insurtech Innovation Award 2024
 
WhatsApp 9892124323 ✓Call Girls In Kalyan ( Mumbai ) secure service
WhatsApp 9892124323 ✓Call Girls In Kalyan ( Mumbai ) secure serviceWhatsApp 9892124323 ✓Call Girls In Kalyan ( Mumbai ) secure service
WhatsApp 9892124323 ✓Call Girls In Kalyan ( Mumbai ) secure service
 
Google AI Hackathon: LLM based Evaluator for RAG
Google AI Hackathon: LLM based Evaluator for RAGGoogle AI Hackathon: LLM based Evaluator for RAG
Google AI Hackathon: LLM based Evaluator for RAG
 
Maximizing Board Effectiveness 2024 Webinar.pptx
Maximizing Board Effectiveness 2024 Webinar.pptxMaximizing Board Effectiveness 2024 Webinar.pptx
Maximizing Board Effectiveness 2024 Webinar.pptx
 
Handwritten Text Recognition for manuscripts and early printed texts
Handwritten Text Recognition for manuscripts and early printed textsHandwritten Text Recognition for manuscripts and early printed texts
Handwritten Text Recognition for manuscripts and early printed texts
 
Raspberry Pi 5: Challenges and Solutions in Bringing up an OpenGL/Vulkan Driv...
Raspberry Pi 5: Challenges and Solutions in Bringing up an OpenGL/Vulkan Driv...Raspberry Pi 5: Challenges and Solutions in Bringing up an OpenGL/Vulkan Driv...
Raspberry Pi 5: Challenges and Solutions in Bringing up an OpenGL/Vulkan Driv...
 
04-2024-HHUG-Sales-and-Marketing-Alignment.pptx
04-2024-HHUG-Sales-and-Marketing-Alignment.pptx04-2024-HHUG-Sales-and-Marketing-Alignment.pptx
04-2024-HHUG-Sales-and-Marketing-Alignment.pptx
 
The 7 Things I Know About Cyber Security After 25 Years | April 2024
The 7 Things I Know About Cyber Security After 25 Years | April 2024The 7 Things I Know About Cyber Security After 25 Years | April 2024
The 7 Things I Know About Cyber Security After 25 Years | April 2024
 
SQL Database Design For Developers at php[tek] 2024
SQL Database Design For Developers at php[tek] 2024SQL Database Design For Developers at php[tek] 2024
SQL Database Design For Developers at php[tek] 2024
 
Transforming Data Streams with Kafka Connect: An Introduction to Single Messa...
Transforming Data Streams with Kafka Connect: An Introduction to Single Messa...Transforming Data Streams with Kafka Connect: An Introduction to Single Messa...
Transforming Data Streams with Kafka Connect: An Introduction to Single Messa...
 
🐬 The future of MySQL is Postgres 🐘
🐬  The future of MySQL is Postgres   🐘🐬  The future of MySQL is Postgres   🐘
🐬 The future of MySQL is Postgres 🐘
 
Strategies for Unlocking Knowledge Management in Microsoft 365 in the Copilot...
Strategies for Unlocking Knowledge Management in Microsoft 365 in the Copilot...Strategies for Unlocking Knowledge Management in Microsoft 365 in the Copilot...
Strategies for Unlocking Knowledge Management in Microsoft 365 in the Copilot...
 
Enhancing Worker Digital Experience: A Hands-on Workshop for Partners
Enhancing Worker Digital Experience: A Hands-on Workshop for PartnersEnhancing Worker Digital Experience: A Hands-on Workshop for Partners
Enhancing Worker Digital Experience: A Hands-on Workshop for Partners
 
From Event to Action: Accelerate Your Decision Making with Real-Time Automation
From Event to Action: Accelerate Your Decision Making with Real-Time AutomationFrom Event to Action: Accelerate Your Decision Making with Real-Time Automation
From Event to Action: Accelerate Your Decision Making with Real-Time Automation
 
Breaking the Kubernetes Kill Chain: Host Path Mount
Breaking the Kubernetes Kill Chain: Host Path MountBreaking the Kubernetes Kill Chain: Host Path Mount
Breaking the Kubernetes Kill Chain: Host Path Mount
 
Understanding the Laravel MVC Architecture
Understanding the Laravel MVC ArchitectureUnderstanding the Laravel MVC Architecture
Understanding the Laravel MVC Architecture
 
A Call to Action for Generative AI in 2024
A Call to Action for Generative AI in 2024A Call to Action for Generative AI in 2024
A Call to Action for Generative AI in 2024
 

Art Rage Expert Tutorial Lo Res1

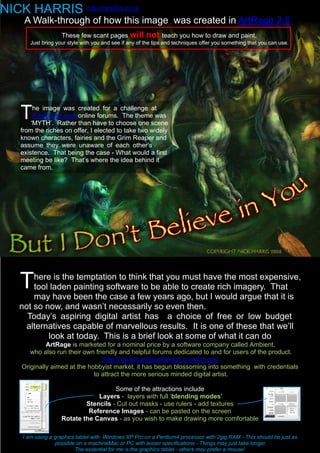
  • 1. NICK HARRIS http://nickillus.co.uk A Walk-through of how this image was created in ArtRage 2.5 These few scant pages will not teach you how to draw and paint. Just bring your style with you and see if any of the tips and techniques offer you something that you can use. T he image was created for a challenge at Pixelbrush.com online forums. The theme was ‘MYTH’. Rather than have to choose one scene from the riches on offer, I elected to take two widely known characters, fairies and the Grim Reaper and assume they were unaware of each other’s existence. That being the case - What would a first meeting be like? That’s where the idea behind it came from. T here is the temptation to think that you must have the most expensive, tool laden painting software to be able to create rich imagery. That may have been the case a few years ago, but I would argue that it is not so now, and wasn’t necessarily so even then. Today’s aspiring digital artist has a choice of free or low budget alternatives capable of marvellous results. It is one of these that we’ll look at today. This is a brief look at some of what it can do ArtRage is marketed for a nominal price by a software company called Ambient, who also run their own friendly and helpful forums dedicated to and for users of the product. (http://www2.ambientdesign.com/forums/ Originally aimed at the hobbyist market, it has begun blossoming into something with credentials to attract the more serious minded digital artist. Some of the attractions include Layers - layers with full ‘blending modes’ Stencils - Cut out masks - use rulers - add textures Reference Images - can be pasted on the screen Rotate the Canvas - as you wish to make drawing more comfortable I am using a graphics tablet with Windows XP Pro on a Pentium4 processor with 2gig RAM - This should be just as possible on a machineMac or PC with lesser specifications - Things may just take longer. The essential for me is the graphics tablet - others may prefer a mouse!
  • 2. LEVEL - Beginner-ish to Intermediate The Object of this Exercise Is to show what a good example of a low budget software can be coaxed to do. We’ll look at a few of the tools and some things I’ve done with them in a particular image. I don’t claim to be any kind of expert with this software. This is just how I happened to use it this time. Free starter edition to download - but a mere $25 for the full software. $39.95 + shipping for the physical version with manual. One of the things that often differentiates between top end software and the budget offering is the size of the toolset. - that and how much control you have over the marks they can make. If you like mark making and experimenting though, a limited toolset can be an advantage. 1 2 4 5 6 To the left is a basic visual record of some of the sorts of marks the ArtRage brushes will make. There 1 are almost infinite variations 7 8 10 11 2 available if you take into account 5 individual brush controls and 6 the ability to change paper 9 3 settings. 10 7 As if that wasn’t enough, 11 there is the ability to import There are controls on all the brushes specific to each - 8 4 any image to make a including three variations of the ‘Palette Knife’ (3). 12 stencil of - which is a 9 is a colour picker and 12 is the eraser. fantastic addition to the mark 3 Brush size making arsenal. control is here Here’s a few such images gathered in a local cemetery. ONLINE TEXTURE RESOURCES To get you started It might be a good idea to point out some basic navigation features for moving about the image before we get any further. You can zoom in and out using Ctrl/Cmd in combination with the + and - keys OR hold down Spbr and Shft while dragging left and right You can Move the image if you hold the Spacebar down and drag it. Rotate the image by holding down Spbr and Alt/Opt and dragging around CGTextures You can look at the image flipped horizontally (which is always a good test to see how your right or left handedness has affected your drawing) by holding There are plenty more the H key down. out there for you to find and use. Hold the V key down for vertical flipping. That should be enough to get you started, Remember that the full manual is built into the software, to access at any time.
  • 3. The whole point of this exercise is to encourage you to LEARN THROUGH PLAY. This is anything but a paint by numbers guide. I would urge you to explore and experiment as you go. You’ll absorb much more that way. Fire upalter the image sizea through Edit/Rescale the can ArtRage and create new default document. You Painting or paper textures through Tools/Layer Options/Edit Paper Settings if you feel like playing straight away. The software comes with a full built in manual, so stuff like this can be looked up at any time. Scan a sketch in if that’s your Tip preferred way of working, but I usually draw straight in with You can contract the palettes to the my tablet. ArtRage is nice to draw in, with good sensitivity. I sides by pressing TAB - or clear the the area completely by clicking prefer the ‘precise pencil tool option, but the standard more onscreen while holding the spacebar textural one is nice too. down (or right clicking on a PC) - Just I add a few layers, by clicking the Add Layer button at the repeat in each case to return them. bottom of the layer palette. 1 1 I sketch the figures on one layer with the precise pencil, Block in a dark green base for the water with the roller, as big as I can make it, on another, and Paint some rough leaf shapes on a layer above with the paintbrush 2 Add layers as you go for elements that may also need to be isolated. WHY? It makes adding textures etc easier without affecting everything near to that element. LAYER PALETTE I separate the ground I beef up the base green colour by The ripples - 2 layers duplicating the layer ad working on the Body colour of the characters. upper layer with the ‘Palette Knife‘ 3 It’s possible to emulate ‘lighting effects’ by using a layer on top with its blending mode set to ‘Mulitply’ and working into it. 2 Here I’ve filled the layer with blue/green, using the roller, and then painted into it with much lighter yellow - or rubbed it out with the eraser. BLENDING MODES Affect how layers interact with what’s below them. Depending on whether they are additive or subtractive they can darken or lighten in different ways. Some transform the colour in an almost psychedelic way. The best way to find out is to TRY them out. To change a layer blending mode in ArtRage - right click over it, and click in the window that says BLEND-Normal. I list of options will appear for you to select from You will find blending modes in far more expensive software like Photoshop and Painter Also be aware that you have total control over layer transparency. Simply right click over the layer and type a value in the appropriate box I add a bit of texture to the ‘gound in the top half of the image, using the ‘Glitter Brush and ‘Palette Knife‘ tools. 3
  • 4. Tip You can Zoom in and out using Ctrl/Cmd and the +/- keys - or hold down Ctrl/Cmd and spacebar while dragging the cursor in the image 4 Tip 4 Ignoring the fact that I haven’t even resolved the You can NAME layers by right composition yet, I start working up the characters , because clicking on them and editing the default name given. they will be the focal points of interest. This is done by If you are using a lot of layers, refining the drawing, body colour and ‘lighting’ layers. I use this is VERY IMPORTANT, mostly the Pencil, Chalk and Airbrush tools. I’ve added one otherwise you’ll quickly get in a more layer for bright edges that I name Glint, to sharpen up tangle. I know - I do it all the the highlights. time. It’s about time I introduced to you a very powerful tool in this application that I’ve begun employing as well - the STENCIL Stencils can be combined by overlaying one on top of another, as I’ve done here to work on the ground texture. You also have options how your stencil will behave. STENCILS When you click on the ‘Stencils’ tab you open up a whole world of possibilities.. Click on one and it I drop some bright Autumnal eaves floating in the water will appear as a red shape in you image. The red to add interest in the foreground (forewater?) area represents what will be prevented from passing through onto the canvas when you apply paint. Chalk, whatever.. There are also rulers 5 and geometric shapes should you need them. All are scaleable, rotatable and moveable. The most exciting part is the ability to add your 5 I’ve kept the main light-source in the image simple - the own to the libraries though. sun, and imagined it coming from top right It will make it EITHER - Right click on a layer and take the easier to bring subtler lighting effects from the water and option to ‘Make a stencil form this layer’. Do this fairy magic (!?) into the shadows later. The light is and right click over it so you can ‘Invert this Stencil’ to create a protective mask for the golden/yellow, so the shadows should be painting on that layer. purple/blue, if I rely on simple complementaries like OR - Click the ‘Add New Stencil’ button in a I usually do. This mixed with the natural earth library to navigate to any image of acceptable tones of the leaves and ground should give the sort format (see guide) and open it for the stencil to of feel I’m after. be created. I use images of rock, ground etc to add textures that way. Tip You can transform stencils using the spacebar(move) Ctrl/Cmd(rotate) and Alt/Opt(scale) keys while dragging on it in the image
  • 5. Tip You can hide Stencils and leave them in place to use again later. (Right click - Hide Stencil) Open the ‘Active’ tab in the Stencils Palette and click ‘show’ under its representation to make visible again Working on the Lighting Layer through a texture stencil Lighting Layer switched OFF Lighting Layer switched ON 6 Switch layer visibility on and off to see 6 Continue to push the textures, using stencils and a how you’re doing. combination of the various brushes. The Reaper’s head is a Click the ‘Eye Icon’ on each layer. particularly attractive spot to play with this. The natural grain of the chalk just adds to the effect. You can adjust how much grain it has in its onscreen tool settings. Each tool has its own set. Don’t just think about adding grain on the solid paint layer. You can also work through stencils on the semi-transparent ‘Lighting Layer’ as well. 7 It’s long overdue that the composition be improved. It’s strongly divided into two halves at the moment. The greatest gift of digital is editability. Real media is far less forgiving, and demands better planning if you are to maintain any sort of control - Unless you are blessed with supreme confidence 7 and ability. I have neither. Just as well we’re in the digital world then.. If I can put something eye-catching enough here, it’ll make a more triangular composition, which should work better. The leaf is OK but not a strong enough element to compete with the two characters. I add a swimming Fairy on a couple of new layers, and group them so that I can move her about as a unit.
  • 6. Carry On - MORE OF THE SAME There are gradients included in the stencils - It’s a bit of a chore, but you If you work with dark tones through a can lay a flat wash using the roller texture stencil - think about inverting and a bit of patience. it and using light tones to really push the effect home. You can crisp things up more by picking out details on that ‘Glint’layer I mentioned a few pages ago. Using two radial gradient stencils I lay down a ‘magical’ turquoise glow in the shadowy areas, by laying a wash with the roller on a separate layer and reducing the opacity. Then I work back in eraser where it’s just too strong still. I’ve left some of the original texture that the chalk produced much earlier,to seem like dust floating on tranquil water. That was never planned, but I spotted it and thought it might work. ALWAYS keep an eye open ‘happy accidents’ rso r o l cu lle r to Ro
  • 7. I add more layers to do my final tweaking, still naming them to avoid confusion. 8 8 I’ve come to a point where having all these layers is impeding me rather than helping. That’s why I decide to ‘‘Merge All Layers’ which is an option on the layers palette. This allows me to work in a much more holistic way again. A quick technique for darkening the image is to duplicate the image to another layer, set it to ‘multiply’ blending mode (or Duplicating the image and setting another of the additive options) and adjust the opacity to to multiply blending mode taste. You can then go back in and gently erase lighter areas on the upper layer to accentuate the contrast. Doing this throws up a couple of areas I feel need attention. Some hint of reflected leaves and a bit more colour and detail on those floating. FINISH That’s about it. The rest is down to more tweaking and fiddling (very technical terminology), using the methods already covered. It’s far from the perfect image, but then that wasn’t really the object here. Knowing me I’ll go back in and tinker with it at a later date, when I have a fresh perspective on it and some time to do that. For now it’ll have to do. This is how the last tweak layers look with the visibility of the image Here’s hoping that you can get something out of this brief at the bottom of the layer stack look at a promising software. Just enjoy yourself with it, or turned off whichever software you decide to or are limited to using. MY WEBSITE - http://nickillus.co.uk This tutorial was put together using Serif PagePlusX3 (version 9 with pdf export available for under £10 at the time of writing this), and Traction Screengrab Pro (free)software. Try not to let budget be an excuse for not being able to tackle things. All artwork and design copyrighted to Nick Harris 2008