SlideShare a Scribd company logo
1 of 22
Download to read offline
Simple Todo Application With React and Material UI
Hey there everyone, hope you all are doing great. In today’s blog, we are going to create
a simple Todo Application With React and Material UI. We will build this simple React.Js
application and will store our information in the local storage. We will discuss every step
in this blog.
Before we start building this simple application, we assume you have some basic
understanding of JavaScript and the React.Js library. In this application, we will use the
best and most modern approach for our React application. We will separate our code
into smaller chunks so that you easily understand what it’s doing under the hood.
Application Structure of Simple Todo Application with React and Material UI
While building the application we will be keeping the best practices as a developer. We
will divide our app into smaller reusable components and one main file to host our
components. Our application will have three different reusable utility functionalities
folders. They are our context, reducers, and hooks. These folders will have their own
custom functions that will help us in creating logic for our to-do application.
Some Terms To Remember
● Components: Components in React are basically reusable pieces of code that we
can use anywhere in our application. Components can be anything like a reusable
Button, Card, Form, or any stuff that we think can be reused in our application.
The advantage of using the components in React is that it makes our application
more organized and human-friendly.
● Props: So if you are using JavaScript, then you have heard about the term
parameter or say arguments. They can be passed to a function as variable
holders of a function. Similarly, props or properties are the arguments or
parameters that we pass to React Components. Props are read-only. They can’t
mutate directly.
● State: State is the component variable. They hold certain values for our
components that can be changed later on during program execution. States can
be mutated with the help of hooks in React.
It’s Build Time
Now let us start building our application.
The first thing we will do is install Node.Js. Also kindly check the Node.Js version as
well. Now let’s create our project from scratch. But before let me mention that we will
use just React and Material UI.
Installation and Setup
Now let’s create a React App from scratch
npx create-react-app todoApp
or
yarn create react-app todoApp
Once the installation is complete, open this project folder with your favorite code editor.
In this case, we will use the VS Code. Also, let us quickly install the Material UI for our
project. Type the following command in the project root folder in your terminal.
Folder Structure
Our final folder structure will look like this.
node_modules
public
src
|
| --> context
| --> todos.context.js
| --> reducers
| --> todo.reducer.js
| --> hooks
| --> useInputState.js
| --> useLocalStorageReducer.js
| --> useToggleState.js
|
| --> App.js
| --> Todo.js
| --> TodoApp.js
| --> TodoList.js
| --> TodoForm.js
| --> EditTodoForm.js
| --> index.js
| --> index.css
Installing Materail UI
npm install @mui/material @emotion/react @emotion/styled
You can clean the files which you don’t want.
This application requires some logic for CRUD operation. So let’s create our contexts,
reducers, and custom hooks so that we can use them. These utility functions will allow
us to maintain our application state and help us to pass our data dynamically.
Globally Managing our States
Context
At first, we will build our todo context so that we can easily pass our props down the
order where it is necessary. Inside the context folder create a todos.context.js file. This
is the only application context we will create in this entire application.
import React, { createContext } from "react";
import { useLocalStorageReducer } from "../hooks/useLocalStorageReducer";
import todoReducer from "../reducers/todo.reducer";
const defaultTodos = [
{ id: 1, task: "Buy Milks and Bread", completed: false },
{ id: 2, task: "Release ladybugs into garden", completed: true },
];
export const TodosContext = createContext();
export const DispatchContext = createContext();
export function TodosProvider(props) {
const [todos, dispatch] = useLocalStorageReducer(
"todos",
defaultTodos,
todoReducer
);
return (
<TodosContext.Provider value={todos}>
<DispatchContext.Provider value={dispatch}>
{props.children}
</DispatchContext.Provider>
</TodosContext.Provider>
);
}
If you look at the code above, you can see the context logic for our application. We are
passing some default to-do items. The todoReducer will allow us to manipulate the todo
form by creating a todo, editing the todo, and deleting them. Whereas the
useLocalStorageReducer allows us to store our pieces of information.
Hooks
In our custom hooks, we will be creating some custom hooks for managing our
application state that will keep changing at regular intervals. Our application will have
three custom hooks, i.e. ‘useLocalStorageReducer.js’, ‘useInputState.js’, and
‘useToggleState.js’. Each custom hook will have its own use case in our application.
Let us create our first custom hook useInputState.js
import { useState } from "react";
export default initialVal => {
const [value, setValue] = useState(initialVal);
const handleChange = e => {
setValue(e.target.value);
};
const reset = () => {
setValue("");
};
return [value, handleChange, reset];
};
The useInputState.js hook will allow the user to enter the form data of our application.
We can also reset the value of our form input.
Our next custom hook is the useLocalStorageReducer.js. This customs hook provides
us with the capability to store the new or updated to-do items in the local storage of our
web browser.
import { useReducer, useEffect } from "react";
function useLocalStorageReducer(key, defaultVal, reducer) {
const [state, dispatch] = useReducer(reducer, defaultVal, () => {
let value;
try {
value = JSON.parse(
window.localStorage.getItem(key) || String(defaultVal)
);
} catch (e) {
value = defaultVal;
}
return value;
});
useEffect(() => {
window.localStorage.setItem(key, JSON.stringify(state));
}, [key, state]);
return [state, dispatch];
}
export { useLocalStorageReducer };
Our last and final hook is useToggleState.js
jimport { useState } from "react";
function useToggle(initialVal = false) {
// call useState, "reserve piece of state"
const [state, setState] = useState(initialVal);
const toggle = () => {
setState(!state);
};
// return piece of state AND a function to toggle it
return [state, toggle];
}
export default useToggle;
The use of toggle custom hook is that it returns us with the piece of application state
and a function to toggle it.
Reducer
We will use todo.reducer.js it is for our reducer. Note that we are the UUID module to
create a unique id for each of our to-do lists. You can install the UUID with the following
command in your terminal. npm i uuid
import * as uuid from "uuid";
const reducer = (state, action) => {
switch (action.type) {
case "ADD":
return [...state, { id: uuid.v4(), task: action.task, completed: false }];
case "REMOVE":
return state.filter(todo => todo.id !== action.id);
case "TOGGLE":
return state.map(todo =>
todo.id === action.id ? { ...todo, completed: !todo.completed } : todo
);
case "EDIT":
return state.map(todo =>
todo.id === action.id ? { ...todo, task: action.newTask } : todo
);
default:
return state;
}
};
export default reducer;
Building The UI
Now our setup is complete, let’s create our React Component, i.e TodoApp.Js. This will
be our main application component whereas our other component will reside for UI
rendering.
import React from "react";
import TodoList from "./TodoList";
import TodoForm from "./TodoForm";
import Typography from "@material-ui/core/Typography";
import Paper from "@material-ui/core/Paper";
import AppBar from "@material-ui/core/AppBar";
import Toolbar from "@material-ui/core/Toolbar";
import Grid from "@material-ui/core/Grid";
import { TodosProvider } from "./context/todos.context";
function TodoApp() {
return (
<Paper
style={{
padding: 0,
margin: 0,
height: "100vh",
backgroundColor: "#fafafa"
}}
elevation={0}
>
<AppBar color='primary' position='static' style={{ height: "64px" }}>
<Toolbar>
<Typography color='inherit'>React ToDo</Typography>
</Toolbar>
</AppBar>
<Grid container justify='center' style={{ marginTop: "1rem" }}>
<Grid item xs={11} md={8} lg={4}>
<TodosProvider>
<TodoForm />
<TodoList />
</TodosProvider>
</Grid>
</Grid>
</Paper>
);
}
export default TodoApp;
This component will act as a container for our application. You can consider this to-do
component as a Parent element. Our component will display of todo application which
will render the other components.
Todo.js Component
import React, { useContext, memo } from "react";
import useToggleState from "./hooks/useToggleState";
import EditTodoForm from "./EditTodoForm";
import ListItem from "@material-ui/core/ListItem";
import ListItemText from "@material-ui/core/ListItem";
import Checkbox from "@material-ui/core/Checkbox";
import IconButton from "@material-ui/core/IconButton";
import DeleteIcon from "@material-ui/icons/Delete";
import EditIcon from "@material-ui/icons/Edit";
import ListItemSecondaryAction from "@material-ui/core/ListItemSecondaryAction";
import { DispatchContext } from "./context/todos.context";
function Todo({ id, task, completed }) {
const dispatch = useContext(DispatchContext);
const [isEditing, toggle] = useToggleState(false);
// console.log("RE-RENDER ==> ", task);
return (
<ListItem style={{ height: "64px" }}>
{isEditing ? (
<EditTodoForm id={id} task={task} toggleEditForm={toggle} />
) : (
<>
<Checkbox
tabIndex={-1}
checked={completed}
onClick={() => dispatch({ type: "TOGGLE", id: id })}
/>
<ListItemText
style={{ textDecoration: completed ? "line-through" : "none" }}
>
{task}
</ListItemText>
<ListItemSecondaryAction>
<IconButton
aria-label="Delete"
onClick={() => dispatch({ type: "REMOVE", id: id })}
>
<DeleteIcon />
</IconButton>
<IconButton aria-label="Edit" onClick={toggle}>
<EditIcon />
</IconButton>
</ListItemSecondaryAction>
</>
)}
</ListItem>
);
}
export default memo(Todo);
The Todo.js component is our main call to action component where most of the
application logic will reside.
Our next component will be todoList.js
import React, { useContext } from "react";
import Todo from "./Todo";
import Paper from "@material-ui/core/Paper";
import List from "@material-ui/core/List";
import Divider from "@material-ui/core/Divider";
import { TodosContext } from "./context/todos.context";
function TodoList() {
const todos = useContext(TodosContext);
if (todos.length)
return (
<Paper>
<List>
{todos.map((todo, i) => (
// To add a key to a fragment, we have to use the long-hand version
// rather than <> </>, we have to use <React.Fragment>
<React.Fragment key={i}>
<Todo {...todo} key={todo.id} />
{i < todos.length - 1 && <Divider />}
</React.Fragment>
))}
</List>
</Paper>
);
return null;
}
export default TodoList;
Our TodoList component will return the to-do list items that we create. Whenever we
create a new todo item, this react todo application component will render those new
lists.
TodoForm.js component
import React, { useContext } from "react";
import TextField from "@material-ui/core/TextField";
import Paper from "@material-ui/core/Paper";
import useInputState from "./hooks/useInputState";
import { DispatchContext } from "./context/todos.context";
function TodoForm() {
const [value, handleChange, reset] = useInputState("");
const dispatch = useContext(DispatchContext);
return (
<Paper style={{ margin: "1rem 0", padding: "0 1rem" }}>
<form
onSubmit={e => {
e.preventDefault();
dispatch({ type: "ADD", task: value });
reset();
}}
>
<TextField
value={value}
onChange={handleChange}
margin="normal"
label="Add New Todo"
fullWidth
/>
</form>
</Paper>
);
}
export default TodoForm;
This component allows the user to enter values in the to-do form.
Our final todo component is EditTodoForm.js
import React, { useContext } from "react";
import useInputState from "./hooks/useInputState";
import TextField from "@material-ui/core/TextField";
import { DispatchContext } from "./context/todos.context";
function EditTodoForm({ id, task, toggleEditForm }) {
const dispatch = useContext(DispatchContext);
const [value, handleChange, reset] = useInputState(task);
console.log("EDIT FORM RENDER!!!");
return (
<form
onSubmit={e => {
e.preventDefault();
dispatch({ type: "EDIT", id: id, newTask: value });
reset();
toggleEditForm();
}}
style={{ marginLeft: "1rem", width: "50%" }}
>
<TextField
margin="normal"
value={value}
onChange={handleChange}
fullWidth
autoFocus
/>
</form>
);
}
export default EditTodoForm;
This component will allow us to edit the to-do form.
Now at last we will display all the application UI in our main App.js file.
import React from "react";
import TodoApp from "./TodoApp";
function App() {
return <TodoApp />;
}
export default App;
And that’s it, guys. Here we have a fully functional React Todo Application with modern
React practices. And hope you guys will like this simple react application.
How To Run This Project
It’s very simple to run this project. Just follow the steps.
● Make sure you have node.js installed on your system if not then download it first.
● After that, you open the project in your favorite code editor(VS Code is
preferable).
● If you are using Vs Code then, simply open the code editor and open your project.
○ Then open a new terminal (ctrl + shift + ~ ==> will open a new
terminal).
○ run this command `npm install`
○ then `npm start
● If you want to directly run without a code editor, then follow these steps:
○ open a terminal(command prompt or git bash)
○ goto your project root directory(cd folder name)
○ then again type `npm install` and then after installation `npm start`
In case npm gives you any kind of error then you can run the project with the Yarn
package manager instead. Follow these steps:
● Open your windows terminal
● the type `npm i –global yarn`. This will install your yarn package manager
globally.
● After the installation, repeat the same commands from the above but this time
uses yarn instead of npm.
● `yarn install` and then to start `yarn start`.
Conclusion
That’s it for this tutorial and blog. Here in this article, we learned about building a simple
React Todo List application from scratch with custom React Hooks. The application
uses the Material UI for the design. Hope you will like this simple tutorial.

More Related Content

What's hot

Basics of React Hooks.pptx.pdf
Basics of React Hooks.pptx.pdfBasics of React Hooks.pptx.pdf
Basics of React Hooks.pptx.pdfKnoldus Inc.
 
Advanced Javascript
Advanced JavascriptAdvanced Javascript
Advanced JavascriptAdieu
 
Introduction to React JS for beginners
Introduction to React JS for beginners Introduction to React JS for beginners
Introduction to React JS for beginners Varun Raj
 
Android | Android Activity Launch Modes and Tasks | Gonçalo Silva
Android | Android Activity Launch Modes and Tasks | Gonçalo SilvaAndroid | Android Activity Launch Modes and Tasks | Gonçalo Silva
Android | Android Activity Launch Modes and Tasks | Gonçalo SilvaJAX London
 
ASP.NET Web API
ASP.NET Web APIASP.NET Web API
ASP.NET Web APIhabib_786
 
Sharing Data Between Angular Components
Sharing Data Between Angular ComponentsSharing Data Between Angular Components
Sharing Data Between Angular ComponentsSquash Apps Pvt Ltd
 
Introduction to ReactJS
Introduction to ReactJSIntroduction to ReactJS
Introduction to ReactJSKnoldus Inc.
 
What is component in reactjs
What is component in reactjsWhat is component in reactjs
What is component in reactjsmanojbkalla
 
React Components Lifecycle | React Tutorial for Beginners | ReactJS Training ...
React Components Lifecycle | React Tutorial for Beginners | ReactJS Training ...React Components Lifecycle | React Tutorial for Beginners | ReactJS Training ...
React Components Lifecycle | React Tutorial for Beginners | ReactJS Training ...Edureka!
 
Understanding React hooks | Walkingtree Technologies
Understanding React hooks | Walkingtree TechnologiesUnderstanding React hooks | Walkingtree Technologies
Understanding React hooks | Walkingtree TechnologiesWalking Tree Technologies
 
React + Redux Introduction
React + Redux IntroductionReact + Redux Introduction
React + Redux IntroductionNikolaus Graf
 

What's hot (20)

Basics of React Hooks.pptx.pdf
Basics of React Hooks.pptx.pdfBasics of React Hooks.pptx.pdf
Basics of React Hooks.pptx.pdf
 
JavaScript Promises
JavaScript PromisesJavaScript Promises
JavaScript Promises
 
Advanced Javascript
Advanced JavascriptAdvanced Javascript
Advanced Javascript
 
Reactjs
Reactjs Reactjs
Reactjs
 
Introduction to React JS for beginners
Introduction to React JS for beginners Introduction to React JS for beginners
Introduction to React JS for beginners
 
React Hooks
React HooksReact Hooks
React Hooks
 
Android | Android Activity Launch Modes and Tasks | Gonçalo Silva
Android | Android Activity Launch Modes and Tasks | Gonçalo SilvaAndroid | Android Activity Launch Modes and Tasks | Gonçalo Silva
Android | Android Activity Launch Modes and Tasks | Gonçalo Silva
 
ASP.NET Web API
ASP.NET Web APIASP.NET Web API
ASP.NET Web API
 
Sharing Data Between Angular Components
Sharing Data Between Angular ComponentsSharing Data Between Angular Components
Sharing Data Between Angular Components
 
Introduction to ReactJS
Introduction to ReactJSIntroduction to ReactJS
Introduction to ReactJS
 
What is component in reactjs
What is component in reactjsWhat is component in reactjs
What is component in reactjs
 
React Components Lifecycle | React Tutorial for Beginners | ReactJS Training ...
React Components Lifecycle | React Tutorial for Beginners | ReactJS Training ...React Components Lifecycle | React Tutorial for Beginners | ReactJS Training ...
React Components Lifecycle | React Tutorial for Beginners | ReactJS Training ...
 
Spring Boot
Spring BootSpring Boot
Spring Boot
 
Junit
JunitJunit
Junit
 
Spring Boot Tutorial
Spring Boot TutorialSpring Boot Tutorial
Spring Boot Tutorial
 
Understanding React hooks | Walkingtree Technologies
Understanding React hooks | Walkingtree TechnologiesUnderstanding React hooks | Walkingtree Technologies
Understanding React hooks | Walkingtree Technologies
 
React hooks
React hooksReact hooks
React hooks
 
Its time to React.js
Its time to React.jsIts time to React.js
Its time to React.js
 
Angular 2
Angular 2Angular 2
Angular 2
 
React + Redux Introduction
React + Redux IntroductionReact + Redux Introduction
React + Redux Introduction
 

Similar to Simple React Todo List

React js programming concept
React js programming conceptReact js programming concept
React js programming conceptTariqul islam
 
React Hooks Best Practices in 2022.pptx
React Hooks Best Practices in 2022.pptxReact Hooks Best Practices in 2022.pptx
React Hooks Best Practices in 2022.pptxBOSC Tech Labs
 
Fundamental concepts of react js
Fundamental concepts of react jsFundamental concepts of react js
Fundamental concepts of react jsStephieJohn
 
How to create components in react js
How to create components in react jsHow to create components in react js
How to create components in react jsBOSC Tech Labs
 
Build web apps with react js
Build web apps with react jsBuild web apps with react js
Build web apps with react jsdhanushkacnd
 
React Native +Redux + ES6 (Updated)
React Native +Redux + ES6 (Updated)React Native +Redux + ES6 (Updated)
React Native +Redux + ES6 (Updated)Chiew Carol
 
Full Stack React Workshop [CSSC x GDSC]
Full Stack React Workshop [CSSC x GDSC]Full Stack React Workshop [CSSC x GDSC]
Full Stack React Workshop [CSSC x GDSC]GDSC UofT Mississauga
 
How To Integrate Native Android App With React Native.
How To Integrate Native Android App With React Native.How To Integrate Native Android App With React Native.
How To Integrate Native Android App With React Native.Techugo
 
How to build a react native app with the help of react native hooks
How to build a react native app with the help of react native hooksHow to build a react native app with the help of react native hooks
How to build a react native app with the help of react native hooksKaty Slemon
 
Getting Started with React v16
Getting Started with React v16Getting Started with React v16
Getting Started with React v16Benny Neugebauer
 
Content-Driven Apps with React
Content-Driven Apps with ReactContent-Driven Apps with React
Content-Driven Apps with ReactNetcetera
 
React Native for multi-platform mobile applications
React Native for multi-platform mobile applicationsReact Native for multi-platform mobile applications
React Native for multi-platform mobile applicationsMatteo Manchi
 
React Basic and Advance || React Basic
React Basic and Advance   || React BasicReact Basic and Advance   || React Basic
React Basic and Advance || React Basicrafaqathussainc077
 
Introduction to React for Frontend Developers
Introduction to React for Frontend DevelopersIntroduction to React for Frontend Developers
Introduction to React for Frontend DevelopersSergio Nakamura
 
Pluginkla2019 - React Presentation
Pluginkla2019 - React PresentationPluginkla2019 - React Presentation
Pluginkla2019 - React PresentationAngela Lehru
 
End to end todo list app with NestJs - Angular - Redux & Redux Saga
End to end todo list app with NestJs - Angular - Redux & Redux SagaEnd to end todo list app with NestJs - Angular - Redux & Redux Saga
End to end todo list app with NestJs - Angular - Redux & Redux SagaBabacar NIANG
 
Redux and context api with react native app introduction, use cases, implemen...
Redux and context api with react native app introduction, use cases, implemen...Redux and context api with react native app introduction, use cases, implemen...
Redux and context api with react native app introduction, use cases, implemen...Katy Slemon
 

Similar to Simple React Todo List (20)

React js programming concept
React js programming conceptReact js programming concept
React js programming concept
 
React Hooks Best Practices in 2022.pptx
React Hooks Best Practices in 2022.pptxReact Hooks Best Practices in 2022.pptx
React Hooks Best Practices in 2022.pptx
 
Fundamental concepts of react js
Fundamental concepts of react jsFundamental concepts of react js
Fundamental concepts of react js
 
How to create components in react js
How to create components in react jsHow to create components in react js
How to create components in react js
 
Build web apps with react js
Build web apps with react jsBuild web apps with react js
Build web apps with react js
 
React Native +Redux + ES6 (Updated)
React Native +Redux + ES6 (Updated)React Native +Redux + ES6 (Updated)
React Native +Redux + ES6 (Updated)
 
Full Stack React Workshop [CSSC x GDSC]
Full Stack React Workshop [CSSC x GDSC]Full Stack React Workshop [CSSC x GDSC]
Full Stack React Workshop [CSSC x GDSC]
 
How To Integrate Native Android App With React Native.
How To Integrate Native Android App With React Native.How To Integrate Native Android App With React Native.
How To Integrate Native Android App With React Native.
 
Intro react js
Intro react jsIntro react js
Intro react js
 
How to build a react native app with the help of react native hooks
How to build a react native app with the help of react native hooksHow to build a react native app with the help of react native hooks
How to build a react native app with the help of react native hooks
 
Getting Started with React v16
Getting Started with React v16Getting Started with React v16
Getting Started with React v16
 
Content-Driven Apps with React
Content-Driven Apps with ReactContent-Driven Apps with React
Content-Driven Apps with React
 
React Native for multi-platform mobile applications
React Native for multi-platform mobile applicationsReact Native for multi-platform mobile applications
React Native for multi-platform mobile applications
 
React Basic and Advance || React Basic
React Basic and Advance   || React BasicReact Basic and Advance   || React Basic
React Basic and Advance || React Basic
 
Introduction to React for Frontend Developers
Introduction to React for Frontend DevelopersIntroduction to React for Frontend Developers
Introduction to React for Frontend Developers
 
react-slides.pptx
react-slides.pptxreact-slides.pptx
react-slides.pptx
 
Pluginkla2019 - React Presentation
Pluginkla2019 - React PresentationPluginkla2019 - React Presentation
Pluginkla2019 - React Presentation
 
ReactJS.pptx
ReactJS.pptxReactJS.pptx
ReactJS.pptx
 
End to end todo list app with NestJs - Angular - Redux & Redux Saga
End to end todo list app with NestJs - Angular - Redux & Redux SagaEnd to end todo list app with NestJs - Angular - Redux & Redux Saga
End to end todo list app with NestJs - Angular - Redux & Redux Saga
 
Redux and context api with react native app introduction, use cases, implemen...
Redux and context api with react native app introduction, use cases, implemen...Redux and context api with react native app introduction, use cases, implemen...
Redux and context api with react native app introduction, use cases, implemen...
 

Recently uploaded

WSO2CON 2024 - IoT Needs CIAM: The Importance of Centralized IAM in a Growing...
WSO2CON 2024 - IoT Needs CIAM: The Importance of Centralized IAM in a Growing...WSO2CON 2024 - IoT Needs CIAM: The Importance of Centralized IAM in a Growing...
WSO2CON 2024 - IoT Needs CIAM: The Importance of Centralized IAM in a Growing...WSO2
 
WSO2Con2024 - From Code To Cloud: Fast Track Your Cloud Native Journey with C...
WSO2Con2024 - From Code To Cloud: Fast Track Your Cloud Native Journey with C...WSO2Con2024 - From Code To Cloud: Fast Track Your Cloud Native Journey with C...
WSO2Con2024 - From Code To Cloud: Fast Track Your Cloud Native Journey with C...WSO2
 
WSO2Con2024 - Software Delivery in Hybrid Environments
WSO2Con2024 - Software Delivery in Hybrid EnvironmentsWSO2Con2024 - Software Delivery in Hybrid Environments
WSO2Con2024 - Software Delivery in Hybrid EnvironmentsWSO2
 
WSO2CON 2024 - Freedom First—Unleashing Developer Potential with Open Source
WSO2CON 2024 - Freedom First—Unleashing Developer Potential with Open SourceWSO2CON 2024 - Freedom First—Unleashing Developer Potential with Open Source
WSO2CON 2024 - Freedom First—Unleashing Developer Potential with Open SourceWSO2
 
WSO2CON 2024 - Cloud Native Middleware: Domain-Driven Design, Cell-Based Arch...
WSO2CON 2024 - Cloud Native Middleware: Domain-Driven Design, Cell-Based Arch...WSO2CON 2024 - Cloud Native Middleware: Domain-Driven Design, Cell-Based Arch...
WSO2CON 2024 - Cloud Native Middleware: Domain-Driven Design, Cell-Based Arch...WSO2
 
WSO2CON 2024 - WSO2's Digital Transformation Journey with Choreo: A Platforml...
WSO2CON 2024 - WSO2's Digital Transformation Journey with Choreo: A Platforml...WSO2CON 2024 - WSO2's Digital Transformation Journey with Choreo: A Platforml...
WSO2CON 2024 - WSO2's Digital Transformation Journey with Choreo: A Platforml...WSO2
 
What Goes Wrong with Language Definitions and How to Improve the Situation
What Goes Wrong with Language Definitions and How to Improve the SituationWhat Goes Wrong with Language Definitions and How to Improve the Situation
What Goes Wrong with Language Definitions and How to Improve the SituationJuha-Pekka Tolvanen
 
WSO2Con2024 - Navigating the Digital Landscape: Transforming Healthcare with ...
WSO2Con2024 - Navigating the Digital Landscape: Transforming Healthcare with ...WSO2Con2024 - Navigating the Digital Landscape: Transforming Healthcare with ...
WSO2Con2024 - Navigating the Digital Landscape: Transforming Healthcare with ...WSO2
 
WSO2Con204 - Hard Rock Presentation - Keynote
WSO2Con204 - Hard Rock Presentation - KeynoteWSO2Con204 - Hard Rock Presentation - Keynote
WSO2Con204 - Hard Rock Presentation - KeynoteWSO2
 
WSO2CON 2024 - How CSI Piemonte Is Apifying the Public Administration
WSO2CON 2024 - How CSI Piemonte Is Apifying the Public AdministrationWSO2CON 2024 - How CSI Piemonte Is Apifying the Public Administration
WSO2CON 2024 - How CSI Piemonte Is Apifying the Public AdministrationWSO2
 
Effective Strategies for Wix's Scaling challenges - GeeCon
Effective Strategies for Wix's Scaling challenges - GeeConEffective Strategies for Wix's Scaling challenges - GeeCon
Effective Strategies for Wix's Scaling challenges - GeeConNatan Silnitsky
 
WSO2Con2024 - From Blueprint to Brilliance: WSO2's Guide to API-First Enginee...
WSO2Con2024 - From Blueprint to Brilliance: WSO2's Guide to API-First Enginee...WSO2Con2024 - From Blueprint to Brilliance: WSO2's Guide to API-First Enginee...
WSO2Con2024 - From Blueprint to Brilliance: WSO2's Guide to API-First Enginee...WSO2
 
WSO2Con2024 - WSO2's IAM Vision: Identity-Led Digital Transformation
WSO2Con2024 - WSO2's IAM Vision: Identity-Led Digital TransformationWSO2Con2024 - WSO2's IAM Vision: Identity-Led Digital Transformation
WSO2Con2024 - WSO2's IAM Vision: Identity-Led Digital TransformationWSO2
 
WSO2Con2024 - Organization Management: The Revolution in B2B CIAM
WSO2Con2024 - Organization Management: The Revolution in B2B CIAMWSO2Con2024 - Organization Management: The Revolution in B2B CIAM
WSO2Con2024 - Organization Management: The Revolution in B2B CIAMWSO2
 
WSO2CON 2024 - Software Engineering for Digital Businesses
WSO2CON 2024 - Software Engineering for Digital BusinessesWSO2CON 2024 - Software Engineering for Digital Businesses
WSO2CON 2024 - Software Engineering for Digital BusinessesWSO2
 
Team Transformation Tactics for Holistic Testing and Quality (NewCrafts Paris...
Team Transformation Tactics for Holistic Testing and Quality (NewCrafts Paris...Team Transformation Tactics for Holistic Testing and Quality (NewCrafts Paris...
Team Transformation Tactics for Holistic Testing and Quality (NewCrafts Paris...Lisi Hocke
 
Artyushina_Guest lecture_YorkU CS May 2024.pptx
Artyushina_Guest lecture_YorkU CS May 2024.pptxArtyushina_Guest lecture_YorkU CS May 2024.pptx
Artyushina_Guest lecture_YorkU CS May 2024.pptxAnnaArtyushina1
 
Large-scale Logging Made Easy: Meetup at Deutsche Bank 2024
Large-scale Logging Made Easy: Meetup at Deutsche Bank 2024Large-scale Logging Made Easy: Meetup at Deutsche Bank 2024
Large-scale Logging Made Easy: Meetup at Deutsche Bank 2024VictoriaMetrics
 
WSO2CON 2024 - Designing Event-Driven Enterprises: Stories of Transformation
WSO2CON 2024 - Designing Event-Driven Enterprises: Stories of TransformationWSO2CON 2024 - Designing Event-Driven Enterprises: Stories of Transformation
WSO2CON 2024 - Designing Event-Driven Enterprises: Stories of TransformationWSO2
 
WSO2CON 2024 - Building the API First Enterprise – Running an API Program, fr...
WSO2CON 2024 - Building the API First Enterprise – Running an API Program, fr...WSO2CON 2024 - Building the API First Enterprise – Running an API Program, fr...
WSO2CON 2024 - Building the API First Enterprise – Running an API Program, fr...WSO2
 

Recently uploaded (20)

WSO2CON 2024 - IoT Needs CIAM: The Importance of Centralized IAM in a Growing...
WSO2CON 2024 - IoT Needs CIAM: The Importance of Centralized IAM in a Growing...WSO2CON 2024 - IoT Needs CIAM: The Importance of Centralized IAM in a Growing...
WSO2CON 2024 - IoT Needs CIAM: The Importance of Centralized IAM in a Growing...
 
WSO2Con2024 - From Code To Cloud: Fast Track Your Cloud Native Journey with C...
WSO2Con2024 - From Code To Cloud: Fast Track Your Cloud Native Journey with C...WSO2Con2024 - From Code To Cloud: Fast Track Your Cloud Native Journey with C...
WSO2Con2024 - From Code To Cloud: Fast Track Your Cloud Native Journey with C...
 
WSO2Con2024 - Software Delivery in Hybrid Environments
WSO2Con2024 - Software Delivery in Hybrid EnvironmentsWSO2Con2024 - Software Delivery in Hybrid Environments
WSO2Con2024 - Software Delivery in Hybrid Environments
 
WSO2CON 2024 - Freedom First—Unleashing Developer Potential with Open Source
WSO2CON 2024 - Freedom First—Unleashing Developer Potential with Open SourceWSO2CON 2024 - Freedom First—Unleashing Developer Potential with Open Source
WSO2CON 2024 - Freedom First—Unleashing Developer Potential with Open Source
 
WSO2CON 2024 - Cloud Native Middleware: Domain-Driven Design, Cell-Based Arch...
WSO2CON 2024 - Cloud Native Middleware: Domain-Driven Design, Cell-Based Arch...WSO2CON 2024 - Cloud Native Middleware: Domain-Driven Design, Cell-Based Arch...
WSO2CON 2024 - Cloud Native Middleware: Domain-Driven Design, Cell-Based Arch...
 
WSO2CON 2024 - WSO2's Digital Transformation Journey with Choreo: A Platforml...
WSO2CON 2024 - WSO2's Digital Transformation Journey with Choreo: A Platforml...WSO2CON 2024 - WSO2's Digital Transformation Journey with Choreo: A Platforml...
WSO2CON 2024 - WSO2's Digital Transformation Journey with Choreo: A Platforml...
 
What Goes Wrong with Language Definitions and How to Improve the Situation
What Goes Wrong with Language Definitions and How to Improve the SituationWhat Goes Wrong with Language Definitions and How to Improve the Situation
What Goes Wrong with Language Definitions and How to Improve the Situation
 
WSO2Con2024 - Navigating the Digital Landscape: Transforming Healthcare with ...
WSO2Con2024 - Navigating the Digital Landscape: Transforming Healthcare with ...WSO2Con2024 - Navigating the Digital Landscape: Transforming Healthcare with ...
WSO2Con2024 - Navigating the Digital Landscape: Transforming Healthcare with ...
 
WSO2Con204 - Hard Rock Presentation - Keynote
WSO2Con204 - Hard Rock Presentation - KeynoteWSO2Con204 - Hard Rock Presentation - Keynote
WSO2Con204 - Hard Rock Presentation - Keynote
 
WSO2CON 2024 - How CSI Piemonte Is Apifying the Public Administration
WSO2CON 2024 - How CSI Piemonte Is Apifying the Public AdministrationWSO2CON 2024 - How CSI Piemonte Is Apifying the Public Administration
WSO2CON 2024 - How CSI Piemonte Is Apifying the Public Administration
 
Effective Strategies for Wix's Scaling challenges - GeeCon
Effective Strategies for Wix's Scaling challenges - GeeConEffective Strategies for Wix's Scaling challenges - GeeCon
Effective Strategies for Wix's Scaling challenges - GeeCon
 
WSO2Con2024 - From Blueprint to Brilliance: WSO2's Guide to API-First Enginee...
WSO2Con2024 - From Blueprint to Brilliance: WSO2's Guide to API-First Enginee...WSO2Con2024 - From Blueprint to Brilliance: WSO2's Guide to API-First Enginee...
WSO2Con2024 - From Blueprint to Brilliance: WSO2's Guide to API-First Enginee...
 
WSO2Con2024 - WSO2's IAM Vision: Identity-Led Digital Transformation
WSO2Con2024 - WSO2's IAM Vision: Identity-Led Digital TransformationWSO2Con2024 - WSO2's IAM Vision: Identity-Led Digital Transformation
WSO2Con2024 - WSO2's IAM Vision: Identity-Led Digital Transformation
 
WSO2Con2024 - Organization Management: The Revolution in B2B CIAM
WSO2Con2024 - Organization Management: The Revolution in B2B CIAMWSO2Con2024 - Organization Management: The Revolution in B2B CIAM
WSO2Con2024 - Organization Management: The Revolution in B2B CIAM
 
WSO2CON 2024 - Software Engineering for Digital Businesses
WSO2CON 2024 - Software Engineering for Digital BusinessesWSO2CON 2024 - Software Engineering for Digital Businesses
WSO2CON 2024 - Software Engineering for Digital Businesses
 
Team Transformation Tactics for Holistic Testing and Quality (NewCrafts Paris...
Team Transformation Tactics for Holistic Testing and Quality (NewCrafts Paris...Team Transformation Tactics for Holistic Testing and Quality (NewCrafts Paris...
Team Transformation Tactics for Holistic Testing and Quality (NewCrafts Paris...
 
Artyushina_Guest lecture_YorkU CS May 2024.pptx
Artyushina_Guest lecture_YorkU CS May 2024.pptxArtyushina_Guest lecture_YorkU CS May 2024.pptx
Artyushina_Guest lecture_YorkU CS May 2024.pptx
 
Large-scale Logging Made Easy: Meetup at Deutsche Bank 2024
Large-scale Logging Made Easy: Meetup at Deutsche Bank 2024Large-scale Logging Made Easy: Meetup at Deutsche Bank 2024
Large-scale Logging Made Easy: Meetup at Deutsche Bank 2024
 
WSO2CON 2024 - Designing Event-Driven Enterprises: Stories of Transformation
WSO2CON 2024 - Designing Event-Driven Enterprises: Stories of TransformationWSO2CON 2024 - Designing Event-Driven Enterprises: Stories of Transformation
WSO2CON 2024 - Designing Event-Driven Enterprises: Stories of Transformation
 
WSO2CON 2024 - Building the API First Enterprise – Running an API Program, fr...
WSO2CON 2024 - Building the API First Enterprise – Running an API Program, fr...WSO2CON 2024 - Building the API First Enterprise – Running an API Program, fr...
WSO2CON 2024 - Building the API First Enterprise – Running an API Program, fr...
 

Simple React Todo List

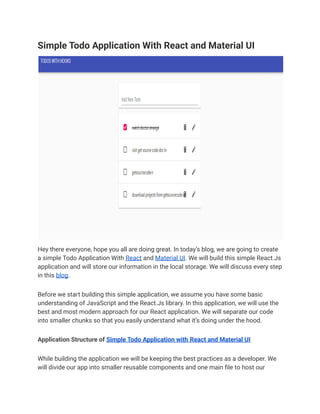
  • 1. Simple Todo Application With React and Material UI Hey there everyone, hope you all are doing great. In today’s blog, we are going to create a simple Todo Application With React and Material UI. We will build this simple React.Js application and will store our information in the local storage. We will discuss every step in this blog. Before we start building this simple application, we assume you have some basic understanding of JavaScript and the React.Js library. In this application, we will use the best and most modern approach for our React application. We will separate our code into smaller chunks so that you easily understand what it’s doing under the hood. Application Structure of Simple Todo Application with React and Material UI While building the application we will be keeping the best practices as a developer. We will divide our app into smaller reusable components and one main file to host our
  • 2. components. Our application will have three different reusable utility functionalities folders. They are our context, reducers, and hooks. These folders will have their own custom functions that will help us in creating logic for our to-do application. Some Terms To Remember ● Components: Components in React are basically reusable pieces of code that we can use anywhere in our application. Components can be anything like a reusable Button, Card, Form, or any stuff that we think can be reused in our application. The advantage of using the components in React is that it makes our application more organized and human-friendly. ● Props: So if you are using JavaScript, then you have heard about the term parameter or say arguments. They can be passed to a function as variable holders of a function. Similarly, props or properties are the arguments or parameters that we pass to React Components. Props are read-only. They can’t mutate directly. ● State: State is the component variable. They hold certain values for our components that can be changed later on during program execution. States can be mutated with the help of hooks in React. It’s Build Time Now let us start building our application. The first thing we will do is install Node.Js. Also kindly check the Node.Js version as well. Now let’s create our project from scratch. But before let me mention that we will use just React and Material UI. Installation and Setup Now let’s create a React App from scratch npx create-react-app todoApp
  • 3. or yarn create react-app todoApp Once the installation is complete, open this project folder with your favorite code editor. In this case, we will use the VS Code. Also, let us quickly install the Material UI for our project. Type the following command in the project root folder in your terminal. Folder Structure Our final folder structure will look like this. node_modules public src | | --> context | --> todos.context.js | --> reducers | --> todo.reducer.js | --> hooks | --> useInputState.js | --> useLocalStorageReducer.js | --> useToggleState.js | | --> App.js | --> Todo.js | --> TodoApp.js | --> TodoList.js | --> TodoForm.js | --> EditTodoForm.js | --> index.js | --> index.css
  • 4. Installing Materail UI npm install @mui/material @emotion/react @emotion/styled You can clean the files which you don’t want. This application requires some logic for CRUD operation. So let’s create our contexts, reducers, and custom hooks so that we can use them. These utility functions will allow us to maintain our application state and help us to pass our data dynamically. Globally Managing our States Context At first, we will build our todo context so that we can easily pass our props down the order where it is necessary. Inside the context folder create a todos.context.js file. This is the only application context we will create in this entire application. import React, { createContext } from "react"; import { useLocalStorageReducer } from "../hooks/useLocalStorageReducer"; import todoReducer from "../reducers/todo.reducer"; const defaultTodos = [ { id: 1, task: "Buy Milks and Bread", completed: false }, { id: 2, task: "Release ladybugs into garden", completed: true },
  • 5. ]; export const TodosContext = createContext(); export const DispatchContext = createContext(); export function TodosProvider(props) { const [todos, dispatch] = useLocalStorageReducer( "todos", defaultTodos, todoReducer ); return ( <TodosContext.Provider value={todos}> <DispatchContext.Provider value={dispatch}> {props.children} </DispatchContext.Provider> </TodosContext.Provider> ); }
  • 6. If you look at the code above, you can see the context logic for our application. We are passing some default to-do items. The todoReducer will allow us to manipulate the todo form by creating a todo, editing the todo, and deleting them. Whereas the useLocalStorageReducer allows us to store our pieces of information. Hooks In our custom hooks, we will be creating some custom hooks for managing our application state that will keep changing at regular intervals. Our application will have three custom hooks, i.e. ‘useLocalStorageReducer.js’, ‘useInputState.js’, and ‘useToggleState.js’. Each custom hook will have its own use case in our application. Let us create our first custom hook useInputState.js import { useState } from "react"; export default initialVal => { const [value, setValue] = useState(initialVal); const handleChange = e => { setValue(e.target.value); }; const reset = () => { setValue(""); }; return [value, handleChange, reset]; };
  • 7. The useInputState.js hook will allow the user to enter the form data of our application. We can also reset the value of our form input. Our next custom hook is the useLocalStorageReducer.js. This customs hook provides us with the capability to store the new or updated to-do items in the local storage of our web browser. import { useReducer, useEffect } from "react"; function useLocalStorageReducer(key, defaultVal, reducer) { const [state, dispatch] = useReducer(reducer, defaultVal, () => { let value; try { value = JSON.parse( window.localStorage.getItem(key) || String(defaultVal) ); } catch (e) { value = defaultVal; } return value; }); useEffect(() => {
  • 8. window.localStorage.setItem(key, JSON.stringify(state)); }, [key, state]); return [state, dispatch]; } export { useLocalStorageReducer }; Our last and final hook is useToggleState.js jimport { useState } from "react"; function useToggle(initialVal = false) { // call useState, "reserve piece of state" const [state, setState] = useState(initialVal); const toggle = () => { setState(!state); }; // return piece of state AND a function to toggle it return [state, toggle]; }
  • 9. export default useToggle; The use of toggle custom hook is that it returns us with the piece of application state and a function to toggle it. Reducer We will use todo.reducer.js it is for our reducer. Note that we are the UUID module to create a unique id for each of our to-do lists. You can install the UUID with the following command in your terminal. npm i uuid import * as uuid from "uuid"; const reducer = (state, action) => { switch (action.type) { case "ADD": return [...state, { id: uuid.v4(), task: action.task, completed: false }]; case "REMOVE": return state.filter(todo => todo.id !== action.id); case "TOGGLE": return state.map(todo => todo.id === action.id ? { ...todo, completed: !todo.completed } : todo ); case "EDIT":
  • 10. return state.map(todo => todo.id === action.id ? { ...todo, task: action.newTask } : todo ); default: return state; } }; export default reducer; Building The UI Now our setup is complete, let’s create our React Component, i.e TodoApp.Js. This will be our main application component whereas our other component will reside for UI rendering. import React from "react"; import TodoList from "./TodoList"; import TodoForm from "./TodoForm"; import Typography from "@material-ui/core/Typography";
  • 11. import Paper from "@material-ui/core/Paper"; import AppBar from "@material-ui/core/AppBar"; import Toolbar from "@material-ui/core/Toolbar"; import Grid from "@material-ui/core/Grid"; import { TodosProvider } from "./context/todos.context"; function TodoApp() { return ( <Paper style={{ padding: 0, margin: 0, height: "100vh", backgroundColor: "#fafafa" }} elevation={0} > <AppBar color='primary' position='static' style={{ height: "64px" }}>
  • 12. <Toolbar> <Typography color='inherit'>React ToDo</Typography> </Toolbar> </AppBar> <Grid container justify='center' style={{ marginTop: "1rem" }}> <Grid item xs={11} md={8} lg={4}> <TodosProvider> <TodoForm /> <TodoList /> </TodosProvider> </Grid> </Grid> </Paper> ); } export default TodoApp;
  • 13. This component will act as a container for our application. You can consider this to-do component as a Parent element. Our component will display of todo application which will render the other components. Todo.js Component import React, { useContext, memo } from "react"; import useToggleState from "./hooks/useToggleState"; import EditTodoForm from "./EditTodoForm"; import ListItem from "@material-ui/core/ListItem"; import ListItemText from "@material-ui/core/ListItem"; import Checkbox from "@material-ui/core/Checkbox"; import IconButton from "@material-ui/core/IconButton"; import DeleteIcon from "@material-ui/icons/Delete"; import EditIcon from "@material-ui/icons/Edit"; import ListItemSecondaryAction from "@material-ui/core/ListItemSecondaryAction"; import { DispatchContext } from "./context/todos.context"; function Todo({ id, task, completed }) { const dispatch = useContext(DispatchContext); const [isEditing, toggle] = useToggleState(false);
  • 14. // console.log("RE-RENDER ==> ", task); return ( <ListItem style={{ height: "64px" }}> {isEditing ? ( <EditTodoForm id={id} task={task} toggleEditForm={toggle} /> ) : ( <> <Checkbox tabIndex={-1} checked={completed} onClick={() => dispatch({ type: "TOGGLE", id: id })} /> <ListItemText style={{ textDecoration: completed ? "line-through" : "none" }} > {task} </ListItemText>
  • 15. <ListItemSecondaryAction> <IconButton aria-label="Delete" onClick={() => dispatch({ type: "REMOVE", id: id })} > <DeleteIcon /> </IconButton> <IconButton aria-label="Edit" onClick={toggle}> <EditIcon /> </IconButton> </ListItemSecondaryAction> </> )} </ListItem> ); } export default memo(Todo);
  • 16. The Todo.js component is our main call to action component where most of the application logic will reside. Our next component will be todoList.js import React, { useContext } from "react"; import Todo from "./Todo"; import Paper from "@material-ui/core/Paper"; import List from "@material-ui/core/List"; import Divider from "@material-ui/core/Divider"; import { TodosContext } from "./context/todos.context"; function TodoList() { const todos = useContext(TodosContext); if (todos.length) return ( <Paper> <List> {todos.map((todo, i) => ( // To add a key to a fragment, we have to use the long-hand version // rather than <> </>, we have to use <React.Fragment>
  • 17. <React.Fragment key={i}> <Todo {...todo} key={todo.id} /> {i < todos.length - 1 && <Divider />} </React.Fragment> ))} </List> </Paper> ); return null; } export default TodoList; Our TodoList component will return the to-do list items that we create. Whenever we create a new todo item, this react todo application component will render those new lists. TodoForm.js component import React, { useContext } from "react"; import TextField from "@material-ui/core/TextField"; import Paper from "@material-ui/core/Paper";
  • 18. import useInputState from "./hooks/useInputState"; import { DispatchContext } from "./context/todos.context"; function TodoForm() { const [value, handleChange, reset] = useInputState(""); const dispatch = useContext(DispatchContext); return ( <Paper style={{ margin: "1rem 0", padding: "0 1rem" }}> <form onSubmit={e => { e.preventDefault(); dispatch({ type: "ADD", task: value }); reset(); }} > <TextField value={value} onChange={handleChange}
  • 19. margin="normal" label="Add New Todo" fullWidth /> </form> </Paper> ); } export default TodoForm; This component allows the user to enter values in the to-do form. Our final todo component is EditTodoForm.js import React, { useContext } from "react"; import useInputState from "./hooks/useInputState"; import TextField from "@material-ui/core/TextField"; import { DispatchContext } from "./context/todos.context"; function EditTodoForm({ id, task, toggleEditForm }) { const dispatch = useContext(DispatchContext);
  • 20. const [value, handleChange, reset] = useInputState(task); console.log("EDIT FORM RENDER!!!"); return ( <form onSubmit={e => { e.preventDefault(); dispatch({ type: "EDIT", id: id, newTask: value }); reset(); toggleEditForm(); }} style={{ marginLeft: "1rem", width: "50%" }} > <TextField margin="normal" value={value} onChange={handleChange} fullWidth
  • 21. autoFocus /> </form> ); } export default EditTodoForm; This component will allow us to edit the to-do form. Now at last we will display all the application UI in our main App.js file. import React from "react"; import TodoApp from "./TodoApp"; function App() { return <TodoApp />; } export default App; And that’s it, guys. Here we have a fully functional React Todo Application with modern React practices. And hope you guys will like this simple react application. How To Run This Project It’s very simple to run this project. Just follow the steps.
  • 22. ● Make sure you have node.js installed on your system if not then download it first. ● After that, you open the project in your favorite code editor(VS Code is preferable). ● If you are using Vs Code then, simply open the code editor and open your project. ○ Then open a new terminal (ctrl + shift + ~ ==> will open a new terminal). ○ run this command `npm install` ○ then `npm start ● If you want to directly run without a code editor, then follow these steps: ○ open a terminal(command prompt or git bash) ○ goto your project root directory(cd folder name) ○ then again type `npm install` and then after installation `npm start` In case npm gives you any kind of error then you can run the project with the Yarn package manager instead. Follow these steps: ● Open your windows terminal ● the type `npm i –global yarn`. This will install your yarn package manager globally. ● After the installation, repeat the same commands from the above but this time uses yarn instead of npm. ● `yarn install` and then to start `yarn start`. Conclusion That’s it for this tutorial and blog. Here in this article, we learned about building a simple React Todo List application from scratch with custom React Hooks. The application uses the Material UI for the design. Hope you will like this simple tutorial.