SlideShare a Scribd company logo
1 of 211
C O N T E N T S
S.No. Page No.
1. INTRODUCTION 1
2. EVOLUTION & HISTORY 2
3. DEFINITION & COMPOSITION 5
4. CLASSIFICATION OF COMPOSITE 11
5. CURING OF RESIN BASED COMPOSITES 16
6. PROPERTIES OF COMPOSITES 24
7. CLINICAL CONSIDERATIONS 29
8. INDICATIONS AND CONTRAINDICATIONS 33
9. MERITS AND DEMERITS 34
10. CLINICAL STEPS IN COMPOSITE
RESTORATION
35
11. EVOLUTION OF DENTIN BONDING
AGENTS
43
12. BASIC PRINCIPLES OF TOOTH
PREPARATIONS FOR COMPOSITES
51
13. TYPES OF COMPOSITE TOOTH
PREPARATIONS
52
14. RESTORATIVE TECHNIQUE FOR
COMPOSITE RESTORATIONS
60
15. DIRECT CLASS III COMPOSITE
RESTORATIONS
66
16. DIRECT CLASS IV COMPOSITE
RESTORATIONS
72
17. RESTORATION OF FRACTURED INCISOR 75
18. VENEERS 76
19. DIASTEMA 78
1
20. CLASS V COMPOSITE RESTORATIONS 79
21. CLASS I COMPOSITE RESTORATIONS 82
22. CLASS II COMPOSITE RESTORATIONS 84
23. ACHIEVING A TIGHT CONTACT –
MATRICES
90
24. CURING TECHNIQUE 92
25. INDIRECT COMPOSITE RESIN SYSTEMS 97
26. FINISHING & POLISHING 102
27. REPAIRS AND COMPOSITE RESTORATION 108
28. AMALGAM Vs. COMPOSITES 109
29. BIOCOMPATABILITY & COMPOSITES 110
30. NEW CLASSES OF RESIN COMPOSITES 112
31. CONVENTIONAL POSTERIOR
COMPOSITES IN GENERAL
114
32. ADVANCES
a) Packable composites
b) Compomers
c) Indirect composite resins
d) Ceromers
e) Fiber reinforced composites
f) Composite inserts
g) Flowable composites
h) Smart composites
i) Oemocers
j) Giomers
k) Single crystal modified composites
l) Nanocomposites
137
147
155
159
161
175
176
179
181
185
193
193
33. CONCLUSION 194
2
INTRODUCTION
Of all the innovative esthetic materials available today composite
restorative materials have assumed a thrust in restorative dentistry. Properly
placed composite restorations provide an excellent alternative to traditional
metallic posterior restorations. The search for an ideal esthetic material for
restoring teeth has resulted in significant improvements in both esthetic materials
and techniques for using them. Three individuals who made the most significant
contributions in this aspect are:
(1) MICHAEL BUONOCORE: Introduced the acid–etch technique and
demonstrated the concept of bonding acrylic resin to the surface of enamel.
(2) RAFAEL BOWEN: Developed composite resin matrix –BISGMA (Bis
Phenol A Glycidyl Methacrylate)
(3) NOBUO NAKABAYASHI: His efforts have led to the technique for
bonding of resin composites to the surface of dentin.
Skinner in 1959 stated, “ The esthetic quality of a restoration may be as
important to the mental health of the patient as the biological and technical
qualities of the restoration are to his/her physical or dental health”, thus
stressing the importance of esthetics as far as forty-five years back. The research
in the field of esthetic and restorative dentistry led to the achievement of the long
sought dream of virtually bonding any type of material to the tooth surface. The
advances in the restorative materials and bonding techniques have changed the
concept of “EXTENSION FOR PREVENTION” as “RESTRICTION
WITH CONVICTION”
3
EVOLUTION AND HISTORY
The disadvantages of silicate cements such as their solubility, pulp irritation
potential, and desiccation led to the advent of acrylics in the early 1940’s.
1956: Dr.Raphael Bowen formulated a resin molecule – Bisphenol A
Glycidyl Methacrylate – BISGMA –that was used later as a matrix and binder of
inorganic filler particles for all the present day resin based composite restorative
materials.
1960: Dr.Bowen added fibre filler in experimental combinations to
formulate the first composite resin .The resin BISGMA was developed at the
NATIONAL INSTITUTES OF HEALTH.
1962: Dr.Ray L Bowen of the ADA research unit at the National Bureau Of
Standards (now National institute of Standard’s) developed new type of
composite resin material. Coupling agents were patented and the first generation
composites or MACROFILLED composites were introduced. These were
chemically cured and indicated for Class III, IV, and V cavity preparation.
1970: Introduction of photo – cured composite resin using U- V Light.
Eg: Prima –Fil
Nuva – Fil.
1972: First visible light curing system (Foto –Fil) was introduced which had
greater rate and depth of polymerization. They were also more resistant to wear
and stable in colour.
Mid 1970: The filler size was reduced to 5-8 nm, which resulted in smoother
restorations then earlier ones.
1976: Micro filled composite resins were developed which were highly
polishable. Colloidal silica of diameter 0.5 mm or less was used as filler. This is
the SECOND GENERATION OF COMPOSITE.
4
1980: Microfil – resin properties were altered into a heterogeneous mix.
BISGMA resin was improved by adding a patented resin UDMA.Resins for
posterior use appeared.
Eg: P-10: Auto – cured
P-30: Light – cured.
Mid 1980: Advancement in filler technology was achieved by blending
conventional sized filler particles (1-5 µm) with micro fine particles – 0.04 µ
resulting in HYBRID COMPOSITES. This is the THIRD GENERATION
OF COMPOSITES.
The filler size was reduced gradually to an average of 1 µm diameter. These
were introduced by KERR Company as HERCULITE, which was intended for
universal use in both anterior and posterior regions.
The first generation of INDIRECT LAB PROCESSED MICROFILL
COMPOSITE RESIN SYSTEM was introduced to overcome the problem of
wear in posterior composite resins. But they had a low flexural strength and wear
resistance.
1987:60 – 70 % increase in wear resistance by post – light heat curing was
shown by Wendt. This led to the development of SECOND GENERATION
OF LAB PROCESSED RESIN. These were variations of sub micron hybrid
resin system with increased filler loading and increased flexural strength.
1991: Mega – filled composites with glass ceramic inserts coated with silane for
restoration stiffness and increased strength in posterior composites were
introduced.
1992: Introduction of FIBER – REINFORCED COMPOSITES which were
composed of woven glass or polyethylene fibers that were hand impregnated in
the composites for increased strength
5
1996: Flowable composites developed for special handling properties were
introduced. Filler content in these was decreased to decrease the viscosity of
mix.
1997 – 98: Packable posterior composites were introduced based on the
PRIMM- POLYMER RIGID INORGANIC MATRIX MATERIAL in
which the ground filler of traditional composites was replaced by inorganic
phase consisting of a continuous network or scaffolding of ceramic fibers with
spaces in between filled by resin. They had the advantage of reduced
polymerization shrinkage and increased wear resistance.
1998: New pre impregnated fiber reinforced composites were introduced in
which fibers and resinous matrix phase were coupled during manufacturing
process resulting in fibers uniformly impregnated with matrix. The strength was
increased seven (7) times.
1998: Introduction of COMPOMER, which combined the properties of
GLASS IONOMER and COMPOSITES. Bonding is achieved by means of a
primer, applied to the clean but unetched Enamel and Dentin. Filler is a reactive
silicate glass (72%) containing fluorides.
1998: Introduction of Packable resin material based on ORMOCER technology
_ ORGANICALLY MODIFIED CERAMICS. The matrix consists of ceramic
polysiloxane instead of the traditional BisGMA, TEGDMA, etc.
1998: Introduction of ion releasing composite material; which releases Fluoride,
Hydroxyl, Calcium ions in dependence on the pH value adjacent to the
restorative material. This functional fluoride ions release increases with
increasing pH value.
6
DEFINITION AND COMPOSITION
DEFINITION:
Composite material is a compound of two or more distinctly different materials
with properties that are superior to or intermediate to those of the individual
constituents. ISO 4049 for polymer based filling, restorative and luting materials
(ANSI / ADA No.27) describes two types and three classes of composites.
COMPOSITION
Dental composites are highly cross – linked polymeric materials reinforced by a
dispersion of glass, crystalline or resin filler particles and / or short fibers bound
to matrix by silane coupling agent. The basic structural components of a dental
resin based composite are:
(1) Matrix
7
Type I Type II
Suitable for restoration of
involved occlusal surfaces
Class I Class II Class III
Self – cured
materials
Light – cured
materials
Dual – cured
materials
Group I Group II
Energy applied intra
- orally
Energy applied extra -
orally
POLYMER BASED MATERIALS
(2) Filler
(3) Coupling agent
(4) Initiator – accelerator system
(5) Inhibitors
(6) Optical modifiers
1) MATRIX:
Most of the dental composites use a blend of aromatic or aliphatic
dimethacrylate monomers such as BisGMA, TEGDMA, and UDMA that form a
highly cross linked polymer structures in composite and sealant materials. The
matrix used mostly is BisGMA.It has particularly a high viscosity (similarly to
honey), which makes it very difficult to blend and manipulate. To reduce the
viscosity of BisGMA, diluent monomers such as TEGDMA are added.
BisGMA and TEGDMA are mixed in a ratio of 75:25 or 50:50.These
dimethacrylate monomers also have the advantage of producing extensive cross-
linking among polymer chains.
2) FILLER:
Fillers form the inorganic component of resin matrix, the incorporation of which
greatly improves material properties, provided the filler particles are well
bonded to the matrix. The filler particles are most commonly produced by
grinding or milling quartz or glasses to produce particles ranging in size from 0.1
to 100 µm. Particles that are about 0.04µm are referred to as MICROFILLERS.
All These improvements occur with an increase in the volume fraction of filler.
Composites are often classified on the basis of the average size of the major
filler component. In addition to filler volume level, the size distribution, index to
refraction, radiopacity and hardness are also important factors in determining the
properties and clinical application of the resultant composites.
To incorporate maximum amount of filler into the resin matrix, distribution of
particle sizes is necessary. It is obvious that if a single particle size is used, even
8
with clear packing a space exists between particles. Smaller particles can fill up
these spaces thus resulting in a continuous distribution of filler affording for a
maximum amount of filler loading. Most composites contain Colloidal silica as
filler. The amount of filler that cam be incorporated is generally affected by the
relative surface area of the filler particles.
Various fillers used are:
1. Glass fibers
2. Beads
3. Lithium aluminium silicates
4. Crystalline quartz
5. Barium glass, Strontium
6. Microfine silica
7. Sintered silica.
EFFECT OF FILLER
1. Fillers increase the strength of composites.
2. They reinforce the resin matrix resulting in increased hardness, strength and
decreased wear.
3. Fillers reduce the polymerization shrinkage.
4. The addition of fillers reduces thermal expansion and contraction.
5. Fillers improve the workability by increasing viscosity.
6. Addition of fillers causes reduction in water sorption, softening and staining.
7. Fillers increase radio opacity and diagnostic sensitivity through incorporation
of Strontium and Barium glass.
8. Mechanical properties such as compressive strength, tensile strength and
modulus of elasticity are increased.
9. Fillers increase the abrasion resistance of composite restorative materials.
3) COUPLING AGENTS:
Bonding between the organic oligomer and inorganic filler will determine the
properties of a composite. This bonding is accomplished by coupling agents
9
called Silanes.This allows the more flexible polymer matrix to transfer stresses
to the stiffer particles. A properly applied coupling agent can impart improved
physical and mechanical properties and provide hydrolytic stability by
preventing water from penetrating along the filler – resin interface. Most
commonly used coupling agents are:
(1) Titanates
(2) Zirconates
(3) Organosilanes such as r-methacryloxypropyl silane.
The methacrylate groups of the organosilane compound form covalent bonds
(carbon double bonds) with resin when it is polymerized thus completing the
coupling process. This bond can be degraded by water absorbed by the
composite during clinical use.
4) ACTIVATOR – INITIATOR SYSTEM:
Methacrylate monomers polymerize by addition mechanism initiated by free
radicals generated by chemical activation or by external energy activation (heat
or light). Thus there are two types of resin systems:
A) CHEMICALLY ACTIVATED RESINS
They are supplied as two pastes one of which contains benzoyl peroxide initiator
and the other a tertiary amine activator (N, N-dimethyl P-toluidene) which react
with each other to form free radicals thus initiating addition polymerization
reaction. They are usually used for restorations and build –ups that are not
readily cured with a light source.
The disadvantage with these systems was the incorporation of air when the two
pastes were mixed.
B) LIGHT ACTIVATED RESINS:
10
First light activated systems used UV light for free radical initiation. The
initiator was Benzoin methyl ether. The UV light activated systems are replaced
by the present day Visible Light Activated (VLC) composites.
The initiator in the visible light activated systems is Camphoroquinone present at
0.12%by wt or less. The light curable dental composites are supplied as a single
paste contained in a syringe containing photo initiator and an amine activator.
They do not interact with each other until exposed to light. However exposure to
visible light of appropriate wave length (468 nm) causes excitation of the photo
initiator and an interaction with the amine to form free radicals that initiate
addition polymerization. The amine accelerator suitable for interaction with
Camphoroquinone such as 0.15% dimethylaminoethyl methacrylate is used.
COMPARISON BETWEEN CHEMICALLY CURED AND LIGHT CURED
COMPOSITE SYSTEMS
CHEMICALLY CURED
COMPOSITES
LIGHT CURED COMPOSITES
Polymerization is central Polymerization is peripheral
Curing is in one phase Curing is in increments
These systems set within 45
seconds
These systems set only after light
activation
Working time is limited Working time is increased or
adequate
More wastage Less wastage
Surface finish of these systems is
not adequate
These systems take good surface
finish.
11
COMPARISON BETWEEN UV LIGHT ACTIVATED AND VISIBLE LIGHT
ACTIVATED SYSTEMS
5) INHIBITORS:
Inhibitors prevent or minimize spontaneous or accidental polymerization of
monomers. They have a strong affinity or reactivity with free radicals. A typical
inhibitor used commonly is Butylated hydroxytoluene (BHT), used in a
UV LIGHT SYSTEMS VISIBLE LIGHT SYSTEMS
Work at 360 – 400 nm light
range
Work between 400 – 480 nm
light range
The intensity falls with time Intensity of these systems
remains the same
UV light systems are
injurious to eyes of operator
and patient
These are not injurious to eyes
and thus are safer systems
Depth of cure of these
systems is less
Compared to the UV light
systems depth of cure is more.
12
concentration of around 0.01% by weight. Thus inhibitors extend the storage
lifetime for all resins and they ensure sufficient working time.
6) OPTICAL MODIFIERS:
To ensure optimal esthetics of a composite restoration the translucency of the
filler must be similar to the tooth structure. For this the index of refraction of the
filler must match to that of the resin. The refractive indices if Bis GMA and
TEGDMA are 1.55 and 1.46 respectively and that of a mixture of these two
would result in an effective refractive index of 1.5, which is sufficient for an
effective translucency. Translucency or opacity is provided to simulate dentine
and enamel. To adjust this opacifiers are added. All optical modifiers affect light
transmission ability of a composite.
They include metal oxides in minute quantities that improve the shade and
transluscency of dental composites. Titanium dioxide (TiO2) and Aluminium
oxide (Al2O3) are added in minute amounts 0.001 – 0.007 % by weight to
increase the opacity, as they are highly effective opacifiers.
CLASSIFICATION OF COMPOSITE RESINS
Composite resins have undergone enormous improvements and advances since
their introduction in 1956. They have thus been classified in various ways based
on:
1. Filler particle size and distribution.
2. Handling characteristics.
3. Polymerization method.
4. Use
1. FILLER PARTICLE SIZE AND DISTRIBUTION:
A) BASED ON PRIMARY PARTICLES SIZE – BY STURDEVANT:
13
1. Mega fill - Very large individual particles or inserts for posterior
composites.
2. Macrofil - 10 to 100 µm.
3. Midi fill - 1 – 10 µm.
4. Minifill - 0.1 - 1µm
5. Microfill - 0.01 – 0.1 µm (fine fishing)
6. Nanofill - 0.005 – 0.01 µm.
B) BASED ON MEAN PARTICLE SIZE OF MAJOR FILLER – BY
SKINNERS.
1. Traditional or Conventional composites - 8 to 12µm
2. Small particle filled composite - 1 to 5µm
3. Micro filled composite - 0.04 – 0.4µm
4. Hybrid composite - 0.6 - 1µm
C) HOMOGENOUS COMPOSITE - Composite simply
consists of filler and uncured material
HETEROGENOUS COMPOSITE - Composite consists of precured
composite or any other filler.
MODIFIED - Composite includes novel filler modifications inaddition to
conventional fillers.
Eg. Fiber modified homogenous Minifill.
2. HANDLING PROPERTIES:
A) Flowable composites:
The filler content is reduced by 20-25% compared to traditional hybrid
composites, which decreases the viscosity and makes the composite flowable.
14
B) Packable / Condensable composites
The filler instead of being incorporated into composites as ground particles is
present as a continuous network / scaffold of ceramic fibres composed of
Alumina (Al2O3) & Silicon dioxide (SiO2).
3. POLYMERIZATION METHOD
A) Self cure / auto cure / chemically cured composites
B) U-V light cured composites - Polymerization is initiated
by U-V light.
C) Visible light cured composite- Visible light – blue light in
the range of 470nm
wavelength is used for
polymerization
D) Dual cured composite - They combine self – curing
and light curing.
4. USE
A) Anterior composite
B) Posterior composite
C) Core-build up composite
D) Luting composites
ACCORDING TO CHRONOLOGICAL DEVELOPMENT
1. First Generation Composite Resins
15
They consist of macro ceramic reinforcing phases in the resin matrix. They have
the highest mechanical properties and highest surface roughness.
2. Second Generation Composite Resins
They consist of colloidal and micro ceramic phases in a continuous resin phase.
They exhibit the best surface texture of all composite resins and better wear
resistance than First generation composites.
3. Third Generation Composite Resins
They are hybrid composites in which there is a combination of macro and micro
ceramics as reinforcers in a ratio of 75:25. The properties are intermediate to
those to First and Second generation composite resins.
4. Fourth Generation Composite Resins
They are also hybrid types that contain heat-cured irregularly shaped, highly
reinforced composite macro particles with a reinforcing phase of micro
(colloidal) ceramics. They are highly technique sensitive.
5. Fifth Generation Composite Resins
They are hybrid composites in which the resin matrix is reinforced with micro
ceramics (colloidal) and macro, spherical, highly reinforced heat cured
composite particles. They have improved wettability and consequently improved
bonding to continuous phase.
6. Sixth Generation composites Resins
These are hybrid composites in which continuous phase is reinforced with a
combination of micro (colloidal) ceramics and agglomerates of sintered micro
(colloidal) ceramics. They have the best mechanical properties. They exhibit the
least shrinkage and the wear and surface texture similar to Fourth generation
composite resins.
SKINNER’S CLASSIFICATION
1. TRADITIONAL COMPOSITES
16
They were developed in 1970 and are also referred to as conventional or macro
filled composites. The filler is finely ground amorphous silica and quartz. The
average size of filler particles is 8-12µm and the filler loading is generally 70-
80% wt or 60-70% by volume. The properties such as water sorption,
polymerization shrinkage, and thermal expansion are less than those of unfilled
resins.
A major clinical disadvantage of traditional composites is the rough surface due
to abrasive wear of the soft resin matrix exposing the more wear resistant filler
particles. They are more susceptible to occlusal surface wear and thus are
inferior to be used in stress bearing posterior areas.
2. SMALL PARTICLE FILLED COMPOSITES:
They contain fillers of size range between 0.5-3µm (1-5µm) and high filler
loading upto 80-90 wt% compared to the traditional composites. The filler used
is amorphous silica; glasses. Colloidal silica in 5% wt is added to adjust the
viscosity. The physical & mechanical properties such as compressive strength
are superior to traditional composites and the other micro filled composites.
Coefficient of thermal expansion is two times that of tooth and polymerization
shrinkage is less, wear resistance is improved.
The addition of heavy metal containing glasses makes them radio opaque. They
are indicated for high stress and abrasion prone areas eg: Class IV.
3. MICROFILLED COMPOSITE
These composites contain colloidal silica particles of 0.01-0.04µm as inorganic
filler. To increase the filler loading:
(1) Colloidal silica particles are sintered to obtain larger agglomerate that has a
reduced surface area thus allowing more filler without compromising the
rheological properties.
17
(2) Prepolymerized composite is ground to get smaller particles that are used as
fillers into the composite resin in range of 60 to 70-wt%. The bond between
cured matrix and composite filler particles is weak, facilitating wear by chipping
mechanism. Thus micro filled composites are not indicated for stress – bearing
areas.
Due to greater amount of resin, water sorption, coefficient of thermal expansion
are more & elastic modulus is decreased.
They provide the smoothest surface finish. Thus they are preferred for restoring
teeth with Class III and V cavities.
4. HYBRID COMPOSITES
These composites are developed in an attempt to produce better surface finish
than Small Particle Filled composites but retaining their properties. Hybrid
composites contain two kinds of filler particles – colloidal silica and ground
particles of glasses containing heavy metals upto 75 to 80-wt%. The smaller
filler particle size as well as greater amount of microfillers increases the surface
area. Their physical & mechanical properties are intermediate to those of
traditional and small particle filled composites. They are indicated for both
esthetic anterior & stress bearing posterior regions.
CURING OF RESIN – BASED COMPOSITES
The first composites were cured by a chemically activated polymerization
process – known as cold cure or self-cure resins. They were available as two
pastes, which had to be mixed. The disadvantage in this system was
incorporation of air bubbles during mixing that weaken the structure and trap
oxygen, inhibiting polymerization during curing.
18
Later different curing systems using light as a source of curing came into
existence that are as follows.
a) U-V light cured composites - Polymerization is initiated by U-V light.
b) Visible light cured composite - Visible light – blue light in the range of
470nm wavelength is used for
polymerization
c) Dual cured composite - They combine self – curing and light
curing.
VISIBLE LIGHT CURING COMPOSITES:
The composites to be cured by light contain a photosensitive initiator system and
a light source for activation. These systems are not sensitive to oxygen inhibition
as the chemically cured systems.
The photo initiator used most commonly is CAMPHOROQUINONE that
absorbs photons at 474 nm ranges.
CURING LAMPS:
Curing lamps are hand held devices that contain light source and are equipped
with a rigid light guide made up of fused optical fibers.
The most widely used light source is QUARTZ BULB with TUNGSTEN
FILAMENT in a halogen environment. The various types of light devices used
are:
1. Light emitting Diodes –LED Lamps
2. Quartz Tungsten Halogen Lamps –QTH Lamps.
19
3. Plasma arc Curing light – PAC Lamps.
4. Laser lamps.
Light Emitting Diode Lamps:
They emit radiation only in blue part of visible light between 440-480 nm. They
do not require filters. They can be battery operated and do not produce heat.
Quartz Tungsten Halogen Lamps:
They have quartz bulb with a tungsten filament that irradiates U-V and white
light. They require a filter to remove heat & unwanted wavelengths to produce
violet-blue light in 400-500 nm range. The intensity of light diminishes with use.
Plasma Arc Curing Lamps:
20
They use ionized xenon gas to produce plasma. The required filters to remove
high intensity white light and allow blue light in the range of 400-500nm to be
emitted.
Argon Laser Lamps:
They have the highest intensity & emit a single wavelength at 490 nm.
Quartz Tungsten Halogen Lamps, Plasma Arc Curing Lamps and laser lamps
with increased intensities of greater than 1000 mw/cm2
have advantage of
reduced exposure times with increased or greater depth of cure.
An increase in intensity of the light will allow shorter curing times for given
depth as cure (or) increased depth of cure for a given exposure time. The curing
depth is limited to 2-3 mm unless excessively long exposure times are used.
When attempting to polymerize the resin through tooth structure, exposure time
should be increased by a factor of 2 to 3 to compensate for the reduction in light
intensity.
21
The light intensity of halogen lamps will decrease depending on the quality and
age of light source, orientation of light tip, distance between tip and restoration;
presence of contamination. To overcome limits on curing depth and problems
associated with light curing the chemical curing & Visible Light Cure
composites are combined into a single system namely the Dual cure resin
systems. They are available as two light curable pastes: –
1) One containing benzoyl peroxide as Initiator
2) Other containing an aromatic tertiary amine as an activator.
When the two pastes are mixed and exposed to light, light curing is promoted by
amine and Camphoroquinone combination and chemical curing by amine and
Benzoyl peroxide combination. These are intended for cementation of bulky
ceramic inlays where a single light cure system would be insufficient for light
penetration through bulky ceramic structure.
Tip size: Curing tips are available in various sizes.
DEGREE OF CONVERSION:
It is the percentage of Carbon – Carbon double bonds that have been converted
to single bonds to form a polymeric resin. A 65% conversion is considered to be
good.
22
The higher is the degree of conversion, better will be the strength and wear
resistance. Conversion of the monomer to polymer depends on resin
composition, transmission of light through the material, concentration of
sensitiser, initiator & inhibitor. Due to faster polymerization of Visible Light
Cure resins there are chances of building up of residual stresses.
DEPTH OF CURE
It is determined by the boundary between somewhat cured and uncured
material. Most light curing requires minimum of 20 seconds under optimal
conditions of access. The problems of light penetration can be slightly overcome
by increasing curing times. Curing again after completion of recommended
procedure (Post –curing) for 20 – 60 seconds may slightly improve the surface
layer.
POLYMERIZATION SHRINKAGE:
All composites shrink while hardening in order of 2-3 % volume. This is referred
to as Polymerization shrinkage .It usually does not cause significant problems
with restorations cured in preparations having all- enamel margins. However
when a tooth preparation extends on to the root surface polymerization shrinkage
can cause gap formations at the junction of composite and root surface, as the
force of polymerization of composites is greater than the initial bond strength of
composites to tooth structure. This problem though cannot be eliminated, can be
minimized. This polymerization contraction depends on two factors:
1) The quality of bond
2) The shape of the cavity preparation - C –Factor configuration.
APPROACHES TO REDUCE BUILD UP OF STRESSES:
1) Reducing volume contraction by altering chemistry and / or composition of
the resin system.
23
2) Clinical techniques designed to offset the effects of polymerization
shrinkage.
CLINICAL TECHNIQUES TO OFFSET EFFECTS OF
POLYMERIZATION SHRINKAGE.
Incremental build up and configuration:
During curing, shrinkage of composite leaves the bonded cavity surfaces in a
state of stress and the unbonded surfaces undergo relaxation by shrinking
towards the bulk of material. The stresses thus created may be upto 7 Mpa in the
composite. When composite is bonded to only one surface as in facial veneer
stresses are released by flow from unbonded surface. But stress relief within a 3 -
dimensional bonded restoration is limited by its configuration factor, or C-
factor.
C –Factor:
It was first analyzed by Feilzer in 1987 and is described in terms of the ratio of
surface area of bonded surfaces to the surface area of unbonded surfaces.
The higher is the C –factor the greater is the potential for bond disruptions from
polymerization effects.
Most technique sensitive preparations to restore successfully are class V, and I
both of which have five bounded and one free surface, thus resulting in the
24
maximum stresses. A veneer on the other hand has five free and only one
bounded surface.
The magnitude of development of stresses is influenced by the rate at which the
composite is cured (Kinomoto, Torii, Ebisu Journal of dentistry 1999). Light
cured materials demonstrated twice the magnitude of stress compared to self-
cured materials. Also heavily filled composites exhibited higher stress.
Maximum stresses developed are at internal line angles and stress on lateral
walls increases with depth of the cavity.
Unrelieved stresses in composite cause bond disruption as well as marginal gaps
around restorations that increase micro leakage.
Clinical techniques to reduce c-factor:
1. Layering technique:
The restoration is built up in increments, curing one layer at a time. This reduces
‘C’ factor by reducing the surface area of bonded surfaces and increasing the
non bonded surface areas. This is done in increments whereby problems of depth
of cure and residual stress concentration are both eliminated.
2. Sectioning:
The composite is sectioned horizontally and vertically to reduce the stresses.
CURING RATE CONTROL:
An approach to offsetting polymerization stress build up is starting with an
initial low rate of polymerization similar to chemical initiation. Thus sufficient
time is present for stress relaxation before reaching the gel point.
SOFT START TECHNIQUE:
Curing begins with a low intensity and finishes with a high intensity. There is a
slow initial rate of polymerization and high initial level of stress relaxation
during the early stages and ends at maximum intensity once the gel point has
reached.
RAMPED CURE TECHNIQUE:
25
Intensity of curing is gradually increased or “ramped up” in step wise, linear or
exponential modes.
DELAYED CURE:
The restoration is initially cured incompletely at a low intensity. Then
contouring of the resin is done and later a second exposure for final cure is done.
This delay allows for stress relief or relaxation.
FACTORS EFFECTING CURING
A) PROCEDURAL FACTORS
B) RESTORATION FACTORS.
A) PROCEDURAL FACTORS:
1) Light tip direction
2) Access to the restorations
3) Distance from the surface – ideally should be within 2 mm to be effective.
However distances of 5-6 mm are often encountered.
4) Size of the tip, which range from 3 – 11 mm. Smaller the tip size greater will
be the intensity of light
5) Tip movement.
6) Time of exposure.
B) RESTORATION FACTORS
1) Restoration thickness: The ideal thickness of composite increment for
optimal cure has been suggested to be 1.5 – 2 mm.
2) Cavity design
3) Filler amount size: Smaller sized fillers (0.01 – 1 µm) scatter maximum
amount of light thus resulting in a more effective curing of the composite.
4) Restoration shade: Darker shades require more light and thus greater
exposure times for adequate curing.
26
5) Monomer ratios
The intensity of light tip output falls from the center to the edges producing
bullet shaped curing pattern also leading to inadequate curing in the proximal
box line angles of Class – II restoration.
PROPERTIES OF COMPOSITES:
1. Of all the tooth colored materials composite resins possess the highest
tensile and compressive strengths.
2. The modulus of elasticity is high.
3. The modulus of resilience is very low which may explain some of the
crazing, cracking and wear failures of composite resins.
4. The co-efficient of thermal expansion of composite resin is close to that
for amalgam (25-35 PPM/10
C). The co-efficient of thermal expansion of II
generation composite is high and close to that of unfilled resins.
5. Composite resins show less resistance to abrasion. The main mechanism
of wear starts at the interface, leading to debonding of the attachments of the
reinforcing particles from the resin matrix. The abrading forces dislodge the
particles. The interfacial failure is precipitated first by exposure of resin matrix
and further by deterioration of coupling agents by environmental factors.
6. Solubility of resins is influenced by the residual monomer and
discontinuity or weakness in the bond between the dispersed and dispersion
phase in composite and filled resin.
7. WATER SORPTION:
Water sorption swells the polymer portions of the dental composite and
promotes diffusion and desorption of any unbound monomer. Water and other
small molecules potentially plasticize as well as chemically degrade the matrix
into monomer or other derivatives. The micro filled composites have a greater
potential for being discolored by water-soluble stains.
27
This combines both water sorptions within the material and water adsorption.
Absorption and adsorption are most pronounced in unfilled and filled resins and
significant in composite resins. This increases the dimensions of the restoration
thus compensating for polymerization shrinkage but also causes unfavourable
results like disruption of adhesive bonds, susceptibility to discoloration,
increased plasticity.
8. PLASTICITY:
Composite resins & unfilled resins are viscoelastic in nature and show limited
degree of plasticity that may lead to a change in shape under loading. Resinous
materials can withstand high rates of loading better than low rates.
9. DISINTEGRATION:
It involves gross loss of material as a result of solubility, abrasion, erosion and
low strength properties. Composite resins undergo disintegration due to failure at
interphase between dispersed and dispersion phases. This leads to surface
roughness, leakage and a partial or complete loss of material.
10. HARDNESS:
Of all the tooth coloured restorative materials, composite resins show greater
Knoop Hardness Number ( KHN) of 30-100 as compared to 300 of enamel. The
KHN depends on whether the intender of the tool was applied on dispersed
phase (greater KHN) or on the continuous phase (low KHN).
11. SURFACE ROUGHNESS:
This is measured by the average number of scratches per square inch, average
depth of irregularities in micro inches and surface profile of the material
specimens after proper finishing and polishing. Of all tooth coloured restorative
materials composite resins in general have the highest and deepest scratches
after all finishing and polishing procedures. The II generation composite exhibits
the least surface roughness comparable to unfilled resins.
28
Surface roughness leads to plaque accumulation and thus has harmful effects on
the tooth and periodontium, leads to surface discolouration, fatigue failure and
mechanical irritation to tongue, lips and cheek.
To improve surface characteristics using monomer of resin matrix being
polymerized onto the surface does glazing of composite resin but this is a
temporary phenomenon due to the low abrasive resistance of the monomer.
12. MICROLEAKAGE:
The unfilled resins and II generation composites show greatest micro leakage,
especially when inserted with a bulk-pack technique.
The use of acid – etched technique reduced the micro leakage of composites to
nearly zero at least for a period. This leakage is influenced by several factors like
co-efficient of thermal expansion, solubility, disintegration, strength properties,
wettability, viscosity, abrasive resistance and adhesiveness to tooth structure.
13. OPTICAL PROPERTIES
Composite resins have the most approximate translucency to that of tooth
enamel. Translucency depends mainly on the type and nature of unreacted
particles of fillers.
Reflectiveness is mainly the product of surface texture. The more smoother the
surface, the more rays will be reflected, giving a shiny bright surface impression
visually. It is also is a major modifying factor for any shade.
Inorganic pigments added produce a stable predictable coloration and shading.
14. COLOUR STABILITY
Composite resins may undergo discoloration, which may be either intrinsic or
extrinsic.
Intrinsic discoloration: Due to chemical changes or deterioration of one or
more component phases of the material with coloring by products
Eg: effect of U-V light on the Benzoyl peroxide – tertiary amines.
29
Extrinsic discoloration: It is the most common type and can occur marginally
or on surface.
A) Marginal discoloration: This may be due to micro leakage,
recurrent decay or dissolution of varnish.
B) Surface discoloration: This is mainly due to surface roughness or
irregularities that increase stainability or possibility of plaque accumulation on
the surface. It may also be a continuation of intrinsic discoloration.
15. RATE OF HARDENING:
Composite resins gain most of their mechanical properties within 15 minutes;
and can usually be finished and polished after 5-8 minutes.
16. BIOLOGIC FORM :
If acid etching the enamel did not come into contact with underlying dentin of
the involved Pulp - Dentin organ then when the:
(a) Effective - depth is 3 mm or more we can expect a healthy reparative
reaction.
(b) Effective - depth is 1.5-3 mm then composite resins can induce an
unhealthy reparative reaction or sometimes even destruction.
(c) Effective - depth is less than 1.5 mm composite resins induce always
destruction of Pulp - Dentin organ.
17. WEAR:
The second most frequent clinical problem apart form polymerization shrinkage
of composite is Occlusal wear. The wear rate of posterior composite is 0.1 to 0.2
mm/year more than that of enamel. The principal mechanisms of composite wear
are:
30
a) TWO BODY WEAR:
This is due to direct contact of restoration with an opposing cusp / adjacent
proximal surfaces that result in high stresses in the contact area. Two body wear
causes significant wear of composite rather than three body wear.
b) THREE BODY WEAR:
Three body wear explains loss of composite material in non-contacting areas.
This is due to the contact with food bolus as it is forced across occlusal surface.
This is controlled by various factors such as toughness porosity, stability of
silane coupling agent, degree of monomer conversion, filler loading, size and
type of filler particles Also variations among patients such as chewing habits,
force levels play a significant role.
18. POLYMERIZATION SHRINKAGE:
Polymerization shrinkage of resin composites range from 1.5 to 5.5% by
volume. This leads to production of polymerization shrinkage stresses within the
resin that pulls it away from tooth structure. To offset this the resin to tooth bond
should be atleast 17Mpa.
CLINICAL CONSIDERATIONS
Dental composites are monitored in clinical studies in terms of USPHS (United
states Public Health Sciences) categories of interest
1. Colour matching
2. Marginal Integrity
3. Bulk fracture
4. Post operative sensitivity
5. Bio compatibility
6. Improving wear resistance
1) Colour Matching:
31
This depends on not only proper initial colour match, but also on the relative
changes, which occur with time. Both the restoration and tooth structure are
known to change colour with age, with time. Chemical changes in the matrix
polymer cause the dental composite to appear more yellow. This process is
accelerated by UV Light, oxidation and moisture.
Newer systems that are visible light cured, that contain higher filler content are
modified and UV absorbers and Anti oxidants are more resistant to colour
change. Even if the composite is relatively colour stable, tooth structure
undergoes a change in its appearance with time due to dentin darkening from
ageing. Aged tooth structure appears more yellow and opaque. The challenge is
to match the rate and type of colour change of the restoration with the tooth
structure .A colour mismatch that appears after several years is difficult to avoid.
Another important consideration for esthetics is a gradual transition in colour
and translucency between the restoration and tooth structure. This goal is
accomplished in two ways. Bevelling the enamel ends to blend any colour
difference associated with the margin over about 0.5 – 1 mm (depending on the
preparation size and requirements for bevel width) rather than making it abrupt.
It also produces more surface area for a well-bonded margin that does not leak.
Marginal leakage leads to the accumulation of sub surface interfacial staining
that is difficult to remove and which creates a marked boundary for the
restoration appearance.
2) Marginal Integrity
Restorations which have been properly acid-etched should be well bonded for
years. The longevity of micro-mechanical enamel retention is unknown. Like
wise the effects of fatigue, stresses and other intraoral events are unknown.
However, clinical studies as long as 14 years, indicate relatively good resistance
to interfacial staining.
32
As long as the margins are well bonded and no marginal fractures occur, there
should be good resistance to secondary caries. Although not well documented,
most secondary caries seem to occur along proximal or cervical margins where
enamel is thin, less well oriented for bonding, difficult to access during the
restorative procedure, and potentially subject to flexural stresses as well.
Only rarely is secondary caries is observed along margins on occlusal surfaces or
non-cervical aspects of other surfaces. The incidence of caries is quite variable
depending on the degree of technical excellence during composite placement.
Bayne etal (1992) in their clinical study of failure in posterior composites
indicated that for well controlled insertion techniques the incidence of secondary
caries after ten years can as low as 3%. Under these circumstances the primary
reason for composite failure is poor esthetics or excessive occlusal wear. Cross
sectional studies of dental practices that did not strictly conform the
recommended techniques indicate that caries levels as high as 25 – 30 % have
been observed after 10 years for composites placed during the 1970 ‘s and early
1980’s.
3) Bulk fracture
Bulk fracture of composites is very rare. Though there is persistant rumour that
micro-filled composites are more subjected to fracture at occlusal contact areas,
there is no published evidence of that fact.
4) Post –operative sensitivity
This is a major clinical concern for any restorative procedure. The actual causes
of post- operative sensitivity are poorly researched but are hypothesized to be
due to the following reasons:
1) Marginal diffusion along spaces, which induce fluid flow within
dentin.
33
2) Dimensional changes of the restoration –contraction resulting from
polymerization shrinkage and / or expansion from water sorption can
cause flexural forces in the cusps bonded resulting in pain.
3) It usually occurs within 6 months to 1 year of the restoration
placement and subsides within 6 months of initial onset.
5) Biocompatibility
There are only limited problems of biocompatibility for composites with respect
to the dental pulp. Although the unpolymerized materials are potentially toxic
and may even have been classified as Carcinogenic, they are very poorly soluble
in water and are polymerizes into a bound state before there is significant time
for dissolution and diffusion
Monomers, which do not polymerize may diffuse slowly out of the restoration
but the concentration at any given time is so low that the materials do not appear
to represent any practical risk. From long-term clinical studies there is no
evidence of any clinical problems resulting in pulp death or soft tissue changes.
6) Improving the wear resistance of composites
The greatest effort in improving the wear resistance of composites has been in
the modification of filler particles. The use of large (50 – 100 µm) hard ceramic
filler particles resulted in wear rates of 100 – 150 µm /year. The masticatory
stresses are transformed into filler and into the resin matrix resulting in micro
cracking of the polymeric supporting materials that cause a substantial
weakening of the composite resin.
Major modification consisted of substituting barium silicate glass (NUVAFIL,
L.D CAULK and Co) for the traditional quartz filler. This reduced the wear
rate .As compared with harder fillers such as quartz; the softer filler particles
tend to absorb the stresses rather than transferring it to the resin matrix. Further
34
these barium silicate glasses rendered the composite material more radio opaque.
Most commercial composites today contain fillers from 1-3 µm. Recently the
role of spherical filler particles is under research. The basic advantage of this
concept is that stress concentration between the filler and matrix are dispersed
more uniformly. In case of irregularly shaped particles, the stresses become
concentrated in areas where the particle is angulated leading to failure.
One more way of controlling the wear of composites is the use of glass or
ceramic inserts in the composite resin. This unusual concept was developed by
Dr.Rafael Bowen who developed a biphasic glass for use as mega or macro
fillers. This technique consists of first filling the cavity preparation with a wear
resistant posterior composite resin. Prior to light curing, however one or two
large filler particles (1-2 mm in diameter) are inserted into the surface of
composite resin. Care is taken to insert the particles in such a manner so that
their surface remains above that of unpolymerized resin. After curing the
extruded filler and supporting resin are contoured to the normal anatomic form.
During mastication the occlusal stresses are directed towards the macro sized
filler particles rather than resin matrix. The polymerization shrinkage is
considerably less due to the volume of glass inserts thus improving the
coefficient of thermal expansion property of the restoration.
Recently these glass ceramic inserts made of ß- quartz are available as cones or
tapered cylinders which are inserted onto the surface of the resin composite
where there is contacts with the opposing cusps.
INDICATIONS FOR COMPOSITE RESIN RESTORATIONS
Composites can be used for most clinical applications. Generally, the indications
for their use are:
1. Restoration of class I, II, III, IV, V, VI cavities.
35
2. Foundations or core build-ups.
3. Pit & fissure sealants.
4. Conservative composite restorations or preventive resin restorations
5. Esthetic enhancements such as:
a. Full veneers
b. Partial veneers
c. Tooth colour modifications.
d. Closure of Diastema
6. As luting cements
Eg: Resin cements for indirect restorations
7. Temporary restorations
8. Periodontal splinting.
CONTRAINDICATIONS FOR COMPOSITE RESIN RESTORATIONS:
1. The operating site cannot be properly isolated.
2. When the occlusal contacts are in such a way that they are on the
composite material.
3. Heavy occlusal stresses such as bruxism
4. Deep sub gingival areas that are difficult to prepare.
5. Extension onto root surfaces may exhibit marginal gap formation.
MERITS AND DEMERITS
MERITS:
1. Esthetics
2. Conservation of tooth structure.
3. Improved resistance to micro leakage
4. Strengthening of remaining tooth structure
5. Low thermal conductivity
6. Completion of restoration in one appointment
7. Economic – Less expensive compared to gold or porcelain restorations
36
8. No corrosion
DEMERITS:
1. Very technique sensitive
2. High coefficient of thermal expansion than tooth structure
3. Low modulus of elasticity
4. Biocompatibility of Bis GMA and TEGDMA resins is not known
5. Limited wear resistance in high stress areas
6. Finishing procedures are prolonged and tedious
7. Post operative sensitivity
CLINICAL STEPS IN COMPOSITE RESTORATION
The preliminary clinical steps in building up composite restorations are:
1. ACID conditioning.
2. Priming
3. Application of adhesive agent.
4. Placement of composite resin.
ACID CONDITIONING / ETCHING
Michael Buonocore reported the first meaningful proof of intraoral adhesion in
1955 by using 85% ortho phosphoric acid. At present 35-50% ortho phosphoric
acid is used to condition the enamel before inserting tooth – colored resin.
37
Concentrations greater than 50% result in deposition of monocalcium phosphate
monohydrate on etched surface.
The etchants are supplied in the form of aqueous solutions or gels. Gels are
preferred due to the control in area of application on the tooth.
EFFECTS OF ACID CONDITIONING ON SURFACE ENAMEL:
35-50% ortho H3PO4 applied on the surface of tooth for 60 sec will have the
following effects on the treated enamel:
1. There will be a preferential dissolution of interprismatic enamel followed
by top of the prisms. The sides of enamel prisms are most resistant to
dissolution. Based on the type of dissolution etching patterns can be as follows:
a. Type I: Selective dissolution of the cores of the enamel rods.
b. Type II: Selective dissolution of the peripheries of t he enamel rods.
c. Type III: A combination of type I & II seen in teeth with more
interprismatic substance.
Due to the preferential dissolution the surface area of enamel increases to upto
2000 times of the unetched surface.
2. Acid etching creates an irregular enamel surface with valleys in place of
interprismatic substance, which is etched with an average depth of 25 microns.
3. Acid etching of dentin exposes the organic matrix which when
incorporated into restoration increases the retention.
38
4. Acid etching removes the surface debris, salivary deposits, plaque thus
exposing a cleaner, less contaminated and more wettable enamel surface for
adhesion with restorative material.
5. Enamel treatment with H3PO4 will add a highly polar phosphate group to
enamel thus increasing its adhesive ability.
PRINCIPLES OF ACID CONDITIONING OF SURFACE ENAMEL:
1. Enamel surface should be mechanically cleansed from adhesive deposits
& surface stains.
2. The surface area of enamel to be etched should be atleast double the
surface are of the defect to be restored or minimally 1 mm in width.
3. Etching should be performed at right angle to the surface of enamel
(prism heads) so as to produce retentive valleys and honey – combs. Etching
enamel from sides of the prisms will not provide any retention of the restorative
material.
4. When acid etching or conditioning is to be used in conjunction with
cavity preparation then enamel walls are to be prepared in one of the following
ways:
39
(a) PARTIAL BEVEL
This involves 1/3 – 1/2 of enamel wall at 450
-700
to cavity walls .This is
indicated when acid etching is used only to reduce marginal leakage and the
internal anatomy of the cavity walls can adequately retain the restoration
(b) LONG BEVEL
This involves entire enamel wall beveled at 45 – 700
. It is indicated when the
walls of the cavity preparation are not enough for retaining the restoration but a
distinct apical termination is not present.
(c) HOLLOW GROUND BEVEL
About 2/3 rds
of enamel wall is ground in a concave manner and thus cavity
margin will had a right angle cavosurface angle, with a butt joint between tooth
and restorative material. This is indicated in gingival areas, inaccessible areas,
areas of direct loading to accommodate maximum bulk of restorative material.
(d) SCACLLOPED MARGINS
This is used in conjunction with partial or long bevel to increase surface area of
enamel to be conditioned. This is indicated when the conditioned enamel will
have a major role in retention of restoration. It has the disadvantage of greater
possibilities of overhangs and flash. It is contraindicated for inaccessible areas.
(e) SKIRTING
This is used when conditioned enamel will be the main mode of retention. It is a
surface extension with a definite termination to improve retention and finishing.
The acid should be applied on enamel with a soft sponge or cotton pellet using
light patting touches and not rubbing at all. Rubbing may fracture the thin
enamel rods thereby decreasing the depth of the created valleys and
irregularities.
40
Acid conditioned enamel should be washed thoroughly for 1 minute, using
copious stream of water, air dried before application of bonding agent.
Primary teeth & fluorosed teeth required more time (> 1 minute) for acid
etching.
Contamination of the etched enamel is a frequent problem in restoring lesions
closer to gingival margins, inaccessible areas and if this occurs then the
contaminated surface should be etched again for 10 sec. If etched areas are left
exposed to saliva remineralization of the etched areas takes place.
APPLICATION OF BONDING AGENT:
The oral hard tissues and the surrounding environments are complex. The
mechanisms of adhesion that have been employed are also complex. There are
several factors that play role in achieving adhesive bonds such as:
(1) Wetting
(2) Interpenetration (formation of hybrid zone)
(3) Micro mechanical interlocking
(4) Chemical bonding
For any adhesion to occur wetting is essential. The principal substrates
(adherends), enamel & dentin are hydrated, hydrophilic and permeable to water.
The wetting agent thus should be hydrophilic and hydrolytically stable. Before
the total etch technique was adopted for enamel and dentin, enamel-bonding
agents were used.
41
Fusayama in 1973 used 37% Orthophosphoric acid to etch both Enamel and
Dentin. For a successful bonding of resin composite to dentin micromechancial
attachment between resin and demineralized, primed surface layer of intertubular
dentin occurs, which is known as Hybrid layer. This is achieved by acidic
conditioning agents, which remove smear layer, produce surface
demineralization to a depth of 3-6 µms and expose the dentinal collagen
framework.
SMEAR LAYER AND ITS ROLE IN BONDING
Smear layer, a product of dental instrumentation covers the normal structural
components of dentin by 1-2µms and penetrates several micrometers (1-5µm)
into the tubules to form smear plugs. Smear layer may be deterrent to the
bonding as it acts as a barrier to penetration of resin underlying dentin substrate
and bacteria entrapped in smear layer can survive and multiply beneath the
restoration.
The removal of smear layer and demineralization of dentin matrix facilitates
bonding in the following ways:
1. The exposed collagen provides reactive groups that can chemically
interact with primers.
2. Amino groups may act as a catalyst to polymerization reactions.
3. Exposed collagen promotes micro mechanical bonding to resin by
providing a framework.
Chemical conditioning of dentin is done by Acid conditioners and chelators;
Thermal conditioning.
PRIMING:
It is the second step is bonding procedure. Primers are the actual adhesion
promoting agents that contain monomers with hydrophilic properties, which
have an affinity for the exposed collagen fibrils and hydrophilic properties for co
42
polymerization with adhesive resin. The idea behind using a primer is to
promote resin diffusion into moist, demineralized dentin with the aim of
achieving complete resin penetration. The monomers that are most commonly
used are HEMA and 4-META dissolved in solutions of acetone or ethanol.
Upon microscopic examination there were found to be deficiencies in the spread
of primer such as:
1. Incomplete surface coverage.
2. Incomplete interfibrillar penetration
3. Incomplete penetration to the full depth of demineralized dentin.
Primer is thus applied in multiple coats to improve surface coverage and
diffusion. For effective penetration of primer and adhesive resin the collagen
fibrils need to be suspended to create sufficient space for penetration and water
is an essential part for this. Excessive drying thus eliminates the water causing
collapse of collagen network preventing primer from entry.
BONDING:
Bonding agents are unfilled /or semi filled resins which match to the resin in the
composite but have a lower viscosity to permit easy flow and penetration. The
major role of adhesive resin is the formation and stabilization of hybrid layer,
formation of resin tags in the dentinal tubules and thus sealing them to reduce
the chances of permeability and pulpal irritation.
The adhesive resins penetrate into the micro porous collagen scaffold of the
intertubular dentin, polymerize and co polymerize with the adhesion promoters
of primer to form an intermingled layer of collagen & resin termed as the ‘resin
reinforced layer’ or ‘hybrid layer’, or resin interdiffusion zone.
43
The remaining adhesive resin enters into the dentinal tubules to a limited depth
of 10-20µms forming intratubular penetration tags. Prolonged conditioning to
effect maximum tag length is actually not needed. The latest bonding systems
have shown to penetrate and hybridize the walls of lateral tubule branches
forming sub micron resin tags and a phenomenon defined as lateral tubule
hybridization.
In superficial portions of dentin where tubules are fewer compared to deep
dentin, intertubular penetration accounts for the major portion of the bond
strength, whereas the reverse is true for deep dentin where intratubular
penetration contributes to most of the retention and sealing.
For light cured resins it is advisable to cure the bonding resin separately so as to
polymerize the hybrid layer adequately thereby allowing to counteract the
polymerization shrinkage of the resin composite.
44
C – composite resin
A – Adhesive agent
H – Hybrid layer
During polymerization, an oxygen-inhibited layer of 15µm is formed on the top
of the adhesive resin that co-polymerizes with subsequently placed restorative
resin-through unpolymerized methacrylate double bonds.
The thin uniform layer of adhesive resin is critical as it serves as an elastic
intermediary for absorbing stresses of polymerization shrinkage.
MECHANISM OF DENTIN BONDING:
The basic chemical composition of dentin bonding adhesives is:
M – R – X
M = Methacrylate group
R = Spacer
X = Reactive group capable of boding to dentin surface.
The adhesive is a bifunctional molecule, one end of which enters into chemical
union with tooth structure and the other part co-polymerizes with resin through
double bond of methacrylate. Ideally dentin adhesives should be both
hydrophilic and hydrophobic.
EVOLUTION OF DENTIN BONDING AGENTS:
The bonding agents are divided into generations depending on their evolution.
FIRST GENERATION DENTIN BONDING AGENTS:
They consisted of NPG GMA (N-Phenyl glycine Glycidyl methacrylate) as a
primer and adhesion promoter between enamel or dentin and resin materials by
chelating with surface dentin.
Eg: Cervident of S S white company.
The first generation adhesives ignored the smear layer.
45
SECOND GENERATION DENTIN BONDING AGENTS:
These agents were developed for clinical use during the early 1980’s. They left
the smear layer intact and bonded to smear layer. The second generation bonding
agents performed better than the first generation bonding agents and the clinical
failure rate for one year was around 30%. The bond strengths ranged from 4.5 –
6Mpa. There are three types of second generation products:
1. ETCHED TUBULE DENTIN BONDING AGENTS:
They achieved retention to dentin by etching the tubules with 25% citric acid
and employing ethyl methacrylate to mechanically interlock with the etched
tubules.
Eg: Dentin bonding system (Den - Mat)
2. PHOSPHATE ESTER DENTIN BONDING AGENTS:
These systems used analogs of BIS – GMA with phosphate esters phenyl or
chloro phosphorous esters attached that apparently bonded with calcium in the
tooth and methacrylate end of the molecule bonded to the composite resin. They
employed a mild cleanser to modify the smear layer.
Eg: Bondlite (SDS/Kerr)
Scotch bond (3M) – Halophosporous ester introduced n 1983.
Prisma universal bond (Caulk)
Clearfil (Kuraray, Japan) → Ethyl alcohol solution with tertiary amine-
Phenyl phosphorous ester as an activator
3. POLYURETHANE DENTIN BONDING AGENTS:
These systems are based on the isocyanate group of the polyurethane polymer
that bond to carboxyl, amino & hydroxyl groups of dentin. The setting reacting
of these systems was unaffected by the presence of fluid in dentinal tubules or
smear layer. Most of these systems left the smear layer intact.
46
Eg: Dentin – Adhesit (Ivoclar vivadent)
The mean bond strengths of these second generation bonding agents in the range
of 2 -7Mpa are considered to be quite weak to counteract the polymerization
shrinkage of composite resins. There is also evidence that the bond between the
phosphonate esters and dentin when immersed in water was prone for
hydrolysis*. They did not wet dentin well nor penetrate the entire depth of smear
layer, and could not reach the superficial dentin to *establish ionic bonding or
resin extensions into the dentinal tubules. Draw backs of I & II generation
bonding agents:
1. Lack of adequate bond strengths to overcome the stresses of
polymerization.
2. These systems due to hydrophobic nature could not wet the hydrophilic
dentin.
3. These systems bonded to smear layer rather than dentin and thus resulted
in a cohesive failure.
THIRD GENERATION DENTIN BONDING AGENTS:
To offset the drawbacks of II generation dentin bonding agents Kuraray in1984
introduced Clearfil new bond in 1984. This new phosphate based adhesive
contained HEMA and a ten-carbon molecule known as 10-MDP, which
includes a long hydrophobic and a short hydrophilic component.
To overcome the negative influence of smear layer the third generation dentin
bonding agents were developed which included an additional step to modify or
remove the smear layer before the application of adhesive. Thus the three steps -
conditioning, priming and application of bonding agent may be done either
separately or combined to reduce the steps. The bond strengths of these systems
to dentin ranged between 9-15Mpa. Two year clinical retention rates of these
systems were 100% .These systems consist of :
47
1. Conditioner: (Cleanser / Etchant)
This consists of a weak organic acid such as Maleic acid or a low concentration
of stronger acid such as phosphoric or nitric acid, or chelating agents like EDTA.
Conditioner heavily alters or removes the smear layer, demineralizes peritubular
and intertubular dentin surface upto 7.5µ to expose the collagen fibrils and thus
increases the permeability of dentin by 4-9 times.
2. Primer:
It is also called as the adhesion promoter; adhesion enhancer. Primers are
bifunctional monomers, which are hydrophilic dissolved in a volatile solvent
such as acetone or alcohol such as:
1. HEMA - Hydroxy ethyl methacrylate
2. NMSA – N-methacryl – 5 – Amino salicylic acid
3. NPG – N – Phenyl glycine.
4. PMDM – Pyromalletic di ethyl methacrylate.
5. 4-META – 4 – Methacryloxyethyl trimalletic anhydride
These primers which are bifunctional link the hydrophilic dentin to hydrophobic
adhesive resin & thus promote infiltration of demineralized peritubular &
intertubular dentin there by increasing the wettability of conditioned dentin
surface.
3) Adhesive:
This is the third component .It is an unfilled or partially filled resin containing
some component of primer. It combines with primer to form resin reinforced
hybrid layer (Resin dentin interdiffusion zone - RDIZ) of 1-5µ thick.
The adhesive forms resin tags to seal the dentinal tubules and provides
methacrylate groups that bond with the subsequently placed composite resin.
48
Representative systems are :
1. Oxalate bonding system: First system of III generation bonding agents.
It consisted of acidic ferric oxalate (2.5% Nitric acid + ferric oxalate) as a
conditioner.
2. Scotch bond – 2 :( 3M ESPE)
The first system to receive “provisional” & “full acceptance” from ADA in
1987. It consists of 2.5% maleic acid and 58% HEMA as primer and 32.5%
HEMA + 62.5% BISGMA as adhesive.
3. Gluma:
This system developed in 1984 utilizes EDTA 0.5M at neutral PH to remove the
smear layer and free collagen from embedding apatite. this is followed by
treating with 35% HEMA and 5% gluteraldehyde
.
Drawbacks of third generation bonding systems:
1. The retention of these systems decreased with time.
FOURTH GENERATION DENTIN BONDING AGENTS
Though the smear layer acts as a “diffusion barrier” that decreases the
permeability of dentin it also is an obstacle that must be removed so that the
resin can be bonded to the underlying dentin substrate. Based on this
consideration the IV generation adhesives were introduced for use on acid –
etched dentin. The IV generation dentin bonding systems rely on hybridization
for their attachment.
The advantages of these systems are:
1. Reduced technique sensitivity.
49
2. Similar bond strengths to both enamel & dentin.
3. The bond strength is not altered by presence of moisture on the surface.
4. Some systems can bond to mineralized tissue as well as metal, amalgam,
porcelain and indirect composite restoration. Excessive drying is to be avoided
as it causes collapse of the collagen meshwork.
The mean Shear Bond Strength of these agents is between 17-24 Mpa.
Representative products:
1. ALL bond – 2:
It consists of 35% orthophosphoricacid as etchant, primer containing of 2% NTG
GMA and 16% BPDM (Biphenyl di methacrylate) in ethanol or acetone,
BISGMA or HEMA as bonding adhesive.
2. Scotch Bond MPA:
It was introduced in November 1994 and consists of 10% maleic acid as etchant,
primer that is aqueous solution of HEMA and polyalkenoate copolymer. The
adhesive resin is a BisGMA containing HEMA. 10% Maleic acid was replaced
by 35% ortho phosphoric acid, as the effectiveness of maleic acid was
questionable.
3. Clearfil liner bond 2 (Kuraray):
It used the first no rinse self-etching primer comprising of phenyl-P, HEMA and
5 NMSA. The bonding resin consists of 10 MDP, BisGMA and HEMA. This
MDP has potential towards providing long-term bond strength to metal and
silanated porcelain.
FIFTH GENERATION DENTIN BONDING AGENTS
These systems primarily rely on the wet bonding technique. The priming &
bonding steps of the fourth generation are combined into a single step. They are
also called as the one-bottle adhesives. The etching step is separate.
50
Representative products:
1. Prime & Bond (Dentsply caulk) :
This was the first system to be marketed among the V generation. They contain
PENTA, TEGDMA, UDMA resins in acetone.
PENTA is a multifunctional molecule and is believed to partially demineralize
dentin; facilitating penetration of resins into it. Prime & Bond was modified
recently as prime and Bond 2.1.
2. Prime & Bond 2.1:
This is a modified form of prime and bond to which fluorides – cetylamine
fluoride and an elastomeric resin were added.
3. Single Bond (3M):
This is a one component version of scotch bond MPA containing HEMA,
BiSGMAresin and a unique methacrylate functional copolymer of polyacrylic
and polyitaconic acids in water and ethanol solvent base.
The bond strengths of these fifth generation systems range from 17-24 MPa.
Advantages of fifth generation bonding systems:
1. Improved bond strengths.
2. Reduced postoperative sensitivity.
3. Time consumption is less and simple to use.
SIXTH GENERATION DENTIN BONDING AGENTS:
Sixth generation bonding systems combine all the three steps – etching, priming,
and bonding into a single solution. These consist of an acidic solution that
cannot be stored for long and also the bond strengths are sufficient with dentin
51
but weaker to enamel. This acidified primer is applied to the dentin and is dried
but not rinsed off. They are moderately acidic with pH between 1.8 and 2.5.
The bonding mechanism is based on simultaneous etching and priming of
enamel and dentin without rinsing forming a continuum in the substrate and
incorporating smear plugs into resin tags. Self-etching primers produced a
shallow etching pattern than conventional etchants.
Advantages:
1. Reduced postoperative sensitivity due to their less aggressive action and
smear plugs retained in orifices of dentinal tubules sealing them.
2. The elimination of rinsing, drying steps reduces possibility of over
wetting or over drying which influence adhesion negatively.
Eg. Prompt L – POP – Self etching adhesive – 3M
NRL – Non rinse conditioner – Dentsply
Xeno III
The self-etching primers can be:
1. Two-step products: Two solutions applied sequentially.
Eg: NRC – Prime & Bond.
52
2. All – in – One system: Single solution that is applied
Eg: Prompt – L – Pop
Xeno-III
(OR)
These may be supplied as two solutions that are mixed into a single solution
prior to application to tooth.
Eg: One – Up Bond F- undergoes colour
change when mixed and after light activation.
TOOTH PREPARATION FOR COMPOSITE
RESTORATIONS
Basically, the tooth preparation for a composite restoration includes:
1. Removing the fault, defect, old material or friable tooth structure.
2. Creating prepared enamel margins of 90 degrees or greater (greater than
900
usually preferable]
3. Creating 900
(or butt joint) cavosurface margins on root surfaces.
4. Roughening the prepared tooth structure (enamel and dentin) with a
diamond stone.
53
These objectives can be met by producing a tooth preparation form
significantly different from that for an amalgam restoration. Differences
include:
1. Less outline extension (adjacent suspicious or at-risk areas (grooves or
pits) may be “sealed” rather than restored).
2. An axial and/or pulpal wall of varying depth (not uniform).
3. Incorporation of an enamel bevel at some areas (the width of which is
dictated by the need for secondary retention).
4. Tooth preparation walls being rough (to increase the surface area for
bonding).
5. Use of a diamond stone (to increase the roughness of the tooth
preparation walls).
The basic principles of tooth preparation must be followed for
composite restorations.
Outline form: The tooth preparation should include removing all of the caries,
fault, defect or old restorative material (when necessary) in the most
conservative manner possible.
Retention form: The composite material must be retained within the tooth, but
this primarily results from the micromechanical bonding of the composite to the
roughened, etched and primed enamel and dentin. In some instances, a dentinal
retention groove or enamel bevel may be prepared to enhance the retention
forms.
Resistance form: This keeps the tooth strong and protects it from fracture, is
primarily accomplished by the strength of the micromechanical bond but may be
increased, when necessary, by usual resistance form features such as
• Flat preparation floors,
• Box-like forms, and
• Floors prepared perpendicular to the occlusal forces
54
Caries removal technique is the same as that of any tooth preparation.
Pulp protection procedures are different for a composite restoration. Because
the composite is bonded to the prepared tooth and the composite material is
insulative, there is no need for any bases under composite restorations.
However, a Ca(OH)2 liner is still indicated when a pulpal exposure (or possible
pulpal exposure) occurs.
Types of composite tooth preparations:
Tooth preparations for composite materials should be as conservative as
possible. The extent of the preparation is usually determined by the size, shape
and location of the defect and whatever extensions are necessary to provide
access for vision and instrumentation. Acid-etch techniques, effective bonding
systems and improved composites have significantly affected tooth preparation
and expanded the ability to restore teeth.
Five designs of tooth preparations for complete restorations are
available now, and sometimes they will be used in combination. The design
include:
(1) Conventional
(2) Beveled conventional
(3) Modified
(4) Box only, and
(5) Slot preparation designs
1. Conventional: Conventional tooth preparations are those typical for
amalgam restorations. Outline form is the necessary extension of external walls
at an initial, limited, uniform dentin depth, resulting in the formation of those
walls in a butt joint junction (90 degrees) with the restorative material.
55
The primary indications for conventional tooth preparation in composite
restorations are:
(1) Preparations located on root surfaces (non enamel areas) and (2)
Moderate to large class I or class II restorations.
In the root areas, the butt joint design provides a better preparation
configuration into which the groove and/or cave retention form can be placed, if
deemed necessary. This design facilitates a better seal between the composite
and the dentin or cementum surfaces and enhances retention of the composite
material in the tooth.
In moderate to large class I or class II composite restorations, there may be
increased need for resistance form, which the conventional amalgam like
preparation design provides. An inverted cone diamond (similar in shape to a
No.245 bur) is used to prepare the tooth, resulting in a preparation design similar
to that for amalgam, but usually smaller in width and extension and without
prepared secondary retention form. The inverted cone diamond not only leaves
the prepared tooth structure roughened, but also is conservative of the occlusal
faciolingual extension. The butt joint marginal configuration between the tooth
and the composite is not required (as it would be for amalgam).
Thus the cavosurface angle in areas on the preparation periphery can be
more flared (obtuse) than 90 degrees. The occlusal cavosurface angle is obtuse,
yet provides for occlusally converging walls.
Class I or class II conventional composite preparations should be prepared
with as little facio lingual extension as possible and should not routinely be
extended into all pits and fissures on the occlusal surface where sealants may be
otherwise indicated. Likewise, it should be remembered that the box like form
increases the negative effects of the C-factor.
56
It is usually advantageous to use a diamond stone for preparing the tooth
for a composite restoration. This results in a roughened prepared surface, which
increases the surface area for bonding. Retention and marginal seal also are
improved by beveling some enamel margins. Bevelling increases favourable
end-on etching of enamel prisms and increases the surface area for bonding.
2. Beveled conventional:
These preparations are similar to conventional preparations in that the
outline form has external box-like walls with some beveled enamel margins.
Typically – indicated – when a composite restoration is being used to replace an
existing restoration using amalgam or to restore a large area. This design is most
typical for classes III, IV and V restorations. Usually all of the old material is
removed, not only to enamel but also to dentin. Sometimes, the old restorative
material may be only partially removed if the remaining material is judged
acceptable (radio graphically negative for caries, with symptomless tooth pulp).
However, leaving old amalgam material may result in a poor esthetic result
because it may show through the overlying composite material. To facilitate
better marginal sealing and bonding, some accessible enamel margins may be
beveled and then acid-etched.
57
The advantage of an enamel bevel for a composite tooth preparation is that
the ends of the enamel rods (exposed by beveling) are more effectively etched
than otherwise occurs when only the sides of the enamel rods are exposed to the
acid etchant. Also, the increase in etched surface area results in a stronger
enamel-to-resin bond, which increases retention of the restoration and reduces
marginal leakage and margin discolouration. Furthermore, incorporation of a
cavosurface bevel may enable the restoration to blend more esthetically with the
coloration of the surrounding tooth structure.
Even recognizing these advantages, bevels are not usually placed on the
occlusal surfaces of posterior teeth or other areas of potential heavy contact
because a conventional preparation design already produces end-on etching of
the enamel rods by virtue of the enamel rod direction on occlusal surfaces.
Bevels are not placed on proximal margins if such beveling results in excessive
extension of the cavo surface margins. Therefore, the beveled conventional
preparation is rarely used for posterior composite restorations.
58
MODIFIED: Modified tooth preparations for composite restorations have
neither specified wall configurations nor specified pulpal or axial depths;
preferably, they have enamel margins.
Unlike conventional preparations, modified preparations are not prepared to a
uniform dentinal depth. Both the extension of the margins and the depth of a
modified tooth preparation are dictated solely by the extent (laterally) and the
depth of the carious lesion or other defects.
The objectives of this preparation design are to remove the fault as
conservatively as possible and rely on the composite bond to tooth structure to
retain the restoration in the tooth.
Modified tooth preparations conserve more tooth structure because retention is
obtained primarily by micromechanical adhesion to the surrounding enamel and
59
underlying dentin, rather than by preparation of retention grooves or coves in
dentin.
Round burs or diamond stones may be used to prepare this type of
preparation, resulting in a marginal design similar to a beveled preparation;
however, less tooth structure is removed in the internal portions of the
preparation. Often, the preparation appears to have been “scooped out” rather
than having the distinct internal line angle characteristic of a conventional
preparation design.
Modified preparations are primarily indicated for the initial restoration of
smaller, cavitated, carious lesions usually surrounded by enamel and for
correcting enamel defects. However, they can be successful for larger
restorations as well. For the restoration of large carious lesions, wider bevels or
flares and retention grooves, caves, or locks may be indicated in addition to the
retention afforded by the adhesive procedure.
BOX-ONLY: Another modified design is the box-only tooth preparation. This
design is indicted when only the proximal surface is faulty, with no lesions
present on the occlusal surface. A proximal box is prepared with either an
inverted cone or round diamond stone held parallel to the long axis of the tooth
crown. The diamond is extended through the marginal ridge in a gingival
direction; the initial proximal axial depth is prepared 0.2mm inside the
dentinoenamel junction (DEJ). The form of the box is dependent on which
diamond is used – more box like with the inverted diamond, more scooped with
the round diamond. The facial, lingual and gingival extensions are dictated by
the fault or caries. Caries excavation in a pulpal direction is done with a round
bur or spoon excavator. Neither beveling nor secondary retention is usually
indicated.
60
FACIAL / LINGUAL SLOT: A third modified design for restoring proximal
lesions on posterior teeth is the facial or lingual slot preparation. In this case, a
lesion is detected on the proximal surface but the operator believes that access to
the lesion can be obtained from either a facial or lingual direction, rather than
through the marginal ridge from an occlusal direction.
Usually a small round diamond stone is used to gain access to the lesion.
The diamond is oriented at the correct occlusogingival height and the height and
the entry is made with the diamond as close to the adjacent tooth as possible,
thus preserving as much of the facial or lingual surface as possible. The
61
preparation is extended occlusogingivally and faciolingually enough to remove
the lesion.
The initial axial depth is 0.2mm inside the DEJ. The occlusal, facial and
gingival cavosurface margins are 90 degrees or greater. Caries excavation in a
pulpal direction is done with a round bur or spoon excavator. This preparation is
similar to a class III preparation for an anterior tooth.
62
RESTORATIVE TECHNIQUE FOR COMPOSITE
RESTORATIONS
Once the tooth preparation has been completed, the prepared tooth
structure is readied for composite insertion and finishing. Treating the prepared
tooth for bonding requires etching and then application of an adhesive if only
enamel is prepared, or a primer and adhesive if the composite will be bonded to
the dentin as well as the enamel. Bonding systems are available in various
forms, depending on the manufacturer. Components of one system usually are
not interchangeable with another system. Following the manufacturer’s
directions is imperative for success. Likewise, effecting the bond in an
acceptable clinical environment, free from moisture contamination, is a
requirement whether to place a matrix depends on the part of the tooth being
restored, with most proximal surface restorations requiring a matrix. Whether to
place a matrix before or after placement of the etchant, primer and adhesive is
dependent on factors presented in a subsequent section. Several options also are
available for composite insertion into the tooth preparation including injection of
the composite or hand placement with an instrument. After insertion and
carving of the material, the restoration is contoured and polished.
Preliminary steps for Enamel and Dentin Bonding:
The acid-etch technique requires proper isolation from fluids by using
either a rubber dam or cotton rolls and/or retraction cord.
Etching enamel affects both the prism core and prism periphery. Etching
enamel affects the intertubular and peritubular dentin resulting in enlarging the
tubular openings, removing much of the surface hydroxyapatite and leaving an
interconnected network of collagen fibrils. Both liquid and gel etchants are
available, most in concentration of 32% to 37% phosphoric acid (gel is
preferred). An etching time of 15 seconds for both dentin and enamel is
63
considered sufficient. For enamel preparation only, 30 seconds is considered
optional.
The area is then rinsed with water for 5 seconds, starting on the adjacent
tooth to prevent possible splashing of acid-rich water onto the patient, dentist or
assistant.
The area should be dried with clean, dry air from the air-water syringe if
only enamel has been etched. Dried etched enamel should exhibit a ground glass
or lightly frosted appearance.
If both enamel and dentin have been etched, then the area must be left
slightly moistened. This allows the primer and adhesive materials to more
effectively penetrate the collagen fibrils to form a hybrid layer, which is the
basis for the micromechanical bond to dentin.
Overdrying etched dentin surfaces compromises dentin bonding as a result
of the collapse of the collagen network in the etched dentin layer. This collapse
prevents optimal primer and adhesive penetration and comprises hybrid layer
formation.
Matrix Placement:
A matrix is a device that may be applied to a prepared tooth before the insertion
of the composite material.
It fits around part or all of the tooth being restored and functions primarily to
confine the restorative material on axial surfaces (usually proximal) while
assisting in the development of the appropriate axial contour.
When a condensable (packable) restorative material is used, the matrix must be
rigid enough to resist deformation from insertion forces. Otherwise, the matrix
may be more flexible, especially for anterior restorations.
64
The matrix should provide the appropriate proximal contact and contour and
prevent major excess of the restorative material beyond the preparation margins
on the proximal surface, especially the gingival margin.
It should be relatively easy to apply and remove. The matrix band may need to
be altered (burnished) to have appropriate contour for the designed shape of the
restoration. It should extend just above (occlusal to) the marginal ridge and
below (gingival to) the gingival margin.
It is held in place by a gingival wedge and in some instances, also by a matrix
retainer whether or not a matrix retainer is used, the wedge is placed into the
gingival embrasure and is positioned (wedged) between the two adjacent teeth,
below the prepared gingival margin, and exterior to (outside) the matrix
material.
The wedge functions to:
(1) Separate the teeth [which helps to compensate for the thickness of the
matrix material, as it relates to establishing a proximal contact).
(2) Hold the matrix in place, and
(3) Prevent or reduce any excess of restorative material at the gingival margin.
Usually, a Tofflemine matrix system is used for most class II restorations
in posterior teeth, and a polyester strip is used for class III and IV restorations in
anterior teeth.
Likewise, there are different types of wedges. Triangular wooden wedges
may be needed for tooth preparations with deeply extended gingival margins.
However, the terminal half-inch of a round tooth pick is the typical wedge
selected for most uses.
65
The placement of etchant, primer and adhesive may or may not precede the
application of a matrix. The exact sequence for applying the enamel / dentin
etchant, primer, bonding adhesive and matrix is dependent on the operator.
Some operators prefer matrix application first, followed by enamel/dentin
etchant, primer, bonding adhesive and finally composite. This sequence may
provide the best isolation of the tooth preparation for maximum enamel and
dentin adhesion. It also allows an assessment of any enamel fracture (upon
insertion of the proximal wedge) before bonding to that area. If the matrix is
applied first, care must be taken to avoid pooling of the bonding materials,
especially the adhesive, along the junction of the matrix with the gingival
margin. Placing the matrix first in the sequence is especially beneficial when the
tooth preparation is deep gingivally.
Other operators prefer to complete all enamel and dentin etching, primary
and adhesive application before matrix placement. The primary reasons for this
sequence are to minimize pooling potential and maximize the etching, priming
and adhesive placement at the cavosurface margins. Either sequence may be
used as long as meticulous technique is followed.
Inserting the composite:
The composite restoration usually is placed in two stages. First, a bonding
adhesive is applied (if not already placed during enamel and dentin etching and
priming procedures). Second, the composite restorative material inserted. With
newer bonding systems the adhesive may be combined with another component
of the system, usually the primer. Therefore, as always, etching and priming the
prepared tooth structure and placing the bonding adhesive should be done
according to the manufacturer’s directions. As noted earlier, two types of
composites exist – self-cured and light curved. Self-cured composites are not
used extensively because light-cured composites provide additional benefits such
as less discoloration, less porosity, easy placement, and less required finishing.
66
Because a light source must be applied to the light-curved composite to cause
polymerization, it is important that the material be inserted into the tooth
preparation in 1 to 2mm thicknesses. This allows the light to properly
polymerize the composite and may reduce the effect of polymerization
shrinkage, especially along the gingival floor. Either a hand instrument or
syringe can be used for inserting self-cured or light-cured composite. The use of
a hand instrument is a popular method for placing composites because it is easy
and fast. In addition to the simplicity of hand instrument insertion, a smaller
amount of composite material is required compared to the amount needed for the
syringe method. A disadvantage of hand instrument insertion is that air can be
trapped in the tooth preparation or incorporated into the material during the
insertion procedure. Experience and care in insertion minimizes this problem.
The syringe technique is popular because it provides a convenient means
for transporting the composite to the preparation and reduces the possibility of
trapping air. Many manufacturers provide pre-loaded syringe compules with a
light-cured composite. The tips of the light-cured compules have covers that
should be replaced when not using the material to keep it from being
polymerized inadvertently by ambient light. The syringe technique can present a
problem in small preparations with limited access because the syringe tip may be
too large. When the preparation opening is questionable, an empty syringe tip
should first be tried in the tooth preparation.
Starting in the most remote area of an anterior tooth preparation, the
composite is steadily injected, ensuring that the tip remains in the material while
slowly withdrawing the syringe. If the area is large, the light-cured composite is
placed in 1 to 2mm thicknesses, with each increment being cured per
manufacturer’s instructions. Usually a hand instrument is used to adapt the
composite to the preparation after each syringe injection of material. When
cutting, the light tip is kept as close to the material as possible. The preparation
is filled to slight excess so that positive pressure can be applied by the matrix
67
strip. Before the matrix strip is closed, any gross excess is removed with a hand
instrument. The matrix strip is then closed and secured and the composite cured.
For Class II restorations it is also important to place and cure the
composite incrementally to reduce the effects of polymerization shrinkage,
especially along the gingival floor. For this reason, the first small increment
should be placed along the gingival floor and should extend slightly up the facial
and lingual walls.
This increment should only be approximately 1 to 2mm in thickness
because it is the farthest increment from the curing light and is most critical in
establishing a proper gingival seal. After the first increment is cured, subsequent
additions are made and cured (usually not exceeding 2mm in thickness at a time)
until the preparation is filled to slight excess. The restoration can be contoured
and finished immediately after the last increment is cured.
Following insertion and polymerization of the composite material, the
matrix and wedges are removed, the restoration cured again from different
angles (if light cured) and the restoration is examined for voids or lack of
proximal contacts. If correction is needed, it should be accomplished at this
time, because any additions will bond satisfactorily to the uncontaminated,
oxygen-inhibited surface layer of the composite material.
Contouring the composite:
Contouring can be initiated immediately after a light-cured composite
material has been polymerized or 3 minutes after the initial hardening of a self-
cured material.
Coarse diamond instruments can be used for removing gross excess but
are not generally recommended for finishing composites because of the high risk
68
of inadvertently damaging adjacent tooth structure. They leave a rough surface
on the restoration and tooth, as compared to finishing burs and discs.
However, special fine-diamond finishing instruments are available
commercially, and can be used to obtain excellent results.
Polishing the composite:
Polishing the contoured composite restoration is done with very fine
polishing discs, fine rubber points or cups, and/or composite polishing pastes.
DIRECT CLASS III COMPOSITE RESTORATIONS:
INITIAL CLINICAL PROCEDURES:-
Procedures necessary before beginning the restoration:
(1) Anesthesia may be necessary for patient comfort and if used, will help
decrease the salivary flow during the procedure.
(2) Occlusal assessments should be made to help in properly adjusting the
restoration’s function and in determining the tooth preparation design.
(3) The shade must be selected before the tooth dehydrates and
experiences concomitant lightening.
(4) The area must be isolated to permit effective bonding.
(5) If the restoration will be large (including all of the proximal contact),
prewedging the area will assist in the reestablishment of the proximal
contact with composite.
TOOTH PREPARATION
Class III tooth preparations, by definition, are located on the proximal
surfaces of anterior teeth.
69
When a proximal surface of anterior tooth is to be restored and there is a
choice between facial or lingual entry into the tooth, the lingual approach is
preferable.
The advantages of restoring the proximal lesion from the lingual approach
include:
1. The facial enamel is conserved for enhanced esthetics.
2. Some unsupported, but not friable, enamel may be left on the facial wall
of a class III or class IV preparation.
3. Colour matching of the composite is not as critical.
4. Discolouration or deterioration of the restoration is less visible.
The indications for a facial approach include:
1. The carious lesion is positioned facially such that facial access would
significantly conserve tooth structure.
2. The teeth are irregularly aligned, making lingual access undesirable.
3. Extensive caries extend on to the facial surface.
4. A faulty restoration that was originally placed from facial approach
need to be replaced.
When both the facial and lingual surfaces are involved, use the approach
that provides the best access for instrumentation.
It is expeditious to prepare and restore approximating carious lesions or
faculty restorations on adjacent teeth at the same appointment. Usually
one of the preparations will be longer (more extended out line forum)
than the other. When the larger outline form is developed first, the
second preparation usually can be conservative because of the improved
access provided by the larger preparation. The reverse order would be
followed when the restorative material is inserted.
CONVENTIONAL CLASS III TOOTH PREPARATION:-
The primary indication for this type of class III preparation is for restoration of
root surfaces that has no enamel margin.
70
The preparation exhibits butt joint margins. The external walls prepared
perpendicular to the root surface.
The wall depth pulpally will be approximate 0.75 mm into dentin, provided no
additional caries excavation is required.
The general shape is triangular with rounded corners.
A continuous retention groove can be prepared in the external walls to maximize
retention.
71
BEVELLED CONVENTIONAL CLASS III TOOTH PREPARATION:-
It is indicated primarily for replacing an existing defective restoration in
the crown portion of the tooth.
However, it also may be used when restoring a large carious lesion for which the
need for increased retention and / or resistance form is anticipated.
The beveled conventional preparation is characterized by external walls that are
perpendicular to the enamel surface, with the enamel margin beveled. Retention
is obtained by bonding to Enamel & Dentin.
For large restorations the retention form should be enhanced by placing a groove
at gingival and / or incisal areas.
Axial depth is 0.2 mm inside DEJ.
If retention groove is to be placed the depth is 0,5mm into dentin at retention
location.
If part of the tooth to be restored is located on the root surface – the preparation
will be a combination of the two preparation designs – a conventional type in the
root portion and a beveled conventional type in crown portion. For moderate or
large class III beveled conventional preparation – bevels are not recommended
on the lingual surface margins that are in areas of centric contact or subjected to
heavy masticator forces because composite has less wear resistance than enamel
for withstanding heavy attritional forces.
72
MODIFIED CLASS III TOOTH PREPARATION:-
This is the most used type of class III tooth preparation for small or
moderate lesions or faults and is designed to be as conservative as possible. The
preparation design is dictated by the extent of the fault or defect and is prepared
from a lingual approach when possible, with an appropriate size round bur or
diamond instrument. No effort is made to produce preparation walls that have
specific shapes or forms other than external angles of 90 degrees or greater. The
extension axially also is dictated by the extent of the fault or carious lesion and
usually will not be uniform in depth.
Weakened, friable enamel is removed while preparing the cavosurface margins
in a beveled or flared configuration with the round diamond. Usually no groove
(or cove) retention form is indicated because the retention of the material in the
tooth will result from the bond created between the composite material and the
etched peripheral enamel. Thus, the preparation design appears to be “scooped
or concave”.
Most initial composite restorations utilize the modified preparation design,
because a carious lesion that requires a restoration usually extends into dentin,
many modified preparations will be prepared to an initial axial wall depth of
0.2mm into dentin. However, no attempt is made to prepare distinct or uniform
axial preparation walls, but rather, the objective is to include only the infected
carious area as conservatively as possible by “scooping” out the defective tooth
structure. Additional caries excavation (deeper than the initial stage of 0.2mm
pulpal of the DEJ) or marginal refinement may be necessary later.
Begin the preparation from a lingual approach (it possible) by making
using a round carbide bur (No.1/2, 1, or 2) or diamond instrument, the size
depending on the extent of the lesion. Before contacting the tooth, the bar is
positioned for entry and rotated at high speed using air-water spray.
The assistant directs air on the mirror surface and position the evacuator
tip near the operating site.
73
Dental Composites/ endodontics courses

More Related Content

What's hot

Restoration of endodontically treated teeth
Restoration of endodontically treated teethRestoration of endodontically treated teeth
Restoration of endodontically treated teethNivedha Tina
 
Impression techniques in fpd
Impression techniques in fpdImpression techniques in fpd
Impression techniques in fpdApurva Thampi
 
Bonding to enamel and dentin
Bonding to enamel and dentinBonding to enamel and dentin
Bonding to enamel and dentinNivedha Tina
 
Kennedy’s Classification in Cast Partial Denture
Kennedy’s Classification in Cast Partial DentureKennedy’s Classification in Cast Partial Denture
Kennedy’s Classification in Cast Partial DentureAamir Godil
 
Interim and Temporary restorations
Interim and Temporary restorationsInterim and Temporary restorations
Interim and Temporary restorationsParikshit Harnoor
 
1. fixed partial denture finals1
1. fixed partial denture finals11. fixed partial denture finals1
1. fixed partial denture finals1Emjei Mendoza
 
Impression Techniques in Fixed partial denture
Impression Techniques in Fixed partial dentureImpression Techniques in Fixed partial denture
Impression Techniques in Fixed partial dentureDr.Richa Sahai
 
OCCLUSION IN COMPLETE DENTURES
OCCLUSION IN COMPLETE DENTURESOCCLUSION IN COMPLETE DENTURES
OCCLUSION IN COMPLETE DENTURESpranav verma
 
Diagnosis & Treatment Planning in FPD
Diagnosis & Treatment Planning in FPDDiagnosis & Treatment Planning in FPD
Diagnosis & Treatment Planning in FPDDr. Anshul Sahu
 
Advances in glass ionomer cement
Advances in glass ionomer cementAdvances in glass ionomer cement
Advances in glass ionomer cementShashank Trivedi
 
DENTIN BONDING AGENTS
DENTIN BONDING AGENTSDENTIN BONDING AGENTS
DENTIN BONDING AGENTSTaduri Vivek
 
Introduction to fixed partial denture
Introduction to fixed partial dentureIntroduction to fixed partial denture
Introduction to fixed partial denturejinishnath
 
Occlusion in conservative dentistry
Occlusion in conservative dentistryOcclusion in conservative dentistry
Occlusion in conservative dentistryboris saha
 
Esthetics in complete denture
Esthetics in complete dentureEsthetics in complete denture
Esthetics in complete denturePriya Gupta
 

What's hot (20)

Restoration of endodontically treated teeth
Restoration of endodontically treated teethRestoration of endodontically treated teeth
Restoration of endodontically treated teeth
 
Impression techniques in fpd
Impression techniques in fpdImpression techniques in fpd
Impression techniques in fpd
 
Root Caries
Root CariesRoot Caries
Root Caries
 
Bonding to enamel and dentin
Bonding to enamel and dentinBonding to enamel and dentin
Bonding to enamel and dentin
 
Kennedy’s Classification in Cast Partial Denture
Kennedy’s Classification in Cast Partial DentureKennedy’s Classification in Cast Partial Denture
Kennedy’s Classification in Cast Partial Denture
 
Impression errors presentation
Impression errors presentation Impression errors presentation
Impression errors presentation
 
Interim and Temporary restorations
Interim and Temporary restorationsInterim and Temporary restorations
Interim and Temporary restorations
 
Bleaching
BleachingBleaching
Bleaching
 
1. fixed partial denture finals1
1. fixed partial denture finals11. fixed partial denture finals1
1. fixed partial denture finals1
 
Impression Techniques in Fixed partial denture
Impression Techniques in Fixed partial dentureImpression Techniques in Fixed partial denture
Impression Techniques in Fixed partial denture
 
OCCLUSION IN COMPLETE DENTURES
OCCLUSION IN COMPLETE DENTURESOCCLUSION IN COMPLETE DENTURES
OCCLUSION IN COMPLETE DENTURES
 
indirect restorations
indirect restorationsindirect restorations
indirect restorations
 
Shade selection
Shade selectionShade selection
Shade selection
 
Diagnosis & Treatment Planning in FPD
Diagnosis & Treatment Planning in FPDDiagnosis & Treatment Planning in FPD
Diagnosis & Treatment Planning in FPD
 
Advances in glass ionomer cement
Advances in glass ionomer cementAdvances in glass ionomer cement
Advances in glass ionomer cement
 
DENTIN BONDING AGENTS
DENTIN BONDING AGENTSDENTIN BONDING AGENTS
DENTIN BONDING AGENTS
 
Introduction to fixed partial denture
Introduction to fixed partial dentureIntroduction to fixed partial denture
Introduction to fixed partial denture
 
Inlay
InlayInlay
Inlay
 
Occlusion in conservative dentistry
Occlusion in conservative dentistryOcclusion in conservative dentistry
Occlusion in conservative dentistry
 
Esthetics in complete denture
Esthetics in complete dentureEsthetics in complete denture
Esthetics in complete denture
 

Similar to Dental Composites/ endodontics courses

Composites in dentistry /certified fixed orthodontic courses by Indian denta...
Composites in dentistry  /certified fixed orthodontic courses by Indian denta...Composites in dentistry  /certified fixed orthodontic courses by Indian denta...
Composites in dentistry /certified fixed orthodontic courses by Indian denta...Indian dental academy
 
Composite resins1/ rotary endodontic courses by indian dental academy
Composite resins1/ rotary endodontic courses by indian dental academyComposite resins1/ rotary endodontic courses by indian dental academy
Composite resins1/ rotary endodontic courses by indian dental academyIndian dental academy
 
اوبرتــــف
اوبرتــــفاوبرتــــف
اوبرتــــفAya Almtwaly
 
Recent advances in composite dentistry
Recent advances in composite dentistryRecent advances in composite dentistry
Recent advances in composite dentistryYogha Padhma Asokan
 
RECENT ADVANCES AND DEVELOPMENTS IN COMPOSITE DENTAL RESTORATIVE [Autosaved]....
RECENT ADVANCES AND DEVELOPMENTS IN COMPOSITE DENTAL RESTORATIVE [Autosaved]....RECENT ADVANCES AND DEVELOPMENTS IN COMPOSITE DENTAL RESTORATIVE [Autosaved]....
RECENT ADVANCES AND DEVELOPMENTS IN COMPOSITE DENTAL RESTORATIVE [Autosaved]....nupur239418
 
Composites /certified fixed orthodontic courses by Indian dental academy
Composites  /certified fixed orthodontic courses by Indian dental academy Composites  /certified fixed orthodontic courses by Indian dental academy
Composites /certified fixed orthodontic courses by Indian dental academy Indian dental academy
 
Composite Resin Materials
Composite Resin MaterialsComposite Resin Materials
Composite Resin Materialsssuseraf61fb
 
Waste Management Of Polymer and Its Application
Waste Management Of Polymer and Its ApplicationWaste Management Of Polymer and Its Application
Waste Management Of Polymer and Its ApplicationHaasyimah Ab Rahim
 
J. class iii,iv, & v direct composite
J. class iii,iv, & v direct compositeJ. class iii,iv, & v direct composite
J. class iii,iv, & v direct compositeEmjei Mendoza
 
Resin based composites(Recent Advances)
Resin based composites(Recent Advances)Resin based composites(Recent Advances)
Resin based composites(Recent Advances)Taduri Vivek
 
class iv direct composite
class iv direct compositeclass iv direct composite
class iv direct compositeddert
 
Tooth Color Restorations (Composite) 2018-2019
Tooth Color Restorations (Composite) 2018-2019Tooth Color Restorations (Composite) 2018-2019
Tooth Color Restorations (Composite) 2018-2019Amir Hamde
 

Similar to Dental Composites/ endodontics courses (20)

Adhesives (2)
Adhesives (2)Adhesives (2)
Adhesives (2)
 
update of orthodontic adhesives
update of orthodontic adhesivesupdate of orthodontic adhesives
update of orthodontic adhesives
 
Composites in dentistry /certified fixed orthodontic courses by Indian denta...
Composites in dentistry  /certified fixed orthodontic courses by Indian denta...Composites in dentistry  /certified fixed orthodontic courses by Indian denta...
Composites in dentistry /certified fixed orthodontic courses by Indian denta...
 
Composite resins1/ rotary endodontic courses by indian dental academy
Composite resins1/ rotary endodontic courses by indian dental academyComposite resins1/ rotary endodontic courses by indian dental academy
Composite resins1/ rotary endodontic courses by indian dental academy
 
Composite
CompositeComposite
Composite
 
Composite and bonding
Composite and bondingComposite and bonding
Composite and bonding
 
Pre_presentation.pptx
Pre_presentation.pptxPre_presentation.pptx
Pre_presentation.pptx
 
اوبرتــــف
اوبرتــــفاوبرتــــف
اوبرتــــف
 
Composite resins part ii
Composite resins   part iiComposite resins   part ii
Composite resins part ii
 
Recent advances in composite dentistry
Recent advances in composite dentistryRecent advances in composite dentistry
Recent advances in composite dentistry
 
RECENT ADVANCES AND DEVELOPMENTS IN COMPOSITE DENTAL RESTORATIVE [Autosaved]....
RECENT ADVANCES AND DEVELOPMENTS IN COMPOSITE DENTAL RESTORATIVE [Autosaved]....RECENT ADVANCES AND DEVELOPMENTS IN COMPOSITE DENTAL RESTORATIVE [Autosaved]....
RECENT ADVANCES AND DEVELOPMENTS IN COMPOSITE DENTAL RESTORATIVE [Autosaved]....
 
Composites/ prosthodontic courses
Composites/ prosthodontic coursesComposites/ prosthodontic courses
Composites/ prosthodontic courses
 
Composites /certified fixed orthodontic courses by Indian dental academy
Composites  /certified fixed orthodontic courses by Indian dental academy Composites  /certified fixed orthodontic courses by Indian dental academy
Composites /certified fixed orthodontic courses by Indian dental academy
 
Composite Resin Materials
Composite Resin MaterialsComposite Resin Materials
Composite Resin Materials
 
Waste Management Of Polymer and Its Application
Waste Management Of Polymer and Its ApplicationWaste Management Of Polymer and Its Application
Waste Management Of Polymer and Its Application
 
Composite resins
Composite resinsComposite resins
Composite resins
 
J. class iii,iv, & v direct composite
J. class iii,iv, & v direct compositeJ. class iii,iv, & v direct composite
J. class iii,iv, & v direct composite
 
Resin based composites(Recent Advances)
Resin based composites(Recent Advances)Resin based composites(Recent Advances)
Resin based composites(Recent Advances)
 
class iv direct composite
class iv direct compositeclass iv direct composite
class iv direct composite
 
Tooth Color Restorations (Composite) 2018-2019
Tooth Color Restorations (Composite) 2018-2019Tooth Color Restorations (Composite) 2018-2019
Tooth Color Restorations (Composite) 2018-2019
 

More from Indian dental academy

Indian Dentist - relocate to united kingdom
Indian Dentist - relocate to united kingdomIndian Dentist - relocate to united kingdom
Indian Dentist - relocate to united kingdomIndian dental academy
 
1ST, 2ND AND 3RD ORDER BENDS IN STANDARD EDGEWISE APPLIANCE SYSTEM /Fixed ort...
1ST, 2ND AND 3RD ORDER BENDS IN STANDARD EDGEWISE APPLIANCE SYSTEM /Fixed ort...1ST, 2ND AND 3RD ORDER BENDS IN STANDARD EDGEWISE APPLIANCE SYSTEM /Fixed ort...
1ST, 2ND AND 3RD ORDER BENDS IN STANDARD EDGEWISE APPLIANCE SYSTEM /Fixed ort...Indian dental academy
 
Invisalign -invisible aligners course in india
Invisalign -invisible aligners course in india Invisalign -invisible aligners course in india
Invisalign -invisible aligners course in india Indian dental academy
 
Invisible aligners for your orthodontics pratice
Invisible aligners for your orthodontics praticeInvisible aligners for your orthodontics pratice
Invisible aligners for your orthodontics praticeIndian dental academy
 
Development of muscles of mastication / dental implant courses
Development of muscles of mastication / dental implant coursesDevelopment of muscles of mastication / dental implant courses
Development of muscles of mastication / dental implant coursesIndian dental academy
 
Corticosteriods uses in dentistry/ oral surgery courses  
Corticosteriods uses in dentistry/ oral surgery courses  Corticosteriods uses in dentistry/ oral surgery courses  
Corticosteriods uses in dentistry/ oral surgery courses  Indian dental academy
 
Cytotoxicity of silicone materials used in maxillofacial prosthesis / dental ...
Cytotoxicity of silicone materials used in maxillofacial prosthesis / dental ...Cytotoxicity of silicone materials used in maxillofacial prosthesis / dental ...
Cytotoxicity of silicone materials used in maxillofacial prosthesis / dental ...Indian dental academy
 
Diagnosis and treatment planning in completely endntulous arches/dental courses
Diagnosis and treatment planning in completely endntulous arches/dental coursesDiagnosis and treatment planning in completely endntulous arches/dental courses
Diagnosis and treatment planning in completely endntulous arches/dental coursesIndian dental academy
 
Properties of Denture base materials /rotary endodontic courses
Properties of Denture base materials /rotary endodontic coursesProperties of Denture base materials /rotary endodontic courses
Properties of Denture base materials /rotary endodontic coursesIndian dental academy
 
Use of modified tooth forms in complete denture occlusion / dental implant...
Use of modified  tooth forms  in  complete denture occlusion / dental implant...Use of modified  tooth forms  in  complete denture occlusion / dental implant...
Use of modified tooth forms in complete denture occlusion / dental implant...Indian dental academy
 
Dental luting cements / oral surgery courses  
Dental   luting cements / oral surgery courses  Dental   luting cements / oral surgery courses  
Dental luting cements / oral surgery courses  Indian dental academy
 
Dental casting alloys/ oral surgery courses  
Dental casting alloys/ oral surgery courses  Dental casting alloys/ oral surgery courses  
Dental casting alloys/ oral surgery courses  Indian dental academy
 
Dental casting investment materials/endodontic courses
Dental casting investment materials/endodontic coursesDental casting investment materials/endodontic courses
Dental casting investment materials/endodontic coursesIndian dental academy
 
Dental casting waxes/ oral surgery courses  
Dental casting waxes/ oral surgery courses  Dental casting waxes/ oral surgery courses  
Dental casting waxes/ oral surgery courses  Indian dental academy
 
Dental ceramics/prosthodontic courses
Dental ceramics/prosthodontic coursesDental ceramics/prosthodontic courses
Dental ceramics/prosthodontic coursesIndian dental academy
 
Dental implant/ oral surgery courses  
Dental implant/ oral surgery courses  Dental implant/ oral surgery courses  
Dental implant/ oral surgery courses  Indian dental academy
 
Dental perspective/cosmetic dentistry courses
Dental perspective/cosmetic dentistry coursesDental perspective/cosmetic dentistry courses
Dental perspective/cosmetic dentistry coursesIndian dental academy
 
Dental tissues and their replacements/ oral surgery courses  
Dental tissues and their replacements/ oral surgery courses  Dental tissues and their replacements/ oral surgery courses  
Dental tissues and their replacements/ oral surgery courses  Indian dental academy
 

More from Indian dental academy (20)

Indian Dentist - relocate to united kingdom
Indian Dentist - relocate to united kingdomIndian Dentist - relocate to united kingdom
Indian Dentist - relocate to united kingdom
 
1ST, 2ND AND 3RD ORDER BENDS IN STANDARD EDGEWISE APPLIANCE SYSTEM /Fixed ort...
1ST, 2ND AND 3RD ORDER BENDS IN STANDARD EDGEWISE APPLIANCE SYSTEM /Fixed ort...1ST, 2ND AND 3RD ORDER BENDS IN STANDARD EDGEWISE APPLIANCE SYSTEM /Fixed ort...
1ST, 2ND AND 3RD ORDER BENDS IN STANDARD EDGEWISE APPLIANCE SYSTEM /Fixed ort...
 
Invisalign -invisible aligners course in india
Invisalign -invisible aligners course in india Invisalign -invisible aligners course in india
Invisalign -invisible aligners course in india
 
Invisible aligners for your orthodontics pratice
Invisible aligners for your orthodontics praticeInvisible aligners for your orthodontics pratice
Invisible aligners for your orthodontics pratice
 
online fixed orthodontics course
online fixed orthodontics courseonline fixed orthodontics course
online fixed orthodontics course
 
online orthodontics course
online orthodontics courseonline orthodontics course
online orthodontics course
 
Development of muscles of mastication / dental implant courses
Development of muscles of mastication / dental implant coursesDevelopment of muscles of mastication / dental implant courses
Development of muscles of mastication / dental implant courses
 
Corticosteriods uses in dentistry/ oral surgery courses  
Corticosteriods uses in dentistry/ oral surgery courses  Corticosteriods uses in dentistry/ oral surgery courses  
Corticosteriods uses in dentistry/ oral surgery courses  
 
Cytotoxicity of silicone materials used in maxillofacial prosthesis / dental ...
Cytotoxicity of silicone materials used in maxillofacial prosthesis / dental ...Cytotoxicity of silicone materials used in maxillofacial prosthesis / dental ...
Cytotoxicity of silicone materials used in maxillofacial prosthesis / dental ...
 
Diagnosis and treatment planning in completely endntulous arches/dental courses
Diagnosis and treatment planning in completely endntulous arches/dental coursesDiagnosis and treatment planning in completely endntulous arches/dental courses
Diagnosis and treatment planning in completely endntulous arches/dental courses
 
Properties of Denture base materials /rotary endodontic courses
Properties of Denture base materials /rotary endodontic coursesProperties of Denture base materials /rotary endodontic courses
Properties of Denture base materials /rotary endodontic courses
 
Use of modified tooth forms in complete denture occlusion / dental implant...
Use of modified  tooth forms  in  complete denture occlusion / dental implant...Use of modified  tooth forms  in  complete denture occlusion / dental implant...
Use of modified tooth forms in complete denture occlusion / dental implant...
 
Dental luting cements / oral surgery courses  
Dental   luting cements / oral surgery courses  Dental   luting cements / oral surgery courses  
Dental luting cements / oral surgery courses  
 
Dental casting alloys/ oral surgery courses  
Dental casting alloys/ oral surgery courses  Dental casting alloys/ oral surgery courses  
Dental casting alloys/ oral surgery courses  
 
Dental casting investment materials/endodontic courses
Dental casting investment materials/endodontic coursesDental casting investment materials/endodontic courses
Dental casting investment materials/endodontic courses
 
Dental casting waxes/ oral surgery courses  
Dental casting waxes/ oral surgery courses  Dental casting waxes/ oral surgery courses  
Dental casting waxes/ oral surgery courses  
 
Dental ceramics/prosthodontic courses
Dental ceramics/prosthodontic coursesDental ceramics/prosthodontic courses
Dental ceramics/prosthodontic courses
 
Dental implant/ oral surgery courses  
Dental implant/ oral surgery courses  Dental implant/ oral surgery courses  
Dental implant/ oral surgery courses  
 
Dental perspective/cosmetic dentistry courses
Dental perspective/cosmetic dentistry coursesDental perspective/cosmetic dentistry courses
Dental perspective/cosmetic dentistry courses
 
Dental tissues and their replacements/ oral surgery courses  
Dental tissues and their replacements/ oral surgery courses  Dental tissues and their replacements/ oral surgery courses  
Dental tissues and their replacements/ oral surgery courses  
 

Recently uploaded

ICS2208 Lecture6 Notes for SL spaces.pdf
ICS2208 Lecture6 Notes for SL spaces.pdfICS2208 Lecture6 Notes for SL spaces.pdf
ICS2208 Lecture6 Notes for SL spaces.pdfVanessa Camilleri
 
Mythology Quiz-4th April 2024, Quiz Club NITW
Mythology Quiz-4th April 2024, Quiz Club NITWMythology Quiz-4th April 2024, Quiz Club NITW
Mythology Quiz-4th April 2024, Quiz Club NITWQuiz Club NITW
 
Narcotic and Non Narcotic Analgesic..pdf
Narcotic and Non Narcotic Analgesic..pdfNarcotic and Non Narcotic Analgesic..pdf
Narcotic and Non Narcotic Analgesic..pdfPrerana Jadhav
 
Q4-PPT-Music9_Lesson-1-Romantic-Opera.pptx
Q4-PPT-Music9_Lesson-1-Romantic-Opera.pptxQ4-PPT-Music9_Lesson-1-Romantic-Opera.pptx
Q4-PPT-Music9_Lesson-1-Romantic-Opera.pptxlancelewisportillo
 
Scientific Writing :Research Discourse
Scientific  Writing :Research  DiscourseScientific  Writing :Research  Discourse
Scientific Writing :Research DiscourseAnita GoswamiGiri
 
Mental Health Awareness - a toolkit for supporting young minds
Mental Health Awareness - a toolkit for supporting young mindsMental Health Awareness - a toolkit for supporting young minds
Mental Health Awareness - a toolkit for supporting young mindsPooky Knightsmith
 
How to Fix XML SyntaxError in Odoo the 17
How to Fix XML SyntaxError in Odoo the 17How to Fix XML SyntaxError in Odoo the 17
How to Fix XML SyntaxError in Odoo the 17Celine George
 
How to Make a Duplicate of Your Odoo 17 Database
How to Make a Duplicate of Your Odoo 17 DatabaseHow to Make a Duplicate of Your Odoo 17 Database
How to Make a Duplicate of Your Odoo 17 DatabaseCeline George
 
Blowin' in the Wind of Caste_ Bob Dylan's Song as a Catalyst for Social Justi...
Blowin' in the Wind of Caste_ Bob Dylan's Song as a Catalyst for Social Justi...Blowin' in the Wind of Caste_ Bob Dylan's Song as a Catalyst for Social Justi...
Blowin' in the Wind of Caste_ Bob Dylan's Song as a Catalyst for Social Justi...DhatriParmar
 
Grade Three -ELLNA-REVIEWER-ENGLISH.pptx
Grade Three -ELLNA-REVIEWER-ENGLISH.pptxGrade Three -ELLNA-REVIEWER-ENGLISH.pptx
Grade Three -ELLNA-REVIEWER-ENGLISH.pptxkarenfajardo43
 
4.11.24 Poverty and Inequality in America.pptx
4.11.24 Poverty and Inequality in America.pptx4.11.24 Poverty and Inequality in America.pptx
4.11.24 Poverty and Inequality in America.pptxmary850239
 
Q-Factor General Quiz-7th April 2024, Quiz Club NITW
Q-Factor General Quiz-7th April 2024, Quiz Club NITWQ-Factor General Quiz-7th April 2024, Quiz Club NITW
Q-Factor General Quiz-7th April 2024, Quiz Club NITWQuiz Club NITW
 
Active Learning Strategies (in short ALS).pdf
Active Learning Strategies (in short ALS).pdfActive Learning Strategies (in short ALS).pdf
Active Learning Strategies (in short ALS).pdfPatidar M
 
Beauty Amidst the Bytes_ Unearthing Unexpected Advantages of the Digital Wast...
Beauty Amidst the Bytes_ Unearthing Unexpected Advantages of the Digital Wast...Beauty Amidst the Bytes_ Unearthing Unexpected Advantages of the Digital Wast...
Beauty Amidst the Bytes_ Unearthing Unexpected Advantages of the Digital Wast...DhatriParmar
 
Decoding the Tweet _ Practical Criticism in the Age of Hashtag.pptx
Decoding the Tweet _ Practical Criticism in the Age of Hashtag.pptxDecoding the Tweet _ Practical Criticism in the Age of Hashtag.pptx
Decoding the Tweet _ Practical Criticism in the Age of Hashtag.pptxDhatriParmar
 
Unraveling Hypertext_ Analyzing Postmodern Elements in Literature.pptx
Unraveling Hypertext_ Analyzing  Postmodern Elements in  Literature.pptxUnraveling Hypertext_ Analyzing  Postmodern Elements in  Literature.pptx
Unraveling Hypertext_ Analyzing Postmodern Elements in Literature.pptxDhatriParmar
 
ROLES IN A STAGE PRODUCTION in arts.pptx
ROLES IN A STAGE PRODUCTION in arts.pptxROLES IN A STAGE PRODUCTION in arts.pptx
ROLES IN A STAGE PRODUCTION in arts.pptxVanesaIglesias10
 
4.16.24 21st Century Movements for Black Lives.pptx
4.16.24 21st Century Movements for Black Lives.pptx4.16.24 21st Century Movements for Black Lives.pptx
4.16.24 21st Century Movements for Black Lives.pptxmary850239
 

Recently uploaded (20)

ICS2208 Lecture6 Notes for SL spaces.pdf
ICS2208 Lecture6 Notes for SL spaces.pdfICS2208 Lecture6 Notes for SL spaces.pdf
ICS2208 Lecture6 Notes for SL spaces.pdf
 
INCLUSIVE EDUCATION PRACTICES FOR TEACHERS AND TRAINERS.pptx
INCLUSIVE EDUCATION PRACTICES FOR TEACHERS AND TRAINERS.pptxINCLUSIVE EDUCATION PRACTICES FOR TEACHERS AND TRAINERS.pptx
INCLUSIVE EDUCATION PRACTICES FOR TEACHERS AND TRAINERS.pptx
 
Mythology Quiz-4th April 2024, Quiz Club NITW
Mythology Quiz-4th April 2024, Quiz Club NITWMythology Quiz-4th April 2024, Quiz Club NITW
Mythology Quiz-4th April 2024, Quiz Club NITW
 
Narcotic and Non Narcotic Analgesic..pdf
Narcotic and Non Narcotic Analgesic..pdfNarcotic and Non Narcotic Analgesic..pdf
Narcotic and Non Narcotic Analgesic..pdf
 
Q4-PPT-Music9_Lesson-1-Romantic-Opera.pptx
Q4-PPT-Music9_Lesson-1-Romantic-Opera.pptxQ4-PPT-Music9_Lesson-1-Romantic-Opera.pptx
Q4-PPT-Music9_Lesson-1-Romantic-Opera.pptx
 
Scientific Writing :Research Discourse
Scientific  Writing :Research  DiscourseScientific  Writing :Research  Discourse
Scientific Writing :Research Discourse
 
Mental Health Awareness - a toolkit for supporting young minds
Mental Health Awareness - a toolkit for supporting young mindsMental Health Awareness - a toolkit for supporting young minds
Mental Health Awareness - a toolkit for supporting young minds
 
How to Fix XML SyntaxError in Odoo the 17
How to Fix XML SyntaxError in Odoo the 17How to Fix XML SyntaxError in Odoo the 17
How to Fix XML SyntaxError in Odoo the 17
 
How to Make a Duplicate of Your Odoo 17 Database
How to Make a Duplicate of Your Odoo 17 DatabaseHow to Make a Duplicate of Your Odoo 17 Database
How to Make a Duplicate of Your Odoo 17 Database
 
Blowin' in the Wind of Caste_ Bob Dylan's Song as a Catalyst for Social Justi...
Blowin' in the Wind of Caste_ Bob Dylan's Song as a Catalyst for Social Justi...Blowin' in the Wind of Caste_ Bob Dylan's Song as a Catalyst for Social Justi...
Blowin' in the Wind of Caste_ Bob Dylan's Song as a Catalyst for Social Justi...
 
Grade Three -ELLNA-REVIEWER-ENGLISH.pptx
Grade Three -ELLNA-REVIEWER-ENGLISH.pptxGrade Three -ELLNA-REVIEWER-ENGLISH.pptx
Grade Three -ELLNA-REVIEWER-ENGLISH.pptx
 
4.11.24 Poverty and Inequality in America.pptx
4.11.24 Poverty and Inequality in America.pptx4.11.24 Poverty and Inequality in America.pptx
4.11.24 Poverty and Inequality in America.pptx
 
Q-Factor General Quiz-7th April 2024, Quiz Club NITW
Q-Factor General Quiz-7th April 2024, Quiz Club NITWQ-Factor General Quiz-7th April 2024, Quiz Club NITW
Q-Factor General Quiz-7th April 2024, Quiz Club NITW
 
Active Learning Strategies (in short ALS).pdf
Active Learning Strategies (in short ALS).pdfActive Learning Strategies (in short ALS).pdf
Active Learning Strategies (in short ALS).pdf
 
Beauty Amidst the Bytes_ Unearthing Unexpected Advantages of the Digital Wast...
Beauty Amidst the Bytes_ Unearthing Unexpected Advantages of the Digital Wast...Beauty Amidst the Bytes_ Unearthing Unexpected Advantages of the Digital Wast...
Beauty Amidst the Bytes_ Unearthing Unexpected Advantages of the Digital Wast...
 
Paradigm shift in nursing research by RS MEHTA
Paradigm shift in nursing research by RS MEHTAParadigm shift in nursing research by RS MEHTA
Paradigm shift in nursing research by RS MEHTA
 
Decoding the Tweet _ Practical Criticism in the Age of Hashtag.pptx
Decoding the Tweet _ Practical Criticism in the Age of Hashtag.pptxDecoding the Tweet _ Practical Criticism in the Age of Hashtag.pptx
Decoding the Tweet _ Practical Criticism in the Age of Hashtag.pptx
 
Unraveling Hypertext_ Analyzing Postmodern Elements in Literature.pptx
Unraveling Hypertext_ Analyzing  Postmodern Elements in  Literature.pptxUnraveling Hypertext_ Analyzing  Postmodern Elements in  Literature.pptx
Unraveling Hypertext_ Analyzing Postmodern Elements in Literature.pptx
 
ROLES IN A STAGE PRODUCTION in arts.pptx
ROLES IN A STAGE PRODUCTION in arts.pptxROLES IN A STAGE PRODUCTION in arts.pptx
ROLES IN A STAGE PRODUCTION in arts.pptx
 
4.16.24 21st Century Movements for Black Lives.pptx
4.16.24 21st Century Movements for Black Lives.pptx4.16.24 21st Century Movements for Black Lives.pptx
4.16.24 21st Century Movements for Black Lives.pptx
 

Dental Composites/ endodontics courses

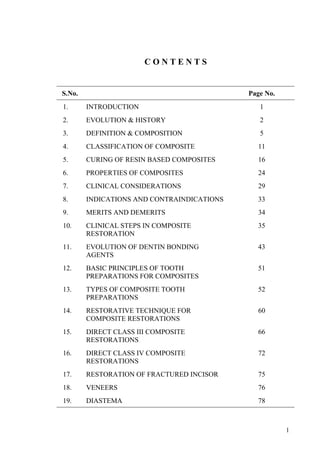
  • 1. C O N T E N T S S.No. Page No. 1. INTRODUCTION 1 2. EVOLUTION & HISTORY 2 3. DEFINITION & COMPOSITION 5 4. CLASSIFICATION OF COMPOSITE 11 5. CURING OF RESIN BASED COMPOSITES 16 6. PROPERTIES OF COMPOSITES 24 7. CLINICAL CONSIDERATIONS 29 8. INDICATIONS AND CONTRAINDICATIONS 33 9. MERITS AND DEMERITS 34 10. CLINICAL STEPS IN COMPOSITE RESTORATION 35 11. EVOLUTION OF DENTIN BONDING AGENTS 43 12. BASIC PRINCIPLES OF TOOTH PREPARATIONS FOR COMPOSITES 51 13. TYPES OF COMPOSITE TOOTH PREPARATIONS 52 14. RESTORATIVE TECHNIQUE FOR COMPOSITE RESTORATIONS 60 15. DIRECT CLASS III COMPOSITE RESTORATIONS 66 16. DIRECT CLASS IV COMPOSITE RESTORATIONS 72 17. RESTORATION OF FRACTURED INCISOR 75 18. VENEERS 76 19. DIASTEMA 78 1
  • 2. 20. CLASS V COMPOSITE RESTORATIONS 79 21. CLASS I COMPOSITE RESTORATIONS 82 22. CLASS II COMPOSITE RESTORATIONS 84 23. ACHIEVING A TIGHT CONTACT – MATRICES 90 24. CURING TECHNIQUE 92 25. INDIRECT COMPOSITE RESIN SYSTEMS 97 26. FINISHING & POLISHING 102 27. REPAIRS AND COMPOSITE RESTORATION 108 28. AMALGAM Vs. COMPOSITES 109 29. BIOCOMPATABILITY & COMPOSITES 110 30. NEW CLASSES OF RESIN COMPOSITES 112 31. CONVENTIONAL POSTERIOR COMPOSITES IN GENERAL 114 32. ADVANCES a) Packable composites b) Compomers c) Indirect composite resins d) Ceromers e) Fiber reinforced composites f) Composite inserts g) Flowable composites h) Smart composites i) Oemocers j) Giomers k) Single crystal modified composites l) Nanocomposites 137 147 155 159 161 175 176 179 181 185 193 193 33. CONCLUSION 194 2
  • 3. INTRODUCTION Of all the innovative esthetic materials available today composite restorative materials have assumed a thrust in restorative dentistry. Properly placed composite restorations provide an excellent alternative to traditional metallic posterior restorations. The search for an ideal esthetic material for restoring teeth has resulted in significant improvements in both esthetic materials and techniques for using them. Three individuals who made the most significant contributions in this aspect are: (1) MICHAEL BUONOCORE: Introduced the acid–etch technique and demonstrated the concept of bonding acrylic resin to the surface of enamel. (2) RAFAEL BOWEN: Developed composite resin matrix –BISGMA (Bis Phenol A Glycidyl Methacrylate) (3) NOBUO NAKABAYASHI: His efforts have led to the technique for bonding of resin composites to the surface of dentin. Skinner in 1959 stated, “ The esthetic quality of a restoration may be as important to the mental health of the patient as the biological and technical qualities of the restoration are to his/her physical or dental health”, thus stressing the importance of esthetics as far as forty-five years back. The research in the field of esthetic and restorative dentistry led to the achievement of the long sought dream of virtually bonding any type of material to the tooth surface. The advances in the restorative materials and bonding techniques have changed the concept of “EXTENSION FOR PREVENTION” as “RESTRICTION WITH CONVICTION” 3
  • 4. EVOLUTION AND HISTORY The disadvantages of silicate cements such as their solubility, pulp irritation potential, and desiccation led to the advent of acrylics in the early 1940’s. 1956: Dr.Raphael Bowen formulated a resin molecule – Bisphenol A Glycidyl Methacrylate – BISGMA –that was used later as a matrix and binder of inorganic filler particles for all the present day resin based composite restorative materials. 1960: Dr.Bowen added fibre filler in experimental combinations to formulate the first composite resin .The resin BISGMA was developed at the NATIONAL INSTITUTES OF HEALTH. 1962: Dr.Ray L Bowen of the ADA research unit at the National Bureau Of Standards (now National institute of Standard’s) developed new type of composite resin material. Coupling agents were patented and the first generation composites or MACROFILLED composites were introduced. These were chemically cured and indicated for Class III, IV, and V cavity preparation. 1970: Introduction of photo – cured composite resin using U- V Light. Eg: Prima –Fil Nuva – Fil. 1972: First visible light curing system (Foto –Fil) was introduced which had greater rate and depth of polymerization. They were also more resistant to wear and stable in colour. Mid 1970: The filler size was reduced to 5-8 nm, which resulted in smoother restorations then earlier ones. 1976: Micro filled composite resins were developed which were highly polishable. Colloidal silica of diameter 0.5 mm or less was used as filler. This is the SECOND GENERATION OF COMPOSITE. 4
  • 5. 1980: Microfil – resin properties were altered into a heterogeneous mix. BISGMA resin was improved by adding a patented resin UDMA.Resins for posterior use appeared. Eg: P-10: Auto – cured P-30: Light – cured. Mid 1980: Advancement in filler technology was achieved by blending conventional sized filler particles (1-5 µm) with micro fine particles – 0.04 µ resulting in HYBRID COMPOSITES. This is the THIRD GENERATION OF COMPOSITES. The filler size was reduced gradually to an average of 1 µm diameter. These were introduced by KERR Company as HERCULITE, which was intended for universal use in both anterior and posterior regions. The first generation of INDIRECT LAB PROCESSED MICROFILL COMPOSITE RESIN SYSTEM was introduced to overcome the problem of wear in posterior composite resins. But they had a low flexural strength and wear resistance. 1987:60 – 70 % increase in wear resistance by post – light heat curing was shown by Wendt. This led to the development of SECOND GENERATION OF LAB PROCESSED RESIN. These were variations of sub micron hybrid resin system with increased filler loading and increased flexural strength. 1991: Mega – filled composites with glass ceramic inserts coated with silane for restoration stiffness and increased strength in posterior composites were introduced. 1992: Introduction of FIBER – REINFORCED COMPOSITES which were composed of woven glass or polyethylene fibers that were hand impregnated in the composites for increased strength 5
  • 6. 1996: Flowable composites developed for special handling properties were introduced. Filler content in these was decreased to decrease the viscosity of mix. 1997 – 98: Packable posterior composites were introduced based on the PRIMM- POLYMER RIGID INORGANIC MATRIX MATERIAL in which the ground filler of traditional composites was replaced by inorganic phase consisting of a continuous network or scaffolding of ceramic fibers with spaces in between filled by resin. They had the advantage of reduced polymerization shrinkage and increased wear resistance. 1998: New pre impregnated fiber reinforced composites were introduced in which fibers and resinous matrix phase were coupled during manufacturing process resulting in fibers uniformly impregnated with matrix. The strength was increased seven (7) times. 1998: Introduction of COMPOMER, which combined the properties of GLASS IONOMER and COMPOSITES. Bonding is achieved by means of a primer, applied to the clean but unetched Enamel and Dentin. Filler is a reactive silicate glass (72%) containing fluorides. 1998: Introduction of Packable resin material based on ORMOCER technology _ ORGANICALLY MODIFIED CERAMICS. The matrix consists of ceramic polysiloxane instead of the traditional BisGMA, TEGDMA, etc. 1998: Introduction of ion releasing composite material; which releases Fluoride, Hydroxyl, Calcium ions in dependence on the pH value adjacent to the restorative material. This functional fluoride ions release increases with increasing pH value. 6
  • 7. DEFINITION AND COMPOSITION DEFINITION: Composite material is a compound of two or more distinctly different materials with properties that are superior to or intermediate to those of the individual constituents. ISO 4049 for polymer based filling, restorative and luting materials (ANSI / ADA No.27) describes two types and three classes of composites. COMPOSITION Dental composites are highly cross – linked polymeric materials reinforced by a dispersion of glass, crystalline or resin filler particles and / or short fibers bound to matrix by silane coupling agent. The basic structural components of a dental resin based composite are: (1) Matrix 7 Type I Type II Suitable for restoration of involved occlusal surfaces Class I Class II Class III Self – cured materials Light – cured materials Dual – cured materials Group I Group II Energy applied intra - orally Energy applied extra - orally POLYMER BASED MATERIALS
  • 8. (2) Filler (3) Coupling agent (4) Initiator – accelerator system (5) Inhibitors (6) Optical modifiers 1) MATRIX: Most of the dental composites use a blend of aromatic or aliphatic dimethacrylate monomers such as BisGMA, TEGDMA, and UDMA that form a highly cross linked polymer structures in composite and sealant materials. The matrix used mostly is BisGMA.It has particularly a high viscosity (similarly to honey), which makes it very difficult to blend and manipulate. To reduce the viscosity of BisGMA, diluent monomers such as TEGDMA are added. BisGMA and TEGDMA are mixed in a ratio of 75:25 or 50:50.These dimethacrylate monomers also have the advantage of producing extensive cross- linking among polymer chains. 2) FILLER: Fillers form the inorganic component of resin matrix, the incorporation of which greatly improves material properties, provided the filler particles are well bonded to the matrix. The filler particles are most commonly produced by grinding or milling quartz or glasses to produce particles ranging in size from 0.1 to 100 µm. Particles that are about 0.04µm are referred to as MICROFILLERS. All These improvements occur with an increase in the volume fraction of filler. Composites are often classified on the basis of the average size of the major filler component. In addition to filler volume level, the size distribution, index to refraction, radiopacity and hardness are also important factors in determining the properties and clinical application of the resultant composites. To incorporate maximum amount of filler into the resin matrix, distribution of particle sizes is necessary. It is obvious that if a single particle size is used, even 8
  • 9. with clear packing a space exists between particles. Smaller particles can fill up these spaces thus resulting in a continuous distribution of filler affording for a maximum amount of filler loading. Most composites contain Colloidal silica as filler. The amount of filler that cam be incorporated is generally affected by the relative surface area of the filler particles. Various fillers used are: 1. Glass fibers 2. Beads 3. Lithium aluminium silicates 4. Crystalline quartz 5. Barium glass, Strontium 6. Microfine silica 7. Sintered silica. EFFECT OF FILLER 1. Fillers increase the strength of composites. 2. They reinforce the resin matrix resulting in increased hardness, strength and decreased wear. 3. Fillers reduce the polymerization shrinkage. 4. The addition of fillers reduces thermal expansion and contraction. 5. Fillers improve the workability by increasing viscosity. 6. Addition of fillers causes reduction in water sorption, softening and staining. 7. Fillers increase radio opacity and diagnostic sensitivity through incorporation of Strontium and Barium glass. 8. Mechanical properties such as compressive strength, tensile strength and modulus of elasticity are increased. 9. Fillers increase the abrasion resistance of composite restorative materials. 3) COUPLING AGENTS: Bonding between the organic oligomer and inorganic filler will determine the properties of a composite. This bonding is accomplished by coupling agents 9
  • 10. called Silanes.This allows the more flexible polymer matrix to transfer stresses to the stiffer particles. A properly applied coupling agent can impart improved physical and mechanical properties and provide hydrolytic stability by preventing water from penetrating along the filler – resin interface. Most commonly used coupling agents are: (1) Titanates (2) Zirconates (3) Organosilanes such as r-methacryloxypropyl silane. The methacrylate groups of the organosilane compound form covalent bonds (carbon double bonds) with resin when it is polymerized thus completing the coupling process. This bond can be degraded by water absorbed by the composite during clinical use. 4) ACTIVATOR – INITIATOR SYSTEM: Methacrylate monomers polymerize by addition mechanism initiated by free radicals generated by chemical activation or by external energy activation (heat or light). Thus there are two types of resin systems: A) CHEMICALLY ACTIVATED RESINS They are supplied as two pastes one of which contains benzoyl peroxide initiator and the other a tertiary amine activator (N, N-dimethyl P-toluidene) which react with each other to form free radicals thus initiating addition polymerization reaction. They are usually used for restorations and build –ups that are not readily cured with a light source. The disadvantage with these systems was the incorporation of air when the two pastes were mixed. B) LIGHT ACTIVATED RESINS: 10
  • 11. First light activated systems used UV light for free radical initiation. The initiator was Benzoin methyl ether. The UV light activated systems are replaced by the present day Visible Light Activated (VLC) composites. The initiator in the visible light activated systems is Camphoroquinone present at 0.12%by wt or less. The light curable dental composites are supplied as a single paste contained in a syringe containing photo initiator and an amine activator. They do not interact with each other until exposed to light. However exposure to visible light of appropriate wave length (468 nm) causes excitation of the photo initiator and an interaction with the amine to form free radicals that initiate addition polymerization. The amine accelerator suitable for interaction with Camphoroquinone such as 0.15% dimethylaminoethyl methacrylate is used. COMPARISON BETWEEN CHEMICALLY CURED AND LIGHT CURED COMPOSITE SYSTEMS CHEMICALLY CURED COMPOSITES LIGHT CURED COMPOSITES Polymerization is central Polymerization is peripheral Curing is in one phase Curing is in increments These systems set within 45 seconds These systems set only after light activation Working time is limited Working time is increased or adequate More wastage Less wastage Surface finish of these systems is not adequate These systems take good surface finish. 11
  • 12. COMPARISON BETWEEN UV LIGHT ACTIVATED AND VISIBLE LIGHT ACTIVATED SYSTEMS 5) INHIBITORS: Inhibitors prevent or minimize spontaneous or accidental polymerization of monomers. They have a strong affinity or reactivity with free radicals. A typical inhibitor used commonly is Butylated hydroxytoluene (BHT), used in a UV LIGHT SYSTEMS VISIBLE LIGHT SYSTEMS Work at 360 – 400 nm light range Work between 400 – 480 nm light range The intensity falls with time Intensity of these systems remains the same UV light systems are injurious to eyes of operator and patient These are not injurious to eyes and thus are safer systems Depth of cure of these systems is less Compared to the UV light systems depth of cure is more. 12
  • 13. concentration of around 0.01% by weight. Thus inhibitors extend the storage lifetime for all resins and they ensure sufficient working time. 6) OPTICAL MODIFIERS: To ensure optimal esthetics of a composite restoration the translucency of the filler must be similar to the tooth structure. For this the index of refraction of the filler must match to that of the resin. The refractive indices if Bis GMA and TEGDMA are 1.55 and 1.46 respectively and that of a mixture of these two would result in an effective refractive index of 1.5, which is sufficient for an effective translucency. Translucency or opacity is provided to simulate dentine and enamel. To adjust this opacifiers are added. All optical modifiers affect light transmission ability of a composite. They include metal oxides in minute quantities that improve the shade and transluscency of dental composites. Titanium dioxide (TiO2) and Aluminium oxide (Al2O3) are added in minute amounts 0.001 – 0.007 % by weight to increase the opacity, as they are highly effective opacifiers. CLASSIFICATION OF COMPOSITE RESINS Composite resins have undergone enormous improvements and advances since their introduction in 1956. They have thus been classified in various ways based on: 1. Filler particle size and distribution. 2. Handling characteristics. 3. Polymerization method. 4. Use 1. FILLER PARTICLE SIZE AND DISTRIBUTION: A) BASED ON PRIMARY PARTICLES SIZE – BY STURDEVANT: 13
  • 14. 1. Mega fill - Very large individual particles or inserts for posterior composites. 2. Macrofil - 10 to 100 µm. 3. Midi fill - 1 – 10 µm. 4. Minifill - 0.1 - 1µm 5. Microfill - 0.01 – 0.1 µm (fine fishing) 6. Nanofill - 0.005 – 0.01 µm. B) BASED ON MEAN PARTICLE SIZE OF MAJOR FILLER – BY SKINNERS. 1. Traditional or Conventional composites - 8 to 12µm 2. Small particle filled composite - 1 to 5µm 3. Micro filled composite - 0.04 – 0.4µm 4. Hybrid composite - 0.6 - 1µm C) HOMOGENOUS COMPOSITE - Composite simply consists of filler and uncured material HETEROGENOUS COMPOSITE - Composite consists of precured composite or any other filler. MODIFIED - Composite includes novel filler modifications inaddition to conventional fillers. Eg. Fiber modified homogenous Minifill. 2. HANDLING PROPERTIES: A) Flowable composites: The filler content is reduced by 20-25% compared to traditional hybrid composites, which decreases the viscosity and makes the composite flowable. 14
  • 15. B) Packable / Condensable composites The filler instead of being incorporated into composites as ground particles is present as a continuous network / scaffold of ceramic fibres composed of Alumina (Al2O3) & Silicon dioxide (SiO2). 3. POLYMERIZATION METHOD A) Self cure / auto cure / chemically cured composites B) U-V light cured composites - Polymerization is initiated by U-V light. C) Visible light cured composite- Visible light – blue light in the range of 470nm wavelength is used for polymerization D) Dual cured composite - They combine self – curing and light curing. 4. USE A) Anterior composite B) Posterior composite C) Core-build up composite D) Luting composites ACCORDING TO CHRONOLOGICAL DEVELOPMENT 1. First Generation Composite Resins 15
  • 16. They consist of macro ceramic reinforcing phases in the resin matrix. They have the highest mechanical properties and highest surface roughness. 2. Second Generation Composite Resins They consist of colloidal and micro ceramic phases in a continuous resin phase. They exhibit the best surface texture of all composite resins and better wear resistance than First generation composites. 3. Third Generation Composite Resins They are hybrid composites in which there is a combination of macro and micro ceramics as reinforcers in a ratio of 75:25. The properties are intermediate to those to First and Second generation composite resins. 4. Fourth Generation Composite Resins They are also hybrid types that contain heat-cured irregularly shaped, highly reinforced composite macro particles with a reinforcing phase of micro (colloidal) ceramics. They are highly technique sensitive. 5. Fifth Generation Composite Resins They are hybrid composites in which the resin matrix is reinforced with micro ceramics (colloidal) and macro, spherical, highly reinforced heat cured composite particles. They have improved wettability and consequently improved bonding to continuous phase. 6. Sixth Generation composites Resins These are hybrid composites in which continuous phase is reinforced with a combination of micro (colloidal) ceramics and agglomerates of sintered micro (colloidal) ceramics. They have the best mechanical properties. They exhibit the least shrinkage and the wear and surface texture similar to Fourth generation composite resins. SKINNER’S CLASSIFICATION 1. TRADITIONAL COMPOSITES 16
  • 17. They were developed in 1970 and are also referred to as conventional or macro filled composites. The filler is finely ground amorphous silica and quartz. The average size of filler particles is 8-12µm and the filler loading is generally 70- 80% wt or 60-70% by volume. The properties such as water sorption, polymerization shrinkage, and thermal expansion are less than those of unfilled resins. A major clinical disadvantage of traditional composites is the rough surface due to abrasive wear of the soft resin matrix exposing the more wear resistant filler particles. They are more susceptible to occlusal surface wear and thus are inferior to be used in stress bearing posterior areas. 2. SMALL PARTICLE FILLED COMPOSITES: They contain fillers of size range between 0.5-3µm (1-5µm) and high filler loading upto 80-90 wt% compared to the traditional composites. The filler used is amorphous silica; glasses. Colloidal silica in 5% wt is added to adjust the viscosity. The physical & mechanical properties such as compressive strength are superior to traditional composites and the other micro filled composites. Coefficient of thermal expansion is two times that of tooth and polymerization shrinkage is less, wear resistance is improved. The addition of heavy metal containing glasses makes them radio opaque. They are indicated for high stress and abrasion prone areas eg: Class IV. 3. MICROFILLED COMPOSITE These composites contain colloidal silica particles of 0.01-0.04µm as inorganic filler. To increase the filler loading: (1) Colloidal silica particles are sintered to obtain larger agglomerate that has a reduced surface area thus allowing more filler without compromising the rheological properties. 17
  • 18. (2) Prepolymerized composite is ground to get smaller particles that are used as fillers into the composite resin in range of 60 to 70-wt%. The bond between cured matrix and composite filler particles is weak, facilitating wear by chipping mechanism. Thus micro filled composites are not indicated for stress – bearing areas. Due to greater amount of resin, water sorption, coefficient of thermal expansion are more & elastic modulus is decreased. They provide the smoothest surface finish. Thus they are preferred for restoring teeth with Class III and V cavities. 4. HYBRID COMPOSITES These composites are developed in an attempt to produce better surface finish than Small Particle Filled composites but retaining their properties. Hybrid composites contain two kinds of filler particles – colloidal silica and ground particles of glasses containing heavy metals upto 75 to 80-wt%. The smaller filler particle size as well as greater amount of microfillers increases the surface area. Their physical & mechanical properties are intermediate to those of traditional and small particle filled composites. They are indicated for both esthetic anterior & stress bearing posterior regions. CURING OF RESIN – BASED COMPOSITES The first composites were cured by a chemically activated polymerization process – known as cold cure or self-cure resins. They were available as two pastes, which had to be mixed. The disadvantage in this system was incorporation of air bubbles during mixing that weaken the structure and trap oxygen, inhibiting polymerization during curing. 18
  • 19. Later different curing systems using light as a source of curing came into existence that are as follows. a) U-V light cured composites - Polymerization is initiated by U-V light. b) Visible light cured composite - Visible light – blue light in the range of 470nm wavelength is used for polymerization c) Dual cured composite - They combine self – curing and light curing. VISIBLE LIGHT CURING COMPOSITES: The composites to be cured by light contain a photosensitive initiator system and a light source for activation. These systems are not sensitive to oxygen inhibition as the chemically cured systems. The photo initiator used most commonly is CAMPHOROQUINONE that absorbs photons at 474 nm ranges. CURING LAMPS: Curing lamps are hand held devices that contain light source and are equipped with a rigid light guide made up of fused optical fibers. The most widely used light source is QUARTZ BULB with TUNGSTEN FILAMENT in a halogen environment. The various types of light devices used are: 1. Light emitting Diodes –LED Lamps 2. Quartz Tungsten Halogen Lamps –QTH Lamps. 19
  • 20. 3. Plasma arc Curing light – PAC Lamps. 4. Laser lamps. Light Emitting Diode Lamps: They emit radiation only in blue part of visible light between 440-480 nm. They do not require filters. They can be battery operated and do not produce heat. Quartz Tungsten Halogen Lamps: They have quartz bulb with a tungsten filament that irradiates U-V and white light. They require a filter to remove heat & unwanted wavelengths to produce violet-blue light in 400-500 nm range. The intensity of light diminishes with use. Plasma Arc Curing Lamps: 20
  • 21. They use ionized xenon gas to produce plasma. The required filters to remove high intensity white light and allow blue light in the range of 400-500nm to be emitted. Argon Laser Lamps: They have the highest intensity & emit a single wavelength at 490 nm. Quartz Tungsten Halogen Lamps, Plasma Arc Curing Lamps and laser lamps with increased intensities of greater than 1000 mw/cm2 have advantage of reduced exposure times with increased or greater depth of cure. An increase in intensity of the light will allow shorter curing times for given depth as cure (or) increased depth of cure for a given exposure time. The curing depth is limited to 2-3 mm unless excessively long exposure times are used. When attempting to polymerize the resin through tooth structure, exposure time should be increased by a factor of 2 to 3 to compensate for the reduction in light intensity. 21
  • 22. The light intensity of halogen lamps will decrease depending on the quality and age of light source, orientation of light tip, distance between tip and restoration; presence of contamination. To overcome limits on curing depth and problems associated with light curing the chemical curing & Visible Light Cure composites are combined into a single system namely the Dual cure resin systems. They are available as two light curable pastes: – 1) One containing benzoyl peroxide as Initiator 2) Other containing an aromatic tertiary amine as an activator. When the two pastes are mixed and exposed to light, light curing is promoted by amine and Camphoroquinone combination and chemical curing by amine and Benzoyl peroxide combination. These are intended for cementation of bulky ceramic inlays where a single light cure system would be insufficient for light penetration through bulky ceramic structure. Tip size: Curing tips are available in various sizes. DEGREE OF CONVERSION: It is the percentage of Carbon – Carbon double bonds that have been converted to single bonds to form a polymeric resin. A 65% conversion is considered to be good. 22
  • 23. The higher is the degree of conversion, better will be the strength and wear resistance. Conversion of the monomer to polymer depends on resin composition, transmission of light through the material, concentration of sensitiser, initiator & inhibitor. Due to faster polymerization of Visible Light Cure resins there are chances of building up of residual stresses. DEPTH OF CURE It is determined by the boundary between somewhat cured and uncured material. Most light curing requires minimum of 20 seconds under optimal conditions of access. The problems of light penetration can be slightly overcome by increasing curing times. Curing again after completion of recommended procedure (Post –curing) for 20 – 60 seconds may slightly improve the surface layer. POLYMERIZATION SHRINKAGE: All composites shrink while hardening in order of 2-3 % volume. This is referred to as Polymerization shrinkage .It usually does not cause significant problems with restorations cured in preparations having all- enamel margins. However when a tooth preparation extends on to the root surface polymerization shrinkage can cause gap formations at the junction of composite and root surface, as the force of polymerization of composites is greater than the initial bond strength of composites to tooth structure. This problem though cannot be eliminated, can be minimized. This polymerization contraction depends on two factors: 1) The quality of bond 2) The shape of the cavity preparation - C –Factor configuration. APPROACHES TO REDUCE BUILD UP OF STRESSES: 1) Reducing volume contraction by altering chemistry and / or composition of the resin system. 23
  • 24. 2) Clinical techniques designed to offset the effects of polymerization shrinkage. CLINICAL TECHNIQUES TO OFFSET EFFECTS OF POLYMERIZATION SHRINKAGE. Incremental build up and configuration: During curing, shrinkage of composite leaves the bonded cavity surfaces in a state of stress and the unbonded surfaces undergo relaxation by shrinking towards the bulk of material. The stresses thus created may be upto 7 Mpa in the composite. When composite is bonded to only one surface as in facial veneer stresses are released by flow from unbonded surface. But stress relief within a 3 - dimensional bonded restoration is limited by its configuration factor, or C- factor. C –Factor: It was first analyzed by Feilzer in 1987 and is described in terms of the ratio of surface area of bonded surfaces to the surface area of unbonded surfaces. The higher is the C –factor the greater is the potential for bond disruptions from polymerization effects. Most technique sensitive preparations to restore successfully are class V, and I both of which have five bounded and one free surface, thus resulting in the 24
  • 25. maximum stresses. A veneer on the other hand has five free and only one bounded surface. The magnitude of development of stresses is influenced by the rate at which the composite is cured (Kinomoto, Torii, Ebisu Journal of dentistry 1999). Light cured materials demonstrated twice the magnitude of stress compared to self- cured materials. Also heavily filled composites exhibited higher stress. Maximum stresses developed are at internal line angles and stress on lateral walls increases with depth of the cavity. Unrelieved stresses in composite cause bond disruption as well as marginal gaps around restorations that increase micro leakage. Clinical techniques to reduce c-factor: 1. Layering technique: The restoration is built up in increments, curing one layer at a time. This reduces ‘C’ factor by reducing the surface area of bonded surfaces and increasing the non bonded surface areas. This is done in increments whereby problems of depth of cure and residual stress concentration are both eliminated. 2. Sectioning: The composite is sectioned horizontally and vertically to reduce the stresses. CURING RATE CONTROL: An approach to offsetting polymerization stress build up is starting with an initial low rate of polymerization similar to chemical initiation. Thus sufficient time is present for stress relaxation before reaching the gel point. SOFT START TECHNIQUE: Curing begins with a low intensity and finishes with a high intensity. There is a slow initial rate of polymerization and high initial level of stress relaxation during the early stages and ends at maximum intensity once the gel point has reached. RAMPED CURE TECHNIQUE: 25
  • 26. Intensity of curing is gradually increased or “ramped up” in step wise, linear or exponential modes. DELAYED CURE: The restoration is initially cured incompletely at a low intensity. Then contouring of the resin is done and later a second exposure for final cure is done. This delay allows for stress relief or relaxation. FACTORS EFFECTING CURING A) PROCEDURAL FACTORS B) RESTORATION FACTORS. A) PROCEDURAL FACTORS: 1) Light tip direction 2) Access to the restorations 3) Distance from the surface – ideally should be within 2 mm to be effective. However distances of 5-6 mm are often encountered. 4) Size of the tip, which range from 3 – 11 mm. Smaller the tip size greater will be the intensity of light 5) Tip movement. 6) Time of exposure. B) RESTORATION FACTORS 1) Restoration thickness: The ideal thickness of composite increment for optimal cure has been suggested to be 1.5 – 2 mm. 2) Cavity design 3) Filler amount size: Smaller sized fillers (0.01 – 1 µm) scatter maximum amount of light thus resulting in a more effective curing of the composite. 4) Restoration shade: Darker shades require more light and thus greater exposure times for adequate curing. 26
  • 27. 5) Monomer ratios The intensity of light tip output falls from the center to the edges producing bullet shaped curing pattern also leading to inadequate curing in the proximal box line angles of Class – II restoration. PROPERTIES OF COMPOSITES: 1. Of all the tooth colored materials composite resins possess the highest tensile and compressive strengths. 2. The modulus of elasticity is high. 3. The modulus of resilience is very low which may explain some of the crazing, cracking and wear failures of composite resins. 4. The co-efficient of thermal expansion of composite resin is close to that for amalgam (25-35 PPM/10 C). The co-efficient of thermal expansion of II generation composite is high and close to that of unfilled resins. 5. Composite resins show less resistance to abrasion. The main mechanism of wear starts at the interface, leading to debonding of the attachments of the reinforcing particles from the resin matrix. The abrading forces dislodge the particles. The interfacial failure is precipitated first by exposure of resin matrix and further by deterioration of coupling agents by environmental factors. 6. Solubility of resins is influenced by the residual monomer and discontinuity or weakness in the bond between the dispersed and dispersion phase in composite and filled resin. 7. WATER SORPTION: Water sorption swells the polymer portions of the dental composite and promotes diffusion and desorption of any unbound monomer. Water and other small molecules potentially plasticize as well as chemically degrade the matrix into monomer or other derivatives. The micro filled composites have a greater potential for being discolored by water-soluble stains. 27
  • 28. This combines both water sorptions within the material and water adsorption. Absorption and adsorption are most pronounced in unfilled and filled resins and significant in composite resins. This increases the dimensions of the restoration thus compensating for polymerization shrinkage but also causes unfavourable results like disruption of adhesive bonds, susceptibility to discoloration, increased plasticity. 8. PLASTICITY: Composite resins & unfilled resins are viscoelastic in nature and show limited degree of plasticity that may lead to a change in shape under loading. Resinous materials can withstand high rates of loading better than low rates. 9. DISINTEGRATION: It involves gross loss of material as a result of solubility, abrasion, erosion and low strength properties. Composite resins undergo disintegration due to failure at interphase between dispersed and dispersion phases. This leads to surface roughness, leakage and a partial or complete loss of material. 10. HARDNESS: Of all the tooth coloured restorative materials, composite resins show greater Knoop Hardness Number ( KHN) of 30-100 as compared to 300 of enamel. The KHN depends on whether the intender of the tool was applied on dispersed phase (greater KHN) or on the continuous phase (low KHN). 11. SURFACE ROUGHNESS: This is measured by the average number of scratches per square inch, average depth of irregularities in micro inches and surface profile of the material specimens after proper finishing and polishing. Of all tooth coloured restorative materials composite resins in general have the highest and deepest scratches after all finishing and polishing procedures. The II generation composite exhibits the least surface roughness comparable to unfilled resins. 28
  • 29. Surface roughness leads to plaque accumulation and thus has harmful effects on the tooth and periodontium, leads to surface discolouration, fatigue failure and mechanical irritation to tongue, lips and cheek. To improve surface characteristics using monomer of resin matrix being polymerized onto the surface does glazing of composite resin but this is a temporary phenomenon due to the low abrasive resistance of the monomer. 12. MICROLEAKAGE: The unfilled resins and II generation composites show greatest micro leakage, especially when inserted with a bulk-pack technique. The use of acid – etched technique reduced the micro leakage of composites to nearly zero at least for a period. This leakage is influenced by several factors like co-efficient of thermal expansion, solubility, disintegration, strength properties, wettability, viscosity, abrasive resistance and adhesiveness to tooth structure. 13. OPTICAL PROPERTIES Composite resins have the most approximate translucency to that of tooth enamel. Translucency depends mainly on the type and nature of unreacted particles of fillers. Reflectiveness is mainly the product of surface texture. The more smoother the surface, the more rays will be reflected, giving a shiny bright surface impression visually. It is also is a major modifying factor for any shade. Inorganic pigments added produce a stable predictable coloration and shading. 14. COLOUR STABILITY Composite resins may undergo discoloration, which may be either intrinsic or extrinsic. Intrinsic discoloration: Due to chemical changes or deterioration of one or more component phases of the material with coloring by products Eg: effect of U-V light on the Benzoyl peroxide – tertiary amines. 29
  • 30. Extrinsic discoloration: It is the most common type and can occur marginally or on surface. A) Marginal discoloration: This may be due to micro leakage, recurrent decay or dissolution of varnish. B) Surface discoloration: This is mainly due to surface roughness or irregularities that increase stainability or possibility of plaque accumulation on the surface. It may also be a continuation of intrinsic discoloration. 15. RATE OF HARDENING: Composite resins gain most of their mechanical properties within 15 minutes; and can usually be finished and polished after 5-8 minutes. 16. BIOLOGIC FORM : If acid etching the enamel did not come into contact with underlying dentin of the involved Pulp - Dentin organ then when the: (a) Effective - depth is 3 mm or more we can expect a healthy reparative reaction. (b) Effective - depth is 1.5-3 mm then composite resins can induce an unhealthy reparative reaction or sometimes even destruction. (c) Effective - depth is less than 1.5 mm composite resins induce always destruction of Pulp - Dentin organ. 17. WEAR: The second most frequent clinical problem apart form polymerization shrinkage of composite is Occlusal wear. The wear rate of posterior composite is 0.1 to 0.2 mm/year more than that of enamel. The principal mechanisms of composite wear are: 30
  • 31. a) TWO BODY WEAR: This is due to direct contact of restoration with an opposing cusp / adjacent proximal surfaces that result in high stresses in the contact area. Two body wear causes significant wear of composite rather than three body wear. b) THREE BODY WEAR: Three body wear explains loss of composite material in non-contacting areas. This is due to the contact with food bolus as it is forced across occlusal surface. This is controlled by various factors such as toughness porosity, stability of silane coupling agent, degree of monomer conversion, filler loading, size and type of filler particles Also variations among patients such as chewing habits, force levels play a significant role. 18. POLYMERIZATION SHRINKAGE: Polymerization shrinkage of resin composites range from 1.5 to 5.5% by volume. This leads to production of polymerization shrinkage stresses within the resin that pulls it away from tooth structure. To offset this the resin to tooth bond should be atleast 17Mpa. CLINICAL CONSIDERATIONS Dental composites are monitored in clinical studies in terms of USPHS (United states Public Health Sciences) categories of interest 1. Colour matching 2. Marginal Integrity 3. Bulk fracture 4. Post operative sensitivity 5. Bio compatibility 6. Improving wear resistance 1) Colour Matching: 31
  • 32. This depends on not only proper initial colour match, but also on the relative changes, which occur with time. Both the restoration and tooth structure are known to change colour with age, with time. Chemical changes in the matrix polymer cause the dental composite to appear more yellow. This process is accelerated by UV Light, oxidation and moisture. Newer systems that are visible light cured, that contain higher filler content are modified and UV absorbers and Anti oxidants are more resistant to colour change. Even if the composite is relatively colour stable, tooth structure undergoes a change in its appearance with time due to dentin darkening from ageing. Aged tooth structure appears more yellow and opaque. The challenge is to match the rate and type of colour change of the restoration with the tooth structure .A colour mismatch that appears after several years is difficult to avoid. Another important consideration for esthetics is a gradual transition in colour and translucency between the restoration and tooth structure. This goal is accomplished in two ways. Bevelling the enamel ends to blend any colour difference associated with the margin over about 0.5 – 1 mm (depending on the preparation size and requirements for bevel width) rather than making it abrupt. It also produces more surface area for a well-bonded margin that does not leak. Marginal leakage leads to the accumulation of sub surface interfacial staining that is difficult to remove and which creates a marked boundary for the restoration appearance. 2) Marginal Integrity Restorations which have been properly acid-etched should be well bonded for years. The longevity of micro-mechanical enamel retention is unknown. Like wise the effects of fatigue, stresses and other intraoral events are unknown. However, clinical studies as long as 14 years, indicate relatively good resistance to interfacial staining. 32
  • 33. As long as the margins are well bonded and no marginal fractures occur, there should be good resistance to secondary caries. Although not well documented, most secondary caries seem to occur along proximal or cervical margins where enamel is thin, less well oriented for bonding, difficult to access during the restorative procedure, and potentially subject to flexural stresses as well. Only rarely is secondary caries is observed along margins on occlusal surfaces or non-cervical aspects of other surfaces. The incidence of caries is quite variable depending on the degree of technical excellence during composite placement. Bayne etal (1992) in their clinical study of failure in posterior composites indicated that for well controlled insertion techniques the incidence of secondary caries after ten years can as low as 3%. Under these circumstances the primary reason for composite failure is poor esthetics or excessive occlusal wear. Cross sectional studies of dental practices that did not strictly conform the recommended techniques indicate that caries levels as high as 25 – 30 % have been observed after 10 years for composites placed during the 1970 ‘s and early 1980’s. 3) Bulk fracture Bulk fracture of composites is very rare. Though there is persistant rumour that micro-filled composites are more subjected to fracture at occlusal contact areas, there is no published evidence of that fact. 4) Post –operative sensitivity This is a major clinical concern for any restorative procedure. The actual causes of post- operative sensitivity are poorly researched but are hypothesized to be due to the following reasons: 1) Marginal diffusion along spaces, which induce fluid flow within dentin. 33
  • 34. 2) Dimensional changes of the restoration –contraction resulting from polymerization shrinkage and / or expansion from water sorption can cause flexural forces in the cusps bonded resulting in pain. 3) It usually occurs within 6 months to 1 year of the restoration placement and subsides within 6 months of initial onset. 5) Biocompatibility There are only limited problems of biocompatibility for composites with respect to the dental pulp. Although the unpolymerized materials are potentially toxic and may even have been classified as Carcinogenic, they are very poorly soluble in water and are polymerizes into a bound state before there is significant time for dissolution and diffusion Monomers, which do not polymerize may diffuse slowly out of the restoration but the concentration at any given time is so low that the materials do not appear to represent any practical risk. From long-term clinical studies there is no evidence of any clinical problems resulting in pulp death or soft tissue changes. 6) Improving the wear resistance of composites The greatest effort in improving the wear resistance of composites has been in the modification of filler particles. The use of large (50 – 100 µm) hard ceramic filler particles resulted in wear rates of 100 – 150 µm /year. The masticatory stresses are transformed into filler and into the resin matrix resulting in micro cracking of the polymeric supporting materials that cause a substantial weakening of the composite resin. Major modification consisted of substituting barium silicate glass (NUVAFIL, L.D CAULK and Co) for the traditional quartz filler. This reduced the wear rate .As compared with harder fillers such as quartz; the softer filler particles tend to absorb the stresses rather than transferring it to the resin matrix. Further 34
  • 35. these barium silicate glasses rendered the composite material more radio opaque. Most commercial composites today contain fillers from 1-3 µm. Recently the role of spherical filler particles is under research. The basic advantage of this concept is that stress concentration between the filler and matrix are dispersed more uniformly. In case of irregularly shaped particles, the stresses become concentrated in areas where the particle is angulated leading to failure. One more way of controlling the wear of composites is the use of glass or ceramic inserts in the composite resin. This unusual concept was developed by Dr.Rafael Bowen who developed a biphasic glass for use as mega or macro fillers. This technique consists of first filling the cavity preparation with a wear resistant posterior composite resin. Prior to light curing, however one or two large filler particles (1-2 mm in diameter) are inserted into the surface of composite resin. Care is taken to insert the particles in such a manner so that their surface remains above that of unpolymerized resin. After curing the extruded filler and supporting resin are contoured to the normal anatomic form. During mastication the occlusal stresses are directed towards the macro sized filler particles rather than resin matrix. The polymerization shrinkage is considerably less due to the volume of glass inserts thus improving the coefficient of thermal expansion property of the restoration. Recently these glass ceramic inserts made of ß- quartz are available as cones or tapered cylinders which are inserted onto the surface of the resin composite where there is contacts with the opposing cusps. INDICATIONS FOR COMPOSITE RESIN RESTORATIONS Composites can be used for most clinical applications. Generally, the indications for their use are: 1. Restoration of class I, II, III, IV, V, VI cavities. 35
  • 36. 2. Foundations or core build-ups. 3. Pit & fissure sealants. 4. Conservative composite restorations or preventive resin restorations 5. Esthetic enhancements such as: a. Full veneers b. Partial veneers c. Tooth colour modifications. d. Closure of Diastema 6. As luting cements Eg: Resin cements for indirect restorations 7. Temporary restorations 8. Periodontal splinting. CONTRAINDICATIONS FOR COMPOSITE RESIN RESTORATIONS: 1. The operating site cannot be properly isolated. 2. When the occlusal contacts are in such a way that they are on the composite material. 3. Heavy occlusal stresses such as bruxism 4. Deep sub gingival areas that are difficult to prepare. 5. Extension onto root surfaces may exhibit marginal gap formation. MERITS AND DEMERITS MERITS: 1. Esthetics 2. Conservation of tooth structure. 3. Improved resistance to micro leakage 4. Strengthening of remaining tooth structure 5. Low thermal conductivity 6. Completion of restoration in one appointment 7. Economic – Less expensive compared to gold or porcelain restorations 36
  • 37. 8. No corrosion DEMERITS: 1. Very technique sensitive 2. High coefficient of thermal expansion than tooth structure 3. Low modulus of elasticity 4. Biocompatibility of Bis GMA and TEGDMA resins is not known 5. Limited wear resistance in high stress areas 6. Finishing procedures are prolonged and tedious 7. Post operative sensitivity CLINICAL STEPS IN COMPOSITE RESTORATION The preliminary clinical steps in building up composite restorations are: 1. ACID conditioning. 2. Priming 3. Application of adhesive agent. 4. Placement of composite resin. ACID CONDITIONING / ETCHING Michael Buonocore reported the first meaningful proof of intraoral adhesion in 1955 by using 85% ortho phosphoric acid. At present 35-50% ortho phosphoric acid is used to condition the enamel before inserting tooth – colored resin. 37
  • 38. Concentrations greater than 50% result in deposition of monocalcium phosphate monohydrate on etched surface. The etchants are supplied in the form of aqueous solutions or gels. Gels are preferred due to the control in area of application on the tooth. EFFECTS OF ACID CONDITIONING ON SURFACE ENAMEL: 35-50% ortho H3PO4 applied on the surface of tooth for 60 sec will have the following effects on the treated enamel: 1. There will be a preferential dissolution of interprismatic enamel followed by top of the prisms. The sides of enamel prisms are most resistant to dissolution. Based on the type of dissolution etching patterns can be as follows: a. Type I: Selective dissolution of the cores of the enamel rods. b. Type II: Selective dissolution of the peripheries of t he enamel rods. c. Type III: A combination of type I & II seen in teeth with more interprismatic substance. Due to the preferential dissolution the surface area of enamel increases to upto 2000 times of the unetched surface. 2. Acid etching creates an irregular enamel surface with valleys in place of interprismatic substance, which is etched with an average depth of 25 microns. 3. Acid etching of dentin exposes the organic matrix which when incorporated into restoration increases the retention. 38
  • 39. 4. Acid etching removes the surface debris, salivary deposits, plaque thus exposing a cleaner, less contaminated and more wettable enamel surface for adhesion with restorative material. 5. Enamel treatment with H3PO4 will add a highly polar phosphate group to enamel thus increasing its adhesive ability. PRINCIPLES OF ACID CONDITIONING OF SURFACE ENAMEL: 1. Enamel surface should be mechanically cleansed from adhesive deposits & surface stains. 2. The surface area of enamel to be etched should be atleast double the surface are of the defect to be restored or minimally 1 mm in width. 3. Etching should be performed at right angle to the surface of enamel (prism heads) so as to produce retentive valleys and honey – combs. Etching enamel from sides of the prisms will not provide any retention of the restorative material. 4. When acid etching or conditioning is to be used in conjunction with cavity preparation then enamel walls are to be prepared in one of the following ways: 39
  • 40. (a) PARTIAL BEVEL This involves 1/3 – 1/2 of enamel wall at 450 -700 to cavity walls .This is indicated when acid etching is used only to reduce marginal leakage and the internal anatomy of the cavity walls can adequately retain the restoration (b) LONG BEVEL This involves entire enamel wall beveled at 45 – 700 . It is indicated when the walls of the cavity preparation are not enough for retaining the restoration but a distinct apical termination is not present. (c) HOLLOW GROUND BEVEL About 2/3 rds of enamel wall is ground in a concave manner and thus cavity margin will had a right angle cavosurface angle, with a butt joint between tooth and restorative material. This is indicated in gingival areas, inaccessible areas, areas of direct loading to accommodate maximum bulk of restorative material. (d) SCACLLOPED MARGINS This is used in conjunction with partial or long bevel to increase surface area of enamel to be conditioned. This is indicated when the conditioned enamel will have a major role in retention of restoration. It has the disadvantage of greater possibilities of overhangs and flash. It is contraindicated for inaccessible areas. (e) SKIRTING This is used when conditioned enamel will be the main mode of retention. It is a surface extension with a definite termination to improve retention and finishing. The acid should be applied on enamel with a soft sponge or cotton pellet using light patting touches and not rubbing at all. Rubbing may fracture the thin enamel rods thereby decreasing the depth of the created valleys and irregularities. 40
  • 41. Acid conditioned enamel should be washed thoroughly for 1 minute, using copious stream of water, air dried before application of bonding agent. Primary teeth & fluorosed teeth required more time (> 1 minute) for acid etching. Contamination of the etched enamel is a frequent problem in restoring lesions closer to gingival margins, inaccessible areas and if this occurs then the contaminated surface should be etched again for 10 sec. If etched areas are left exposed to saliva remineralization of the etched areas takes place. APPLICATION OF BONDING AGENT: The oral hard tissues and the surrounding environments are complex. The mechanisms of adhesion that have been employed are also complex. There are several factors that play role in achieving adhesive bonds such as: (1) Wetting (2) Interpenetration (formation of hybrid zone) (3) Micro mechanical interlocking (4) Chemical bonding For any adhesion to occur wetting is essential. The principal substrates (adherends), enamel & dentin are hydrated, hydrophilic and permeable to water. The wetting agent thus should be hydrophilic and hydrolytically stable. Before the total etch technique was adopted for enamel and dentin, enamel-bonding agents were used. 41
  • 42. Fusayama in 1973 used 37% Orthophosphoric acid to etch both Enamel and Dentin. For a successful bonding of resin composite to dentin micromechancial attachment between resin and demineralized, primed surface layer of intertubular dentin occurs, which is known as Hybrid layer. This is achieved by acidic conditioning agents, which remove smear layer, produce surface demineralization to a depth of 3-6 µms and expose the dentinal collagen framework. SMEAR LAYER AND ITS ROLE IN BONDING Smear layer, a product of dental instrumentation covers the normal structural components of dentin by 1-2µms and penetrates several micrometers (1-5µm) into the tubules to form smear plugs. Smear layer may be deterrent to the bonding as it acts as a barrier to penetration of resin underlying dentin substrate and bacteria entrapped in smear layer can survive and multiply beneath the restoration. The removal of smear layer and demineralization of dentin matrix facilitates bonding in the following ways: 1. The exposed collagen provides reactive groups that can chemically interact with primers. 2. Amino groups may act as a catalyst to polymerization reactions. 3. Exposed collagen promotes micro mechanical bonding to resin by providing a framework. Chemical conditioning of dentin is done by Acid conditioners and chelators; Thermal conditioning. PRIMING: It is the second step is bonding procedure. Primers are the actual adhesion promoting agents that contain monomers with hydrophilic properties, which have an affinity for the exposed collagen fibrils and hydrophilic properties for co 42
  • 43. polymerization with adhesive resin. The idea behind using a primer is to promote resin diffusion into moist, demineralized dentin with the aim of achieving complete resin penetration. The monomers that are most commonly used are HEMA and 4-META dissolved in solutions of acetone or ethanol. Upon microscopic examination there were found to be deficiencies in the spread of primer such as: 1. Incomplete surface coverage. 2. Incomplete interfibrillar penetration 3. Incomplete penetration to the full depth of demineralized dentin. Primer is thus applied in multiple coats to improve surface coverage and diffusion. For effective penetration of primer and adhesive resin the collagen fibrils need to be suspended to create sufficient space for penetration and water is an essential part for this. Excessive drying thus eliminates the water causing collapse of collagen network preventing primer from entry. BONDING: Bonding agents are unfilled /or semi filled resins which match to the resin in the composite but have a lower viscosity to permit easy flow and penetration. The major role of adhesive resin is the formation and stabilization of hybrid layer, formation of resin tags in the dentinal tubules and thus sealing them to reduce the chances of permeability and pulpal irritation. The adhesive resins penetrate into the micro porous collagen scaffold of the intertubular dentin, polymerize and co polymerize with the adhesion promoters of primer to form an intermingled layer of collagen & resin termed as the ‘resin reinforced layer’ or ‘hybrid layer’, or resin interdiffusion zone. 43
  • 44. The remaining adhesive resin enters into the dentinal tubules to a limited depth of 10-20µms forming intratubular penetration tags. Prolonged conditioning to effect maximum tag length is actually not needed. The latest bonding systems have shown to penetrate and hybridize the walls of lateral tubule branches forming sub micron resin tags and a phenomenon defined as lateral tubule hybridization. In superficial portions of dentin where tubules are fewer compared to deep dentin, intertubular penetration accounts for the major portion of the bond strength, whereas the reverse is true for deep dentin where intratubular penetration contributes to most of the retention and sealing. For light cured resins it is advisable to cure the bonding resin separately so as to polymerize the hybrid layer adequately thereby allowing to counteract the polymerization shrinkage of the resin composite. 44 C – composite resin A – Adhesive agent H – Hybrid layer
  • 45. During polymerization, an oxygen-inhibited layer of 15µm is formed on the top of the adhesive resin that co-polymerizes with subsequently placed restorative resin-through unpolymerized methacrylate double bonds. The thin uniform layer of adhesive resin is critical as it serves as an elastic intermediary for absorbing stresses of polymerization shrinkage. MECHANISM OF DENTIN BONDING: The basic chemical composition of dentin bonding adhesives is: M – R – X M = Methacrylate group R = Spacer X = Reactive group capable of boding to dentin surface. The adhesive is a bifunctional molecule, one end of which enters into chemical union with tooth structure and the other part co-polymerizes with resin through double bond of methacrylate. Ideally dentin adhesives should be both hydrophilic and hydrophobic. EVOLUTION OF DENTIN BONDING AGENTS: The bonding agents are divided into generations depending on their evolution. FIRST GENERATION DENTIN BONDING AGENTS: They consisted of NPG GMA (N-Phenyl glycine Glycidyl methacrylate) as a primer and adhesion promoter between enamel or dentin and resin materials by chelating with surface dentin. Eg: Cervident of S S white company. The first generation adhesives ignored the smear layer. 45
  • 46. SECOND GENERATION DENTIN BONDING AGENTS: These agents were developed for clinical use during the early 1980’s. They left the smear layer intact and bonded to smear layer. The second generation bonding agents performed better than the first generation bonding agents and the clinical failure rate for one year was around 30%. The bond strengths ranged from 4.5 – 6Mpa. There are three types of second generation products: 1. ETCHED TUBULE DENTIN BONDING AGENTS: They achieved retention to dentin by etching the tubules with 25% citric acid and employing ethyl methacrylate to mechanically interlock with the etched tubules. Eg: Dentin bonding system (Den - Mat) 2. PHOSPHATE ESTER DENTIN BONDING AGENTS: These systems used analogs of BIS – GMA with phosphate esters phenyl or chloro phosphorous esters attached that apparently bonded with calcium in the tooth and methacrylate end of the molecule bonded to the composite resin. They employed a mild cleanser to modify the smear layer. Eg: Bondlite (SDS/Kerr) Scotch bond (3M) – Halophosporous ester introduced n 1983. Prisma universal bond (Caulk) Clearfil (Kuraray, Japan) → Ethyl alcohol solution with tertiary amine- Phenyl phosphorous ester as an activator 3. POLYURETHANE DENTIN BONDING AGENTS: These systems are based on the isocyanate group of the polyurethane polymer that bond to carboxyl, amino & hydroxyl groups of dentin. The setting reacting of these systems was unaffected by the presence of fluid in dentinal tubules or smear layer. Most of these systems left the smear layer intact. 46
  • 47. Eg: Dentin – Adhesit (Ivoclar vivadent) The mean bond strengths of these second generation bonding agents in the range of 2 -7Mpa are considered to be quite weak to counteract the polymerization shrinkage of composite resins. There is also evidence that the bond between the phosphonate esters and dentin when immersed in water was prone for hydrolysis*. They did not wet dentin well nor penetrate the entire depth of smear layer, and could not reach the superficial dentin to *establish ionic bonding or resin extensions into the dentinal tubules. Draw backs of I & II generation bonding agents: 1. Lack of adequate bond strengths to overcome the stresses of polymerization. 2. These systems due to hydrophobic nature could not wet the hydrophilic dentin. 3. These systems bonded to smear layer rather than dentin and thus resulted in a cohesive failure. THIRD GENERATION DENTIN BONDING AGENTS: To offset the drawbacks of II generation dentin bonding agents Kuraray in1984 introduced Clearfil new bond in 1984. This new phosphate based adhesive contained HEMA and a ten-carbon molecule known as 10-MDP, which includes a long hydrophobic and a short hydrophilic component. To overcome the negative influence of smear layer the third generation dentin bonding agents were developed which included an additional step to modify or remove the smear layer before the application of adhesive. Thus the three steps - conditioning, priming and application of bonding agent may be done either separately or combined to reduce the steps. The bond strengths of these systems to dentin ranged between 9-15Mpa. Two year clinical retention rates of these systems were 100% .These systems consist of : 47
  • 48. 1. Conditioner: (Cleanser / Etchant) This consists of a weak organic acid such as Maleic acid or a low concentration of stronger acid such as phosphoric or nitric acid, or chelating agents like EDTA. Conditioner heavily alters or removes the smear layer, demineralizes peritubular and intertubular dentin surface upto 7.5µ to expose the collagen fibrils and thus increases the permeability of dentin by 4-9 times. 2. Primer: It is also called as the adhesion promoter; adhesion enhancer. Primers are bifunctional monomers, which are hydrophilic dissolved in a volatile solvent such as acetone or alcohol such as: 1. HEMA - Hydroxy ethyl methacrylate 2. NMSA – N-methacryl – 5 – Amino salicylic acid 3. NPG – N – Phenyl glycine. 4. PMDM – Pyromalletic di ethyl methacrylate. 5. 4-META – 4 – Methacryloxyethyl trimalletic anhydride These primers which are bifunctional link the hydrophilic dentin to hydrophobic adhesive resin & thus promote infiltration of demineralized peritubular & intertubular dentin there by increasing the wettability of conditioned dentin surface. 3) Adhesive: This is the third component .It is an unfilled or partially filled resin containing some component of primer. It combines with primer to form resin reinforced hybrid layer (Resin dentin interdiffusion zone - RDIZ) of 1-5µ thick. The adhesive forms resin tags to seal the dentinal tubules and provides methacrylate groups that bond with the subsequently placed composite resin. 48
  • 49. Representative systems are : 1. Oxalate bonding system: First system of III generation bonding agents. It consisted of acidic ferric oxalate (2.5% Nitric acid + ferric oxalate) as a conditioner. 2. Scotch bond – 2 :( 3M ESPE) The first system to receive “provisional” & “full acceptance” from ADA in 1987. It consists of 2.5% maleic acid and 58% HEMA as primer and 32.5% HEMA + 62.5% BISGMA as adhesive. 3. Gluma: This system developed in 1984 utilizes EDTA 0.5M at neutral PH to remove the smear layer and free collagen from embedding apatite. this is followed by treating with 35% HEMA and 5% gluteraldehyde . Drawbacks of third generation bonding systems: 1. The retention of these systems decreased with time. FOURTH GENERATION DENTIN BONDING AGENTS Though the smear layer acts as a “diffusion barrier” that decreases the permeability of dentin it also is an obstacle that must be removed so that the resin can be bonded to the underlying dentin substrate. Based on this consideration the IV generation adhesives were introduced for use on acid – etched dentin. The IV generation dentin bonding systems rely on hybridization for their attachment. The advantages of these systems are: 1. Reduced technique sensitivity. 49
  • 50. 2. Similar bond strengths to both enamel & dentin. 3. The bond strength is not altered by presence of moisture on the surface. 4. Some systems can bond to mineralized tissue as well as metal, amalgam, porcelain and indirect composite restoration. Excessive drying is to be avoided as it causes collapse of the collagen meshwork. The mean Shear Bond Strength of these agents is between 17-24 Mpa. Representative products: 1. ALL bond – 2: It consists of 35% orthophosphoricacid as etchant, primer containing of 2% NTG GMA and 16% BPDM (Biphenyl di methacrylate) in ethanol or acetone, BISGMA or HEMA as bonding adhesive. 2. Scotch Bond MPA: It was introduced in November 1994 and consists of 10% maleic acid as etchant, primer that is aqueous solution of HEMA and polyalkenoate copolymer. The adhesive resin is a BisGMA containing HEMA. 10% Maleic acid was replaced by 35% ortho phosphoric acid, as the effectiveness of maleic acid was questionable. 3. Clearfil liner bond 2 (Kuraray): It used the first no rinse self-etching primer comprising of phenyl-P, HEMA and 5 NMSA. The bonding resin consists of 10 MDP, BisGMA and HEMA. This MDP has potential towards providing long-term bond strength to metal and silanated porcelain. FIFTH GENERATION DENTIN BONDING AGENTS These systems primarily rely on the wet bonding technique. The priming & bonding steps of the fourth generation are combined into a single step. They are also called as the one-bottle adhesives. The etching step is separate. 50
  • 51. Representative products: 1. Prime & Bond (Dentsply caulk) : This was the first system to be marketed among the V generation. They contain PENTA, TEGDMA, UDMA resins in acetone. PENTA is a multifunctional molecule and is believed to partially demineralize dentin; facilitating penetration of resins into it. Prime & Bond was modified recently as prime and Bond 2.1. 2. Prime & Bond 2.1: This is a modified form of prime and bond to which fluorides – cetylamine fluoride and an elastomeric resin were added. 3. Single Bond (3M): This is a one component version of scotch bond MPA containing HEMA, BiSGMAresin and a unique methacrylate functional copolymer of polyacrylic and polyitaconic acids in water and ethanol solvent base. The bond strengths of these fifth generation systems range from 17-24 MPa. Advantages of fifth generation bonding systems: 1. Improved bond strengths. 2. Reduced postoperative sensitivity. 3. Time consumption is less and simple to use. SIXTH GENERATION DENTIN BONDING AGENTS: Sixth generation bonding systems combine all the three steps – etching, priming, and bonding into a single solution. These consist of an acidic solution that cannot be stored for long and also the bond strengths are sufficient with dentin 51
  • 52. but weaker to enamel. This acidified primer is applied to the dentin and is dried but not rinsed off. They are moderately acidic with pH between 1.8 and 2.5. The bonding mechanism is based on simultaneous etching and priming of enamel and dentin without rinsing forming a continuum in the substrate and incorporating smear plugs into resin tags. Self-etching primers produced a shallow etching pattern than conventional etchants. Advantages: 1. Reduced postoperative sensitivity due to their less aggressive action and smear plugs retained in orifices of dentinal tubules sealing them. 2. The elimination of rinsing, drying steps reduces possibility of over wetting or over drying which influence adhesion negatively. Eg. Prompt L – POP – Self etching adhesive – 3M NRL – Non rinse conditioner – Dentsply Xeno III The self-etching primers can be: 1. Two-step products: Two solutions applied sequentially. Eg: NRC – Prime & Bond. 52
  • 53. 2. All – in – One system: Single solution that is applied Eg: Prompt – L – Pop Xeno-III (OR) These may be supplied as two solutions that are mixed into a single solution prior to application to tooth. Eg: One – Up Bond F- undergoes colour change when mixed and after light activation. TOOTH PREPARATION FOR COMPOSITE RESTORATIONS Basically, the tooth preparation for a composite restoration includes: 1. Removing the fault, defect, old material or friable tooth structure. 2. Creating prepared enamel margins of 90 degrees or greater (greater than 900 usually preferable] 3. Creating 900 (or butt joint) cavosurface margins on root surfaces. 4. Roughening the prepared tooth structure (enamel and dentin) with a diamond stone. 53
  • 54. These objectives can be met by producing a tooth preparation form significantly different from that for an amalgam restoration. Differences include: 1. Less outline extension (adjacent suspicious or at-risk areas (grooves or pits) may be “sealed” rather than restored). 2. An axial and/or pulpal wall of varying depth (not uniform). 3. Incorporation of an enamel bevel at some areas (the width of which is dictated by the need for secondary retention). 4. Tooth preparation walls being rough (to increase the surface area for bonding). 5. Use of a diamond stone (to increase the roughness of the tooth preparation walls). The basic principles of tooth preparation must be followed for composite restorations. Outline form: The tooth preparation should include removing all of the caries, fault, defect or old restorative material (when necessary) in the most conservative manner possible. Retention form: The composite material must be retained within the tooth, but this primarily results from the micromechanical bonding of the composite to the roughened, etched and primed enamel and dentin. In some instances, a dentinal retention groove or enamel bevel may be prepared to enhance the retention forms. Resistance form: This keeps the tooth strong and protects it from fracture, is primarily accomplished by the strength of the micromechanical bond but may be increased, when necessary, by usual resistance form features such as • Flat preparation floors, • Box-like forms, and • Floors prepared perpendicular to the occlusal forces 54
  • 55. Caries removal technique is the same as that of any tooth preparation. Pulp protection procedures are different for a composite restoration. Because the composite is bonded to the prepared tooth and the composite material is insulative, there is no need for any bases under composite restorations. However, a Ca(OH)2 liner is still indicated when a pulpal exposure (or possible pulpal exposure) occurs. Types of composite tooth preparations: Tooth preparations for composite materials should be as conservative as possible. The extent of the preparation is usually determined by the size, shape and location of the defect and whatever extensions are necessary to provide access for vision and instrumentation. Acid-etch techniques, effective bonding systems and improved composites have significantly affected tooth preparation and expanded the ability to restore teeth. Five designs of tooth preparations for complete restorations are available now, and sometimes they will be used in combination. The design include: (1) Conventional (2) Beveled conventional (3) Modified (4) Box only, and (5) Slot preparation designs 1. Conventional: Conventional tooth preparations are those typical for amalgam restorations. Outline form is the necessary extension of external walls at an initial, limited, uniform dentin depth, resulting in the formation of those walls in a butt joint junction (90 degrees) with the restorative material. 55
  • 56. The primary indications for conventional tooth preparation in composite restorations are: (1) Preparations located on root surfaces (non enamel areas) and (2) Moderate to large class I or class II restorations. In the root areas, the butt joint design provides a better preparation configuration into which the groove and/or cave retention form can be placed, if deemed necessary. This design facilitates a better seal between the composite and the dentin or cementum surfaces and enhances retention of the composite material in the tooth. In moderate to large class I or class II composite restorations, there may be increased need for resistance form, which the conventional amalgam like preparation design provides. An inverted cone diamond (similar in shape to a No.245 bur) is used to prepare the tooth, resulting in a preparation design similar to that for amalgam, but usually smaller in width and extension and without prepared secondary retention form. The inverted cone diamond not only leaves the prepared tooth structure roughened, but also is conservative of the occlusal faciolingual extension. The butt joint marginal configuration between the tooth and the composite is not required (as it would be for amalgam). Thus the cavosurface angle in areas on the preparation periphery can be more flared (obtuse) than 90 degrees. The occlusal cavosurface angle is obtuse, yet provides for occlusally converging walls. Class I or class II conventional composite preparations should be prepared with as little facio lingual extension as possible and should not routinely be extended into all pits and fissures on the occlusal surface where sealants may be otherwise indicated. Likewise, it should be remembered that the box like form increases the negative effects of the C-factor. 56
  • 57. It is usually advantageous to use a diamond stone for preparing the tooth for a composite restoration. This results in a roughened prepared surface, which increases the surface area for bonding. Retention and marginal seal also are improved by beveling some enamel margins. Bevelling increases favourable end-on etching of enamel prisms and increases the surface area for bonding. 2. Beveled conventional: These preparations are similar to conventional preparations in that the outline form has external box-like walls with some beveled enamel margins. Typically – indicated – when a composite restoration is being used to replace an existing restoration using amalgam or to restore a large area. This design is most typical for classes III, IV and V restorations. Usually all of the old material is removed, not only to enamel but also to dentin. Sometimes, the old restorative material may be only partially removed if the remaining material is judged acceptable (radio graphically negative for caries, with symptomless tooth pulp). However, leaving old amalgam material may result in a poor esthetic result because it may show through the overlying composite material. To facilitate better marginal sealing and bonding, some accessible enamel margins may be beveled and then acid-etched. 57
  • 58. The advantage of an enamel bevel for a composite tooth preparation is that the ends of the enamel rods (exposed by beveling) are more effectively etched than otherwise occurs when only the sides of the enamel rods are exposed to the acid etchant. Also, the increase in etched surface area results in a stronger enamel-to-resin bond, which increases retention of the restoration and reduces marginal leakage and margin discolouration. Furthermore, incorporation of a cavosurface bevel may enable the restoration to blend more esthetically with the coloration of the surrounding tooth structure. Even recognizing these advantages, bevels are not usually placed on the occlusal surfaces of posterior teeth or other areas of potential heavy contact because a conventional preparation design already produces end-on etching of the enamel rods by virtue of the enamel rod direction on occlusal surfaces. Bevels are not placed on proximal margins if such beveling results in excessive extension of the cavo surface margins. Therefore, the beveled conventional preparation is rarely used for posterior composite restorations. 58
  • 59. MODIFIED: Modified tooth preparations for composite restorations have neither specified wall configurations nor specified pulpal or axial depths; preferably, they have enamel margins. Unlike conventional preparations, modified preparations are not prepared to a uniform dentinal depth. Both the extension of the margins and the depth of a modified tooth preparation are dictated solely by the extent (laterally) and the depth of the carious lesion or other defects. The objectives of this preparation design are to remove the fault as conservatively as possible and rely on the composite bond to tooth structure to retain the restoration in the tooth. Modified tooth preparations conserve more tooth structure because retention is obtained primarily by micromechanical adhesion to the surrounding enamel and 59
  • 60. underlying dentin, rather than by preparation of retention grooves or coves in dentin. Round burs or diamond stones may be used to prepare this type of preparation, resulting in a marginal design similar to a beveled preparation; however, less tooth structure is removed in the internal portions of the preparation. Often, the preparation appears to have been “scooped out” rather than having the distinct internal line angle characteristic of a conventional preparation design. Modified preparations are primarily indicated for the initial restoration of smaller, cavitated, carious lesions usually surrounded by enamel and for correcting enamel defects. However, they can be successful for larger restorations as well. For the restoration of large carious lesions, wider bevels or flares and retention grooves, caves, or locks may be indicated in addition to the retention afforded by the adhesive procedure. BOX-ONLY: Another modified design is the box-only tooth preparation. This design is indicted when only the proximal surface is faulty, with no lesions present on the occlusal surface. A proximal box is prepared with either an inverted cone or round diamond stone held parallel to the long axis of the tooth crown. The diamond is extended through the marginal ridge in a gingival direction; the initial proximal axial depth is prepared 0.2mm inside the dentinoenamel junction (DEJ). The form of the box is dependent on which diamond is used – more box like with the inverted diamond, more scooped with the round diamond. The facial, lingual and gingival extensions are dictated by the fault or caries. Caries excavation in a pulpal direction is done with a round bur or spoon excavator. Neither beveling nor secondary retention is usually indicated. 60
  • 61. FACIAL / LINGUAL SLOT: A third modified design for restoring proximal lesions on posterior teeth is the facial or lingual slot preparation. In this case, a lesion is detected on the proximal surface but the operator believes that access to the lesion can be obtained from either a facial or lingual direction, rather than through the marginal ridge from an occlusal direction. Usually a small round diamond stone is used to gain access to the lesion. The diamond is oriented at the correct occlusogingival height and the height and the entry is made with the diamond as close to the adjacent tooth as possible, thus preserving as much of the facial or lingual surface as possible. The 61
  • 62. preparation is extended occlusogingivally and faciolingually enough to remove the lesion. The initial axial depth is 0.2mm inside the DEJ. The occlusal, facial and gingival cavosurface margins are 90 degrees or greater. Caries excavation in a pulpal direction is done with a round bur or spoon excavator. This preparation is similar to a class III preparation for an anterior tooth. 62
  • 63. RESTORATIVE TECHNIQUE FOR COMPOSITE RESTORATIONS Once the tooth preparation has been completed, the prepared tooth structure is readied for composite insertion and finishing. Treating the prepared tooth for bonding requires etching and then application of an adhesive if only enamel is prepared, or a primer and adhesive if the composite will be bonded to the dentin as well as the enamel. Bonding systems are available in various forms, depending on the manufacturer. Components of one system usually are not interchangeable with another system. Following the manufacturer’s directions is imperative for success. Likewise, effecting the bond in an acceptable clinical environment, free from moisture contamination, is a requirement whether to place a matrix depends on the part of the tooth being restored, with most proximal surface restorations requiring a matrix. Whether to place a matrix before or after placement of the etchant, primer and adhesive is dependent on factors presented in a subsequent section. Several options also are available for composite insertion into the tooth preparation including injection of the composite or hand placement with an instrument. After insertion and carving of the material, the restoration is contoured and polished. Preliminary steps for Enamel and Dentin Bonding: The acid-etch technique requires proper isolation from fluids by using either a rubber dam or cotton rolls and/or retraction cord. Etching enamel affects both the prism core and prism periphery. Etching enamel affects the intertubular and peritubular dentin resulting in enlarging the tubular openings, removing much of the surface hydroxyapatite and leaving an interconnected network of collagen fibrils. Both liquid and gel etchants are available, most in concentration of 32% to 37% phosphoric acid (gel is preferred). An etching time of 15 seconds for both dentin and enamel is 63
  • 64. considered sufficient. For enamel preparation only, 30 seconds is considered optional. The area is then rinsed with water for 5 seconds, starting on the adjacent tooth to prevent possible splashing of acid-rich water onto the patient, dentist or assistant. The area should be dried with clean, dry air from the air-water syringe if only enamel has been etched. Dried etched enamel should exhibit a ground glass or lightly frosted appearance. If both enamel and dentin have been etched, then the area must be left slightly moistened. This allows the primer and adhesive materials to more effectively penetrate the collagen fibrils to form a hybrid layer, which is the basis for the micromechanical bond to dentin. Overdrying etched dentin surfaces compromises dentin bonding as a result of the collapse of the collagen network in the etched dentin layer. This collapse prevents optimal primer and adhesive penetration and comprises hybrid layer formation. Matrix Placement: A matrix is a device that may be applied to a prepared tooth before the insertion of the composite material. It fits around part or all of the tooth being restored and functions primarily to confine the restorative material on axial surfaces (usually proximal) while assisting in the development of the appropriate axial contour. When a condensable (packable) restorative material is used, the matrix must be rigid enough to resist deformation from insertion forces. Otherwise, the matrix may be more flexible, especially for anterior restorations. 64
  • 65. The matrix should provide the appropriate proximal contact and contour and prevent major excess of the restorative material beyond the preparation margins on the proximal surface, especially the gingival margin. It should be relatively easy to apply and remove. The matrix band may need to be altered (burnished) to have appropriate contour for the designed shape of the restoration. It should extend just above (occlusal to) the marginal ridge and below (gingival to) the gingival margin. It is held in place by a gingival wedge and in some instances, also by a matrix retainer whether or not a matrix retainer is used, the wedge is placed into the gingival embrasure and is positioned (wedged) between the two adjacent teeth, below the prepared gingival margin, and exterior to (outside) the matrix material. The wedge functions to: (1) Separate the teeth [which helps to compensate for the thickness of the matrix material, as it relates to establishing a proximal contact). (2) Hold the matrix in place, and (3) Prevent or reduce any excess of restorative material at the gingival margin. Usually, a Tofflemine matrix system is used for most class II restorations in posterior teeth, and a polyester strip is used for class III and IV restorations in anterior teeth. Likewise, there are different types of wedges. Triangular wooden wedges may be needed for tooth preparations with deeply extended gingival margins. However, the terminal half-inch of a round tooth pick is the typical wedge selected for most uses. 65
  • 66. The placement of etchant, primer and adhesive may or may not precede the application of a matrix. The exact sequence for applying the enamel / dentin etchant, primer, bonding adhesive and matrix is dependent on the operator. Some operators prefer matrix application first, followed by enamel/dentin etchant, primer, bonding adhesive and finally composite. This sequence may provide the best isolation of the tooth preparation for maximum enamel and dentin adhesion. It also allows an assessment of any enamel fracture (upon insertion of the proximal wedge) before bonding to that area. If the matrix is applied first, care must be taken to avoid pooling of the bonding materials, especially the adhesive, along the junction of the matrix with the gingival margin. Placing the matrix first in the sequence is especially beneficial when the tooth preparation is deep gingivally. Other operators prefer to complete all enamel and dentin etching, primary and adhesive application before matrix placement. The primary reasons for this sequence are to minimize pooling potential and maximize the etching, priming and adhesive placement at the cavosurface margins. Either sequence may be used as long as meticulous technique is followed. Inserting the composite: The composite restoration usually is placed in two stages. First, a bonding adhesive is applied (if not already placed during enamel and dentin etching and priming procedures). Second, the composite restorative material inserted. With newer bonding systems the adhesive may be combined with another component of the system, usually the primer. Therefore, as always, etching and priming the prepared tooth structure and placing the bonding adhesive should be done according to the manufacturer’s directions. As noted earlier, two types of composites exist – self-cured and light curved. Self-cured composites are not used extensively because light-cured composites provide additional benefits such as less discoloration, less porosity, easy placement, and less required finishing. 66
  • 67. Because a light source must be applied to the light-curved composite to cause polymerization, it is important that the material be inserted into the tooth preparation in 1 to 2mm thicknesses. This allows the light to properly polymerize the composite and may reduce the effect of polymerization shrinkage, especially along the gingival floor. Either a hand instrument or syringe can be used for inserting self-cured or light-cured composite. The use of a hand instrument is a popular method for placing composites because it is easy and fast. In addition to the simplicity of hand instrument insertion, a smaller amount of composite material is required compared to the amount needed for the syringe method. A disadvantage of hand instrument insertion is that air can be trapped in the tooth preparation or incorporated into the material during the insertion procedure. Experience and care in insertion minimizes this problem. The syringe technique is popular because it provides a convenient means for transporting the composite to the preparation and reduces the possibility of trapping air. Many manufacturers provide pre-loaded syringe compules with a light-cured composite. The tips of the light-cured compules have covers that should be replaced when not using the material to keep it from being polymerized inadvertently by ambient light. The syringe technique can present a problem in small preparations with limited access because the syringe tip may be too large. When the preparation opening is questionable, an empty syringe tip should first be tried in the tooth preparation. Starting in the most remote area of an anterior tooth preparation, the composite is steadily injected, ensuring that the tip remains in the material while slowly withdrawing the syringe. If the area is large, the light-cured composite is placed in 1 to 2mm thicknesses, with each increment being cured per manufacturer’s instructions. Usually a hand instrument is used to adapt the composite to the preparation after each syringe injection of material. When cutting, the light tip is kept as close to the material as possible. The preparation is filled to slight excess so that positive pressure can be applied by the matrix 67
  • 68. strip. Before the matrix strip is closed, any gross excess is removed with a hand instrument. The matrix strip is then closed and secured and the composite cured. For Class II restorations it is also important to place and cure the composite incrementally to reduce the effects of polymerization shrinkage, especially along the gingival floor. For this reason, the first small increment should be placed along the gingival floor and should extend slightly up the facial and lingual walls. This increment should only be approximately 1 to 2mm in thickness because it is the farthest increment from the curing light and is most critical in establishing a proper gingival seal. After the first increment is cured, subsequent additions are made and cured (usually not exceeding 2mm in thickness at a time) until the preparation is filled to slight excess. The restoration can be contoured and finished immediately after the last increment is cured. Following insertion and polymerization of the composite material, the matrix and wedges are removed, the restoration cured again from different angles (if light cured) and the restoration is examined for voids or lack of proximal contacts. If correction is needed, it should be accomplished at this time, because any additions will bond satisfactorily to the uncontaminated, oxygen-inhibited surface layer of the composite material. Contouring the composite: Contouring can be initiated immediately after a light-cured composite material has been polymerized or 3 minutes after the initial hardening of a self- cured material. Coarse diamond instruments can be used for removing gross excess but are not generally recommended for finishing composites because of the high risk 68
  • 69. of inadvertently damaging adjacent tooth structure. They leave a rough surface on the restoration and tooth, as compared to finishing burs and discs. However, special fine-diamond finishing instruments are available commercially, and can be used to obtain excellent results. Polishing the composite: Polishing the contoured composite restoration is done with very fine polishing discs, fine rubber points or cups, and/or composite polishing pastes. DIRECT CLASS III COMPOSITE RESTORATIONS: INITIAL CLINICAL PROCEDURES:- Procedures necessary before beginning the restoration: (1) Anesthesia may be necessary for patient comfort and if used, will help decrease the salivary flow during the procedure. (2) Occlusal assessments should be made to help in properly adjusting the restoration’s function and in determining the tooth preparation design. (3) The shade must be selected before the tooth dehydrates and experiences concomitant lightening. (4) The area must be isolated to permit effective bonding. (5) If the restoration will be large (including all of the proximal contact), prewedging the area will assist in the reestablishment of the proximal contact with composite. TOOTH PREPARATION Class III tooth preparations, by definition, are located on the proximal surfaces of anterior teeth. 69
  • 70. When a proximal surface of anterior tooth is to be restored and there is a choice between facial or lingual entry into the tooth, the lingual approach is preferable. The advantages of restoring the proximal lesion from the lingual approach include: 1. The facial enamel is conserved for enhanced esthetics. 2. Some unsupported, but not friable, enamel may be left on the facial wall of a class III or class IV preparation. 3. Colour matching of the composite is not as critical. 4. Discolouration or deterioration of the restoration is less visible. The indications for a facial approach include: 1. The carious lesion is positioned facially such that facial access would significantly conserve tooth structure. 2. The teeth are irregularly aligned, making lingual access undesirable. 3. Extensive caries extend on to the facial surface. 4. A faulty restoration that was originally placed from facial approach need to be replaced. When both the facial and lingual surfaces are involved, use the approach that provides the best access for instrumentation. It is expeditious to prepare and restore approximating carious lesions or faculty restorations on adjacent teeth at the same appointment. Usually one of the preparations will be longer (more extended out line forum) than the other. When the larger outline form is developed first, the second preparation usually can be conservative because of the improved access provided by the larger preparation. The reverse order would be followed when the restorative material is inserted. CONVENTIONAL CLASS III TOOTH PREPARATION:- The primary indication for this type of class III preparation is for restoration of root surfaces that has no enamel margin. 70
  • 71. The preparation exhibits butt joint margins. The external walls prepared perpendicular to the root surface. The wall depth pulpally will be approximate 0.75 mm into dentin, provided no additional caries excavation is required. The general shape is triangular with rounded corners. A continuous retention groove can be prepared in the external walls to maximize retention. 71
  • 72. BEVELLED CONVENTIONAL CLASS III TOOTH PREPARATION:- It is indicated primarily for replacing an existing defective restoration in the crown portion of the tooth. However, it also may be used when restoring a large carious lesion for which the need for increased retention and / or resistance form is anticipated. The beveled conventional preparation is characterized by external walls that are perpendicular to the enamel surface, with the enamel margin beveled. Retention is obtained by bonding to Enamel & Dentin. For large restorations the retention form should be enhanced by placing a groove at gingival and / or incisal areas. Axial depth is 0.2 mm inside DEJ. If retention groove is to be placed the depth is 0,5mm into dentin at retention location. If part of the tooth to be restored is located on the root surface – the preparation will be a combination of the two preparation designs – a conventional type in the root portion and a beveled conventional type in crown portion. For moderate or large class III beveled conventional preparation – bevels are not recommended on the lingual surface margins that are in areas of centric contact or subjected to heavy masticator forces because composite has less wear resistance than enamel for withstanding heavy attritional forces. 72
  • 73. MODIFIED CLASS III TOOTH PREPARATION:- This is the most used type of class III tooth preparation for small or moderate lesions or faults and is designed to be as conservative as possible. The preparation design is dictated by the extent of the fault or defect and is prepared from a lingual approach when possible, with an appropriate size round bur or diamond instrument. No effort is made to produce preparation walls that have specific shapes or forms other than external angles of 90 degrees or greater. The extension axially also is dictated by the extent of the fault or carious lesion and usually will not be uniform in depth. Weakened, friable enamel is removed while preparing the cavosurface margins in a beveled or flared configuration with the round diamond. Usually no groove (or cove) retention form is indicated because the retention of the material in the tooth will result from the bond created between the composite material and the etched peripheral enamel. Thus, the preparation design appears to be “scooped or concave”. Most initial composite restorations utilize the modified preparation design, because a carious lesion that requires a restoration usually extends into dentin, many modified preparations will be prepared to an initial axial wall depth of 0.2mm into dentin. However, no attempt is made to prepare distinct or uniform axial preparation walls, but rather, the objective is to include only the infected carious area as conservatively as possible by “scooping” out the defective tooth structure. Additional caries excavation (deeper than the initial stage of 0.2mm pulpal of the DEJ) or marginal refinement may be necessary later. Begin the preparation from a lingual approach (it possible) by making using a round carbide bur (No.1/2, 1, or 2) or diamond instrument, the size depending on the extent of the lesion. Before contacting the tooth, the bar is positioned for entry and rotated at high speed using air-water spray. The assistant directs air on the mirror surface and position the evacuator tip near the operating site. 73