Observational Drawing skills- contour line hands
•Download as PPTX, PDF•
11 likes•4,527 views

Teach students observational drawing skills through the study of hands. By simplifying objects (in this case hands) into simple shapes and lines while comparing height and width, students learn how to draw from observation and not prior knowledge. incorporating the study of contour lines in their hands student then think about design- creating a super cool design int he background! My high school students LOVED this project and this PowerPoint really helped! Enjoy!

Recommended
More Related Content
What's hot
What's hot (20)
Viewers also liked
Viewers also liked (20)
Similar to Observational Drawing skills- contour line hands
Similar to Observational Drawing skills- contour line hands (20)
Recently uploaded
Recently uploaded (20)
Observational Drawing skills- contour line hands
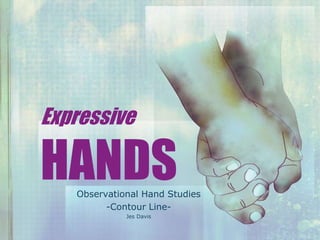
- 1. Expressive HANDSObservational Hand Studies -Contour Line- Jes Davis
- 2. Whatdoesthismean? Fingers Crossed= Good Luck
- 3. Whatdoesthismean? Thumbs up = OK Thumbs down = not OK
- 7. UniversalHANDS Hands can be used as a tool to communicate universally- across many cultures. There are two ways to communicate via hands: • Hand Gestures • Sign Language
- 8. HandGESTURES Gestures are a form of nonverbal communication in which visible bodily actions are used to communicate important messages, either in place of speech or together and in parallel with spoken words. Gestures include movement of the hands, face, or other parts of the body. What are hand gestures?
- 10. http://www.nytimes.com/video/world/ europe/100000002309793/the- italian-gesture-.html HandGESTURES There are different hand gestures for different cultures. One of the most widely known cultures to use hand gestures are ITALIANS! Watch here…
- 11. SignLanguage : a formal language employing a system of hand gestures for communication primarily used by the deaf/hearing impaired community. • It does differ from culture to culture. We use ASL in the USA; but there are universal gestures that all cultures know. • Sign language is an evolving form of language and has new signs much like new words being created in English daily. What is Sign Language?
- 12. SignLanguage AlphabetWatch this little girl communicate with her parents! http://www.youtube. com/watch?v=X6F3 03aNXec
- 14. Comparing for Proportion How to Draw a HAND I. Draw shape of palm II. Compare the height of thumb to height of fingers III. Draw implied line of finger tips IV. Draw implied line of fingers V. Compare knuckles and finger tips to each other VI. Draw contour line of entire hand
- 15. ThePALM
- 16. Keep lines light until final design ObservationalSKILLS Draw the shape of the contour of the hand. _____________________ * Looks like a box with an extra side. STEP 1
- 17. ObservationalSKILLS = 1 = 1 STEP 2 Measure the palm of the hand. _____________________ Compare the length of the palm to the length of the longest finger. * Draw a reference line. Keep lines light until final design
- 18. ObservationalSKILLS STEP 3 = 1 = 1 Draw the curved implied line of the finger tips. ___________________ Draw an imaginary line to the thumb in order to compare the tip of the thumb to the other finger tips. Keep lines light until final design
- 19. ObservationalSKILLS STEP 4 = 1 = 1 Draw the implied line of the fingers. ___________________ Draw little circles for the knuckles, comparing knuckle to knuckle with dotted reference lines. Keep lines light until final design.
- 20. ObservationalSKILLS STEP 5 Draw the contour line of the hand. ___________________ Pay attention to any small curve and individual lines that make up the whole image. Keep lines light until final design
- 21. H A N D S: FORESHORTENING PERSPECTIVE
- 22. ForeshorteningHANDS What is foreshortening? To portray or show (an object or view) as closer than it is or as having less depth or distance, as an effect of perspective or the angle of vision. *Creates the illusion of an object receding or moving forward in space on a 2 dimensional surface.
- 23. FORESHORTENING FACE PARTNER A: Hold your hand out straight in your partners face. FACE PARTNER B: Close one eye and look at the size of your partners face compared to their hand. What do you see? Discuss. SWITCH and DO IT AGAIN! Let your partner see Try THIS!!!
- 28. Simplify into Shapes How to Draw a Foreshortened HAND I. Draw shape(s) of palm II. Compare the height of thumb to height of fingers III. Draw implied line of finger tips IV. Draw implied shapes of the fingers V. Compare knuckles and finger tips to each other VI. Draw final contour line of entire hand
- 29. FORESHORTENING Draw here on board 1. Simplify palm into basic shape 2. Compare proportions for finger height. 3. Draw simple reference shapes/lines. 4. Draw final contour lines. Keep lines light until final design
- 30. ASSIGNMENT: 1. Think of 5 different hands or two “concepts”. Small quick sketches or list. Refer to handout for ideas. Talk to shoulder partner about design until teacher makes rounds. 2. Draw 3 hands for final design: • Has to use the entire length of 18” x 18” paper • Hands should be in proportion to one another (same size) • Draw very lightly until the final design Final Project Example
- 32. ZENTANGLES HANDS