SlideShare a Scribd company logo
1 of 23
Session on Openstack
In this session, we will see , how to use openstack to operate your own private
cloud :
By the end of the session, you will have a core understanding of what OpenStack is
and you will know the basics of setting up and administering OpenStack. You will
also understand some commonly used OpenStack services.
What is OpenStack?
OpenStack is an open source cloud computing platform that is used by organizations
to manage and control large scale deployments of virtual machines, such as in a
cloud computing or virtual private server environment. OpenStack is a popular
choice for organizations because it is scalable, reliable, and provides a high degree
of control over the underlying infrastructure.
Besides being used to manage deployments of virtual machines, OpenStack can also
be used to manage storage and networking resources in a cloud environment.
In some ways OpenStack can be compared to AWS but here are some
key differences between the two:
• OpenStack is an open source platform, while AWS is a proprietary platform.
• OpenStack offers more flexibility and customization options than AWS.
• OpenStack typically requires more technical expertise to set up and manage than AWS since you
basically have to set up everything yourself.
Let's go into more details about what OpenStack offers.
Openstack Components
• OpenStack is a free and open-source cloud computing software platform designed to provide
IaaS •
• OpenStack software includes components to allocate/manage CPUs, IPs, Ports, Subnets, Storage etc.
Beyond standard infrastructure-as-a-service functionality, additional components provide
orchestration, fault & service management, and other services to ensure high availability of user
applications.
Deploy third party services such as Or use built in tools
Kubernetes CloudFoundry Terraform OpenStack SDK Horizon Web Ul
'

'
/
/
/
/
/
/
/
/
s
.
□ □
'V///////A V////////A
’I'
/
/
/
/
/
/
/
/
,
.
Bare Metal Virtual Machines Containers
Shared networking and storage resources
openstack
OpenStack diagram.
TOUTApp-<dt>ont
OPENSTACK
OpcnSuc* UMhbodJd
Horiron
Swift Object Storage
Cinder - Block Storage
Compute Networking Storage
Quantum
Glance Virtual unk Images
Keystone Identity
OpenSuckStored$*rvk«
Stondird H-irdwan
OpenStack is broken up into services to allow you to plug and play components depending on your
needs. The OpenStack map below shows common services and how they fit together.
S Dashboard service -- Horizon S
Identity service -- Keystone S
Compute service -- Nova S
Networking service -- Neutron S
Image service -- Glance S Storage
service -- Cinder/Swift S Metering
service -- Ceilometer S
Orchestration service -- Heat
Object Storage: OpenStack Object Storage (Swift) is a highly scalable, distributed
object storage system.
Compute: OpenStack Compute (Nova) is a cloud computing fabric controller, which
manages the allocation of compute resources.
Networking: OpenStack Networking (Neutron) is a system for managing networks
and IP addresses.
Dashboard: The OpenStack Dashboard (Horizon) is a web-based interface for
managing OpenStack resources.
Identity: OpenStack Identity (Keystone) is a system for managing user accounts and
access control.
Image: OpenStack Image (Glance) is a service for storing and retrieving virtual
machine images.
Block Storage: OpenStack Block Storage (Cinder) is a service for managing block
storage devices.
Telemetry: OpenStack Telemetry (Ceilometer) is a service for collecting and storing
metering data.
Orchestration: OpenStack Orchestration (Heat) is a service for orchestration and
cloud formation.
Bare Metal: OpenStack Bare Metal (Ironic) is a service for provisioning and
managing bare metal servers.
Data Processing: OpenStack Data Processing (Sahara) is a service for provisioning
and managing Hadoop and Spark clusters.
Openstack Variants:
OpenStack Installation (wallaby) with cinder-volumes or without
volumes
Refer - Openstack installation document
Getting Started with OpenStack Horizon
Horizon is the name of the default OpenStack dashboard, which provides a
web based user interface to OpenStack services. It allows a user to manage the
cloud.
To access your new cloud's OpenStack dashboard (called Horizon) you will need
to obtain Horizon's administrator password. The username is "admin".
To access password : login on control node and open file
File to get admin password : cat /etc/kolla/admin-openrc.sh
Login using "admin" and the password you just accessed.
After successful login, redirect to overview page.
Create a Project in OpenStack Horizon
In OpenStack, the cloud is divided through the use of projects. Projects have
associated with them users, who have differing levels of access, defined by
roles. An administrator defines resource limits per project by modifying
quotas.
Now we'll learn how to create a project and associate a user with it. And we
will learn how project quotas can be adjusted.
There are three root-level tabs on the left menu in Horizon: Project, Admin,
and Identity. Only users with administrative privileges can see the admin tab.
To create your first project, navigate to Identity -> Projects.
Several projects already exist, including the admin project. These projects are
deployed by default and generally should not be modified.
Click the Create Project button near the top right to create a new project.
Under the Name field, specify a name for the project. This example project is
called Demo-project. You can also add Project Members and Project Groups
but we are not going to cover those yet. Click Create Project to finish creating
the first project.
Once created, the project appears in the Project Listing page.
While in the project listing page, you can view and adjust quotas for this project
as the admin user. Quotas are limits on resources, like the number of instances.
To view the quotas for this project while in Identity -> Projects tab, find the
drop down to the right with the first option being Manage Members. From this
menu, click Modify Quotas to view the default quota values.
How to Create a User and Associate with Project
Now that you have a project, you can associate a user with it. There is already
the default admin user but now let's see how to create a new user and login
with the new user.
First navigate as admin to Identity -> Users. By default, there are several users
already listed, and this is expected. These are created during cloud deployment
and should generally not be modified.
Click the Create User button.
On the Create User form set values for User Name, Password, Primary Project,
and Role. The Email field is optional but is helpful for password resets. For the
Project choose the project we created earlier.
For Role there are several options depending on the level of access required.
The default OpenStack roles are reader, member, and admin. Additional roles
also exist in the drop down. Reader is the least authoritative role in the
hierarchy. For this example, choose member for the role.
Press Create User to create the user.
Next, log out of Horizon as admin, and log back in with your new user. Upon
logging back in you are by default in the newly created project. You can see the
project you are currently in at the top left and your user can be seen at the top
right of Horizon.
Managing and Creating Images
Now let's see how to upload an image (not a graphical image but a copy of a
Linux installation) into OpenStack as well as create images out of an existing
instance.
Images contain a bootable operating system that is used to create instances.
We will learn how to upload images to Glance through Horizon and how to
create an image from an instance snapshot. Glance is tool for managing images
that allows users to discover, retrieve, and register VM (virtual machine)
images and container images. Glance uses Ceph to store images instead of the
local file system.
To access images from within your Horizon Dashboard, navigate to the Projects
tab. Within the projects tab, select Compute and then select Images. This tab
contains a list of all your images within OpenStack.
Projecl / Compute / Images
Images
Q Click here for filters or full text search. X+ Create 1
mage |
Cl Delete Images
J
Displaying 6 items
□ Name * TypeStatus Visibility Protected
Disk
Format
Size
□ > centos7.9 ImageActive Public No
QCOW
2
847.8
1
MB
Launch
□ > cirros ImageActive Public No
QCOW
2
15 58
MB
Launch »
□ > PanOS10.8 ImageActive Public No
QCOW
2
461.61
MB
Launch •
Images can be uploaded through your Horizon dashboard by clicking the
Create Image button. When creating an image you must choose the Format
of the image. With our configuration, the recommended format for images is
QCOW2 . QCOW2 is the most common format for Linux KVM, expands
dynamically, and supports copy on write.
In order to upload an image on Horizon, you must first have the image locally
on your machine. In this example, we will upload a CirrOS image. You can
download a CirrOS image here.
Now click the Create Image button near the top right.
Create an Instance in OpenStack Horizon
With OpenStack, instances, or virtual machines, play a large role in a cloud's
workload. OpenStack provides a way to create and manage instances with its
compute service, called Nova.
Nova is the OpenStack project that provides a way to provision compute
instances. Nova supports creating virtual machines, baremetal servers, and has
limited support for system containers. Nova runs as a set of daemons on top of
existing Linux servers to provide that service.
Now let's learn how to create an instance, including setting up a private
network and router, creating a security group, and how to add an SSH key pair.
Create a Private Network
First, let's learn how to create a private network and router. Later we will
create an instance on this private network. The router is created so the private
network can be connected to your cloud's public network, allowing you to
assign a floating IP address to it, making the instance accessible over the
Internet.
To create a private network, begin by navigating to Project -> Network ->
Networks. Then click Create Network.
For this example, we'll create a network with the following details:
• Network Name: Set a name for the network. This example is called
Private.
• Enable Admin State: Leave this checked to enable the network.
• Create Subnet: Leave this checked to create a subnet.
• Availability Zone Hints: Leave this option as default.
Next, move on to the Subnet tab of this form and use these details:
• Subnet Name: Set a name for the subnet. This example subnet is called
private-subnet.
• Network Address: Select a private network range. For
example: 192.168.0.1/24
• IP Version: Leave this as IPv4.
Gateway IP: This is optional. If unset, a gateway IP is selected automatically.
Create a Router
You next need to create a router to bridge the connection between the private
network and the public network. The public network is called External.
To create a router, begin by navigating to Project -> Network -> Routers.
Click Create Router.
Input this data for this example:
• Router Name: Set a name for the router here. This example router is
called Router.
• Enable Admin State: Leave this checked to enable the router.
• External Network: Choose the network External/publicl.
• Availability Zone Hints: Leave this as the default.
Once complete, create the router by pressing Create Router.
Connect Router to Private Network
Next, connect the router to the private network by attaching an interface.
Performing this step allows network communication between the Private and
External networks.
To attach an interface to the router, first navigate to the list of routers and
locate the one previously created.
Click the name of the router to access its details page. This is where the
interface is attached. There are three tabs: Overview, Interfaces, and Static
Routes. To attach an interface, navigate to the Interfaces tab then load the
form to attach an interface by clicking Add Interface near the top right.
You can visually see the network topology for your cloud by navigating
to Project -> Network -> Network Topology.
The example above indicates the External network is connected to the Private
network through the router called Router.
Security Groups
Security groups allow control of network traffic to and from instances. For
example, port 22 can be opened for SSH for a single IP or a range of IPs.
Let's see how to create a security group for SSH access. Later we'll apply the
security group we create to an instance.
To view and manage security groups, navigate to Project -> Network ->
Security Groups.
You should notice a single security group called default. This security group
restricts all incoming (ingress) network traffic and allows all outgoing (egress)
network traffic. When an instance is created, this security group is applied by
default. To allow the network traffic your instance requires, only open ports as
required to just the needed IP ranges.
To create a security group for SSH, click Create Security Group near the top
right.
CreateSecurityGroup
Name *
SSH
Description
Description:
Security groups are sets of IP filter rules that are applied to
network interfaces of a VM. After the security group is
created, you can add rules to the security group.
Create Security Group
After creating the SSH security group, we need to add a rule allowing SSH
traffic. We will allow SSH traffic from the first hardware node in this cloud to
this instance.
To add a rule, load the form by navigating to Add Rule near the top right.
Add Rule
Rule*
SSH -
Description ©
Remote *©
CIDR
CIDR* ©
172.10.141.17
Description:
Rules define which traffic is allowed to instances assigned to
the security group. A security group rule consists of three main
parts:
Rule: You can specify the desired rule template or use custom
rules, the options are Custom TCP Rule, Custom UDP Rule, or
Custom ICMP Rule.
Open Port/Port Range: For TCP and UDP rules you may choose
to open either a single port or a range of ports. Selecting the
"Port Range’1 option will provide you with space to provide both
the starting and ending ports for the range. For ICMP rules you
instead specify an ICMP type and code in the spaces provided.
Remote: You must specify the source of the traffic to be allowed
via this rule. You may do so either in the form of an IP address
block (CIDR) or via a source group (Security Group). Selecting a
security group as the source will allow any other instance in that
security group access to any other instance via this rule.
Create an Instance
We now have almost everything in place to create an instance.
To create an instance, begin by navigating to Project -> Compute -> Instances.
Then click the Launch Instance button.
On the details tab, fill in the following details:
Instance Name: Set a name for the instance. This example instance is
called demo-vml.
Description: Optional. Set a description if this applies.
Availability Zone: Leave as the default, which is nova.
• Count: Controls the number of instances spawned. Just create 1.
Next, move to the Source tab allowing you to specify an operating system
image.
This concludes configuring the instance's source. Next, move to the Flavor tab.
Flavors are a way to define the VCPUs, RAM, and Disk space used by an
instance. Pre-built flavors are available for you. For this step, select an
appropriate flavor from the options under the Available heading. This example
uses the m1.small flavor. Click the up arrow to move it to the Allocated
section.
Next, move to the Networks tab.
Launch Instance
Details
Source
Flavor
Network Ports
Security Groups
Key Pair
Configuration
Networks provide the communication channels for instances in the cloud, v
Allocated )
Network
Q
Subnets Associated Shared
Select networks from those listed below. Admin
State Status
il > Private pnvate-subnet No Up Active
v Available Q Select at least one network
Q Click here for filters or full text search. X
Network Subnets Associated Shared Admin State Status
) External Internet Yes Up Active t
Network tab.
In this section, you specify the network with which the instance is associated.
For this example, select the Private network created previously. You can
choose the External network as well, but this is generally recommended
against in favor of using a floating IP should your instance require Internet
connectivity.
You should only expose portions of your network as necessary. This reduces the
attack surface and improves application security. If a private network is not
created and an instance is created in a default cloud, it is associated with the
External network. This means the instance consumes a public IP and it could be
reached over the Internet.
Next, skip over the Network Ports tab and move to the Security Groups.
As the final step, move to the Key Pair tab.
In this section, you specify an SSH public key to inject into the instance. You
can upload your key at this stage using this form using the Import Key Pair
button. You can also create a key pair on this tab.
In this section, you specify an SSH public key to inject into the instance. You
can upload your key at this stage using this form using the Import Key Pair
button. You can also create a key pair on this tab.
We will create a key pair from the control node in our cloud so this instance
will be accessible over SSH from that node.
To create the SSH key pair from the first hardware node, the first step is to
login to the first hardware node.
After logging in to the node, use ssh-keygen to generate an SSH key pair
The private key is saved in the default location of /root/.ssh/id_rsa and a
passphrase is set for additional security.
To view the contents of the public key, use cat /root/.ssh/id_rsa.pub.
For ex.
[root@ubuntu ~]# cat /root/.ssh/id_rsa.pub
ssh-rsa
AAAAB3NzaC1yc2EAAAADAQABAAABgQCv6YOgYbRmXCEFxZP+t+pzh/RRKzsgWpvcnmKwF+uwiKDuihHadScCkgd8dE6y
mCjP/+UVdVLGEzXfHXG5EfbcPQYOGjqqOGqOVCHIrhFMG3GjSPao99KaDIAvXsWyTDI9FmrXTiC+0WkmOLNb0UeDic+lQ6
KJumw12O1niZjC19jMpWR5amRWEJo6oKFylC8JLHsdfhqr7EBcBzvUJkqh/1zY3qcsABHBrBCWOKC5oNiDAzctQ5MeHq6tv6
w6YxdZLLdupczteERN6roroySMtR2JZnOIcnq1aUgD/YDJDeg9zpvUN7stsndONYVOH42+bBu7xEWsm8zobgdfLlmhv+8ab7dK
VlYvJUkITqCoKpp8m0f3dbLtQSevCJ9qaeQvmxkjU9OHVPkkTolw4aUHvUsutpVynNfmErf3RGMjQRiQ3ZE7xGKVV7iSFDK9l0
mMWBHpYu2OnVKQlP823IC0YKD2dP3qDd/nnvGXVlxfRI+C08n9ehoHwZAIz4SM3dU= root@ubuntu
Copy the entire key. It starts with "ssh-rsa" and continues all the way until the
end.
Now back to the Key Pair tab. Click Import Key Pair.
Input the following values:
• Key Pair Name: Set a name for the SSH public key. This example public key is
called demo-key but it can really be anything you like.
• Key Type: This example uses an SSH Key key type.
• Public Key: Paste in the public key you just copied.
Click Import Key Pair.
Once the public key is imported, create the instance by pressing Launch
Instance.
The instance goes through a build process. Allow a few minutes for this to
occur. When complete, the instance appears in the Instances Listing page.
Assign and Attach Floating IP
The instance created previously is associated with a private network. Presently,
the only way to access this instance is to connect to it from with the cloud's
hardware nodes. Another option for connecting is to use a floating IP. In this
section, we demonstrate how to allocate a floating IP and attach it to this
instance.
To allocate a floating IP, first navigate to Project -> Network -> Floating IPs.
Then click Allocate IP to Project.
In the popup, make sure Pool is set to External (and optionally add a
description) and then click Allocate IP to add this floating IP address for use.
Click Associate. This instance is now accessible over SSH from the first
hardware node of your cloud.
openstack-session.ppt

More Related Content

Similar to openstack-session.ppt

Openshift cheat rhce_r3v1 rhce
Openshift cheat rhce_r3v1 rhceOpenshift cheat rhce_r3v1 rhce
Openshift cheat rhce_r3v1 rhceDarnette A
 
Cloud Computing Open Stack Compute Node
Cloud Computing Open Stack Compute NodeCloud Computing Open Stack Compute Node
Cloud Computing Open Stack Compute NodePalak Sood
 
Cloud Computing OpenStack Compute Node
Cloud Computing OpenStack Compute NodeCloud Computing OpenStack Compute Node
Cloud Computing OpenStack Compute NodeNamita Arora
 
ASP.NET Core and Docker
ASP.NET Core and DockerASP.NET Core and Docker
ASP.NET Core and DockerChuck Megivern
 
Openstack starter-guide-diablo
Openstack starter-guide-diabloOpenstack starter-guide-diablo
Openstack starter-guide-diablobabycat_feifei
 
Openstack starter-guide-diablo
Openstack starter-guide-diabloOpenstack starter-guide-diablo
Openstack starter-guide-diablo锐 张
 
Chef and OpenStack Workshop from ChefConf 2013
Chef and OpenStack Workshop from ChefConf 2013Chef and OpenStack Workshop from ChefConf 2013
Chef and OpenStack Workshop from ChefConf 2013Matt Ray
 
OpenStack - An Overview
OpenStack - An OverviewOpenStack - An Overview
OpenStack - An Overviewgraziol
 
Altinity Cluster Manager: ClickHouse Management for Kubernetes and Cloud
Altinity Cluster Manager: ClickHouse Management for Kubernetes and CloudAltinity Cluster Manager: ClickHouse Management for Kubernetes and Cloud
Altinity Cluster Manager: ClickHouse Management for Kubernetes and CloudAltinity Ltd
 
Delivering IaaS with Open Source Software
Delivering IaaS with Open Source SoftwareDelivering IaaS with Open Source Software
Delivering IaaS with Open Source SoftwareMark Hinkle
 
OpenShift In a Nutshell - Episode 05 - Core Concepts Part I
OpenShift In a Nutshell - Episode 05 - Core Concepts Part IOpenShift In a Nutshell - Episode 05 - Core Concepts Part I
OpenShift In a Nutshell - Episode 05 - Core Concepts Part IBehnam Loghmani
 
Drupal In The Cloud
Drupal In The CloudDrupal In The Cloud
Drupal In The CloudBret Piatt
 
Webinar "Introduction to OpenStack"
Webinar "Introduction to OpenStack"Webinar "Introduction to OpenStack"
Webinar "Introduction to OpenStack"CREATE-NET
 
Openstack Global Meetup
Openstack Global Meetup Openstack Global Meetup
Openstack Global Meetup openstackindia
 
Open stack dashboard diablo
Open stack dashboard   diabloOpen stack dashboard   diablo
Open stack dashboard diabloOpen Stack
 
OpenStack Dashboard - Diablo
OpenStack Dashboard - DiabloOpenStack Dashboard - Diablo
OpenStack Dashboard - Diablodevcamcar
 

Similar to openstack-session.ppt (20)

Openstack
OpenstackOpenstack
Openstack
 
OpenStack Ecosystem (10000 feet oveview)
OpenStack Ecosystem (10000 feet oveview)OpenStack Ecosystem (10000 feet oveview)
OpenStack Ecosystem (10000 feet oveview)
 
Openshift cheat rhce_r3v1 rhce
Openshift cheat rhce_r3v1 rhceOpenshift cheat rhce_r3v1 rhce
Openshift cheat rhce_r3v1 rhce
 
Sharad openstack slides
Sharad openstack slidesSharad openstack slides
Sharad openstack slides
 
Cloud Computing Open Stack Compute Node
Cloud Computing Open Stack Compute NodeCloud Computing Open Stack Compute Node
Cloud Computing Open Stack Compute Node
 
Cloud Computing OpenStack Compute Node
Cloud Computing OpenStack Compute NodeCloud Computing OpenStack Compute Node
Cloud Computing OpenStack Compute Node
 
Cloud Computing Using OpenStack
Cloud Computing Using OpenStack Cloud Computing Using OpenStack
Cloud Computing Using OpenStack
 
ASP.NET Core and Docker
ASP.NET Core and DockerASP.NET Core and Docker
ASP.NET Core and Docker
 
Openstack starter-guide-diablo
Openstack starter-guide-diabloOpenstack starter-guide-diablo
Openstack starter-guide-diablo
 
Openstack starter-guide-diablo
Openstack starter-guide-diabloOpenstack starter-guide-diablo
Openstack starter-guide-diablo
 
Chef and OpenStack Workshop from ChefConf 2013
Chef and OpenStack Workshop from ChefConf 2013Chef and OpenStack Workshop from ChefConf 2013
Chef and OpenStack Workshop from ChefConf 2013
 
OpenStack - An Overview
OpenStack - An OverviewOpenStack - An Overview
OpenStack - An Overview
 
Altinity Cluster Manager: ClickHouse Management for Kubernetes and Cloud
Altinity Cluster Manager: ClickHouse Management for Kubernetes and CloudAltinity Cluster Manager: ClickHouse Management for Kubernetes and Cloud
Altinity Cluster Manager: ClickHouse Management for Kubernetes and Cloud
 
Delivering IaaS with Open Source Software
Delivering IaaS with Open Source SoftwareDelivering IaaS with Open Source Software
Delivering IaaS with Open Source Software
 
OpenShift In a Nutshell - Episode 05 - Core Concepts Part I
OpenShift In a Nutshell - Episode 05 - Core Concepts Part IOpenShift In a Nutshell - Episode 05 - Core Concepts Part I
OpenShift In a Nutshell - Episode 05 - Core Concepts Part I
 
Drupal In The Cloud
Drupal In The CloudDrupal In The Cloud
Drupal In The Cloud
 
Webinar "Introduction to OpenStack"
Webinar "Introduction to OpenStack"Webinar "Introduction to OpenStack"
Webinar "Introduction to OpenStack"
 
Openstack Global Meetup
Openstack Global Meetup Openstack Global Meetup
Openstack Global Meetup
 
Open stack dashboard diablo
Open stack dashboard   diabloOpen stack dashboard   diablo
Open stack dashboard diablo
 
OpenStack Dashboard - Diablo
OpenStack Dashboard - DiabloOpenStack Dashboard - Diablo
OpenStack Dashboard - Diablo
 

Recently uploaded

Asset Management Software - Infographic
Asset Management Software - InfographicAsset Management Software - Infographic
Asset Management Software - InfographicHr365.us smith
 
MYjobs Presentation Django-based project
MYjobs Presentation Django-based projectMYjobs Presentation Django-based project
MYjobs Presentation Django-based projectAnoyGreter
 
Cloud Data Center Network Construction - IEEE
Cloud Data Center Network Construction - IEEECloud Data Center Network Construction - IEEE
Cloud Data Center Network Construction - IEEEVICTOR MAESTRE RAMIREZ
 
(Genuine) Escort Service Lucknow | Starting ₹,5K To @25k with A/C 🧑🏽‍❤️‍🧑🏻 89...
(Genuine) Escort Service Lucknow | Starting ₹,5K To @25k with A/C 🧑🏽‍❤️‍🧑🏻 89...(Genuine) Escort Service Lucknow | Starting ₹,5K To @25k with A/C 🧑🏽‍❤️‍🧑🏻 89...
(Genuine) Escort Service Lucknow | Starting ₹,5K To @25k with A/C 🧑🏽‍❤️‍🧑🏻 89...gurkirankumar98700
 
GOING AOT WITH GRAALVM – DEVOXX GREECE.pdf
GOING AOT WITH GRAALVM – DEVOXX GREECE.pdfGOING AOT WITH GRAALVM – DEVOXX GREECE.pdf
GOING AOT WITH GRAALVM – DEVOXX GREECE.pdfAlina Yurenko
 
Building a General PDE Solving Framework with Symbolic-Numeric Scientific Mac...
Building a General PDE Solving Framework with Symbolic-Numeric Scientific Mac...Building a General PDE Solving Framework with Symbolic-Numeric Scientific Mac...
Building a General PDE Solving Framework with Symbolic-Numeric Scientific Mac...stazi3110
 
BATTLEFIELD ORM: TIPS, TACTICS AND STRATEGIES FOR CONQUERING YOUR DATABASE
BATTLEFIELD ORM: TIPS, TACTICS AND STRATEGIES FOR CONQUERING YOUR DATABASEBATTLEFIELD ORM: TIPS, TACTICS AND STRATEGIES FOR CONQUERING YOUR DATABASE
BATTLEFIELD ORM: TIPS, TACTICS AND STRATEGIES FOR CONQUERING YOUR DATABASEOrtus Solutions, Corp
 
Alluxio Monthly Webinar | Cloud-Native Model Training on Distributed Data
Alluxio Monthly Webinar | Cloud-Native Model Training on Distributed DataAlluxio Monthly Webinar | Cloud-Native Model Training on Distributed Data
Alluxio Monthly Webinar | Cloud-Native Model Training on Distributed DataAlluxio, Inc.
 
What is Fashion PLM and Why Do You Need It
What is Fashion PLM and Why Do You Need ItWhat is Fashion PLM and Why Do You Need It
What is Fashion PLM and Why Do You Need ItWave PLM
 
Advancing Engineering with AI through the Next Generation of Strategic Projec...
Advancing Engineering with AI through the Next Generation of Strategic Projec...Advancing Engineering with AI through the Next Generation of Strategic Projec...
Advancing Engineering with AI through the Next Generation of Strategic Projec...OnePlan Solutions
 
chapter--4-software-project-planning.ppt
chapter--4-software-project-planning.pptchapter--4-software-project-planning.ppt
chapter--4-software-project-planning.pptkotipi9215
 
Intelligent Home Wi-Fi Solutions | ThinkPalm
Intelligent Home Wi-Fi Solutions | ThinkPalmIntelligent Home Wi-Fi Solutions | ThinkPalm
Intelligent Home Wi-Fi Solutions | ThinkPalmSujith Sukumaran
 
software engineering Chapter 5 System modeling.pptx
software engineering Chapter 5 System modeling.pptxsoftware engineering Chapter 5 System modeling.pptx
software engineering Chapter 5 System modeling.pptxnada99848
 
Implementing Zero Trust strategy with Azure
Implementing Zero Trust strategy with AzureImplementing Zero Trust strategy with Azure
Implementing Zero Trust strategy with AzureDinusha Kumarasiri
 
Dealing with Cultural Dispersion — Stefano Lambiase — ICSE-SEIS 2024
Dealing with Cultural Dispersion — Stefano Lambiase — ICSE-SEIS 2024Dealing with Cultural Dispersion — Stefano Lambiase — ICSE-SEIS 2024
Dealing with Cultural Dispersion — Stefano Lambiase — ICSE-SEIS 2024StefanoLambiase
 
Professional Resume Template for Software Developers
Professional Resume Template for Software DevelopersProfessional Resume Template for Software Developers
Professional Resume Template for Software DevelopersVinodh Ram
 
The Evolution of Karaoke From Analog to App.pdf
The Evolution of Karaoke From Analog to App.pdfThe Evolution of Karaoke From Analog to App.pdf
The Evolution of Karaoke From Analog to App.pdfPower Karaoke
 
EY_Graph Database Powered Sustainability
EY_Graph Database Powered SustainabilityEY_Graph Database Powered Sustainability
EY_Graph Database Powered SustainabilityNeo4j
 
Try MyIntelliAccount Cloud Accounting Software As A Service Solution Risk Fre...
Try MyIntelliAccount Cloud Accounting Software As A Service Solution Risk Fre...Try MyIntelliAccount Cloud Accounting Software As A Service Solution Risk Fre...
Try MyIntelliAccount Cloud Accounting Software As A Service Solution Risk Fre...MyIntelliSource, Inc.
 
ODSC - Batch to Stream workshop - integration of Apache Spark, Cassandra, Pos...
ODSC - Batch to Stream workshop - integration of Apache Spark, Cassandra, Pos...ODSC - Batch to Stream workshop - integration of Apache Spark, Cassandra, Pos...
ODSC - Batch to Stream workshop - integration of Apache Spark, Cassandra, Pos...Christina Lin
 

Recently uploaded (20)

Asset Management Software - Infographic
Asset Management Software - InfographicAsset Management Software - Infographic
Asset Management Software - Infographic
 
MYjobs Presentation Django-based project
MYjobs Presentation Django-based projectMYjobs Presentation Django-based project
MYjobs Presentation Django-based project
 
Cloud Data Center Network Construction - IEEE
Cloud Data Center Network Construction - IEEECloud Data Center Network Construction - IEEE
Cloud Data Center Network Construction - IEEE
 
(Genuine) Escort Service Lucknow | Starting ₹,5K To @25k with A/C 🧑🏽‍❤️‍🧑🏻 89...
(Genuine) Escort Service Lucknow | Starting ₹,5K To @25k with A/C 🧑🏽‍❤️‍🧑🏻 89...(Genuine) Escort Service Lucknow | Starting ₹,5K To @25k with A/C 🧑🏽‍❤️‍🧑🏻 89...
(Genuine) Escort Service Lucknow | Starting ₹,5K To @25k with A/C 🧑🏽‍❤️‍🧑🏻 89...
 
GOING AOT WITH GRAALVM – DEVOXX GREECE.pdf
GOING AOT WITH GRAALVM – DEVOXX GREECE.pdfGOING AOT WITH GRAALVM – DEVOXX GREECE.pdf
GOING AOT WITH GRAALVM – DEVOXX GREECE.pdf
 
Building a General PDE Solving Framework with Symbolic-Numeric Scientific Mac...
Building a General PDE Solving Framework with Symbolic-Numeric Scientific Mac...Building a General PDE Solving Framework with Symbolic-Numeric Scientific Mac...
Building a General PDE Solving Framework with Symbolic-Numeric Scientific Mac...
 
BATTLEFIELD ORM: TIPS, TACTICS AND STRATEGIES FOR CONQUERING YOUR DATABASE
BATTLEFIELD ORM: TIPS, TACTICS AND STRATEGIES FOR CONQUERING YOUR DATABASEBATTLEFIELD ORM: TIPS, TACTICS AND STRATEGIES FOR CONQUERING YOUR DATABASE
BATTLEFIELD ORM: TIPS, TACTICS AND STRATEGIES FOR CONQUERING YOUR DATABASE
 
Alluxio Monthly Webinar | Cloud-Native Model Training on Distributed Data
Alluxio Monthly Webinar | Cloud-Native Model Training on Distributed DataAlluxio Monthly Webinar | Cloud-Native Model Training on Distributed Data
Alluxio Monthly Webinar | Cloud-Native Model Training on Distributed Data
 
What is Fashion PLM and Why Do You Need It
What is Fashion PLM and Why Do You Need ItWhat is Fashion PLM and Why Do You Need It
What is Fashion PLM and Why Do You Need It
 
Advancing Engineering with AI through the Next Generation of Strategic Projec...
Advancing Engineering with AI through the Next Generation of Strategic Projec...Advancing Engineering with AI through the Next Generation of Strategic Projec...
Advancing Engineering with AI through the Next Generation of Strategic Projec...
 
chapter--4-software-project-planning.ppt
chapter--4-software-project-planning.pptchapter--4-software-project-planning.ppt
chapter--4-software-project-planning.ppt
 
Intelligent Home Wi-Fi Solutions | ThinkPalm
Intelligent Home Wi-Fi Solutions | ThinkPalmIntelligent Home Wi-Fi Solutions | ThinkPalm
Intelligent Home Wi-Fi Solutions | ThinkPalm
 
software engineering Chapter 5 System modeling.pptx
software engineering Chapter 5 System modeling.pptxsoftware engineering Chapter 5 System modeling.pptx
software engineering Chapter 5 System modeling.pptx
 
Implementing Zero Trust strategy with Azure
Implementing Zero Trust strategy with AzureImplementing Zero Trust strategy with Azure
Implementing Zero Trust strategy with Azure
 
Dealing with Cultural Dispersion — Stefano Lambiase — ICSE-SEIS 2024
Dealing with Cultural Dispersion — Stefano Lambiase — ICSE-SEIS 2024Dealing with Cultural Dispersion — Stefano Lambiase — ICSE-SEIS 2024
Dealing with Cultural Dispersion — Stefano Lambiase — ICSE-SEIS 2024
 
Professional Resume Template for Software Developers
Professional Resume Template for Software DevelopersProfessional Resume Template for Software Developers
Professional Resume Template for Software Developers
 
The Evolution of Karaoke From Analog to App.pdf
The Evolution of Karaoke From Analog to App.pdfThe Evolution of Karaoke From Analog to App.pdf
The Evolution of Karaoke From Analog to App.pdf
 
EY_Graph Database Powered Sustainability
EY_Graph Database Powered SustainabilityEY_Graph Database Powered Sustainability
EY_Graph Database Powered Sustainability
 
Try MyIntelliAccount Cloud Accounting Software As A Service Solution Risk Fre...
Try MyIntelliAccount Cloud Accounting Software As A Service Solution Risk Fre...Try MyIntelliAccount Cloud Accounting Software As A Service Solution Risk Fre...
Try MyIntelliAccount Cloud Accounting Software As A Service Solution Risk Fre...
 
ODSC - Batch to Stream workshop - integration of Apache Spark, Cassandra, Pos...
ODSC - Batch to Stream workshop - integration of Apache Spark, Cassandra, Pos...ODSC - Batch to Stream workshop - integration of Apache Spark, Cassandra, Pos...
ODSC - Batch to Stream workshop - integration of Apache Spark, Cassandra, Pos...
 

openstack-session.ppt

  • 1. Session on Openstack In this session, we will see , how to use openstack to operate your own private cloud : By the end of the session, you will have a core understanding of what OpenStack is and you will know the basics of setting up and administering OpenStack. You will also understand some commonly used OpenStack services. What is OpenStack? OpenStack is an open source cloud computing platform that is used by organizations to manage and control large scale deployments of virtual machines, such as in a cloud computing or virtual private server environment. OpenStack is a popular choice for organizations because it is scalable, reliable, and provides a high degree of control over the underlying infrastructure. Besides being used to manage deployments of virtual machines, OpenStack can also be used to manage storage and networking resources in a cloud environment. In some ways OpenStack can be compared to AWS but here are some key differences between the two: • OpenStack is an open source platform, while AWS is a proprietary platform. • OpenStack offers more flexibility and customization options than AWS. • OpenStack typically requires more technical expertise to set up and manage than AWS since you basically have to set up everything yourself. Let's go into more details about what OpenStack offers. Openstack Components • OpenStack is a free and open-source cloud computing software platform designed to provide IaaS • • OpenStack software includes components to allocate/manage CPUs, IPs, Ports, Subnets, Storage etc.
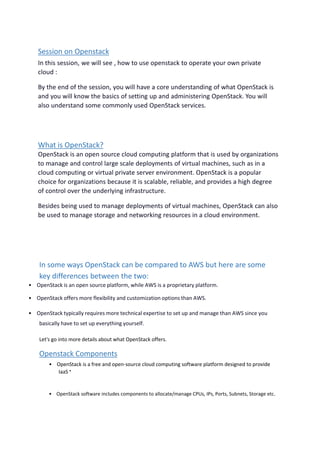
  • 2. Beyond standard infrastructure-as-a-service functionality, additional components provide orchestration, fault & service management, and other services to ensure high availability of user applications. Deploy third party services such as Or use built in tools Kubernetes CloudFoundry Terraform OpenStack SDK Horizon Web Ul ' ' / / / / / / / / s . □ □ 'V///////A V////////A ’I' / / / / / / / / , . Bare Metal Virtual Machines Containers Shared networking and storage resources openstack OpenStack diagram. TOUTApp-<dt>ont OPENSTACK OpcnSuc* UMhbodJd Horiron Swift Object Storage Cinder - Block Storage Compute Networking Storage Quantum Glance Virtual unk Images Keystone Identity OpenSuckStored$*rvk« Stondird H-irdwan
  • 3. OpenStack is broken up into services to allow you to plug and play components depending on your needs. The OpenStack map below shows common services and how they fit together.
  • 4. S Dashboard service -- Horizon S Identity service -- Keystone S Compute service -- Nova S Networking service -- Neutron S Image service -- Glance S Storage service -- Cinder/Swift S Metering service -- Ceilometer S Orchestration service -- Heat Object Storage: OpenStack Object Storage (Swift) is a highly scalable, distributed object storage system. Compute: OpenStack Compute (Nova) is a cloud computing fabric controller, which manages the allocation of compute resources. Networking: OpenStack Networking (Neutron) is a system for managing networks and IP addresses. Dashboard: The OpenStack Dashboard (Horizon) is a web-based interface for managing OpenStack resources. Identity: OpenStack Identity (Keystone) is a system for managing user accounts and access control. Image: OpenStack Image (Glance) is a service for storing and retrieving virtual machine images. Block Storage: OpenStack Block Storage (Cinder) is a service for managing block storage devices. Telemetry: OpenStack Telemetry (Ceilometer) is a service for collecting and storing metering data. Orchestration: OpenStack Orchestration (Heat) is a service for orchestration and cloud formation. Bare Metal: OpenStack Bare Metal (Ironic) is a service for provisioning and managing bare metal servers. Data Processing: OpenStack Data Processing (Sahara) is a service for provisioning and managing Hadoop and Spark clusters. Openstack Variants:
  • 5. OpenStack Installation (wallaby) with cinder-volumes or without volumes Refer - Openstack installation document Getting Started with OpenStack Horizon Horizon is the name of the default OpenStack dashboard, which provides a web based user interface to OpenStack services. It allows a user to manage the cloud. To access your new cloud's OpenStack dashboard (called Horizon) you will need to obtain Horizon's administrator password. The username is "admin". To access password : login on control node and open file File to get admin password : cat /etc/kolla/admin-openrc.sh Login using "admin" and the password you just accessed.
  • 6. After successful login, redirect to overview page.
  • 7. Create a Project in OpenStack Horizon In OpenStack, the cloud is divided through the use of projects. Projects have associated with them users, who have differing levels of access, defined by roles. An administrator defines resource limits per project by modifying quotas. Now we'll learn how to create a project and associate a user with it. And we will learn how project quotas can be adjusted. There are three root-level tabs on the left menu in Horizon: Project, Admin, and Identity. Only users with administrative privileges can see the admin tab. To create your first project, navigate to Identity -> Projects. Several projects already exist, including the admin project. These projects are deployed by default and generally should not be modified. Click the Create Project button near the top right to create a new project.
  • 8. Under the Name field, specify a name for the project. This example project is called Demo-project. You can also add Project Members and Project Groups but we are not going to cover those yet. Click Create Project to finish creating the first project. Once created, the project appears in the Project Listing page. While in the project listing page, you can view and adjust quotas for this project as the admin user. Quotas are limits on resources, like the number of instances. To view the quotas for this project while in Identity -> Projects tab, find the drop down to the right with the first option being Manage Members. From this menu, click Modify Quotas to view the default quota values. How to Create a User and Associate with Project
  • 9. Now that you have a project, you can associate a user with it. There is already the default admin user but now let's see how to create a new user and login with the new user. First navigate as admin to Identity -> Users. By default, there are several users already listed, and this is expected. These are created during cloud deployment and should generally not be modified. Click the Create User button. On the Create User form set values for User Name, Password, Primary Project, and Role. The Email field is optional but is helpful for password resets. For the Project choose the project we created earlier. For Role there are several options depending on the level of access required. The default OpenStack roles are reader, member, and admin. Additional roles also exist in the drop down. Reader is the least authoritative role in the hierarchy. For this example, choose member for the role. Press Create User to create the user. Next, log out of Horizon as admin, and log back in with your new user. Upon logging back in you are by default in the newly created project. You can see the project you are currently in at the top left and your user can be seen at the top right of Horizon.
  • 10. Managing and Creating Images Now let's see how to upload an image (not a graphical image but a copy of a Linux installation) into OpenStack as well as create images out of an existing instance. Images contain a bootable operating system that is used to create instances. We will learn how to upload images to Glance through Horizon and how to create an image from an instance snapshot. Glance is tool for managing images that allows users to discover, retrieve, and register VM (virtual machine) images and container images. Glance uses Ceph to store images instead of the local file system. To access images from within your Horizon Dashboard, navigate to the Projects tab. Within the projects tab, select Compute and then select Images. This tab contains a list of all your images within OpenStack. Projecl / Compute / Images Images Q Click here for filters or full text search. X+ Create 1 mage | Cl Delete Images J Displaying 6 items □ Name * TypeStatus Visibility Protected Disk Format Size □ > centos7.9 ImageActive Public No QCOW 2 847.8 1 MB Launch □ > cirros ImageActive Public No QCOW 2 15 58 MB Launch » □ > PanOS10.8 ImageActive Public No QCOW 2 461.61 MB Launch •
  • 11. Images can be uploaded through your Horizon dashboard by clicking the Create Image button. When creating an image you must choose the Format of the image. With our configuration, the recommended format for images is QCOW2 . QCOW2 is the most common format for Linux KVM, expands dynamically, and supports copy on write. In order to upload an image on Horizon, you must first have the image locally on your machine. In this example, we will upload a CirrOS image. You can download a CirrOS image here. Now click the Create Image button near the top right. Create an Instance in OpenStack Horizon With OpenStack, instances, or virtual machines, play a large role in a cloud's workload. OpenStack provides a way to create and manage instances with its compute service, called Nova.
  • 12. Nova is the OpenStack project that provides a way to provision compute instances. Nova supports creating virtual machines, baremetal servers, and has limited support for system containers. Nova runs as a set of daemons on top of existing Linux servers to provide that service. Now let's learn how to create an instance, including setting up a private network and router, creating a security group, and how to add an SSH key pair. Create a Private Network First, let's learn how to create a private network and router. Later we will create an instance on this private network. The router is created so the private network can be connected to your cloud's public network, allowing you to assign a floating IP address to it, making the instance accessible over the Internet. To create a private network, begin by navigating to Project -> Network -> Networks. Then click Create Network. For this example, we'll create a network with the following details: • Network Name: Set a name for the network. This example is called Private. • Enable Admin State: Leave this checked to enable the network. • Create Subnet: Leave this checked to create a subnet. • Availability Zone Hints: Leave this option as default. Next, move on to the Subnet tab of this form and use these details: • Subnet Name: Set a name for the subnet. This example subnet is called private-subnet.
  • 13. • Network Address: Select a private network range. For example: 192.168.0.1/24 • IP Version: Leave this as IPv4. Gateway IP: This is optional. If unset, a gateway IP is selected automatically. Create a Router You next need to create a router to bridge the connection between the private network and the public network. The public network is called External. To create a router, begin by navigating to Project -> Network -> Routers. Click Create Router.
  • 14. Input this data for this example: • Router Name: Set a name for the router here. This example router is called Router. • Enable Admin State: Leave this checked to enable the router. • External Network: Choose the network External/publicl. • Availability Zone Hints: Leave this as the default. Once complete, create the router by pressing Create Router. Connect Router to Private Network Next, connect the router to the private network by attaching an interface. Performing this step allows network communication between the Private and External networks. To attach an interface to the router, first navigate to the list of routers and locate the one previously created. Click the name of the router to access its details page. This is where the interface is attached. There are three tabs: Overview, Interfaces, and Static Routes. To attach an interface, navigate to the Interfaces tab then load the form to attach an interface by clicking Add Interface near the top right.
  • 15. You can visually see the network topology for your cloud by navigating to Project -> Network -> Network Topology. The example above indicates the External network is connected to the Private network through the router called Router. Security Groups Security groups allow control of network traffic to and from instances. For example, port 22 can be opened for SSH for a single IP or a range of IPs. Let's see how to create a security group for SSH access. Later we'll apply the security group we create to an instance. To view and manage security groups, navigate to Project -> Network -> Security Groups.
  • 16. You should notice a single security group called default. This security group restricts all incoming (ingress) network traffic and allows all outgoing (egress) network traffic. When an instance is created, this security group is applied by default. To allow the network traffic your instance requires, only open ports as required to just the needed IP ranges. To create a security group for SSH, click Create Security Group near the top right. CreateSecurityGroup Name * SSH Description Description: Security groups are sets of IP filter rules that are applied to network interfaces of a VM. After the security group is created, you can add rules to the security group. Create Security Group After creating the SSH security group, we need to add a rule allowing SSH traffic. We will allow SSH traffic from the first hardware node in this cloud to this instance. To add a rule, load the form by navigating to Add Rule near the top right. Add Rule Rule* SSH - Description © Remote *© CIDR CIDR* © 172.10.141.17 Description: Rules define which traffic is allowed to instances assigned to the security group. A security group rule consists of three main parts: Rule: You can specify the desired rule template or use custom rules, the options are Custom TCP Rule, Custom UDP Rule, or Custom ICMP Rule. Open Port/Port Range: For TCP and UDP rules you may choose to open either a single port or a range of ports. Selecting the "Port Range’1 option will provide you with space to provide both the starting and ending ports for the range. For ICMP rules you instead specify an ICMP type and code in the spaces provided. Remote: You must specify the source of the traffic to be allowed via this rule. You may do so either in the form of an IP address block (CIDR) or via a source group (Security Group). Selecting a security group as the source will allow any other instance in that security group access to any other instance via this rule.
  • 17. Create an Instance We now have almost everything in place to create an instance. To create an instance, begin by navigating to Project -> Compute -> Instances. Then click the Launch Instance button. On the details tab, fill in the following details: Instance Name: Set a name for the instance. This example instance is called demo-vml. Description: Optional. Set a description if this applies. Availability Zone: Leave as the default, which is nova. • Count: Controls the number of instances spawned. Just create 1. Next, move to the Source tab allowing you to specify an operating system image.
  • 18. This concludes configuring the instance's source. Next, move to the Flavor tab. Flavors are a way to define the VCPUs, RAM, and Disk space used by an instance. Pre-built flavors are available for you. For this step, select an appropriate flavor from the options under the Available heading. This example uses the m1.small flavor. Click the up arrow to move it to the Allocated section.
  • 19. Next, move to the Networks tab. Launch Instance Details Source Flavor Network Ports Security Groups Key Pair Configuration Networks provide the communication channels for instances in the cloud, v Allocated ) Network Q Subnets Associated Shared Select networks from those listed below. Admin State Status il > Private pnvate-subnet No Up Active v Available Q Select at least one network Q Click here for filters or full text search. X Network Subnets Associated Shared Admin State Status ) External Internet Yes Up Active t Network tab. In this section, you specify the network with which the instance is associated. For this example, select the Private network created previously. You can choose the External network as well, but this is generally recommended against in favor of using a floating IP should your instance require Internet connectivity. You should only expose portions of your network as necessary. This reduces the attack surface and improves application security. If a private network is not created and an instance is created in a default cloud, it is associated with the External network. This means the instance consumes a public IP and it could be reached over the Internet. Next, skip over the Network Ports tab and move to the Security Groups.
  • 20. As the final step, move to the Key Pair tab. In this section, you specify an SSH public key to inject into the instance. You can upload your key at this stage using this form using the Import Key Pair button. You can also create a key pair on this tab. In this section, you specify an SSH public key to inject into the instance. You can upload your key at this stage using this form using the Import Key Pair button. You can also create a key pair on this tab. We will create a key pair from the control node in our cloud so this instance will be accessible over SSH from that node. To create the SSH key pair from the first hardware node, the first step is to login to the first hardware node. After logging in to the node, use ssh-keygen to generate an SSH key pair The private key is saved in the default location of /root/.ssh/id_rsa and a passphrase is set for additional security. To view the contents of the public key, use cat /root/.ssh/id_rsa.pub. For ex.
  • 21. [root@ubuntu ~]# cat /root/.ssh/id_rsa.pub ssh-rsa AAAAB3NzaC1yc2EAAAADAQABAAABgQCv6YOgYbRmXCEFxZP+t+pzh/RRKzsgWpvcnmKwF+uwiKDuihHadScCkgd8dE6y mCjP/+UVdVLGEzXfHXG5EfbcPQYOGjqqOGqOVCHIrhFMG3GjSPao99KaDIAvXsWyTDI9FmrXTiC+0WkmOLNb0UeDic+lQ6 KJumw12O1niZjC19jMpWR5amRWEJo6oKFylC8JLHsdfhqr7EBcBzvUJkqh/1zY3qcsABHBrBCWOKC5oNiDAzctQ5MeHq6tv6 w6YxdZLLdupczteERN6roroySMtR2JZnOIcnq1aUgD/YDJDeg9zpvUN7stsndONYVOH42+bBu7xEWsm8zobgdfLlmhv+8ab7dK VlYvJUkITqCoKpp8m0f3dbLtQSevCJ9qaeQvmxkjU9OHVPkkTolw4aUHvUsutpVynNfmErf3RGMjQRiQ3ZE7xGKVV7iSFDK9l0 mMWBHpYu2OnVKQlP823IC0YKD2dP3qDd/nnvGXVlxfRI+C08n9ehoHwZAIz4SM3dU= root@ubuntu Copy the entire key. It starts with "ssh-rsa" and continues all the way until the end. Now back to the Key Pair tab. Click Import Key Pair. Input the following values: • Key Pair Name: Set a name for the SSH public key. This example public key is called demo-key but it can really be anything you like. • Key Type: This example uses an SSH Key key type. • Public Key: Paste in the public key you just copied. Click Import Key Pair. Once the public key is imported, create the instance by pressing Launch Instance.
  • 22. The instance goes through a build process. Allow a few minutes for this to occur. When complete, the instance appears in the Instances Listing page. Assign and Attach Floating IP The instance created previously is associated with a private network. Presently, the only way to access this instance is to connect to it from with the cloud's hardware nodes. Another option for connecting is to use a floating IP. In this section, we demonstrate how to allocate a floating IP and attach it to this instance. To allocate a floating IP, first navigate to Project -> Network -> Floating IPs. Then click Allocate IP to Project. In the popup, make sure Pool is set to External (and optionally add a description) and then click Allocate IP to add this floating IP address for use. Click Associate. This instance is now accessible over SSH from the first hardware node of your cloud.