SlideShare a Scribd company logo
1 of 35
LIST OF EXPERIMENTS
DIGITAL COMMUNICATION LAB
S.No. NAME OF EXPERIMENTS EXPERIMENT NO.
1. To Study of Pulse Amplitude Modulation and Time
division multiplexing.
ECE-DC-EX-01
2. To study Pulse Time Modulation and De
Modulation(PWM and PPM ).
ECE- DC-EX-02
3. Study the Analog to Digital conversion and Digital to
Analog conversion.
ECE- DC-EX-03
4. Study of Delta Modulation and Demodulation ECE- DC-EX-04
5. Study of Adaptive Delta Modulation and Demodulation. ECE- DC-EX-05
6. Study of Amplitude Shift Keying. ECE- DC-EX-06
7. Study of Frequency Shift Keying. ECE-DC-EX-07
8. Study of Phase Shift Keying. ECE- DC-EX-08
9. To Study Quadrature Phase Shift Keying transmission
and Reception.
ECE- DC-EX-09
10. ECE- DC-EX-10
Experiment No-1
Aim: To Study of Pulse Amplitude Modulation and Time division multiplexing.
Apparatus Required:-ST-2110 kit with power supply cord CRO with connecting probe,
connecting cords.
Theory: Most digital modulation systems are based on pulse modulation. It involves variation
of a pulse parameter in accordance with the instantaneous value of the information signal. This
parameter can be amplitude, width, repetitive frequency etc. Depending upon the nature of
parameter varied, various modulation systems are used. Pulse amplitude modulation, pulse width
modulation, pulse code modulation are few modulation systems cropping up from the pulse
modulation technique. In pulse amplitude modulation (PAM) the amplitude of the pulses are
varied in accordance with the modulating signal. In true sense, pulse amplitude modulation is
analog in nature but it forms the basis of most digital communication and modulation systems.
The pulse modulation systems require analog information to be sampled at predetermined
intervals of time. Sampling is a process of taking the instantaneous value of the analog
information at a predetermined time interval. A sampled signal consists of a train of pulses,
where each pulse corresponds to the amplitude of the signal at the corresponding sampling time.
The signal sent to line is modulated in amplitude and hence the name Pulse Amplitude
Modulation (PAM).
Block diagram:
(Pulse Amplitude Modulation)
WAVE FORM :
Time Division Multiplexing:
Time division multiplexing is the process of combining the samples from different information
signals, in time domain so that they can be transmitted over the common channel. The fact
utilized in TDM technique is that there are large intervals between the message samples. The
samples from the other sources can be placed within these time intervals. Thus every sample is
separated from other in time domain. The time division multiplexing system can be simulated by
two rotating switches, one at transmitter and the other at receiver. (See figure 7) The two wipers
rotate and establish electrical contact with one channel at a time.
(Principle operation of TDM)
Each signal is sampled over one sampling interval and transmitted one after the other
along a common channel. Thus part of message 1 is transmitted first followed by part
of message 2, message 3 and then again message 1 so on. The switches connect the transmitter
and the receiver to each of the channels in turn for a specific interval of time. In effect each
channel is sampled and the sample is transmitted When the switches are in the channel 1
position, channel 1 forms a PAM channel with an LPF for reconstruction, and so on for channels
2 and 3. The result is that the amplitudes samples from each channel share the line sequentially,
becoming interleaved to form a complex PAM wave, as shown above. A major problem in any
TDM system is the synchronization of the transmitter and receiver timing circuits. The
transmitter and receiver must switch at the same time and frequency. Also SW1 must be in the
channel 1 position when SW2 is in the channel 1 position, so that the switches must be
synchronized in position also. In a system that uses analogue modulation (PAM) the time slots
are separated by guard slots to prevent crosstalk between channels.
WAVE FORM :
(Timing waveform of TDM-PAM system)
Procedure:
1. Connect the circuit as shown in Figure 1.1.
a. Output of sine wave to modulation signal input in PAM block keeping the switch in 1 KHz
position.
b. 8 KHz pulse output to pulse input.
2. Switch ‘On’ the power supply & oscilloscope.
3. Observe the outputs at TP(3 & 5) these are natural & flat top outputs respectively.
4. Observe the difference between the two outputs.
5. Vary the amplitude potentiometer and frequency change over switch & observe the effect on
the two outputs.
6. Vary the frequency of pulse, by connecting the pulse input to the 4 frequencies available i.e. 8,
16, 32, 64 kHz in Pulse output block.
7. Switch ‘On’ fault No. 1, 2, 3, 4 one by one & observe their effect on Pulse Amplitude
Modulation output and try to locate them.
8. Switch ‘Off’ the power supply.
RESULT: The Study of Pulse Amplitude Modulation and Time division multiplexing
successfully .
Experiment No-2
Aim:To study Pulse Time Modulation and De Modulation(PWM and PPM ).
Apparatus Required: ST-2110 Kit, power supply cord, CRO with connecting probe,
Connecting cor
BLOCK DIAGRAM:
Theory: The PWM is a technique which is used to drive the inertial loads since a very long
time.The simple example of an inertial load is a motor. Apply the power to a motor for a very
short period of time and then turn off the power: it can be observed that the motor is still running
even after the power has been cut off from it. This is due to the inertia of the motor and the
significance of this factor is that the continuous power is not required for that kind of devices to
operate. A burst power can save the total power supplied to the load while achieving the same
performance from the device as it runs on continuous power.
The PWM technique is use in devices like DC motors, Loudspeakers, Class -D
Amplifiers, SMPS etc. They are also used in communication field as-well. The modulation
techniques like AM, FM are widely used RF communication whereas the PWM is modulation
technique is mostly used in Optical Fiber Communication (OFC).
As in the case of the inertial loads mentioned previously, the PWM in a communication link
greatly saves the transmitter power. The immunity of the PWM transmission against the inter-
symbol interference is another advantage. This article discusses the technique of generating a
PWM wave corresponding to a modulating sine wave.
WAVE FORM :
Procedure:
1. Connect the circuit as shown in Figure 7.1 and also described below for clarity.
a. 1 KHz sine wave output of function generator block to modulation input
of PWM block.
b. 64 KHz square wave output to pulse input of PWM block.
2. Switch ‘On’ the power supply & oscilloscope.
3. Observe the output of PWM block.
4. Vary the amplitude of sine wave and see its effect on pulse output.
5. Vary the sine wave frequency by switching the frequency selector switch to 2
KHz.
6. Also, change the frequency of the pulse by connecting the pulse input to
different pulse frequencies viz. 8 KHz, 16 KHz, 32 KHz and see the variations
in the PWM output.
7. Switch ‘On’ fault No. 1, 2, & 5 one by one & observes their effect on PWM
output and tries to locate them.
8. Switch ‘Off’ the power supply.
Experiment No 3
AIM: Study the Analog to Digital conversion and Digital to Analog conversion.
APPRATUS:
THEORY: A/D Conversion
The PCM Transmitter samples the analog input, time division multiplex and many
such channels, quantizes it & code it by analog to digital conversion. As it is known,
the binary number system consists of binary digits '0' and '1'. The group of n bits is
called as word and is used to distinguish one code from the other. The range of
decimal numbers represented by such n bits code is equal to 2n (including 0) e.g. If we
take an 8 bit word, the number or different codes possible is equal to 28
= 256 i.e. we
have 0 to 255 code levels available
This range can be used to indicate any range of voltage. The process of allocating the
binary values to each sample taken in PAM system is known as quantization. Every
binary number indicates one level. Since binary value changes in discrete steps & is
not continuous like analog waveform, some distortion creeps in at the time of value
assignment; this is discussed in forth coming parts. The range of binary values used is
the design feature of the system & depends upon the amplitude range of the signal and
the accuracy of the conversion to be achieved.
Most systems use an 8 bit word length which is practically found most suitable to
cover the sufficient range & provide the accuracy needed for speech signals. As with
all engineering processes, quantization produces its own problems & an engineering
compromise is then called for. The two major problems associated with quantization
are : 1) One major problem associated with quantization is due to the discrete nature of
binary numbers which are used to represent continuously variable analog
waveform, It is not possible to represent all the analog values (which are infinite
in number) by limited binary words e.g. if in the figure 27, the analog value lies in
between the two voltages represented by 0011 & 0100 binary words, what will
happen?
In such cases the system allocates a binary number closest to the sample value. This leads to
distortion of the information signal & the approximation is random for different voltage levels.
Hence it is known as quantization noise. Quantization noise can be reduced by increasing the number
of bits used to represent a sample. But it can never be eliminated. Increasing the number of bits in a
word has an effect of increasing the number of quantization levels.
A digital-to-analog converter, or simply DAC, is a semiconductor device that is used to convert a
digital code into an analog signal. Digital-to-analog conversion is the primary means by which digital
equipment such as computer-based systems are able to translate digital data into real-world signals
that are more understandable to or useable by humans, such as music, speech, pictures, video, and the
like. It also allows digital control of machines, equipment, household appliances, and the like. A
typical digital-to-analog converter outputs an analog signal, which is usually voltage or current that is
proportional to the value of the digital code provided to its inputs. Most DAC's have several digital
input pins to receive all the bits of its input digital code in parallel (at the same time). Some DAC's,
however, are designed to receive the input digital data in serial form (one bit at a time), so these only
have a single digital input pin. A simple DAC may be implemented using an op-amp circuit known
as a summer, so named because its output voltage is the sum of its input voltages. Each of its inputs
uses a resistor of different binary weight,
such that if R0=R, then R1=R/2, R2=R/4, R3=R/8,.., RN-1=R/(2N-1). The output of a summer circuit
with N bits is:
Vo = -VR (Rf / R) (SN-12N-1 + SN-22N-2+...+S020)
Where VR is the voltage to which the bit is connected when the digital input is '1'. A= digital input is
'0' if the bit is connected to 0V (ground).
(An Op Amp Summer Circuit Used as a DAC)
Digital Transmission:-
There are two methods for sending digital data over a distance, namely
a. Parallel transmission
b. Serial transmission
In short distance communication like inside terminal equipment or two computer
terminals located near each other, the signals are passed in parallel, format over
parallel wires. Thus the signal in the form of a word is passed. This mode is faster.
For long distances, even more than few feet’s, this is uneconomical & inefficient way
of transmission. It is a wasteful of transmission media as each bit requires a separate
link. Therefore the digital signals are transmitted serially over a single link.
The two important parameters in serial signaling are
1. The modulation rate or the signaling rate (in Baud)&
2. data transmission rate or bit rate (in Bits per second)
The signaling rate or modulation rate is defined as the maximum rate at which the
signal is switched between signaling rate (or number of symbols transmitted per
second).
The other way of defining modulation rate is that it is the reciprocal of the shortest
time for which the signal remains in any state. The modulation rate is measured in
Baud which is equal to one unit signal element per second.
Experiment no 4
AIM: Study of Delta Modulation and Demodulation
APPRATUS: ST-2105 kit with power supply cord CRO with connecting probe, connecting
cords.
Theory of Delta Modulation:
As it has been seen, delta modulation system is unable to chase the rapidly changing information
of the analog signal, which gives rise to distortion & hence poor quality reception. This is known
as slope overloading phenomenon. The problem can be overcome by increasing the integrator
gain (i.e. step-size). But using high step-size integrator would lead to a high quantization noise.
Quantization Noise :
It is defined as error introduced between the original signal, & the quantized signal due to the
fixed step size in which the signal (quantized) is incremented. As the error is random in nature &
hence unpredictable, it can be treated as noise. High quantization noise may play havoc on small
amplitude signals. The solution to this problem is to increase the integrator gain for fast-
changing input & to use normal gain for small amplitude signals. The basic idea is to increase the
integrator the integrator gain (it is doubled on this trainer) when slope overload occurs. If still it
is unable to catch up with the signal, the integrator gain is doubled again. The integrator on board
has four available gains standard, standard X2, standard X4, and standard X8. The integrator thus
adopts it self to the gain where its lowest value can just overcome the slope overloading effect.
See figure 8. 10. As it can be observed, the adaptive delta modulator is similar to the delta
modulator except for few blocks namely the counter & the control circuit. The input to the
control circuit is the latched data from the D Flip-Flop. The counter is reset whenever 'high'
appears at the output of the control circuit. Both the counter & the control circuit are clocked by
the same TX clock. The input to the integrator from the counter is a two-bit control word, which
controls the gain of the integrator. When the output of counter is '00' the gain is lowest (standard)
where as it is highest (standard X8) for counters output '11'. The Control Circuit Works as
Follows :
The control circuit compares the preset data bit from D flip-flop with the previous two data bits.
Its output to the counter is high when the three bits are identical, the control circuits output goes
low, thus letting the counter advance with every clock cycle. This advancement continues till the
output from the control circuit does not go 'high'. Each time the counter is incremented from ‘00’
integrator gain is doubled till the counter reached '11' where it remains in that state until it is
reset by the counter. Similarly, the adaptive delta demodulator is a like delta demodulator except
for two blocks namely, the control circuit & the counter. They function in the same way as in
modulator part, except for the fact that they are clocked by the receiver clock.
BLOCK DIAGRAM:
DIAGRAM:
(Delta Modulation)
Procedure:
Initial setup of ST2155:
Clock frequency selector switches : A = 0 and B = 0 position. Integrator (1) blocks switches
position:
Gain control switch position : Left-hand side.
Switches position : A=0 and B=0 position.
Integrator (2) blocks switches position:
Gain control switch position :Right-hand side
Switches position : A = 0 and B = 0 position.
1. Connect the mains supply cord to the Trainer.
2. Make connection on the board as shown in the figure 1.1.
3. Switch 'ON' the trainer power supply and oscilloscope.
4. In order to ensure for correct operation of the system, we first take the input to 0V. So connect
the '+' input of the delta modulator's voltage comparator to 0V and monitor on an oscilloscope
the output of integrator 1 (TP13) and the output of the transmitter's unipolar to bipolar converter
(TP 29) If the transmitter's unipolar to bipolar converter output has equal positive and negative
output levels, integrator’s output will be a triangular wave centered around '0' Volts, as shown in
figure 1.2 (Case A). However, if the unipolar to bipolar converter’s negative level is greater than
the positive level, the integrator's output will appear as shown in figure 1.2 (Case B). Should the
unipolar to bipolar converter’s positive output level be the greater of the two levels, the
integrator's output will resemble that shown in figure 1.2 (Case C).
5. The relative amplitudes of the unipolar to bipolar converter’s positive and negative output
levels can be varied by adjusting the level adjust preset in the unipolar to bipolar converter
circuit 1 block. When it is turned anticlockwise, the negative level increases relative to the
positive level, when turned clockwise, the positive level increases relative to the negative level.
Case A: Bipolar output: Positive level = Negative level
Case B: Bipolar output: Positive level < Negative level
Case C: Bipolar output: Positive level > Negative level
6. Adjust the transmitter's level changer preset until the output of integrator 1 (TP 13) is a
triangular wave centered around 0 Volts, as shown in figure 1.2 (Case A). The peak-to-peak
amplitude of the triangle wave at the integrator's output should be 1.8V (approx), this amplitude
is known as the integrator step size. The output from the transmitter's bistable circuit (TP 19)
will now be a stream of alternate '1' and '0', ‘s' this is also the output of the delta modulator it
self. The delta modulator is now said to be 'balanced' for correct operation.
7. Examine the signal at the output of integrator 2 (TP 41) at the receiver. This should be a
triangular wave, with step size equal to that of integrator 1, and ideally centre around 0 Volts. If
there is any DC bias at the output of integrator 2, remove it by adjusting the receiver's level
adjust preset (in the unipolar to bipolar converter circuit 2 block). This preset adjusts the relative
amplitudes, of the positive and negative output levels from the receiver's unipolar to bipolar
converter circuit. Only when these levels are balanced will there be no offset at the output of
integrator2.
8. Outputs at TP 13 and TP 41 respectively
Volts/Div: 1V Clock Frequency: 50 KHz
Time/Div: 20 usec Input Signal : 0V
WAVE FORM :
The receiver's low pass filter (whose cut off frequency is 4.2 KHz.) then filters out the higher -
frequency triangular wave, to leave a DC level at the output of filter (TP 43). If the receiver's
level adjust preset has been adjusted correctly, this DC level will be '0' volt. The delta
demodulator also is now balanced for correct operation.
9. Disconnect the voltage comparators '+' input from 0V, and reconnect it to the ~1 KHz output
from the function generator block; the modulator's analog input signal is now a 1 KHz sine wave.
Monitor this analog signal at the voltage comparator's '+' input (TP 15) together with the output
of, integrator 1 (TP 13).Trigger the scope on the same analog signal which is applied to the
voltage comparator's '+' input (TP 15). Note how the output of the transmitter integrator follows
the analog input, as was illustrated in figure 1.
10. Display the data of the transmitter's bistable (at TP 19), together with the analog input at TP
15 (again trigger on this signal), and note that the 1 KHz sine wave has effectively been encoded
into a stream of data bits at the bistable's output, ready for transmission to the receiver.
11. For a full understanding of how the delta modulator works, examine the output of the
voltage comparator (TP 16), the bistable's clock input (TP 19), and the unipolar to bipolar output
(TP 29)
12. Outputs at TP 13 and TP 41 respectively
Volts/Div: 5V Clock Frequency: 50 KHz
Time/Div: 500usec Input Signal : 1 KHz, 10Vpp
WAVE FORM :
Display the output of integrator 1 (TP 13) and that of integrator 2 (TP 41) on thescope. Note that
the two signals are very similar in appearance, showing that the demodulator is working as
expected.
13. Display the output of integrator 2 (TP 41) together with the output of the receiver's low pass
filter block (TP43). Note that although the integrator’s output has been smoothed out somewhat
by the low pass filter, some unwanted 'ripple' still remains at filter's output This 'ripple' is due to
the 'quantization noise' at the integrator's output, which is caused by the relatively large
integrator step size. This step size can be reduced by increasing the rate at which the system is
clocked (i.e. the sampling frequency).This reduces the sampling period, and hence the time
available between samples for the integrators to ramp up and down.
14. The current system clock frequency is 50 KHz. This is set by the A, B switches in the clock
frequency selector block, which are currently in the A= 0, B= 0 positions. While monitoring the
same signals, increase the system clock frequency to 100 KHz, by putting the switches in the A =
0, B = 1 positions.
.
15. By changing the system clock frequency to first 200 KHz (clock frequency selector switches
in A=l, B=0 positions), and then to 400 KHz (switches in A=l, B=1 positions), note the
improvement in the low - pass filter's output signal (TP43). Once again, it may be necessary to
adjust slightly the transmitter's level adjust preset, in order to obtain a stable oscilloscope trace.
16. Using a system clock frequency of 400 KHz compare the low pass filter's output (TP43) with
the original analog input (TP15).
Output waveforms at TP13 and TP43 respectively
Volts/Div: 5V Clock Frequency: 400 KHz
Time/Div: 500usec Input Signal frequency: 1 KHz, 10Vpp
WAVE FORM :
There should now be no noticeable difference between them, other than a slight delay.
17. While continuing to monitor the transmitter's analog input (TP15) and the receiver's low-pass
filter output (TP43), disconnect the comparator's + input from the 1 KHz sine wave output, and
reconnect it to 2 KHz, 3 KHz and 4 KHz outputs in turn and using system clock frequency of 50
KHz . Note that, as the frequency of the analog signal increases, the low pass filter's output
becomes more distorted and reduced in amplitude.
18. In order to understand what has caused this distortion, leave the comparator's + input
connected to the 4 KHz sine wave output of the function generator, and examine the output of
integrator 2 (TP41). Note that the integrator's output no longer approximates the analog input
signal, but is triangular. Compare this with the output of integrator 1 (TP13), and note that the
two signals are exactly the same; the problem obviously starts in the delta modulator circuit
Output waveforms at TP13 and TP43 respectively
Volts/Div: 5V Clock Frequency: 400 KHz
Time/Div: 200usec Input Signal frequency: 4 KHz, 10Vpp
WAVE FORM :
Slope Overloading
19. Compare the 4 KHz analog input signal (TP15) with the output of integrator 1 (TP13) it
should now become clear what has happened. The analog signal is now changing so quickly that
the integrator's output cannot ramp fast enough to 'catch up' with it, and the result is known as
'slope overloading.'
20. Although the system clock frequency i.e. the sampling frequency determines how often the
integrator's output direction can change (up or down), it does not affect how quickly the
integrator's output can ramp up and down. Consequently, changing the system clock frequency
will not help the slope overload problem. Prove this by changing the clock frequency selector
switches, and noting that the problem is still present.
Return the switches to the A= 1, B=1 (400 KHz clock frequency) position before continuing.
21. If slope overloading is to be avoided in a practical delta modulation system, the
transmitter integrator must be able to ramp up or down at a rate which is at least
as great as the maximum rate of change at the transmitter's analog input. If the
incoming analog signal is a sine wave, its maximum rate of change occurs at the
zero crossing point, and is proportional to both the frequency and the amplitude
of the sine wave. the output of integrator 1 (TP17) and the output of the transmitter's level
changer (TP15) If the transmitter's level changer output has equal positive and negative output
levels. Integrator’s output will be a triangle wave centered around '0' Volts, as shown in figure 6
(Case A). However, if the level changer's negative level is greater than the positive level, the
integrator's output will appear as shown in figure 6 (Case B). Should the level changer's positive
output level be the greater of the two levels, the integrator's output will resemble that shown in
figure 6 (Case C).
Result: The Delta modulation / demodulation and Slope Overloading effect has been studied.
Experiment no-5
AIM: Study of Adaptive Delta Modulation and Demodulation.
APPRATUS: ST-2105 kit with power supply cord CRO with connecting probe, connecting
cords.
THEORY: Theory of Adaptive Delta Modulation
The delta modulation & adaptive delta modulation suffers from two serious limitations, namely,
1. They are not able to pass DC level information, which is a must in video systems.
2. The signal to noise ratio decreases as the signal frequency increases. Both these serious
limitations can be overcame by delta sigma modulation. The delta modulator on-board can pass
DC level information if the integrators are zeroed before hand (by level adjust presets) & the
gains of integrator at two ends (TX & RX) are exactly equal. This is possible on ST2105 board
but not in real life operation where TX & RX are separated by hundreds of kms & they are
expected to work over a long period without additional setting up. The inherent short coming of
the delta modulator to pass DC level information is due to the fact that it passes the information
about the change in the voltage level & not the actual voltage level itself itself e.g. encodes the
change from -2V to -1V same as it would encode a change from +2V to +3V. In delta sigma
modulation the integrator is added in front of the delta sigma modulator. This simple
arrangement makes a big change in the circuit behaviour. It now responds to actual voltage levels
rather than the change in the voltage level. The effect of the addition of integrator before the
delta modulator can be done away by adding a differentiator at the end of the receiver. The
voltage comparator functionally can be thought of as a unity gain differential amplifier followed
by a zero-crossing detector. If the voltage comparator is replaced by this circuit, the no. of
integrators can be reduced to one (at the output of unit-gain differential amplifier).Similarly,
since the low pass filter is a linear circuit element the effect of integrator at the input of LPF is
nullified by the differentiator present at its output. Therefore, these two blocks are redundant in
the receiver. The resulting circuit looks as in figure 14 & 15. The system shown in the figure 12
& 13 can be simplified further. Since the voltage comparator is highly non-linear device cannot
transfer the two integrations at its input to one integration at its output.
BLOCK DIAGRAM:
( )
DIAGRAM:
Procedure:
Initial setup of ST 2155:
Clock frequency selector switches : A = 0 and B = 0 position.
Integrator (1) blocks switches position:
Gain control switch position : Left-hand side.
Switches position : A=0 and B=0 position.
Integrator (2) blocks switches position:
Gain control switch position :Right-hand side
Switches position : A = 0 and B = 0 position.
Function Generator’s potentiometers position:
1 KHz to 4 KHz Pots position : fully clockwise position
1. Connect the main supply cord to the trainer.
2. Connect the board as per figure 2.1.
3. Switch ON the supply of trainer and oscilloscope.
4. As the gain control switch is towards A & B switches, the gain setting is still manual, connect
the voltage comparator's +ve input to 0V & check whether the modulator & demodulator are
balanced for correct operation as in delta modulation experimentation. Change the clock
frequency selector switches to the A=1, B=1, positions (400 KHz Clock Frequency) before
continuing.
5. Disconnect the voltage comparators '+' input from 0V and reconnect it to the 4 KHz output
from the function generator block.
6. Monitor the 4 KHz analog input at TP14 and the output of integrator 1 at TP13.
7. At the transmitter, move the slider of the gain control switch in the integrator 1 block to the
right-hand position (towards the sockets labeled A, B). At the receiver, move the slider of the
gain control switch in the integrator 2 block to the left-hand position (again towards the sockets
labeled A, B). The gain of each integrator is now controlled by the outputs of the counter
connected to it. Functionally, the transmitter and receiver are now configured as shown in the
figure 9 & 10 i.e. as adaptive delta modulator and demodulator respectively.
8. Once again examine the 4 KHz analog input at TP14 and the output of integrator 1 at TP13,
noting that the" slope overloading problem has been eliminated, and that the integrator's output
once again follows the analog input signal. Again, it may be necessary to adjust slightly the
transmitter's level adjust preset, in order to obtain a stable trace of the integrator's output signal.
9. Compare the output of integrator 1 (TP13) with that of integrator 2 (TP41); noting that, both
are identical in appearance as expected.
Output waveforms at TP13 and TP43 respectively
Volts/Div: 5V Clock Frequency: 400 KHz
Time/Div: 200usec Input Signal frequency: 4 KHz, 10Vpp
Automatic gain control of Tx. & Rx. Integrators
10. Examine the output of the low pass filter (TP42) and the output of integrator 2 (TP41). The
filter has removed the high-frequency components from the integrator's output signal, to leave
good, clean 4 KHz sine wave.
11. Compare the original 4 KHz analog input signal (at TP15) with the output signal from the
receiver's low pass filter at TP43). Note that the demodulator's output signal is identical to the
modulator's input signal, but is delayed somewhat.
12. Disconnect the voltage comparator’s '+' input from the 4 KHz function generator output, and
reconnected it in turn to the 3 KHz, 2 KHz and 1 KHz outputs, noting in each case that the
demodulator’s output signal is identical to the modulator's input signal, but delayed in time.
Output waveforms at TP13 and TP43 respectively
Volts/Div: 5V Clock Frequency: 400 KHz
Time/Div: 200usec Input Signal frequency: 1 KHz, 10Vpp
Automatic gain control of Tx. & Rx. Integrators
13. The adaptive delta modulator/demodulator system has therefore eliminated slope-overloading
problems. To examine in details how it does this, reconnect the voltage comparator's '+' input to
the function generator's 4 KHz output, then reduce the system clock (i.e. sampling) frequency to
50 KHz, by putting the clock frequency selector switches in the A=0, B=0 positions.
14. Monitor the 4 KHz analog input signal at TP14 and at the output of integrator 1 (TP13). It
should now become a little clearer as to how the adaptive delta modulator is operating. It will be
noted that the slope of the integrator's output signal is no longer constant, but increases in a
series of discrete steps, in order to 'catch up' with the fast-changing analog input signal.
15. Examine also the test points in the adaptive control circuit 1 block (TP22-25), to have an
understanding of how the adaptive delta modulator is operating.
16. While monitoring the outputs of the modulator's binary counter (TP22 and 23), slowly turn
the 4 KHz preset anticlockwise, in order to reduce the amplitude of the 4 KHz analog input
signal. Notice that once the analog input signal becomes small enough, both the counter's outputs
becomes permanently low, causing the integrator to have minimum gain.
Applied Input Output
S.No I/P frequency I/P Voltage O/P Voltage
1.
2.
3.
4.
Experiment No 6.
AIM: Study of Amplitude Shift Keying.
APPRATUS: 1. ST2156 and ST2157 kit .
2. 2 mm Banana cable
3. Oscilloscope Caddo 802 or equivalent
4.Power supply.
THEORY:
Amplitude shift keying - ASK - in the context of digital communications is a modulation process,
which imparts to a sinusoid two or more discrete amplitude levels. These are related to the number of
levels adopted by the digital message.
For a binary message sequence there are two levels, one of which is typically zero.
Thus the modulated waveform consists of bursts of a sinusoid.
There are sharp discontinuities shown at the transition points. These result in the signal having an
unnecessarily wide bandwidth. Band limiting is generally introduced before transmission, in which
case these discontinuities would be ‘rounded off’. The band limiting may be applied to the digital
message, or the modulated signal itself.
The data rate is often made a sub-multiple of the carrier frequency. This has been done in the
waveform of Figure 1.
One of the disadvantages of ASK, compared with FSK and PSK, for example, is that it has not got a
constant envelope. This makes its processing (eg, power amplification) more difficult, since linearity
becomes an important factor. However, it does make for ease of demodulation with an envelope
detector.
ASK signal (below) and the message (above)
A significant reduction can be accepted before errors at the receiver increase unacceptably. This can
be brought about by bandlimiting (pulse shaping) the message before modulation, or bandlimiting the
ASK signal itself after generation.
(ASK generation method)
where the message has been band limited. The shape, after band limiting, depends naturally enough
upon the amplitude and phase characteristics of the band limiting filter.
Original TTL message (lower), band limited message (center),
and ASK (above)
Procedure:
1. Connect the power supplies of ST2156 and ST2157 but do not turn on the power supplies until
connections are made for this experiment.
2. Make the connections as shown in the figure 8.1.
3. Switch 'ON' the power.
4. On ST2156, connect oscilloscope CH1 to ‘Clock In’ and CH2 to ‘Data In’ and observe the
waveforms.
5. On ST2156, connect oscilloscope CH1 to ‘NRZ (L)’ and CH2 to ‘Output’ of modulator
Circuit (l) on ST2156 and observe the waveforms.
6. Vary the gain potentiometer of modulator circuit (l) on ST2156 to adjust the amplitude of
ASK Waveform.
7. On ST2156, connect oscilloscope CH1 to ‘NRZ (L)’ and CH2 to ‘Output’ of
comparator on ST2157 and observe the waveforms.
Observations:
1. The output at ‘Data In’ is repeating sequence of bits generated by Data Source.
2. The output at Modulator Circuit (l) is the ASK waveform which contains carrier
transmitted for Data ‘1’ and carrier suppressed Data ‘0’.
3. The output at comparator on ST2157 is the same as ‘Data In’ on ST2156.
(Waveforms Of ASK Modulation)
Precautions:
1. Check the connections before switching ON the kit.
2. Observations should be taken properly.
Experiment No 7
AIM: Study of Frequency Shift Keying.
APPRATUS: 1. ST2156 and ST2157 kit .
2. 2 mm Banana cable
3. Oscilloscope Caddo 802 or equivalent
4.Power supply.
THEORY: In Frequency shift keying, the carrier frequency is shifted (i.e. from one frequency
to another) corresponding to the digital modulating signal. If the higher frequency is used to
represent a data ‘1’ & lower frequency a data ‘0’, the resulting FSK waveform appears. Thus
Data =1 High Frequency
Data =0 Low Frequency
It is also represented as a sum of two ASK signals. The two carriers have different frequencies &
the digital data is inverted. The demodulation of FSK can be carried out by a PLL. As known,
the PLL tries to ‘lock’ the input frequency. It achieves this by generating corresponding O/P
voltage to be fed to the VCO, if any frequency deviation at its I/P is encountered. Thus the PLL
detector follows the frequency changes and generates proportional O/P voltage. The O/P voltage
from PLL contains the carrier components. Therefore to remove this, the signal is passed through
Low Pass Filter. The resulting wave is too rounded to be used for digital data processing. Also,
the amplitude level may be very low due to channel attenuation.
DIAGRAM:
FSK Generation:
As its name suggests, a frequency shift keyed transmitter has its frequency shifted by the message.
Although there could be more than two frequencies involved in an FSK signal, in this experiment the
message will be a binary bit stream, and so only two frequencies will be involved.
The word ‘keyed’ suggests that the message is of the ‘on-off’ (mark-space) variety, such as one
(historically) generated by a morse key, or more likely in the present context, a binary sequence. The
output from such a generator is illustrated in Figure 1 below.
Procedure:
1. Connect the power supplies of ST2156 and ST2157 but do not turn on the power
supplies until connections are made for this experiment.
2. Make the connections as shown in the figure 3.1.
3. Switch 'ON' the power.
4. On ST2156, connect oscilloscope CH1 to ‘Clock In’ and CH2 to ‘Data In’ and
observe the waveforms.
5. On ST2156, connect oscilloscope CH1 to ‘NRZ (L)’ and CH2 to ‘Output’ of
Summing Amplifier on ST2156 and observe the waveforms.
6. Adjust the potentiometers of both the Modulator Circuit (l) &(ll) onST2156 to
adjust the amplitude of FSK waveform at Summing Amplifier’s output on
ST2156.
7. On ST2156, connect oscilloscope CH1 to ‘NRZ (L)’ and CH2 to ‘Output’ of
comparator on ST2157 and observe the waveforms.
Observations:
1. The output at Summer Amplifier is the FSK waveform, Observe that for data
bit '0' the FSK signal is at lower frequency (960KHz) & for data bit '1’ the FSK
signal is at higher frequency (1.6 MHz)The output at comparator on ST2157 is
the same as ‘Data In’ on ST2156.
(Waveforms of FSK Modulation & Demodulation)
RESULT: The amplitude change in FSK waveform does not matter, therefore FSK
modulation technique is very reliable even in noisy & fading channels.
Experiment No 8
AIM: Study of Phase Shift Keying.
APPRATUS: 1. ST2156 and ST2157.
2. 2 mm Banana cable
3. CRO.
4.Power supply.
THEORY: Phase shift keying involves the phase change of the carrier sine wave between 0 and
180 in accordance with the data stream to be transmitted. PSK is also known as Phase reversal
keying. PSK modulator is shown in figure 1. Functionally, the PSK modulator is very similar to
the ASK modulator. Both uses balanced modulator to multiply the carrier with the modulating
signal. But in contrast to ASK techniques, the digital signal applied to the modulator input for
PSK generation is bipolar i.e. have equal +ve and –ve voltage levels. The unipolar – bipolar
converter converts the unipolar data stream to bipolar data. At receiver, the square loop detector
circuit is used to demodulate the transmitted PSK signal. The demodulator is shown in figure 2.
The incoming PSK signal with 0 & 180 phase changes is first fed to the signal square, which
multiplies the input signal by itself. The phase adjust circuit allows the phase of the digital signal
to be adjusted w.r.t the input PSK signal. Also its O/P controls the closing of an analog switch.
When the output is high the switch closes and the original PSK signal is switched through the
detector.
BLOCK DIAGRAM:
(PSK MODULATED)
(PSK DE MODULATED)
Procedure:
1. Connect the power supplies of ST2156 and ST2157 but do not turn on the power
supplies until connections are made for this experiment.
2. Make the connections as shown in the figure 4.1.
3. Switch 'ON' the power.
4. On ST2156, connect oscilloscope CH1 to ‘Clock In’ and CH2 to ‘Data In’ and
observe the waveforms.
5. On ST2156, connect oscilloscope CH1 to ‘NRZ (L)’ and CH2 to ‘Output’ of
Modulator Circuit (l) on ST2156 and observe the waveforms.
6. Adjust the ‘Gain’ potentiometer of the Modulator Circuit (l) on ST2156 to
adjust the amplitude of PSK waveform at output of Modulator Circuit (l) on
ST2156.
7. Now on ST2157 connect oscilloscope CH1 to ‘Input’ of PSK demodulator and
connect CH2 one by one to output of double squaring circuit, output of PLL,
output of Divide by four (á 2) observe the wave forms.
8. On ST2157 connect oscilloscope CH1 to output of Phase adjust and CH2 to
‘output’ of PSK demodulator and observe the waveforms. Set all toggle switch
to 0 and compare the waveform now vary the phase adjust potentiometer and
observe its effects on the demodulated signal waveform. (Note: If there is
problem in setting the waveform with potentiometer then toggle the switch
given in PSK demodulator block two to three times to get the required
waveform).
9. Now connect oscilloscope CH1 to ‘PSK’ output of PSK demodulator on
ST2157 and connect CH2 ‘Output’ of Low Pass Filter on ST2157 and observe
the waveforms.
10. Connect oscilloscope CH1 to ‘Output’ of Low Pass Filter on ST2157 then
connect CH2 to ‘Output’ of Comparator on ST2157 and observe the waveforms,
now vary the reference voltage potentiometer of first comparator to generate
desired data pattern.
11. On ST2156, connect oscilloscope CH1 to ‘NRZ (L)’ and CH2 to ‘Output’ of
comparator on ST2157 and observe the waveforms.
12. Connect oscilloscope CH1 to ‘Data In’ then connect CH2 output to Bit decoder
and observe the waveforms. If both data does not matches then try to match it by
varying the phase adjust potentiometer on QPSK Demodulator.
13. Now try to match the LED sequence by once pressing the reset switch on
ST2156.
Observations:
1. The output at ‘Data In’ is repeating sequence of bits generated by Data Source.
2. The ‘Output’ of Modulator Circuit (l) is Phase Shift Keying modulated signal.
3. The output of Double squaring circuit is sinusoidal signal (carrier signal) but frequency is four
times higher than that of carrier used for modulation.
4. The output of Phase Lock Loop (PLL) is clock signal of same frequency as that
of the output of double squaring circuit and output of Divide by two (á 2) is
clock signal of frequency two times less than the output of PLL signal.
5. The output of PSK demodulator is a signal having group of positive half cycles
and group of negative half cycles of the carrier signal.
6. A low pass filter removes high frequency component from demodulated PSK
signal and it makes the signal smooth.
7. The variation in reference voltage potentiometer affect the Data, to recover Data
correctly potentiometer adjustment is necessary.
8. The Phase Adjust potentiometer on ST2157 matches the phase of regenerated
clock and carrier with input clock and carrier signal.
(Waveforms of PSK Modulation)
(Waveforms of PSK Demodulation)
Result:
The PSK modulator and demodulator circuit has been studied.
Precautions:
1. Check the connections before switching ON the kit.
2. Observations should be taken properly.
Experiment No 9
3. AIM: To Study Quadrature Phase Shift Keying transmission and Reception.
4. APPRATUS: 1. ST2156 and ST2157.
5. 2. 2 mm Banana cable
6. 3. CRO.
7. 4.Power supply.
THEORY:-
Procedure:
1. Connect the power supplies of ST2156 and ST2157 but do not turn on the power
supplies until connections are made for this experiment.
2. Make the connections as shown in the figure 6.1.
3. Switch 'ON' the power.
4. On ST2156, connect oscilloscope CH1 to ‘Clock In’ and CH2 to ‘Data In’ and
observe the waveforms.
5. On ST2156, connect oscilloscope CH1 to ‘Clock Output’ and CH2 one by one
to ‘Sine’ and ‘Cosine’ output of 960 KHz and observe the waveforms.
6. On ST2156, connect oscilloscope CH1 to ‘Data In’ and connect CH2 one by one
to ‘I Data’ and ‘Q Data’ outputs and observe the waveforms.
7. Now connect oscilloscope CH1 to ‘I Data’ output on ST2156 and connect CH2
one by one to ‘Signal In’, ‘Carrier In’ and ‘Output’ of modulator circuit (l) on
ST2156 and observe the waveforms.
8. Now connect oscilloscope CH1 to ‘Q Data’ output on ST2156 and connect CH2
one by one to ‘Signal In’, ‘Carrier In’ and ‘Output’ of modulator circuit (ll) on
ST2156 and observe the waveforms.
ST2156 &ST2157
Scientech Technologies Pvt. Ltd. 48
9. Now connect oscilloscope CH1 to ‘Data Out’ on ST2156 and CH2 to ‘Output’
of Summing Amplifier on ST2156 and observe the waveforms.
10. Set ‘Carrier frequency’ selection switch to ‘960 KHz’ on ST2157.
11. Now on ST2157 connect oscilloscope CH1 to ‘Input’ of QPSK demodulator
and connect CH2 one by one to output of double squaring circuit, output of
PLL, output of Divide by four (á 4) observe the wave forms.
12. On ST2157, connect oscilloscope CH1 to ‘I’ output of QPSK demodulator and
CH2 to ‘Q’ output of QPSK demodulator and observe the waveforms. Set all
toggle switch to 0, now vary the phase adjust potentiometer and observe its
effects on the demodulated signal waveforms.
13. Connect oscilloscope CH1 to ‘I’ output of QPSK demodulator on ST2157 then
connect CH2 one by one to output of low pass filter, output of Comparator on
ST2157 and observe the waveforms.
14. Connect oscilloscope CH1 to ‘Q’ output of QPSK demodulator on ST2157 then
connect CH2 one by one to output of low pass filter, output of Comparator on
ST2157 and observe the waveforms.
15. Compare the output of comparators on ST2157 with the output ‘I Data’ and ‘Q
Data’ on ST2156 respectively.
16. Connect oscilloscope CH1 to ‘Data In’ then connect CH2 output to Bit decoder
and observe the waveforms. If both data does not matches then try to match it by
varying the phase adjust potentiometer on QPSK Demodulator.
17. Now try to match the LED sequence by once pressing the reset switch on
ST2156.
Observations:
1. The output at ‘Data In’ is repeating sequence of bits generated by Data Source.
2. The ‘I Data’ and ‘Q Data’ output are even and odd bit sequence of input data
sequence and bit duration is double of input data sequence as shown in the
figure 11.2.
3. The ‘Output’ of Modulator Circuit (l) and Modulator Circuit (ll) are Phase Shift
Keying modulated signals, and summation of these two signals are Quadrature
Phase Shifted signal as shown in the figure 6.2.
4. The output of Double squaring circuit is sinusoidal signal (carrier signal) but
frequency is four times higher than that of carrier used.
5. The output of Phase Lock Loop (PLL) is clock signal of same frequency as that
of the output of double squaring circuit and output of Divide by four (á 4) is
clock signal of frequency four times less than the output of PLL signal.
6. The output of QPSK demodulator is a signal having group of positive half
cycles and group of negative half cycles of the carrier signal as shown in the
7. A low pass filter removes high frequency component from demodulated QPSK
signal and it makes the signal smooth as shown in the figure 6.3.
8. The variation in reference voltage potentiometer affect the Data, to recover Data
correctly potentiometer adjustment is necessary and recovered Data.

More Related Content

What's hot

Pulse amplitude modulation (PAM)
Pulse amplitude modulation (PAM)Pulse amplitude modulation (PAM)
Pulse amplitude modulation (PAM)Mugadha Bane
 
Digital modulation techniques...
Digital modulation techniques...Digital modulation techniques...
Digital modulation techniques...Nidhi Baranwal
 
Analog modulation
Analog modulationAnalog modulation
Analog modulationAkash Soni
 
Amplitute modulation
Amplitute modulationAmplitute modulation
Amplitute modulationAkanksha_Seth
 
PULSE WIDTH MODULATION &DEMODULATION
PULSE WIDTH MODULATION &DEMODULATIONPULSE WIDTH MODULATION &DEMODULATION
PULSE WIDTH MODULATION &DEMODULATIONbharath405
 
Chapter 5
Chapter 5Chapter 5
Chapter 5wafaa_A7
 
Telemetry types, frequency,position and multiplexing in telemetry
Telemetry types, frequency,position and multiplexing in telemetryTelemetry types, frequency,position and multiplexing in telemetry
Telemetry types, frequency,position and multiplexing in telemetrysagheer ahmed
 
M ary psk modulation
M ary psk modulationM ary psk modulation
M ary psk modulationAhmed Diaa
 
Chapter 4
Chapter 4Chapter 4
Chapter 4wafaa_A7
 
Phase modulation
Phase modulationPhase modulation
Phase modulationavocado1111
 
Analog vs digital communication
Analog vs digital communicationAnalog vs digital communication
Analog vs digital communicationSahil Rana
 
Different types of Modulation Techniques
Different types of Modulation TechniquesDifferent types of Modulation Techniques
Different types of Modulation TechniquesHimel Himo
 
Pulse amplitude modulation
Pulse amplitude modulationPulse amplitude modulation
Pulse amplitude modulationVishal kakade
 
Antennas slideshare part 2
Antennas slideshare part 2Antennas slideshare part 2
Antennas slideshare part 2Muthumanickam
 
Coherent and Non-coherent detection of ASK, FSK AND QASK
Coherent and Non-coherent detection of ASK, FSK AND QASKCoherent and Non-coherent detection of ASK, FSK AND QASK
Coherent and Non-coherent detection of ASK, FSK AND QASKnaimish12
 

What's hot (20)

Pulse amplitude modulation (PAM)
Pulse amplitude modulation (PAM)Pulse amplitude modulation (PAM)
Pulse amplitude modulation (PAM)
 
Digital modulation techniques...
Digital modulation techniques...Digital modulation techniques...
Digital modulation techniques...
 
Analog modulation
Analog modulationAnalog modulation
Analog modulation
 
Amplitute modulation
Amplitute modulationAmplitute modulation
Amplitute modulation
 
PULSE WIDTH MODULATION &DEMODULATION
PULSE WIDTH MODULATION &DEMODULATIONPULSE WIDTH MODULATION &DEMODULATION
PULSE WIDTH MODULATION &DEMODULATION
 
Ecom
EcomEcom
Ecom
 
Chapter 5
Chapter 5Chapter 5
Chapter 5
 
Telemetry types, frequency,position and multiplexing in telemetry
Telemetry types, frequency,position and multiplexing in telemetryTelemetry types, frequency,position and multiplexing in telemetry
Telemetry types, frequency,position and multiplexing in telemetry
 
M ary psk modulation
M ary psk modulationM ary psk modulation
M ary psk modulation
 
Chapter 4
Chapter 4Chapter 4
Chapter 4
 
Phase modulation
Phase modulationPhase modulation
Phase modulation
 
Analog vs digital communication
Analog vs digital communicationAnalog vs digital communication
Analog vs digital communication
 
Different types of Modulation Techniques
Different types of Modulation TechniquesDifferent types of Modulation Techniques
Different types of Modulation Techniques
 
Pulse amplitude modulation
Pulse amplitude modulationPulse amplitude modulation
Pulse amplitude modulation
 
Digital modulation
Digital modulationDigital modulation
Digital modulation
 
Digital communication unit II
Digital communication unit IIDigital communication unit II
Digital communication unit II
 
Pulse modulation
Pulse modulationPulse modulation
Pulse modulation
 
Antennas slideshare part 2
Antennas slideshare part 2Antennas slideshare part 2
Antennas slideshare part 2
 
Types of Sampling in Analog Communication
Types of Sampling in Analog CommunicationTypes of Sampling in Analog Communication
Types of Sampling in Analog Communication
 
Coherent and Non-coherent detection of ASK, FSK AND QASK
Coherent and Non-coherent detection of ASK, FSK AND QASKCoherent and Non-coherent detection of ASK, FSK AND QASK
Coherent and Non-coherent detection of ASK, FSK AND QASK
 

Similar to Dc lab Manual

Adc lab
Adc labAdc lab
Adc labxyxz
 
pulse width modulated inverter techniques
pulse width modulated inverter techniquespulse width modulated inverter techniques
pulse width modulated inverter techniquesSAURABH KUMAR
 
Project_Kaveh & Mohammad
Project_Kaveh & MohammadProject_Kaveh & Mohammad
Project_Kaveh & MohammadKaveh Dehno
 
Advance technology in power systems
Advance technology in power systemsAdvance technology in power systems
Advance technology in power systemsmkanth
 
Advance technology in power systems
Advance technology in power systemsAdvance technology in power systems
Advance technology in power systemsmkanth
 
International Journal of Engineering Research and Development
International Journal of Engineering Research and DevelopmentInternational Journal of Engineering Research and Development
International Journal of Engineering Research and DevelopmentIJERD Editor
 
Matlab Simulink Model of Sinusoidal PWM For Three-Phase Voltage Source Inverter
Matlab Simulink Model of Sinusoidal PWM For Three-Phase Voltage Source InverterMatlab Simulink Model of Sinusoidal PWM For Three-Phase Voltage Source Inverter
Matlab Simulink Model of Sinusoidal PWM For Three-Phase Voltage Source Inverterijtsrd
 
Iaetsd performance analysis of multicarrier ds-cdma
Iaetsd performance analysis of multicarrier ds-cdmaIaetsd performance analysis of multicarrier ds-cdma
Iaetsd performance analysis of multicarrier ds-cdmaIaetsd Iaetsd
 
Simulation Investigation of SPWM, THIPWM and SVPWM Techniques for Three Phase...
Simulation Investigation of SPWM, THIPWM and SVPWM Techniques for Three Phase...Simulation Investigation of SPWM, THIPWM and SVPWM Techniques for Three Phase...
Simulation Investigation of SPWM, THIPWM and SVPWM Techniques for Three Phase...IJPEDS-IAES
 
Icaee paper id 116.pdf
Icaee paper id 116.pdfIcaee paper id 116.pdf
Icaee paper id 116.pdfshariful islam
 

Similar to Dc lab Manual (20)

Lab 4 c
Lab 4 cLab 4 c
Lab 4 c
 
Adc lab
Adc labAdc lab
Adc lab
 
pulse width modulated inverter techniques
pulse width modulated inverter techniquespulse width modulated inverter techniques
pulse width modulated inverter techniques
 
[IJET-V1I6P3] Authors:Bachwad M.R. , Maske Ashadeep M
[IJET-V1I6P3] Authors:Bachwad M.R. , Maske Ashadeep M[IJET-V1I6P3] Authors:Bachwad M.R. , Maske Ashadeep M
[IJET-V1I6P3] Authors:Bachwad M.R. , Maske Ashadeep M
 
Project_Kaveh & Mohammad
Project_Kaveh & MohammadProject_Kaveh & Mohammad
Project_Kaveh & Mohammad
 
Advance technology in power systems
Advance technology in power systemsAdvance technology in power systems
Advance technology in power systems
 
Advance technology in power systems
Advance technology in power systemsAdvance technology in power systems
Advance technology in power systems
 
M0088
M0088M0088
M0088
 
E1082935
E1082935E1082935
E1082935
 
International Journal of Engineering Research and Development
International Journal of Engineering Research and DevelopmentInternational Journal of Engineering Research and Development
International Journal of Engineering Research and Development
 
Pulse Modulation.pptx
Pulse Modulation.pptxPulse Modulation.pptx
Pulse Modulation.pptx
 
B1103040715
B1103040715B1103040715
B1103040715
 
Matlab Simulink Model of Sinusoidal PWM For Three-Phase Voltage Source Inverter
Matlab Simulink Model of Sinusoidal PWM For Three-Phase Voltage Source InverterMatlab Simulink Model of Sinusoidal PWM For Three-Phase Voltage Source Inverter
Matlab Simulink Model of Sinusoidal PWM For Three-Phase Voltage Source Inverter
 
Iaetsd performance analysis of multicarrier ds-cdma
Iaetsd performance analysis of multicarrier ds-cdmaIaetsd performance analysis of multicarrier ds-cdma
Iaetsd performance analysis of multicarrier ds-cdma
 
Hybrid-Modulation-Based Control Technique for Reduction of Output Voltage Ri...
Hybrid-Modulation-Based Control Technique for Reduction of  Output Voltage Ri...Hybrid-Modulation-Based Control Technique for Reduction of  Output Voltage Ri...
Hybrid-Modulation-Based Control Technique for Reduction of Output Voltage Ri...
 
Simulation Investigation of SPWM, THIPWM and SVPWM Techniques for Three Phase...
Simulation Investigation of SPWM, THIPWM and SVPWM Techniques for Three Phase...Simulation Investigation of SPWM, THIPWM and SVPWM Techniques for Three Phase...
Simulation Investigation of SPWM, THIPWM and SVPWM Techniques for Three Phase...
 
ADC An Introduction
ADC An IntroductionADC An Introduction
ADC An Introduction
 
C4_S2_G8 (1).pdf
C4_S2_G8  (1).pdfC4_S2_G8  (1).pdf
C4_S2_G8 (1).pdf
 
C4_S2_G8 .pdf
C4_S2_G8 .pdfC4_S2_G8 .pdf
C4_S2_G8 .pdf
 
Icaee paper id 116.pdf
Icaee paper id 116.pdfIcaee paper id 116.pdf
Icaee paper id 116.pdf
 

Recently uploaded

Class 1 | NFPA 72 | Overview Fire Alarm System
Class 1 | NFPA 72 | Overview Fire Alarm SystemClass 1 | NFPA 72 | Overview Fire Alarm System
Class 1 | NFPA 72 | Overview Fire Alarm Systemirfanmechengr
 
Call Girls Narol 7397865700 Independent Call Girls
Call Girls Narol 7397865700 Independent Call GirlsCall Girls Narol 7397865700 Independent Call Girls
Call Girls Narol 7397865700 Independent Call Girlsssuser7cb4ff
 
Risk Assessment For Installation of Drainage Pipes.pdf
Risk Assessment For Installation of Drainage Pipes.pdfRisk Assessment For Installation of Drainage Pipes.pdf
Risk Assessment For Installation of Drainage Pipes.pdfROCENODodongVILLACER
 
Why does (not) Kafka need fsync: Eliminating tail latency spikes caused by fsync
Why does (not) Kafka need fsync: Eliminating tail latency spikes caused by fsyncWhy does (not) Kafka need fsync: Eliminating tail latency spikes caused by fsync
Why does (not) Kafka need fsync: Eliminating tail latency spikes caused by fsyncssuser2ae721
 
Transport layer issues and challenges - Guide
Transport layer issues and challenges - GuideTransport layer issues and challenges - Guide
Transport layer issues and challenges - GuideGOPINATHS437943
 
Indian Dairy Industry Present Status and.ppt
Indian Dairy Industry Present Status and.pptIndian Dairy Industry Present Status and.ppt
Indian Dairy Industry Present Status and.pptMadan Karki
 
National Level Hackathon Participation Certificate.pdf
National Level Hackathon Participation Certificate.pdfNational Level Hackathon Participation Certificate.pdf
National Level Hackathon Participation Certificate.pdfRajuKanojiya4
 
Past, Present and Future of Generative AI
Past, Present and Future of Generative AIPast, Present and Future of Generative AI
Past, Present and Future of Generative AIabhishek36461
 
An experimental study in using natural admixture as an alternative for chemic...
An experimental study in using natural admixture as an alternative for chemic...An experimental study in using natural admixture as an alternative for chemic...
An experimental study in using natural admixture as an alternative for chemic...Chandu841456
 
Unit7-DC_Motors nkkjnsdkfnfcdfknfdgfggfg
Unit7-DC_Motors nkkjnsdkfnfcdfknfdgfggfgUnit7-DC_Motors nkkjnsdkfnfcdfknfdgfggfg
Unit7-DC_Motors nkkjnsdkfnfcdfknfdgfggfgsaravananr517913
 
IVE Industry Focused Event - Defence Sector 2024
IVE Industry Focused Event - Defence Sector 2024IVE Industry Focused Event - Defence Sector 2024
IVE Industry Focused Event - Defence Sector 2024Mark Billinghurst
 
Concrete Mix Design - IS 10262-2019 - .pptx
Concrete Mix Design - IS 10262-2019 - .pptxConcrete Mix Design - IS 10262-2019 - .pptx
Concrete Mix Design - IS 10262-2019 - .pptxKartikeyaDwivedi3
 
Steel Structures - Building technology.pptx
Steel Structures - Building technology.pptxSteel Structures - Building technology.pptx
Steel Structures - Building technology.pptxNikhil Raut
 
Research Methodology for Engineering pdf
Research Methodology for Engineering pdfResearch Methodology for Engineering pdf
Research Methodology for Engineering pdfCaalaaAbdulkerim
 
THE SENDAI FRAMEWORK FOR DISASTER RISK REDUCTION
THE SENDAI FRAMEWORK FOR DISASTER RISK REDUCTIONTHE SENDAI FRAMEWORK FOR DISASTER RISK REDUCTION
THE SENDAI FRAMEWORK FOR DISASTER RISK REDUCTIONjhunlian
 
Vishratwadi & Ghorpadi Bridge Tender documents
Vishratwadi & Ghorpadi Bridge Tender documentsVishratwadi & Ghorpadi Bridge Tender documents
Vishratwadi & Ghorpadi Bridge Tender documentsSachinPawar510423
 
Energy Awareness training ppt for manufacturing process.pptx
Energy Awareness training ppt for manufacturing process.pptxEnergy Awareness training ppt for manufacturing process.pptx
Energy Awareness training ppt for manufacturing process.pptxsiddharthjain2303
 
🔝9953056974🔝!!-YOUNG call girls in Rajendra Nagar Escort rvice Shot 2000 nigh...
🔝9953056974🔝!!-YOUNG call girls in Rajendra Nagar Escort rvice Shot 2000 nigh...🔝9953056974🔝!!-YOUNG call girls in Rajendra Nagar Escort rvice Shot 2000 nigh...
🔝9953056974🔝!!-YOUNG call girls in Rajendra Nagar Escort rvice Shot 2000 nigh...9953056974 Low Rate Call Girls In Saket, Delhi NCR
 

Recently uploaded (20)

Class 1 | NFPA 72 | Overview Fire Alarm System
Class 1 | NFPA 72 | Overview Fire Alarm SystemClass 1 | NFPA 72 | Overview Fire Alarm System
Class 1 | NFPA 72 | Overview Fire Alarm System
 
Call Girls Narol 7397865700 Independent Call Girls
Call Girls Narol 7397865700 Independent Call GirlsCall Girls Narol 7397865700 Independent Call Girls
Call Girls Narol 7397865700 Independent Call Girls
 
Risk Assessment For Installation of Drainage Pipes.pdf
Risk Assessment For Installation of Drainage Pipes.pdfRisk Assessment For Installation of Drainage Pipes.pdf
Risk Assessment For Installation of Drainage Pipes.pdf
 
Why does (not) Kafka need fsync: Eliminating tail latency spikes caused by fsync
Why does (not) Kafka need fsync: Eliminating tail latency spikes caused by fsyncWhy does (not) Kafka need fsync: Eliminating tail latency spikes caused by fsync
Why does (not) Kafka need fsync: Eliminating tail latency spikes caused by fsync
 
Transport layer issues and challenges - Guide
Transport layer issues and challenges - GuideTransport layer issues and challenges - Guide
Transport layer issues and challenges - Guide
 
Indian Dairy Industry Present Status and.ppt
Indian Dairy Industry Present Status and.pptIndian Dairy Industry Present Status and.ppt
Indian Dairy Industry Present Status and.ppt
 
National Level Hackathon Participation Certificate.pdf
National Level Hackathon Participation Certificate.pdfNational Level Hackathon Participation Certificate.pdf
National Level Hackathon Participation Certificate.pdf
 
Past, Present and Future of Generative AI
Past, Present and Future of Generative AIPast, Present and Future of Generative AI
Past, Present and Future of Generative AI
 
An experimental study in using natural admixture as an alternative for chemic...
An experimental study in using natural admixture as an alternative for chemic...An experimental study in using natural admixture as an alternative for chemic...
An experimental study in using natural admixture as an alternative for chemic...
 
Unit7-DC_Motors nkkjnsdkfnfcdfknfdgfggfg
Unit7-DC_Motors nkkjnsdkfnfcdfknfdgfggfgUnit7-DC_Motors nkkjnsdkfnfcdfknfdgfggfg
Unit7-DC_Motors nkkjnsdkfnfcdfknfdgfggfg
 
IVE Industry Focused Event - Defence Sector 2024
IVE Industry Focused Event - Defence Sector 2024IVE Industry Focused Event - Defence Sector 2024
IVE Industry Focused Event - Defence Sector 2024
 
Concrete Mix Design - IS 10262-2019 - .pptx
Concrete Mix Design - IS 10262-2019 - .pptxConcrete Mix Design - IS 10262-2019 - .pptx
Concrete Mix Design - IS 10262-2019 - .pptx
 
young call girls in Green Park🔝 9953056974 🔝 escort Service
young call girls in Green Park🔝 9953056974 🔝 escort Serviceyoung call girls in Green Park🔝 9953056974 🔝 escort Service
young call girls in Green Park🔝 9953056974 🔝 escort Service
 
Steel Structures - Building technology.pptx
Steel Structures - Building technology.pptxSteel Structures - Building technology.pptx
Steel Structures - Building technology.pptx
 
Design and analysis of solar grass cutter.pdf
Design and analysis of solar grass cutter.pdfDesign and analysis of solar grass cutter.pdf
Design and analysis of solar grass cutter.pdf
 
Research Methodology for Engineering pdf
Research Methodology for Engineering pdfResearch Methodology for Engineering pdf
Research Methodology for Engineering pdf
 
THE SENDAI FRAMEWORK FOR DISASTER RISK REDUCTION
THE SENDAI FRAMEWORK FOR DISASTER RISK REDUCTIONTHE SENDAI FRAMEWORK FOR DISASTER RISK REDUCTION
THE SENDAI FRAMEWORK FOR DISASTER RISK REDUCTION
 
Vishratwadi & Ghorpadi Bridge Tender documents
Vishratwadi & Ghorpadi Bridge Tender documentsVishratwadi & Ghorpadi Bridge Tender documents
Vishratwadi & Ghorpadi Bridge Tender documents
 
Energy Awareness training ppt for manufacturing process.pptx
Energy Awareness training ppt for manufacturing process.pptxEnergy Awareness training ppt for manufacturing process.pptx
Energy Awareness training ppt for manufacturing process.pptx
 
🔝9953056974🔝!!-YOUNG call girls in Rajendra Nagar Escort rvice Shot 2000 nigh...
🔝9953056974🔝!!-YOUNG call girls in Rajendra Nagar Escort rvice Shot 2000 nigh...🔝9953056974🔝!!-YOUNG call girls in Rajendra Nagar Escort rvice Shot 2000 nigh...
🔝9953056974🔝!!-YOUNG call girls in Rajendra Nagar Escort rvice Shot 2000 nigh...
 

Dc lab Manual

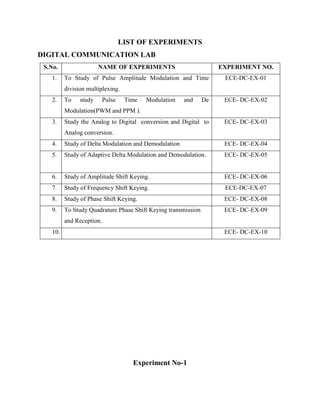
  • 1. LIST OF EXPERIMENTS DIGITAL COMMUNICATION LAB S.No. NAME OF EXPERIMENTS EXPERIMENT NO. 1. To Study of Pulse Amplitude Modulation and Time division multiplexing. ECE-DC-EX-01 2. To study Pulse Time Modulation and De Modulation(PWM and PPM ). ECE- DC-EX-02 3. Study the Analog to Digital conversion and Digital to Analog conversion. ECE- DC-EX-03 4. Study of Delta Modulation and Demodulation ECE- DC-EX-04 5. Study of Adaptive Delta Modulation and Demodulation. ECE- DC-EX-05 6. Study of Amplitude Shift Keying. ECE- DC-EX-06 7. Study of Frequency Shift Keying. ECE-DC-EX-07 8. Study of Phase Shift Keying. ECE- DC-EX-08 9. To Study Quadrature Phase Shift Keying transmission and Reception. ECE- DC-EX-09 10. ECE- DC-EX-10 Experiment No-1
  • 2. Aim: To Study of Pulse Amplitude Modulation and Time division multiplexing. Apparatus Required:-ST-2110 kit with power supply cord CRO with connecting probe, connecting cords. Theory: Most digital modulation systems are based on pulse modulation. It involves variation of a pulse parameter in accordance with the instantaneous value of the information signal. This parameter can be amplitude, width, repetitive frequency etc. Depending upon the nature of parameter varied, various modulation systems are used. Pulse amplitude modulation, pulse width modulation, pulse code modulation are few modulation systems cropping up from the pulse modulation technique. In pulse amplitude modulation (PAM) the amplitude of the pulses are varied in accordance with the modulating signal. In true sense, pulse amplitude modulation is analog in nature but it forms the basis of most digital communication and modulation systems. The pulse modulation systems require analog information to be sampled at predetermined intervals of time. Sampling is a process of taking the instantaneous value of the analog information at a predetermined time interval. A sampled signal consists of a train of pulses, where each pulse corresponds to the amplitude of the signal at the corresponding sampling time. The signal sent to line is modulated in amplitude and hence the name Pulse Amplitude Modulation (PAM). Block diagram: (Pulse Amplitude Modulation) WAVE FORM :
  • 3. Time Division Multiplexing: Time division multiplexing is the process of combining the samples from different information signals, in time domain so that they can be transmitted over the common channel. The fact utilized in TDM technique is that there are large intervals between the message samples. The samples from the other sources can be placed within these time intervals. Thus every sample is separated from other in time domain. The time division multiplexing system can be simulated by two rotating switches, one at transmitter and the other at receiver. (See figure 7) The two wipers rotate and establish electrical contact with one channel at a time. (Principle operation of TDM) Each signal is sampled over one sampling interval and transmitted one after the other along a common channel. Thus part of message 1 is transmitted first followed by part of message 2, message 3 and then again message 1 so on. The switches connect the transmitter and the receiver to each of the channels in turn for a specific interval of time. In effect each channel is sampled and the sample is transmitted When the switches are in the channel 1 position, channel 1 forms a PAM channel with an LPF for reconstruction, and so on for channels
  • 4. 2 and 3. The result is that the amplitudes samples from each channel share the line sequentially, becoming interleaved to form a complex PAM wave, as shown above. A major problem in any TDM system is the synchronization of the transmitter and receiver timing circuits. The transmitter and receiver must switch at the same time and frequency. Also SW1 must be in the channel 1 position when SW2 is in the channel 1 position, so that the switches must be synchronized in position also. In a system that uses analogue modulation (PAM) the time slots are separated by guard slots to prevent crosstalk between channels. WAVE FORM : (Timing waveform of TDM-PAM system) Procedure: 1. Connect the circuit as shown in Figure 1.1. a. Output of sine wave to modulation signal input in PAM block keeping the switch in 1 KHz position. b. 8 KHz pulse output to pulse input. 2. Switch ‘On’ the power supply & oscilloscope. 3. Observe the outputs at TP(3 & 5) these are natural & flat top outputs respectively.
  • 5. 4. Observe the difference between the two outputs. 5. Vary the amplitude potentiometer and frequency change over switch & observe the effect on the two outputs. 6. Vary the frequency of pulse, by connecting the pulse input to the 4 frequencies available i.e. 8, 16, 32, 64 kHz in Pulse output block. 7. Switch ‘On’ fault No. 1, 2, 3, 4 one by one & observe their effect on Pulse Amplitude Modulation output and try to locate them. 8. Switch ‘Off’ the power supply. RESULT: The Study of Pulse Amplitude Modulation and Time division multiplexing successfully . Experiment No-2
  • 6. Aim:To study Pulse Time Modulation and De Modulation(PWM and PPM ). Apparatus Required: ST-2110 Kit, power supply cord, CRO with connecting probe, Connecting cor BLOCK DIAGRAM: Theory: The PWM is a technique which is used to drive the inertial loads since a very long time.The simple example of an inertial load is a motor. Apply the power to a motor for a very short period of time and then turn off the power: it can be observed that the motor is still running even after the power has been cut off from it. This is due to the inertia of the motor and the significance of this factor is that the continuous power is not required for that kind of devices to operate. A burst power can save the total power supplied to the load while achieving the same performance from the device as it runs on continuous power. The PWM technique is use in devices like DC motors, Loudspeakers, Class -D Amplifiers, SMPS etc. They are also used in communication field as-well. The modulation techniques like AM, FM are widely used RF communication whereas the PWM is modulation technique is mostly used in Optical Fiber Communication (OFC). As in the case of the inertial loads mentioned previously, the PWM in a communication link greatly saves the transmitter power. The immunity of the PWM transmission against the inter- symbol interference is another advantage. This article discusses the technique of generating a PWM wave corresponding to a modulating sine wave. WAVE FORM :
  • 7. Procedure: 1. Connect the circuit as shown in Figure 7.1 and also described below for clarity. a. 1 KHz sine wave output of function generator block to modulation input of PWM block. b. 64 KHz square wave output to pulse input of PWM block. 2. Switch ‘On’ the power supply & oscilloscope. 3. Observe the output of PWM block. 4. Vary the amplitude of sine wave and see its effect on pulse output. 5. Vary the sine wave frequency by switching the frequency selector switch to 2 KHz. 6. Also, change the frequency of the pulse by connecting the pulse input to different pulse frequencies viz. 8 KHz, 16 KHz, 32 KHz and see the variations in the PWM output. 7. Switch ‘On’ fault No. 1, 2, & 5 one by one & observes their effect on PWM output and tries to locate them. 8. Switch ‘Off’ the power supply.
  • 8. Experiment No 3 AIM: Study the Analog to Digital conversion and Digital to Analog conversion. APPRATUS: THEORY: A/D Conversion The PCM Transmitter samples the analog input, time division multiplex and many such channels, quantizes it & code it by analog to digital conversion. As it is known, the binary number system consists of binary digits '0' and '1'. The group of n bits is called as word and is used to distinguish one code from the other. The range of decimal numbers represented by such n bits code is equal to 2n (including 0) e.g. If we take an 8 bit word, the number or different codes possible is equal to 28 = 256 i.e. we have 0 to 255 code levels available This range can be used to indicate any range of voltage. The process of allocating the binary values to each sample taken in PAM system is known as quantization. Every binary number indicates one level. Since binary value changes in discrete steps & is not continuous like analog waveform, some distortion creeps in at the time of value assignment; this is discussed in forth coming parts. The range of binary values used is the design feature of the system & depends upon the amplitude range of the signal and the accuracy of the conversion to be achieved. Most systems use an 8 bit word length which is practically found most suitable to cover the sufficient range & provide the accuracy needed for speech signals. As with all engineering processes, quantization produces its own problems & an engineering compromise is then called for. The two major problems associated with quantization are : 1) One major problem associated with quantization is due to the discrete nature of binary numbers which are used to represent continuously variable analog waveform, It is not possible to represent all the analog values (which are infinite in number) by limited binary words e.g. if in the figure 27, the analog value lies in between the two voltages represented by 0011 & 0100 binary words, what will happen?
  • 9. In such cases the system allocates a binary number closest to the sample value. This leads to distortion of the information signal & the approximation is random for different voltage levels. Hence it is known as quantization noise. Quantization noise can be reduced by increasing the number of bits used to represent a sample. But it can never be eliminated. Increasing the number of bits in a word has an effect of increasing the number of quantization levels. A digital-to-analog converter, or simply DAC, is a semiconductor device that is used to convert a digital code into an analog signal. Digital-to-analog conversion is the primary means by which digital equipment such as computer-based systems are able to translate digital data into real-world signals that are more understandable to or useable by humans, such as music, speech, pictures, video, and the like. It also allows digital control of machines, equipment, household appliances, and the like. A typical digital-to-analog converter outputs an analog signal, which is usually voltage or current that is proportional to the value of the digital code provided to its inputs. Most DAC's have several digital input pins to receive all the bits of its input digital code in parallel (at the same time). Some DAC's, however, are designed to receive the input digital data in serial form (one bit at a time), so these only have a single digital input pin. A simple DAC may be implemented using an op-amp circuit known as a summer, so named because its output voltage is the sum of its input voltages. Each of its inputs uses a resistor of different binary weight, such that if R0=R, then R1=R/2, R2=R/4, R3=R/8,.., RN-1=R/(2N-1). The output of a summer circuit with N bits is: Vo = -VR (Rf / R) (SN-12N-1 + SN-22N-2+...+S020) Where VR is the voltage to which the bit is connected when the digital input is '1'. A= digital input is '0' if the bit is connected to 0V (ground).
  • 10. (An Op Amp Summer Circuit Used as a DAC) Digital Transmission:- There are two methods for sending digital data over a distance, namely a. Parallel transmission b. Serial transmission In short distance communication like inside terminal equipment or two computer terminals located near each other, the signals are passed in parallel, format over parallel wires. Thus the signal in the form of a word is passed. This mode is faster. For long distances, even more than few feet’s, this is uneconomical & inefficient way of transmission. It is a wasteful of transmission media as each bit requires a separate link. Therefore the digital signals are transmitted serially over a single link. The two important parameters in serial signaling are 1. The modulation rate or the signaling rate (in Baud)& 2. data transmission rate or bit rate (in Bits per second) The signaling rate or modulation rate is defined as the maximum rate at which the signal is switched between signaling rate (or number of symbols transmitted per second). The other way of defining modulation rate is that it is the reciprocal of the shortest time for which the signal remains in any state. The modulation rate is measured in Baud which is equal to one unit signal element per second.
  • 11.
  • 12. Experiment no 4 AIM: Study of Delta Modulation and Demodulation APPRATUS: ST-2105 kit with power supply cord CRO with connecting probe, connecting cords. Theory of Delta Modulation: As it has been seen, delta modulation system is unable to chase the rapidly changing information of the analog signal, which gives rise to distortion & hence poor quality reception. This is known as slope overloading phenomenon. The problem can be overcome by increasing the integrator gain (i.e. step-size). But using high step-size integrator would lead to a high quantization noise. Quantization Noise : It is defined as error introduced between the original signal, & the quantized signal due to the fixed step size in which the signal (quantized) is incremented. As the error is random in nature & hence unpredictable, it can be treated as noise. High quantization noise may play havoc on small amplitude signals. The solution to this problem is to increase the integrator gain for fast- changing input & to use normal gain for small amplitude signals. The basic idea is to increase the integrator the integrator gain (it is doubled on this trainer) when slope overload occurs. If still it is unable to catch up with the signal, the integrator gain is doubled again. The integrator on board has four available gains standard, standard X2, standard X4, and standard X8. The integrator thus adopts it self to the gain where its lowest value can just overcome the slope overloading effect. See figure 8. 10. As it can be observed, the adaptive delta modulator is similar to the delta modulator except for few blocks namely the counter & the control circuit. The input to the control circuit is the latched data from the D Flip-Flop. The counter is reset whenever 'high' appears at the output of the control circuit. Both the counter & the control circuit are clocked by the same TX clock. The input to the integrator from the counter is a two-bit control word, which controls the gain of the integrator. When the output of counter is '00' the gain is lowest (standard) where as it is highest (standard X8) for counters output '11'. The Control Circuit Works as Follows : The control circuit compares the preset data bit from D flip-flop with the previous two data bits. Its output to the counter is high when the three bits are identical, the control circuits output goes low, thus letting the counter advance with every clock cycle. This advancement continues till the output from the control circuit does not go 'high'. Each time the counter is incremented from ‘00’
  • 13. integrator gain is doubled till the counter reached '11' where it remains in that state until it is reset by the counter. Similarly, the adaptive delta demodulator is a like delta demodulator except for two blocks namely, the control circuit & the counter. They function in the same way as in modulator part, except for the fact that they are clocked by the receiver clock. BLOCK DIAGRAM: DIAGRAM: (Delta Modulation)
  • 14. Procedure: Initial setup of ST2155: Clock frequency selector switches : A = 0 and B = 0 position. Integrator (1) blocks switches position: Gain control switch position : Left-hand side. Switches position : A=0 and B=0 position. Integrator (2) blocks switches position: Gain control switch position :Right-hand side Switches position : A = 0 and B = 0 position. 1. Connect the mains supply cord to the Trainer. 2. Make connection on the board as shown in the figure 1.1. 3. Switch 'ON' the trainer power supply and oscilloscope. 4. In order to ensure for correct operation of the system, we first take the input to 0V. So connect the '+' input of the delta modulator's voltage comparator to 0V and monitor on an oscilloscope the output of integrator 1 (TP13) and the output of the transmitter's unipolar to bipolar converter (TP 29) If the transmitter's unipolar to bipolar converter output has equal positive and negative output levels, integrator’s output will be a triangular wave centered around '0' Volts, as shown in figure 1.2 (Case A). However, if the unipolar to bipolar converter’s negative level is greater than the positive level, the integrator's output will appear as shown in figure 1.2 (Case B). Should the unipolar to bipolar converter’s positive output level be the greater of the two levels, the integrator's output will resemble that shown in figure 1.2 (Case C). 5. The relative amplitudes of the unipolar to bipolar converter’s positive and negative output levels can be varied by adjusting the level adjust preset in the unipolar to bipolar converter circuit 1 block. When it is turned anticlockwise, the negative level increases relative to the positive level, when turned clockwise, the positive level increases relative to the negative level. Case A: Bipolar output: Positive level = Negative level Case B: Bipolar output: Positive level < Negative level
  • 15. Case C: Bipolar output: Positive level > Negative level 6. Adjust the transmitter's level changer preset until the output of integrator 1 (TP 13) is a triangular wave centered around 0 Volts, as shown in figure 1.2 (Case A). The peak-to-peak amplitude of the triangle wave at the integrator's output should be 1.8V (approx), this amplitude is known as the integrator step size. The output from the transmitter's bistable circuit (TP 19) will now be a stream of alternate '1' and '0', ‘s' this is also the output of the delta modulator it self. The delta modulator is now said to be 'balanced' for correct operation. 7. Examine the signal at the output of integrator 2 (TP 41) at the receiver. This should be a triangular wave, with step size equal to that of integrator 1, and ideally centre around 0 Volts. If there is any DC bias at the output of integrator 2, remove it by adjusting the receiver's level adjust preset (in the unipolar to bipolar converter circuit 2 block). This preset adjusts the relative amplitudes, of the positive and negative output levels from the receiver's unipolar to bipolar converter circuit. Only when these levels are balanced will there be no offset at the output of integrator2. 8. Outputs at TP 13 and TP 41 respectively Volts/Div: 1V Clock Frequency: 50 KHz Time/Div: 20 usec Input Signal : 0V WAVE FORM : The receiver's low pass filter (whose cut off frequency is 4.2 KHz.) then filters out the higher - frequency triangular wave, to leave a DC level at the output of filter (TP 43). If the receiver's level adjust preset has been adjusted correctly, this DC level will be '0' volt. The delta demodulator also is now balanced for correct operation. 9. Disconnect the voltage comparators '+' input from 0V, and reconnect it to the ~1 KHz output from the function generator block; the modulator's analog input signal is now a 1 KHz sine wave. Monitor this analog signal at the voltage comparator's '+' input (TP 15) together with the output of, integrator 1 (TP 13).Trigger the scope on the same analog signal which is applied to the
  • 16. voltage comparator's '+' input (TP 15). Note how the output of the transmitter integrator follows the analog input, as was illustrated in figure 1. 10. Display the data of the transmitter's bistable (at TP 19), together with the analog input at TP 15 (again trigger on this signal), and note that the 1 KHz sine wave has effectively been encoded into a stream of data bits at the bistable's output, ready for transmission to the receiver. 11. For a full understanding of how the delta modulator works, examine the output of the voltage comparator (TP 16), the bistable's clock input (TP 19), and the unipolar to bipolar output (TP 29) 12. Outputs at TP 13 and TP 41 respectively Volts/Div: 5V Clock Frequency: 50 KHz Time/Div: 500usec Input Signal : 1 KHz, 10Vpp WAVE FORM : Display the output of integrator 1 (TP 13) and that of integrator 2 (TP 41) on thescope. Note that the two signals are very similar in appearance, showing that the demodulator is working as expected. 13. Display the output of integrator 2 (TP 41) together with the output of the receiver's low pass filter block (TP43). Note that although the integrator’s output has been smoothed out somewhat by the low pass filter, some unwanted 'ripple' still remains at filter's output This 'ripple' is due to the 'quantization noise' at the integrator's output, which is caused by the relatively large integrator step size. This step size can be reduced by increasing the rate at which the system is clocked (i.e. the sampling frequency).This reduces the sampling period, and hence the time available between samples for the integrators to ramp up and down. 14. The current system clock frequency is 50 KHz. This is set by the A, B switches in the clock frequency selector block, which are currently in the A= 0, B= 0 positions. While monitoring the same signals, increase the system clock frequency to 100 KHz, by putting the switches in the A = 0, B = 1 positions. . 15. By changing the system clock frequency to first 200 KHz (clock frequency selector switches in A=l, B=0 positions), and then to 400 KHz (switches in A=l, B=1 positions), note the improvement in the low - pass filter's output signal (TP43). Once again, it may be necessary to adjust slightly the transmitter's level adjust preset, in order to obtain a stable oscilloscope trace. 16. Using a system clock frequency of 400 KHz compare the low pass filter's output (TP43) with the original analog input (TP15). Output waveforms at TP13 and TP43 respectively Volts/Div: 5V Clock Frequency: 400 KHz Time/Div: 500usec Input Signal frequency: 1 KHz, 10Vpp
  • 17. WAVE FORM : There should now be no noticeable difference between them, other than a slight delay. 17. While continuing to monitor the transmitter's analog input (TP15) and the receiver's low-pass filter output (TP43), disconnect the comparator's + input from the 1 KHz sine wave output, and reconnect it to 2 KHz, 3 KHz and 4 KHz outputs in turn and using system clock frequency of 50 KHz . Note that, as the frequency of the analog signal increases, the low pass filter's output becomes more distorted and reduced in amplitude. 18. In order to understand what has caused this distortion, leave the comparator's + input connected to the 4 KHz sine wave output of the function generator, and examine the output of integrator 2 (TP41). Note that the integrator's output no longer approximates the analog input signal, but is triangular. Compare this with the output of integrator 1 (TP13), and note that the two signals are exactly the same; the problem obviously starts in the delta modulator circuit Output waveforms at TP13 and TP43 respectively Volts/Div: 5V Clock Frequency: 400 KHz Time/Div: 200usec Input Signal frequency: 4 KHz, 10Vpp WAVE FORM : Slope Overloading 19. Compare the 4 KHz analog input signal (TP15) with the output of integrator 1 (TP13) it should now become clear what has happened. The analog signal is now changing so quickly that the integrator's output cannot ramp fast enough to 'catch up' with it, and the result is known as 'slope overloading.' 20. Although the system clock frequency i.e. the sampling frequency determines how often the integrator's output direction can change (up or down), it does not affect how quickly the integrator's output can ramp up and down. Consequently, changing the system clock frequency will not help the slope overload problem. Prove this by changing the clock frequency selector switches, and noting that the problem is still present. Return the switches to the A= 1, B=1 (400 KHz clock frequency) position before continuing.
  • 18. 21. If slope overloading is to be avoided in a practical delta modulation system, the transmitter integrator must be able to ramp up or down at a rate which is at least as great as the maximum rate of change at the transmitter's analog input. If the incoming analog signal is a sine wave, its maximum rate of change occurs at the zero crossing point, and is proportional to both the frequency and the amplitude of the sine wave. the output of integrator 1 (TP17) and the output of the transmitter's level changer (TP15) If the transmitter's level changer output has equal positive and negative output levels. Integrator’s output will be a triangle wave centered around '0' Volts, as shown in figure 6 (Case A). However, if the level changer's negative level is greater than the positive level, the integrator's output will appear as shown in figure 6 (Case B). Should the level changer's positive output level be the greater of the two levels, the integrator's output will resemble that shown in figure 6 (Case C). Result: The Delta modulation / demodulation and Slope Overloading effect has been studied.
  • 19. Experiment no-5 AIM: Study of Adaptive Delta Modulation and Demodulation. APPRATUS: ST-2105 kit with power supply cord CRO with connecting probe, connecting cords. THEORY: Theory of Adaptive Delta Modulation The delta modulation & adaptive delta modulation suffers from two serious limitations, namely, 1. They are not able to pass DC level information, which is a must in video systems. 2. The signal to noise ratio decreases as the signal frequency increases. Both these serious limitations can be overcame by delta sigma modulation. The delta modulator on-board can pass DC level information if the integrators are zeroed before hand (by level adjust presets) & the gains of integrator at two ends (TX & RX) are exactly equal. This is possible on ST2105 board but not in real life operation where TX & RX are separated by hundreds of kms & they are expected to work over a long period without additional setting up. The inherent short coming of the delta modulator to pass DC level information is due to the fact that it passes the information about the change in the voltage level & not the actual voltage level itself itself e.g. encodes the change from -2V to -1V same as it would encode a change from +2V to +3V. In delta sigma modulation the integrator is added in front of the delta sigma modulator. This simple arrangement makes a big change in the circuit behaviour. It now responds to actual voltage levels rather than the change in the voltage level. The effect of the addition of integrator before the delta modulator can be done away by adding a differentiator at the end of the receiver. The voltage comparator functionally can be thought of as a unity gain differential amplifier followed by a zero-crossing detector. If the voltage comparator is replaced by this circuit, the no. of integrators can be reduced to one (at the output of unit-gain differential amplifier).Similarly, since the low pass filter is a linear circuit element the effect of integrator at the input of LPF is nullified by the differentiator present at its output. Therefore, these two blocks are redundant in the receiver. The resulting circuit looks as in figure 14 & 15. The system shown in the figure 12 & 13 can be simplified further. Since the voltage comparator is highly non-linear device cannot transfer the two integrations at its input to one integration at its output.
  • 20. BLOCK DIAGRAM: ( ) DIAGRAM: Procedure: Initial setup of ST 2155: Clock frequency selector switches : A = 0 and B = 0 position. Integrator (1) blocks switches position: Gain control switch position : Left-hand side. Switches position : A=0 and B=0 position. Integrator (2) blocks switches position: Gain control switch position :Right-hand side Switches position : A = 0 and B = 0 position. Function Generator’s potentiometers position: 1 KHz to 4 KHz Pots position : fully clockwise position 1. Connect the main supply cord to the trainer. 2. Connect the board as per figure 2.1. 3. Switch ON the supply of trainer and oscilloscope. 4. As the gain control switch is towards A & B switches, the gain setting is still manual, connect the voltage comparator's +ve input to 0V & check whether the modulator & demodulator are balanced for correct operation as in delta modulation experimentation. Change the clock frequency selector switches to the A=1, B=1, positions (400 KHz Clock Frequency) before continuing. 5. Disconnect the voltage comparators '+' input from 0V and reconnect it to the 4 KHz output from the function generator block.
  • 21. 6. Monitor the 4 KHz analog input at TP14 and the output of integrator 1 at TP13. 7. At the transmitter, move the slider of the gain control switch in the integrator 1 block to the right-hand position (towards the sockets labeled A, B). At the receiver, move the slider of the gain control switch in the integrator 2 block to the left-hand position (again towards the sockets labeled A, B). The gain of each integrator is now controlled by the outputs of the counter connected to it. Functionally, the transmitter and receiver are now configured as shown in the figure 9 & 10 i.e. as adaptive delta modulator and demodulator respectively. 8. Once again examine the 4 KHz analog input at TP14 and the output of integrator 1 at TP13, noting that the" slope overloading problem has been eliminated, and that the integrator's output once again follows the analog input signal. Again, it may be necessary to adjust slightly the transmitter's level adjust preset, in order to obtain a stable trace of the integrator's output signal. 9. Compare the output of integrator 1 (TP13) with that of integrator 2 (TP41); noting that, both are identical in appearance as expected. Output waveforms at TP13 and TP43 respectively Volts/Div: 5V Clock Frequency: 400 KHz Time/Div: 200usec Input Signal frequency: 4 KHz, 10Vpp Automatic gain control of Tx. & Rx. Integrators 10. Examine the output of the low pass filter (TP42) and the output of integrator 2 (TP41). The filter has removed the high-frequency components from the integrator's output signal, to leave good, clean 4 KHz sine wave. 11. Compare the original 4 KHz analog input signal (at TP15) with the output signal from the receiver's low pass filter at TP43). Note that the demodulator's output signal is identical to the modulator's input signal, but is delayed somewhat. 12. Disconnect the voltage comparator’s '+' input from the 4 KHz function generator output, and reconnected it in turn to the 3 KHz, 2 KHz and 1 KHz outputs, noting in each case that the demodulator’s output signal is identical to the modulator's input signal, but delayed in time. Output waveforms at TP13 and TP43 respectively Volts/Div: 5V Clock Frequency: 400 KHz Time/Div: 200usec Input Signal frequency: 1 KHz, 10Vpp Automatic gain control of Tx. & Rx. Integrators
  • 22. 13. The adaptive delta modulator/demodulator system has therefore eliminated slope-overloading problems. To examine in details how it does this, reconnect the voltage comparator's '+' input to the function generator's 4 KHz output, then reduce the system clock (i.e. sampling) frequency to 50 KHz, by putting the clock frequency selector switches in the A=0, B=0 positions. 14. Monitor the 4 KHz analog input signal at TP14 and at the output of integrator 1 (TP13). It should now become a little clearer as to how the adaptive delta modulator is operating. It will be noted that the slope of the integrator's output signal is no longer constant, but increases in a series of discrete steps, in order to 'catch up' with the fast-changing analog input signal. 15. Examine also the test points in the adaptive control circuit 1 block (TP22-25), to have an understanding of how the adaptive delta modulator is operating. 16. While monitoring the outputs of the modulator's binary counter (TP22 and 23), slowly turn the 4 KHz preset anticlockwise, in order to reduce the amplitude of the 4 KHz analog input signal. Notice that once the analog input signal becomes small enough, both the counter's outputs becomes permanently low, causing the integrator to have minimum gain. Applied Input Output S.No I/P frequency I/P Voltage O/P Voltage 1. 2. 3. 4.
  • 23. Experiment No 6. AIM: Study of Amplitude Shift Keying. APPRATUS: 1. ST2156 and ST2157 kit . 2. 2 mm Banana cable 3. Oscilloscope Caddo 802 or equivalent 4.Power supply. THEORY: Amplitude shift keying - ASK - in the context of digital communications is a modulation process, which imparts to a sinusoid two or more discrete amplitude levels. These are related to the number of levels adopted by the digital message. For a binary message sequence there are two levels, one of which is typically zero. Thus the modulated waveform consists of bursts of a sinusoid. There are sharp discontinuities shown at the transition points. These result in the signal having an unnecessarily wide bandwidth. Band limiting is generally introduced before transmission, in which case these discontinuities would be ‘rounded off’. The band limiting may be applied to the digital message, or the modulated signal itself. The data rate is often made a sub-multiple of the carrier frequency. This has been done in the waveform of Figure 1. One of the disadvantages of ASK, compared with FSK and PSK, for example, is that it has not got a constant envelope. This makes its processing (eg, power amplification) more difficult, since linearity becomes an important factor. However, it does make for ease of demodulation with an envelope detector.
  • 24. ASK signal (below) and the message (above) A significant reduction can be accepted before errors at the receiver increase unacceptably. This can be brought about by bandlimiting (pulse shaping) the message before modulation, or bandlimiting the ASK signal itself after generation. (ASK generation method) where the message has been band limited. The shape, after band limiting, depends naturally enough upon the amplitude and phase characteristics of the band limiting filter.
  • 25. Original TTL message (lower), band limited message (center), and ASK (above) Procedure: 1. Connect the power supplies of ST2156 and ST2157 but do not turn on the power supplies until connections are made for this experiment. 2. Make the connections as shown in the figure 8.1. 3. Switch 'ON' the power. 4. On ST2156, connect oscilloscope CH1 to ‘Clock In’ and CH2 to ‘Data In’ and observe the waveforms. 5. On ST2156, connect oscilloscope CH1 to ‘NRZ (L)’ and CH2 to ‘Output’ of modulator Circuit (l) on ST2156 and observe the waveforms. 6. Vary the gain potentiometer of modulator circuit (l) on ST2156 to adjust the amplitude of ASK Waveform. 7. On ST2156, connect oscilloscope CH1 to ‘NRZ (L)’ and CH2 to ‘Output’ of comparator on ST2157 and observe the waveforms. Observations: 1. The output at ‘Data In’ is repeating sequence of bits generated by Data Source. 2. The output at Modulator Circuit (l) is the ASK waveform which contains carrier transmitted for Data ‘1’ and carrier suppressed Data ‘0’. 3. The output at comparator on ST2157 is the same as ‘Data In’ on ST2156. (Waveforms Of ASK Modulation)
  • 26. Precautions: 1. Check the connections before switching ON the kit. 2. Observations should be taken properly.
  • 27. Experiment No 7 AIM: Study of Frequency Shift Keying. APPRATUS: 1. ST2156 and ST2157 kit . 2. 2 mm Banana cable 3. Oscilloscope Caddo 802 or equivalent 4.Power supply. THEORY: In Frequency shift keying, the carrier frequency is shifted (i.e. from one frequency to another) corresponding to the digital modulating signal. If the higher frequency is used to represent a data ‘1’ & lower frequency a data ‘0’, the resulting FSK waveform appears. Thus Data =1 High Frequency Data =0 Low Frequency It is also represented as a sum of two ASK signals. The two carriers have different frequencies & the digital data is inverted. The demodulation of FSK can be carried out by a PLL. As known, the PLL tries to ‘lock’ the input frequency. It achieves this by generating corresponding O/P voltage to be fed to the VCO, if any frequency deviation at its I/P is encountered. Thus the PLL detector follows the frequency changes and generates proportional O/P voltage. The O/P voltage from PLL contains the carrier components. Therefore to remove this, the signal is passed through Low Pass Filter. The resulting wave is too rounded to be used for digital data processing. Also, the amplitude level may be very low due to channel attenuation. DIAGRAM:
  • 28. FSK Generation: As its name suggests, a frequency shift keyed transmitter has its frequency shifted by the message. Although there could be more than two frequencies involved in an FSK signal, in this experiment the message will be a binary bit stream, and so only two frequencies will be involved. The word ‘keyed’ suggests that the message is of the ‘on-off’ (mark-space) variety, such as one (historically) generated by a morse key, or more likely in the present context, a binary sequence. The output from such a generator is illustrated in Figure 1 below. Procedure: 1. Connect the power supplies of ST2156 and ST2157 but do not turn on the power supplies until connections are made for this experiment. 2. Make the connections as shown in the figure 3.1. 3. Switch 'ON' the power. 4. On ST2156, connect oscilloscope CH1 to ‘Clock In’ and CH2 to ‘Data In’ and observe the waveforms. 5. On ST2156, connect oscilloscope CH1 to ‘NRZ (L)’ and CH2 to ‘Output’ of
  • 29. Summing Amplifier on ST2156 and observe the waveforms. 6. Adjust the potentiometers of both the Modulator Circuit (l) &(ll) onST2156 to adjust the amplitude of FSK waveform at Summing Amplifier’s output on ST2156. 7. On ST2156, connect oscilloscope CH1 to ‘NRZ (L)’ and CH2 to ‘Output’ of comparator on ST2157 and observe the waveforms. Observations: 1. The output at Summer Amplifier is the FSK waveform, Observe that for data bit '0' the FSK signal is at lower frequency (960KHz) & for data bit '1’ the FSK signal is at higher frequency (1.6 MHz)The output at comparator on ST2157 is the same as ‘Data In’ on ST2156. (Waveforms of FSK Modulation & Demodulation) RESULT: The amplitude change in FSK waveform does not matter, therefore FSK modulation technique is very reliable even in noisy & fading channels.
  • 30. Experiment No 8 AIM: Study of Phase Shift Keying. APPRATUS: 1. ST2156 and ST2157. 2. 2 mm Banana cable 3. CRO. 4.Power supply. THEORY: Phase shift keying involves the phase change of the carrier sine wave between 0 and 180 in accordance with the data stream to be transmitted. PSK is also known as Phase reversal keying. PSK modulator is shown in figure 1. Functionally, the PSK modulator is very similar to the ASK modulator. Both uses balanced modulator to multiply the carrier with the modulating signal. But in contrast to ASK techniques, the digital signal applied to the modulator input for PSK generation is bipolar i.e. have equal +ve and –ve voltage levels. The unipolar – bipolar converter converts the unipolar data stream to bipolar data. At receiver, the square loop detector circuit is used to demodulate the transmitted PSK signal. The demodulator is shown in figure 2. The incoming PSK signal with 0 & 180 phase changes is first fed to the signal square, which multiplies the input signal by itself. The phase adjust circuit allows the phase of the digital signal to be adjusted w.r.t the input PSK signal. Also its O/P controls the closing of an analog switch. When the output is high the switch closes and the original PSK signal is switched through the detector. BLOCK DIAGRAM:
  • 31. (PSK MODULATED) (PSK DE MODULATED) Procedure: 1. Connect the power supplies of ST2156 and ST2157 but do not turn on the power supplies until connections are made for this experiment. 2. Make the connections as shown in the figure 4.1. 3. Switch 'ON' the power. 4. On ST2156, connect oscilloscope CH1 to ‘Clock In’ and CH2 to ‘Data In’ and observe the waveforms. 5. On ST2156, connect oscilloscope CH1 to ‘NRZ (L)’ and CH2 to ‘Output’ of Modulator Circuit (l) on ST2156 and observe the waveforms. 6. Adjust the ‘Gain’ potentiometer of the Modulator Circuit (l) on ST2156 to adjust the amplitude of PSK waveform at output of Modulator Circuit (l) on ST2156. 7. Now on ST2157 connect oscilloscope CH1 to ‘Input’ of PSK demodulator and connect CH2 one by one to output of double squaring circuit, output of PLL, output of Divide by four (á 2) observe the wave forms. 8. On ST2157 connect oscilloscope CH1 to output of Phase adjust and CH2 to ‘output’ of PSK demodulator and observe the waveforms. Set all toggle switch to 0 and compare the waveform now vary the phase adjust potentiometer and observe its effects on the demodulated signal waveform. (Note: If there is problem in setting the waveform with potentiometer then toggle the switch given in PSK demodulator block two to three times to get the required waveform). 9. Now connect oscilloscope CH1 to ‘PSK’ output of PSK demodulator on ST2157 and connect CH2 ‘Output’ of Low Pass Filter on ST2157 and observe the waveforms. 10. Connect oscilloscope CH1 to ‘Output’ of Low Pass Filter on ST2157 then connect CH2 to ‘Output’ of Comparator on ST2157 and observe the waveforms, now vary the reference voltage potentiometer of first comparator to generate desired data pattern. 11. On ST2156, connect oscilloscope CH1 to ‘NRZ (L)’ and CH2 to ‘Output’ of comparator on ST2157 and observe the waveforms. 12. Connect oscilloscope CH1 to ‘Data In’ then connect CH2 output to Bit decoder and observe the waveforms. If both data does not matches then try to match it by varying the phase adjust potentiometer on QPSK Demodulator.
  • 32. 13. Now try to match the LED sequence by once pressing the reset switch on ST2156. Observations: 1. The output at ‘Data In’ is repeating sequence of bits generated by Data Source. 2. The ‘Output’ of Modulator Circuit (l) is Phase Shift Keying modulated signal. 3. The output of Double squaring circuit is sinusoidal signal (carrier signal) but frequency is four times higher than that of carrier used for modulation. 4. The output of Phase Lock Loop (PLL) is clock signal of same frequency as that of the output of double squaring circuit and output of Divide by two (á 2) is clock signal of frequency two times less than the output of PLL signal. 5. The output of PSK demodulator is a signal having group of positive half cycles and group of negative half cycles of the carrier signal. 6. A low pass filter removes high frequency component from demodulated PSK signal and it makes the signal smooth. 7. The variation in reference voltage potentiometer affect the Data, to recover Data correctly potentiometer adjustment is necessary. 8. The Phase Adjust potentiometer on ST2157 matches the phase of regenerated clock and carrier with input clock and carrier signal. (Waveforms of PSK Modulation)
  • 33. (Waveforms of PSK Demodulation) Result: The PSK modulator and demodulator circuit has been studied. Precautions: 1. Check the connections before switching ON the kit. 2. Observations should be taken properly. Experiment No 9 3. AIM: To Study Quadrature Phase Shift Keying transmission and Reception. 4. APPRATUS: 1. ST2156 and ST2157. 5. 2. 2 mm Banana cable 6. 3. CRO. 7. 4.Power supply. THEORY:- Procedure:
  • 34. 1. Connect the power supplies of ST2156 and ST2157 but do not turn on the power supplies until connections are made for this experiment. 2. Make the connections as shown in the figure 6.1. 3. Switch 'ON' the power. 4. On ST2156, connect oscilloscope CH1 to ‘Clock In’ and CH2 to ‘Data In’ and observe the waveforms. 5. On ST2156, connect oscilloscope CH1 to ‘Clock Output’ and CH2 one by one to ‘Sine’ and ‘Cosine’ output of 960 KHz and observe the waveforms. 6. On ST2156, connect oscilloscope CH1 to ‘Data In’ and connect CH2 one by one to ‘I Data’ and ‘Q Data’ outputs and observe the waveforms. 7. Now connect oscilloscope CH1 to ‘I Data’ output on ST2156 and connect CH2 one by one to ‘Signal In’, ‘Carrier In’ and ‘Output’ of modulator circuit (l) on ST2156 and observe the waveforms. 8. Now connect oscilloscope CH1 to ‘Q Data’ output on ST2156 and connect CH2 one by one to ‘Signal In’, ‘Carrier In’ and ‘Output’ of modulator circuit (ll) on ST2156 and observe the waveforms. ST2156 &ST2157 Scientech Technologies Pvt. Ltd. 48 9. Now connect oscilloscope CH1 to ‘Data Out’ on ST2156 and CH2 to ‘Output’ of Summing Amplifier on ST2156 and observe the waveforms. 10. Set ‘Carrier frequency’ selection switch to ‘960 KHz’ on ST2157. 11. Now on ST2157 connect oscilloscope CH1 to ‘Input’ of QPSK demodulator and connect CH2 one by one to output of double squaring circuit, output of PLL, output of Divide by four (á 4) observe the wave forms. 12. On ST2157, connect oscilloscope CH1 to ‘I’ output of QPSK demodulator and CH2 to ‘Q’ output of QPSK demodulator and observe the waveforms. Set all toggle switch to 0, now vary the phase adjust potentiometer and observe its effects on the demodulated signal waveforms. 13. Connect oscilloscope CH1 to ‘I’ output of QPSK demodulator on ST2157 then connect CH2 one by one to output of low pass filter, output of Comparator on ST2157 and observe the waveforms. 14. Connect oscilloscope CH1 to ‘Q’ output of QPSK demodulator on ST2157 then connect CH2 one by one to output of low pass filter, output of Comparator on ST2157 and observe the waveforms. 15. Compare the output of comparators on ST2157 with the output ‘I Data’ and ‘Q Data’ on ST2156 respectively. 16. Connect oscilloscope CH1 to ‘Data In’ then connect CH2 output to Bit decoder and observe the waveforms. If both data does not matches then try to match it by varying the phase adjust potentiometer on QPSK Demodulator. 17. Now try to match the LED sequence by once pressing the reset switch on ST2156. Observations: 1. The output at ‘Data In’ is repeating sequence of bits generated by Data Source. 2. The ‘I Data’ and ‘Q Data’ output are even and odd bit sequence of input data sequence and bit duration is double of input data sequence as shown in the figure 11.2.
  • 35. 3. The ‘Output’ of Modulator Circuit (l) and Modulator Circuit (ll) are Phase Shift Keying modulated signals, and summation of these two signals are Quadrature Phase Shifted signal as shown in the figure 6.2. 4. The output of Double squaring circuit is sinusoidal signal (carrier signal) but frequency is four times higher than that of carrier used. 5. The output of Phase Lock Loop (PLL) is clock signal of same frequency as that of the output of double squaring circuit and output of Divide by four (á 4) is clock signal of frequency four times less than the output of PLL signal. 6. The output of QPSK demodulator is a signal having group of positive half cycles and group of negative half cycles of the carrier signal as shown in the 7. A low pass filter removes high frequency component from demodulated QPSK signal and it makes the signal smooth as shown in the figure 6.3. 8. The variation in reference voltage potentiometer affect the Data, to recover Data correctly potentiometer adjustment is necessary and recovered Data.