Shopify is a complete commerce platform that lets you start, grow, and manage a business. Create and customize an online store. Sell in multiple places, including web, mobile, social media, online marketplaces, brick-and-mortar locations, and pop-up shops. Manage products, inventory, payments, and shipping.
https://www.mouritech.com/blog/create-an-e-commerce-store-in-shopify
Step by step tutorial for building ecommerce website on shopify
1. Step By Step Tutorial for Building Ecommerce Website
on Shopify
Shopify is a complete commerce platform that lets you start, grow, and manage a business.
Create and customize an online store. Sell in multiple places, including web, mobile, social
media, online marketplaces, brick-and-mortar locations, and pop-up shops. Manage products,
inventory, payments, and shipping.
How to set up your online store
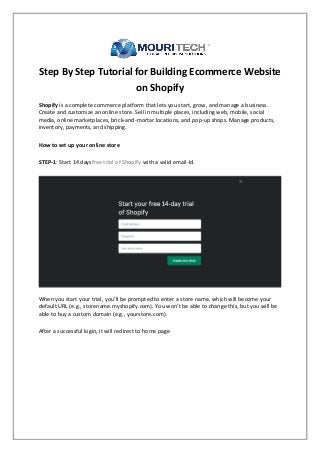
STEP-1: Start 14 daysfree trial of Shopify with a valid email-Id.
When you start your trial, you’ll be prompted to enter a store name, which will become your
default URL (e.g., storename.myshopify.com). You won’t be able to change this, but you will be
able to buy a custom domain (e.g., yourstore.com).
After a successful login, it will redirect to home page
2. STEP-2: Add the products you want to sell. Adding products should be one of the first things you
do because your products are what you will design the look and feel of your website.
Go to Products -> Add Products to create your product list.
Add the Product Title and Description. The product title should make it clear what the product is
and use your product description to surface other specific information or product options, such
as colors or sizes. Upload the product image. We can download the free images fromShopify
Burst which contains the high-resolution images. Create a collection and all the products to the
collection List.
STEP-3: Create a page for your online store OnlineStore -> Pages
3. Some of the most helpful ones to create include: Contact Page, About Page, FAQ Page, Policy
Page. Add navigation to the related pages through Onlinestore->Navigation
STEP-4: Customize your online store Online Store-> Themes
We can download free themes from the Shopify theme store
4. Customize the theme further by tinkering with the following:
Colors
Logos
Font
Social media emblems
Product image carousels
Adding related images to your product pages
STEP-5: Install Plugins on the Store
Shopify includes an app store that allows you to integrate and connect with a lot of different
apps and plugins.
The popular ones are based on:
Dropshipping tools
Shipping tools
Invoice creation
Payment integrations
Marketing tools
Plus a lot more
STEP-6: Add Payment Gateways
Shopify offers you a lot of protection when it comes to payment gateways.
Here are a few of the different payment options:
Stripe
5. Shopify Payments
PayPal
Bitcoin
Most Major Credit Cards
NOTE: You can circumvent Shopify’s limitations — they don’t let you customize the checkout
other than with CSS.
On the Settings tab at the bottom-left corner, select Payment Providers option, choose the
preferred method of payment, set it up, and then hit Activate.
Payment gateway transaction fees are added on top of Shopify’s own transaction fees.
Depending on your plan, you will receive these highly appealing rates.
Basic 2.4% + 20p
Professional 2.1% + 20p
Unlimited 1.8% + 20p
STEP-7: Shipping
If your shipping rates are too narrow, or you don’t give enough options, you may lose out on
some sales. Shopify will only calculate a shipping rate for the customers based on the rules that
you define in the Shipping page of the admin.
1. From your store admin, go to the Settings ->Shipping page.
2. In the “Shipping rates” section, see if you have set a weight-based shipping rate and
adjust it according to your product’s specifications.
Congratulation, Your new Shopify store is ready to preview!!!
In the next blog, I will be posting on how to add language translation, email marketing, and
remaining features in Shopify. Please follow our website for more details
https://www.mouritech.com/