2. Decoration Techniques
What is Batik?
Batik is an ancient technique that has been in use in Asia
to create beautiful designs on fabric. The way it works
is straight forward – melted wax is applied to fabric using
a brush or special tool called a tjanting.
When dye is applied to the fabric the wax stops the
dye from coming in contact with the fabric underneath.
As well as a tjanting tool, wax can be applied using
various techniques e.g. a brush or a stencil.
Once the wax has cooled, colour can be applied by
brush or by placing in a dye bath. The wax
needs to be removed to reveal the pattern, to do this,
place newspaper and clean sheets of paper both on
top and underneath of the fabric, and apply gentle
pressure with a hot iron.
The wax will be absorbed into the paper and you may
need to repeat this process a few times to get rid of all
the wax.
3. It’s more manageable to place your cloth
How to: into an embroidery circle just to be able to keep the
fabric tight and to move the fabric around freely.
Especially when using hot wax!
Tjanting tool
Wax comes out of here in a steady flow so
you have to be quick when drawing your design.
Melting pot for the wax
A Tjanting tool.
Have a go at doing abstract
patterns first as these work
best if your not sure what to
do. With practice you could
come up with some amazing
designs.
4. Work quickly and carefully as the wax will
cool very soon after taking it out of the
melting pot. If you do have an accident in
that you have a blob of wax on you design
don’t worry as it will add to the finished affect. You must work carefully
Draw with the wax just like
if it’s a pen!! Remember the wax
is hot
It’s quite hard to see
the wax so you have
to concentrate.
How to:
5. How to: Warning
If you do spill wax onto your design
unfortunately you will not be able to
get rid of it. Take your time.
Draw your design as far as you can to the sides of the circle
6. Other batik designs.
The wax creates a barrier for the paint colour
to remain in. On the right is what the
design would look like.
How to:
7. Add your colour using batik dyes or fabric paints.
You can mix your colours on the fabric so they
blend into one another or make them watery by
I’ve decided to start with pink. adding water to the batik dyes.
You ‘re now painting in the spaces
as the paint will not settle on the wax.
If it’s your first go don’t be afraid to
experiment with colours and design.
How to:
9. Place the embroidery frame somewhere to dry. When the paint is
dry remove the fabric from the frame.
What
do you think? .
How to:
10. Place the embroidery frame somewhere to dry. When the paint is
dry remove the fabric from the frame.
What
do you think? .
How to:
11. Place a piece of clean paper underneath your batik fabric.
Place another piece of paper on top of your batik fabric in preparation to absorb the
wax.
At the moment your fabric is quite stiff due to the wax.
How to:
12. Iron carefully over the paper. As you go along
You must work carefully
the paper should absorb the wax and the paper will
begin to look greasy. Don’t stop until you have Remember the IRON
is hot
finished ironing the whole piece of fabric. You may
need to change your paper half way through
The wax should be coming
through the paper
How to:
13. To finish you should have a piece of wax free fabric with just your
design on it.
How to:
14. How to:
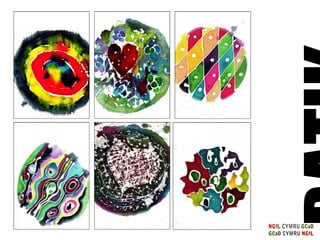
The batik designs can developed
further with machine stitching.
What do you think of some of
Decorative stitches added using these designs?
a free hand embroidery foot on
the sewing machine.
16. If you are interested in taking this technique further
you may want to do some research about its
origins, craft or galleries of artists who have
developed it. Here are some web sites to
have a look at if you’ve got a spare minute.
Or you can do a google search to find your
own interesting sites.
www.batikguild.org.uk
www.teritex.com
www.craftown.com/batik.htm
www.batiktambal.com