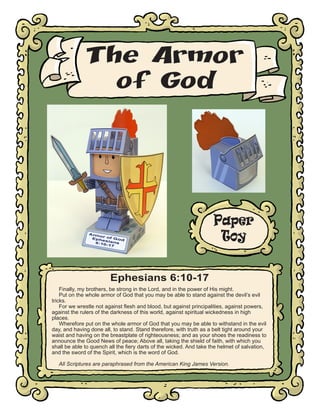
SlideShare a Scribd company logo
1 of 5
Download to read offline
The Armor
of God

Paper
Toy
Ephesians 6:10-17
Finally, my brothers, be strong in the Lord, and in the power of His might.
Put on the whole armor of God that you may be able to stand against the devil’s evil
tricks.
For we wrestle not against flesh and blood, but against principalities, against powers,
against the rulers of the darkness of this world, against spiritual wickedness in high
places.
Wherefore put on the whole armor of God that you may be able to withstand in the evil
day, and having done all, to stand. Stand therefore, with truth as a belt tight around your
waist and having on the breastplate of righteousness; and as your shoes the readiness to
announce the Good News of peace; Above all, taking the shield of faith, with which you
shall be able to quench all the fiery darts of the wicked. And take the helmet of salvation,
and the sword of the Spirit, which is the word of God.
All Scriptures are paraphrased from the American King James Version.
knight’s legs

knight’s head
Fold and glue the
two sides of the
sword together.
Then cut out the
sword by cutting
along the lines of
the sword.

knight’s body

knight’s
left arm

knight’s feet

knight’s
right arm
knight’s armor

pieces for
attaching
the arms to
the body

knight’s
shield
knight’s helmet

tabs to
attach the
tuft on the
helmet

knight’s helmet visor

Armor of God
Ephesians
6:10-17

Copyright © 2014 by Didier Martin
www.mylittlehouse.org

base for Armor of God
helmet tuft
fold and glue the two
sides together, then
cut along the lines

TO ADD THE CREST TO THE HELMET
Cut out and assemble the helmet box and visor. Cut out the
two parts of the tuft. Also, cut out the two tabs for attaching
the tufts found on page 3. Glue the tufts and tabs sandwiched
together with the tufts in the middle. Next, glue the assembled
crest on top of the helmet. See the photos on
the cover for the example.

Extra tabs to use
for the front of the
base to write your
own text.

Print this page on
regular weight paper

knight’s head

knight’s armor
knight’s
arm

pieces for
attaching
the arms to
the body

knight’s body

knight’s legs

knight’s feet

Illustrations by Didier Martin - Copyright © 2014 by Didier Martin
http://jacques-mylittlehouse.blogspot.com/ - www.mylittlehouse.org
Permission granted to print for personal use only. Distribution is prohibited.
TOOLS
NEEDED

Assembly Instructions
•	 Sharp scissors.
•	 Paper-cutting knife (recommended: X-Acto knife with a #11 blade).
•	 Sturdy tweezers with smooth edges. (Tweezers with rough edges or teeth
will mar the surface of the pieces.)
•	 Metal ruler to make a straight cut or score.
•	 Toothpicks for reaching into tiny corners and spreading drops of glue.
•	 White glue and glue stick.
•	 Cutting surface (recommended: a cutting mat).
•	 Dry pen (no ink) or blunt knife for scoring.

Cutting
Usually, a piece for a card stock model is cut out in two stages.
First, the piece is separated from the rest of the pieces by cutting roughly around it with scissors.
Don’t cut along the lines at this step.
Once the piece is separated, you can work on it without damaging other pieces. It’s best to do
the scoring and folding before proceeding to the fine cutting.
Work on one piece at a time:
•	 Score along the dotted lines.
•	 Cut along the solid lines.
•	 Fold along the dotted lines, but don’t add glue to any pieces yet.

VERY IMPORTANT: Try out the pieces to be glued before applying the glue. This
will help you understand how the pieces fit together, and you will be able to take
note of any adjustments that might be needed. Then apply a small amount of glue
on the tab indicated by a black dot.

Scoring
There are two kinds of folds:

Mountain
fold
Valley
fold
Mountain fold generally means that the texture
is on the outside, while on
a valley fold the texture is
usually inside.

Score the fold lines to make a crisp straight fold. It’s
especially important for the smallest pieces to be
scored before folding. To score, place a metal ruler
along the fold line, and then press with a dull point (a
dry pen or dull knife) along the fold line to compress
the paper. This will help to achieve a crisp fold.
Most pieces on the model require a mountain fold,
though a few use a valley fold. Valley folds will be
indicated on the model pieces with the valley fold
symbol.

• Be careful when using scissors or a paper
cutting knife.
• Glue, scissors, and other tools may be
dangerous, so be sure to keep them out of the
reach of young children.

And remember,
there is no hurry.
TAKE YOUR
TIME!

More Related Content

Similar to Armor of god_color

400 proyectos de_mini_reloj[1]
400 proyectos de_mini_reloj[1]400 proyectos de_mini_reloj[1]
400 proyectos de_mini_reloj[1]ruper montes
 
F-F-Fiddle Assembly Instructions
F-F-Fiddle Assembly InstructionsF-F-Fiddle Assembly Instructions
F-F-Fiddle Assembly Instructionsdsp39
 
Woods Presentation
Woods PresentationWoods Presentation
Woods Presentationjsartoris
 
F-F-Fiddle Assembly Instructions
F-F-Fiddle Assembly InstructionsF-F-Fiddle Assembly Instructions
F-F-Fiddle Assembly Instructionsdsp39
 
Putting us on the Radar
Putting us on the RadarPutting us on the Radar
Putting us on the RadarJason Shoup
 
Workshop Technology - basic tools
Workshop Technology - basic toolsWorkshop Technology - basic tools
Workshop Technology - basic toolsYasir Hashmi
 
How to Build a Giant Adirondack Chair
How to Build a Giant Adirondack ChairHow to Build a Giant Adirondack Chair
How to Build a Giant Adirondack ChairVera Stewart
 
Io paper prototyping for the future
Io paper prototyping for the futureIo paper prototyping for the future
Io paper prototyping for the futurenicolemessier
 
Input/Output: Paper Prototyping for the Future
Input/Output: Paper Prototyping for the Future Input/Output: Paper Prototyping for the Future
Input/Output: Paper Prototyping for the Future Joselyn McDonald
 
소형베틀도면
소형베틀도면소형베틀도면
소형베틀도면Seongwon Kim
 
Mega Collection of Southwest Inspired Metal Work Jewelry Tutorials
Mega Collection of Southwest Inspired Metal Work Jewelry TutorialsMega Collection of Southwest Inspired Metal Work Jewelry Tutorials
Mega Collection of Southwest Inspired Metal Work Jewelry TutorialsThe Beading Gem's Journal
 
Workshop technology hand basic tools
Workshop technology hand basic toolsWorkshop technology hand basic tools
Workshop technology hand basic toolsnanishajieha
 
Table saw safety
Table saw safetyTable saw safety
Table saw safetyKen Stayner
 
Glamour princess party_kit_wand
Glamour princess party_kit_wandGlamour princess party_kit_wand
Glamour princess party_kit_wandHIKOO
 

Similar to Armor of god_color (20)

Juguete 03 piezas
Juguete 03 piezasJuguete 03 piezas
Juguete 03 piezas
 
400 proyectos de_mini_reloj[1]
400 proyectos de_mini_reloj[1]400 proyectos de_mini_reloj[1]
400 proyectos de_mini_reloj[1]
 
F-F-Fiddle Assembly Instructions
F-F-Fiddle Assembly InstructionsF-F-Fiddle Assembly Instructions
F-F-Fiddle Assembly Instructions
 
Handmade key grips
Handmade key gripsHandmade key grips
Handmade key grips
 
Woods Presentation
Woods PresentationWoods Presentation
Woods Presentation
 
F-F-Fiddle Assembly Instructions
F-F-Fiddle Assembly InstructionsF-F-Fiddle Assembly Instructions
F-F-Fiddle Assembly Instructions
 
Putting us on the Radar
Putting us on the RadarPutting us on the Radar
Putting us on the Radar
 
TRU-FIT
TRU-FITTRU-FIT
TRU-FIT
 
Workshop Technology - basic tools
Workshop Technology - basic toolsWorkshop Technology - basic tools
Workshop Technology - basic tools
 
Break down bow
Break down bowBreak down bow
Break down bow
 
How to Build a Giant Adirondack Chair
How to Build a Giant Adirondack ChairHow to Build a Giant Adirondack Chair
How to Build a Giant Adirondack Chair
 
Io paper prototyping for the future
Io paper prototyping for the futureIo paper prototyping for the future
Io paper prototyping for the future
 
Input/Output: Paper Prototyping for the Future
Input/Output: Paper Prototyping for the Future Input/Output: Paper Prototyping for the Future
Input/Output: Paper Prototyping for the Future
 
소형베틀도면
소형베틀도면소형베틀도면
소형베틀도면
 
Dragon
DragonDragon
Dragon
 
Mega Collection of Southwest Inspired Metal Work Jewelry Tutorials
Mega Collection of Southwest Inspired Metal Work Jewelry TutorialsMega Collection of Southwest Inspired Metal Work Jewelry Tutorials
Mega Collection of Southwest Inspired Metal Work Jewelry Tutorials
 
Workshop technology hand basic tools
Workshop technology hand basic toolsWorkshop technology hand basic tools
Workshop technology hand basic tools
 
Table saw safety
Table saw safetyTable saw safety
Table saw safety
 
Halloween e a4
Halloween e a4Halloween e a4
Halloween e a4
 
Glamour princess party_kit_wand
Glamour princess party_kit_wandGlamour princess party_kit_wand
Glamour princess party_kit_wand
 

More from Sandra Fuso

Tbt 04 jesus_isborn_flannelgraph_color_en
Tbt 04 jesus_isborn_flannelgraph_color_enTbt 04 jesus_isborn_flannelgraph_color_en
Tbt 04 jesus_isborn_flannelgraph_color_enSandra Fuso
 
01 flannelgraph comic_1_color
01 flannelgraph comic_1_color01 flannelgraph comic_1_color
01 flannelgraph comic_1_colorSandra Fuso
 
02 flannelgraph comic_2_color
02 flannelgraph comic_2_color02 flannelgraph comic_2_color
02 flannelgraph comic_2_colorSandra Fuso
 
Bw nativity-copy (1)
Bw nativity-copy (1)Bw nativity-copy (1)
Bw nativity-copy (1)Sandra Fuso
 
Colour nativity-copy (1)
Colour nativity-copy (1)Colour nativity-copy (1)
Colour nativity-copy (1)Sandra Fuso
 
Calendar dec-2014
Calendar dec-2014Calendar dec-2014
Calendar dec-2014Sandra Fuso
 
Calendar oct-2014
Calendar oct-2014Calendar oct-2014
Calendar oct-2014Sandra Fuso
 
Recursos opcionais para as lições
Recursos opcionais para as liçõesRecursos opcionais para as lições
Recursos opcionais para as liçõesSandra Fuso
 
Calendar sep-2014
Calendar sep-2014Calendar sep-2014
Calendar sep-2014Sandra Fuso
 
Calendar aug-2014
Calendar aug-2014Calendar aug-2014
Calendar aug-2014Sandra Fuso
 
Tuxedo templates.pdf dia dos pais 2014 enviado para o blog
Tuxedo templates.pdf dia dos pais 2014 enviado para o blogTuxedo templates.pdf dia dos pais 2014 enviado para o blog
Tuxedo templates.pdf dia dos pais 2014 enviado para o blogSandra Fuso
 
Calendar july-2014
Calendar july-2014Calendar july-2014
Calendar july-2014Sandra Fuso
 
Calendar june-2014
Calendar june-2014Calendar june-2014
Calendar june-2014Sandra Fuso
 
Calendar may-2014
Calendar may-2014Calendar may-2014
Calendar may-2014Sandra Fuso
 
Calendar apr-2014
Calendar apr-2014Calendar apr-2014
Calendar apr-2014Sandra Fuso
 
Calendar mar-2014
Calendar mar-2014Calendar mar-2014
Calendar mar-2014Sandra Fuso
 
Estudo especial-carnaval
Estudo especial-carnavalEstudo especial-carnaval
Estudo especial-carnavalSandra Fuso
 

More from Sandra Fuso (20)

Tbt 04 jesus_isborn_flannelgraph_color_en
Tbt 04 jesus_isborn_flannelgraph_color_enTbt 04 jesus_isborn_flannelgraph_color_en
Tbt 04 jesus_isborn_flannelgraph_color_en
 
01 flannelgraph comic_1_color
01 flannelgraph comic_1_color01 flannelgraph comic_1_color
01 flannelgraph comic_1_color
 
02 flannelgraph comic_2_color
02 flannelgraph comic_2_color02 flannelgraph comic_2_color
02 flannelgraph comic_2_color
 
Bw nativity-copy (1)
Bw nativity-copy (1)Bw nativity-copy (1)
Bw nativity-copy (1)
 
Colour nativity-copy (1)
Colour nativity-copy (1)Colour nativity-copy (1)
Colour nativity-copy (1)
 
Minhoca
MinhocaMinhoca
Minhoca
 
Mens vestcard
Mens vestcardMens vestcard
Mens vestcard
 
Obs en-v3 1-1
Obs en-v3 1-1Obs en-v3 1-1
Obs en-v3 1-1
 
Calendar dec-2014
Calendar dec-2014Calendar dec-2014
Calendar dec-2014
 
Calendar oct-2014
Calendar oct-2014Calendar oct-2014
Calendar oct-2014
 
Recursos opcionais para as lições
Recursos opcionais para as liçõesRecursos opcionais para as lições
Recursos opcionais para as lições
 
Calendar sep-2014
Calendar sep-2014Calendar sep-2014
Calendar sep-2014
 
Calendar aug-2014
Calendar aug-2014Calendar aug-2014
Calendar aug-2014
 
Tuxedo templates.pdf dia dos pais 2014 enviado para o blog
Tuxedo templates.pdf dia dos pais 2014 enviado para o blogTuxedo templates.pdf dia dos pais 2014 enviado para o blog
Tuxedo templates.pdf dia dos pais 2014 enviado para o blog
 
Calendar july-2014
Calendar july-2014Calendar july-2014
Calendar july-2014
 
Calendar june-2014
Calendar june-2014Calendar june-2014
Calendar june-2014
 
Calendar may-2014
Calendar may-2014Calendar may-2014
Calendar may-2014
 
Calendar apr-2014
Calendar apr-2014Calendar apr-2014
Calendar apr-2014
 
Calendar mar-2014
Calendar mar-2014Calendar mar-2014
Calendar mar-2014
 
Estudo especial-carnaval
Estudo especial-carnavalEstudo especial-carnaval
Estudo especial-carnaval
 

Armor of god_color

  • 1. The Armor of God Paper Toy Ephesians 6:10-17 Finally, my brothers, be strong in the Lord, and in the power of His might. Put on the whole armor of God that you may be able to stand against the devil’s evil tricks. For we wrestle not against flesh and blood, but against principalities, against powers, against the rulers of the darkness of this world, against spiritual wickedness in high places. Wherefore put on the whole armor of God that you may be able to withstand in the evil day, and having done all, to stand. Stand therefore, with truth as a belt tight around your waist and having on the breastplate of righteousness; and as your shoes the readiness to announce the Good News of peace; Above all, taking the shield of faith, with which you shall be able to quench all the fiery darts of the wicked. And take the helmet of salvation, and the sword of the Spirit, which is the word of God. All Scriptures are paraphrased from the American King James Version.
  • 2. knight’s legs knight’s head Fold and glue the two sides of the sword together. Then cut out the sword by cutting along the lines of the sword. knight’s body knight’s left arm knight’s feet knight’s right arm
  • 3. knight’s armor pieces for attaching the arms to the body knight’s shield knight’s helmet tabs to attach the tuft on the helmet knight’s helmet visor Armor of God Ephesians 6:10-17 Copyright © 2014 by Didier Martin www.mylittlehouse.org base for Armor of God
  • 4. helmet tuft fold and glue the two sides together, then cut along the lines TO ADD THE CREST TO THE HELMET Cut out and assemble the helmet box and visor. Cut out the two parts of the tuft. Also, cut out the two tabs for attaching the tufts found on page 3. Glue the tufts and tabs sandwiched together with the tufts in the middle. Next, glue the assembled crest on top of the helmet. See the photos on the cover for the example. Extra tabs to use for the front of the base to write your own text. Print this page on regular weight paper knight’s head knight’s armor knight’s arm pieces for attaching the arms to the body knight’s body knight’s legs knight’s feet Illustrations by Didier Martin - Copyright © 2014 by Didier Martin http://jacques-mylittlehouse.blogspot.com/ - www.mylittlehouse.org Permission granted to print for personal use only. Distribution is prohibited.
  • 5. TOOLS NEEDED Assembly Instructions • Sharp scissors. • Paper-cutting knife (recommended: X-Acto knife with a #11 blade). • Sturdy tweezers with smooth edges. (Tweezers with rough edges or teeth will mar the surface of the pieces.) • Metal ruler to make a straight cut or score. • Toothpicks for reaching into tiny corners and spreading drops of glue. • White glue and glue stick. • Cutting surface (recommended: a cutting mat). • Dry pen (no ink) or blunt knife for scoring. Cutting Usually, a piece for a card stock model is cut out in two stages. First, the piece is separated from the rest of the pieces by cutting roughly around it with scissors. Don’t cut along the lines at this step. Once the piece is separated, you can work on it without damaging other pieces. It’s best to do the scoring and folding before proceeding to the fine cutting. Work on one piece at a time: • Score along the dotted lines. • Cut along the solid lines. • Fold along the dotted lines, but don’t add glue to any pieces yet. VERY IMPORTANT: Try out the pieces to be glued before applying the glue. This will help you understand how the pieces fit together, and you will be able to take note of any adjustments that might be needed. Then apply a small amount of glue on the tab indicated by a black dot. Scoring There are two kinds of folds: Mountain fold Valley fold Mountain fold generally means that the texture is on the outside, while on a valley fold the texture is usually inside. Score the fold lines to make a crisp straight fold. It’s especially important for the smallest pieces to be scored before folding. To score, place a metal ruler along the fold line, and then press with a dull point (a dry pen or dull knife) along the fold line to compress the paper. This will help to achieve a crisp fold. Most pieces on the model require a mountain fold, though a few use a valley fold. Valley folds will be indicated on the model pieces with the valley fold symbol. • Be careful when using scissors or a paper cutting knife. • Glue, scissors, and other tools may be dangerous, so be sure to keep them out of the reach of young children. And remember, there is no hurry. TAKE YOUR TIME!