Chicken Leg Dissection PowerPoint, Muscular System, Skeletal System,
•
14 likes•46,831 views

This Chicken Leg Dissection walkthrough is one very small part of a larger science unit from www.sciencepowerpoint.com. This unit comes with a bundled homework package, detailed lesson notes, worksheets, review games, and much more. The Human Body Systems and Health Topics Unit uses a 13 Part 8,500 slide interactive PowerPoint full of critical class notes, review opportunities, video and academic links, and much more to deliver an entire unit of study. Learn more at www.sciencepowerpoint.com

Recommended
More Related Content
What's hot
What's hot (20)
Similar to Chicken Leg Dissection PowerPoint, Muscular System, Skeletal System,
Similar to Chicken Leg Dissection PowerPoint, Muscular System, Skeletal System, (20)
More from www.sciencepowerpoint.com
More from www.sciencepowerpoint.com (20)
Recently uploaded
Recently uploaded (20)
Chicken Leg Dissection PowerPoint, Muscular System, Skeletal System,
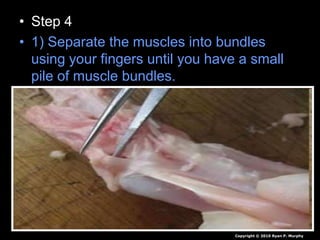
- 1. • Step 4 • 1) Separate the muscles into bundles using your fingers until you have a small pile of muscle bundles. • 2) Look for tendons at the end of the muscle bundles or still attached to the bone. – Record results in data table. Copyright © 2010 Ryan P. Murphy
- 3. • Chicken Leg Dissection Available Sheet
- 4. • Lab Activity! Chicken Dinner. Copyright © 2010 Ryan P. Murphy
- 5. Copyright © 2010 Ryan P. Murphy
- 7. • Lab Activity! Chicken Dinner. – Caution! This lab will deal with raw meat. Pathogens can be present. – Do not put hands in mouth / rub eyes. – Clean all surfaces thoroughly – Watch out for cross contamination (Pencil lands in raw meat and then you put contaminated pencil in your mouth). – Use refrigeration prior, and if lab carries over another day. – Dispose of meat properly at conclusion. – Wash hands after clean-up. Copyright © 2010 Ryan P. Murphy
- 9. Wear gloves and protective eyewear during this lab.
- 10. Wear gloves and protective eyewear during this lab. Gloves to help you stay germ free, and eyewear to prevent serious injury as sharp objects will be used.
- 11. Wear gloves and protective eyewear during this lab. Gloves to help you stay germ free, and eyewear to prevent serious injury as sharp objects will be used. Use common sense. Safety First, Last, and Always. Copyright © 2010 Ryan P. Murphy
- 12. • Picture of best tool to use in this lab. Copyright © 2010 Ryan P. Murphy
- 13. • Picture of best tool to use in this lab. Copyright © 2010 Ryan P. Murphy
- 14. • We need you to perform this dissection like surgeons. Copyright © 2010 Ryan P. Murphy
- 15. • We need you to perform this dissection like surgeons. – The goal is not to hack up the chicken leg as fast you can. Copyright © 2010 Ryan P. Murphy
- 16. • We need you to perform this dissection like surgeons. – The goal is not to hack up the chicken leg as fast you can. Copyright © 2010 Ryan P. Murphy
- 17. • Please record the following chart in your journal. Tissue Color Stretch (Y/N) Hard (Y/N) Fibers (Y/N) Thick (mm) Skin Muscle Tendon Ligament Cartilage Bone Copyright © 2010 Ryan P. Murphy
- 18. • Materials required. – One chicken leg quarter per group. – Eyewear and gloves for all students. – One dissection tray – Dissection equipment (sharp – so watch out!) – Refrigerator. Copyright © 2010 Ryan P. Murphy
- 19. • Step 1: • 1) Please put on eyewear and gloves. • 2) Place chicken leg on dissection tray. • 3) Sketch the chicken leg in your journal. Copyright © 2010 Ryan P. Murphy
- 20. • Step 1: • 1) Please put on eyewear and gloves. • 2) Place chicken leg on dissection tray. • 3) Sketch the chicken leg in your journal. Copyright © 2010 Ryan P. Murphy
- 21. • Step 1: • 1) Please put on eyewear and gloves. • 2) Place chicken leg on dissection tray. • 3) Sketch the chicken leg in your journal. Copyright © 2010 Ryan P. Murphy
- 22. • Step 1: • 1) Please put on eyewear and gloves. • 2) Place chicken leg on dissection tray. • 3) Sketch the chicken leg in your journal. Copyright © 2010 Ryan P. Murphy
- 23. • Step 1: • 1) Please put on eyewear and gloves. • 2) Place chicken leg on dissection tray. • 3) Sketch the chicken leg in your journal. Copyright © 2010 Ryan P. Murphy
- 24. • Step 1: • 1) Please put on eyewear and gloves. • 2) Place chicken leg on dissection tray. • 3) Sketch the chicken leg in your journal. Copyright © 2010 Ryan P. Murphy
- 25. • Step 1: • 1) Please put on eyewear and gloves. • 2) Place chicken leg on dissection tray. • 3) Sketch the chicken leg in your journal. Copyright © 2010 Ryan P. Murphy
- 26. • Step 1: • 1) Please put on eyewear and gloves. • 2) Place chicken leg on dissection tray. • 3) Sketch the chicken leg in your journal. Copyright © 2010 Ryan P. Murphy
- 27. • Step 1: • 1) Please put on eyewear and gloves. • 2) Place chicken leg on dissection tray. • 3) Sketch the chicken leg in your journal. Copyright © 2010 Ryan P. Murphy
- 28. • Step 1: • 1) Please put on eyewear and gloves. • 2) Place chicken leg on dissection tray. • 3) Sketch the chicken leg in your journal. Copyright © 2010 Ryan P. Murphy
- 29. • Step 1: • 1) Please put on eyewear and gloves. • 2) Place chicken leg on dissection tray. • 3) Sketch the chicken leg in your journal. Thigh
- 30. • Step 1: • 1) Please put on eyewear and gloves. • 2) Place chicken leg on dissection tray. • 3) Sketch the chicken leg in your journal. Thigh Drumstick Copyright © 2010 Ryan P. Murphy
- 31. • Step 1: • 1) Please put on eyewear and gloves. • 2) Place chicken leg on dissection tray. • 3) Sketch the chicken leg in your journal. Thigh Drumstick Hip Copyright © 2010 Ryan P. Murphy
- 32. • Step 1: • 1) Please put on eyewear and gloves. • 2) Place chicken leg on dissection tray. • 3) Sketch the chicken leg in your journal. Thigh Drumstick Hip Copyright © 2010 Ryan P. Murphy
- 33. • Step 2 • 1) Look at the skin tissue and record its properties in the results table. – Make at least one observation of the skin. • 2) Look at the hip bone / move it. – What type of joint is it? • 3) Gently move the knee joint? – What type of joint is it? Can it move sideways? Copyright © 2010 Ryan P. Murphy
- 34. • Step 2 • 1) Look at the skin tissue and record its properties in the results table. – Make at least one observation of the skin. • 2) Look at the hip bone / move it. – What type of joint is it? • 3) Gently move the knee joint? – What type of joint is it? Can it move sideways? Copyright © 2010 Ryan P. Murphy
- 35. • Step 3 • 1) Skillfully pull / cut to remove the skin using your dissection tools. – Is fat tissue present? Describe it in your journal • 2) Look for fascia (shiny lining over muscles) • 3) Examine the Muscle Tissue and record your finding in the results table. Copyright © 2010 Ryan P. Murphy
- 36. • Step 3 • 1) Skillfully pull / cut to remove the skin using your dissection tools. – Is fat tissue present? Describe it in your journal • 2) Look for fascia (shiny lining over muscles) • 3) Examine the Muscle Tissue and record your finding in the results table. Copyright © 2010 Ryan P. Murphy
- 38. • Step 4 • 1) Separate the muscles into bundles using your fingers until you have a small pile of muscle bundles. • 2) Look for tendons at the end of the muscle bundles or still attached to the bone. – Record results in data table. Copyright © 2010 Ryan P. Murphy
- 39. • Step 4 • 1) Separate the muscles into bundles using your fingers until you have a small pile of muscle bundles. • 2) Look for tendons at the end of the muscle bundles or still attached to the bone. – Record results in data table. Copyright © 2010 Ryan P. Murphy
- 40. • Step 4 • 1) Separate the muscles into bundles using your fingers until you have a small pile of muscle bundles. • 2) Look for tendons at the end of the muscle bundles or still attached to the bone. – Record results in data table. Copyright © 2010 Ryan P. Murphy
- 41. • Step 4 • 1) Separate the muscles into bundles using your fingers until you have a small pile of muscle bundles. • 2) Look for tendons at the end of the muscle bundles or still attached to the bone. – Record results in data table. Copyright © 2010 Ryan P. Murphy
- 42. • Step 5 • 1) Look for arteries (blood vessels), and thin nerves around the muscle and tendons. • 2) Carefully cut the tendons away near the joint and look for ligaments. – Record findings about the ligament in the data table. • 3) Identify the Femur, Tibia, and Fibula to your teachers. Copyright © 2010 Ryan P. Murphy
- 43. • Step 5 • 1) Look for arteries (blood vessels), and thin nerves around the muscle and tendons. • 2) Carefully cut the tendons away near the joint and look for ligaments. – Record findings about the ligament in the data table. • 3) Identify the Femur, Tibia, and Fibula to your teachers. Copyright © 2010 Ryan P. Murphy
- 44. • Step 5 • 1) Look for arteries (blood vessels), and thin nerves around the muscle and tendons. • 2) Carefully cut the tendons away near the joint and look for ligaments. – Record findings about the ligament in the data table. • 3) Identify the Femur, Tibia, and Fibula to your teachers. Copyright © 2010 Ryan P. Murphy
- 46. • Step 6 • 1) Skillfully remove excess material to expose the joint A (knee). – Don’t cut the ligaments / cartilage • 2) Move this joint around and observe the “Hinge” – Make a sketch of this joint in your journal • 3) Record properties of cartilage (Tissue that lets joints slide easily and absorbs shock) between joints on your data table. Copyright © 2010 Ryan P. Murphy
- 47. • Step 7 • 1) Skillfully remove excess material to expose the joint B (Hip). – Don’t cut the ligaments / cartilage • 2) Move this joint around and observe the “Ball and Socket” – Make a sketch of this joint in your journal
- 48. • Step 7 • 1) Skillfully remove excess material to expose the joint B (Hip). – Don’t cut the ligaments / cartilage • 2) Move this joint around and observe the “Ball and Socket” – Make a sketch of this joint in your journal. Copyright © 2010 Ryan P. Murphy
- 49. • Step 8 • 1) Skillfully cut the ligaments around each joint and remove the bones. – Complete the bone section of the data table. • 2) Draw a sketch of the ends of each bone and how they fit together. • 3) Using your hands, break the Tibia in half and make a sketch of the bone marrow. – Red =Place where blood cells are made. – Yellow = Fats are made. Copyright © 2010 Ryan P. Murphy
- 50. • Step 9 • 1) Dispose of all parts of chicken leg to disposal area (trash bag). • 2) Carefully bring all tools to clean up area and clean properly. • 3) Disinfect area properly. • 4) Remove eyewear and gloves with teacher approval and dispose of gloves properly. –Watch for contamination! Copyright © 2010 Ryan P. Murphy
- 51. • Activity for digestive system! – Place small piece of chicken meat and bone into a jar with vinegar. – Take a similar size of meat and cut with a knife into many pieces and place in another jaw (simulated chewing) – Add vinegar and cap jar and set aside until you reach the digestion system / digestive juices. Copyright © 2010 Ryan P. Murphy
- 52. Tissue Color Stretch (Y/N) Hard (Y/N) Fibers (Y/N) Thick (mm) Skin Muscle Tendon Ligament Cartilage Bone Copyright © 2010 Ryan P. Murphy
- 53. Tissue Color Stretch (Y/N) Hard (Y/N) Fibers (Y/N) Thick (mm) Skin Yellowish White Muscle Tendon Ligament Cartilage Bone Copyright © 2010 Ryan P. Murphy
- 54. • Please record the following chart in your journal. Tissue Color Stretch (Y/N) Hard (Y/N) Fibers (Y/N) Thick (mm) Skin Yellowish White Yes Muscle Tendon Ligament Cartilage Bone Copyright © 2010 Ryan P. Murphy
- 55. • Please record the following chart in your journal. Tissue Color Stretch (Y/N) Hard (Y/N) Fibers (Y/N) Thick (mm) Skin Yellowish White Yes No Muscle Tendon Ligament Cartilage Bone Copyright © 2010 Ryan P. Murphy
- 56. • Please record the following chart in your journal. Tissue Color Stretch (Y/N) Hard (Y/N) Fibers (Y/N) Thick (mm) Skin Yellowish White Yes No No Muscle Tendon Ligament Cartilage Bone Copyright © 2010 Ryan P. Murphy
- 57. • Please record the following chart in your journal. Tissue Color Stretch (Y/N) Hard (Y/N) Fibers (Y/N) Thick (mm) Skin Yellowish White Yes No No Thin Muscle Tendon Ligament Cartilage Bone Copyright © 2010 Ryan P. Murphy
- 58. • Please record the following chart in your journal. Tissue Color Stretch (Y/N) Hard (Y/N) Fibers (Y/N) Thick (mm) Skin Yellowish White Yes No No Thin Muscle Pink Tendon Ligament Cartilage Bone Copyright © 2010 Ryan P. Murphy
- 59. • Please record the following chart in your journal. Tissue Color Stretch (Y/N) Hard (Y/N) Fibers (Y/N) Thick (mm) Skin Yellowish White Yes No No Thin Muscle Pink Yes Tendon Ligament Cartilage Bone Copyright © 2010 Ryan P. Murphy
- 60. • Please record the following chart in your journal. Tissue Color Stretch (Y/N) Hard (Y/N) Fibers (Y/N) Thick (mm) Skin Yellowish White Yes No No Thin Muscle Pink Yes No Tendon Ligament Cartilage Bone Copyright © 2010 Ryan P. Murphy
- 61. • Please record the following chart in your journal. Tissue Color Stretch (Y/N) Hard (Y/N) Fibers (Y/N) Thick (mm) Skin Yellowish White Yes No No Thin Muscle Pink Yes No Yes Tendon Ligament Cartilage Bone Copyright © 2010 Ryan P. Murphy
- 62. • Please record the following chart in your journal. Tissue Color Stretch (Y/N) Hard (Y/N) Fibers (Y/N) Thick (mm) Skin Yellowish White Yes No No Thin Muscle Pink Yes No Yes Thick Tendon Ligament Cartilage Bone Copyright © 2010 Ryan P. Murphy
- 63. • Please record the following chart in your journal. Tissue Color Stretch (Y/N) Hard (Y/N) Fibers (Y/N) Thick (mm) Skin Yellowish White Yes No No Thin Muscle Pink Yes No Yes Thick Tendon Ligament Cartilage Bone Copyright © 2010 Ryan P. Murphy
- 64. • Please record the following chart in your journal. Tissue Color Stretch (Y/N) Hard (Y/N) Fibers (Y/N) Thick (mm) Skin Yellowish White Yes No No Thin Muscle Pink Yes No Yes Thick Tendon White Ligament Cartilage Bone Copyright © 2010 Ryan P. Murphy
- 65. • Please record the following chart in your journal. Tissue Color Stretch (Y/N) Hard (Y/N) Fibers (Y/N) Thick (mm) Skin Yellowish White Yes No No Thin Muscle Pink Yes No Yes Thick Tendon White Yes Ligament Cartilage Bone Copyright © 2010 Ryan P. Murphy
- 66. • Please record the following chart in your journal. Tissue Color Stretch (Y/N) Hard (Y/N) Fibers (Y/N) Thick (mm) Skin Yellowish White Yes No No Thin Muscle Pink Yes No Yes Thick Tendon White Yes No Ligament Cartilage Bone Copyright © 2010 Ryan P. Murphy
- 67. • Please record the following chart in your journal. Tissue Color Stretch (Y/N) Hard (Y/N) Fibers (Y/N) Thick (mm) Skin Yellowish White Yes No No Thin Muscle Pink Yes No Yes Thick Tendon White Yes No Yes Ligament Cartilage Bone Copyright © 2010 Ryan P. Murphy
- 68. • Please record the following chart in your journal. Tissue Color Stretch (Y/N) Hard (Y/N) Fibers (Y/N) Thick (mm) Skin Yellowish White Yes No No Thin Muscle Pink Yes No Yes Thick Tendon White Yes No Yes Thin Ligament Cartilage Bone Copyright © 2010 Ryan P. Murphy
- 69. • Please record the following chart in your journal. Tissue Color Stretch (Y/N) Hard (Y/N) Fibers (Y/N) Thick (mm) Skin Yellowish White Yes No No Thin Muscle Pink Yes No Yes Thick Tendon White Yes No Yes Thin Ligament Cartilage Bone Copyright © 2010 Ryan P. Murphy
- 70. • Please record the following chart in your journal. Tissue Color Stretch (Y/N) Hard (Y/N) Fibers (Y/N) Thick (mm) Skin Yellowish White Yes No No Thin Muscle Pink Yes No Yes Thick Tendon White Yes No Yes Thin Ligament White / Yellow Cartilage Bone Copyright © 2010 Ryan P. Murphy
- 71. • Please record the following chart in your journal. Tissue Color Stretch (Y/N) Hard (Y/N) Fibers (Y/N) Thick (mm) Skin Yellowish White Yes No No Thin Muscle Pink Yes No Yes Thick Tendon White Yes No Yes Thin Ligament White / Yellow Tough Cartilage Bone Copyright © 2010 Ryan P. Murphy
- 72. • Please record the following chart in your journal. Tissue Color Stretch (Y/N) Hard (Y/N) Fibers (Y/N) Thick (mm) Skin Yellowish White Yes No No Thin Muscle Pink Yes No Yes Thick Tendon White Yes No Yes Thin Ligament White / Yellow Tough Tough Cartilage Bone Copyright © 2010 Ryan P. Murphy
- 73. • Please record the following chart in your journal. Tissue Color Stretch (Y/N) Hard (Y/N) Fibers (Y/N) Thick (mm) Skin Yellowish White Yes No No Thin Muscle Pink Yes No Yes Thick Tendon White Yes No Yes Thin Ligament White / Yellow Tough Tough Yes Cartilage Bone Copyright © 2010 Ryan P. Murphy
- 74. • Please record the following chart in your journal. Tissue Color Stretch (Y/N) Hard (Y/N) Fibers (Y/N) Thick (mm) Skin Yellowish White Yes No No Thin Muscle Pink Yes No Yes Thick Tendon White Yes No Yes Thin Ligament White / Yellow Tough Tough Yes Thin Cartilage Bone Copyright © 2010 Ryan P. Murphy
- 75. • Please record the following chart in your journal. Tissue Color Stretch (Y/N) Hard (Y/N) Fibers (Y/N) Thick (mm) Skin Yellowish White Yes No No Thin Muscle Pink Yes No Yes Thick Tendon White Yes No Yes Thin Ligament White / Yellow Tough Tough Yes Thin Cartilage Bone Copyright © 2010 Ryan P. Murphy
- 76. • Please record the following chart in your journal. Tissue Color Stretch (Y/N) Hard (Y/N) Fibers (Y/N) Thick (mm) Skin Yellowish White Yes No No Thin Muscle Pink Yes No Yes Thick Tendon White Yes No Yes Thin Ligament White / Yellow Tough Tough Yes Thin Cartilage White / Grey Bone Copyright © 2010 Ryan P. Murphy
- 77. • Please record the following chart in your journal. Tissue Color Stretch (Y/N) Hard (Y/N) Fibers (Y/N) Thick (mm) Skin Yellowish White Yes No No Thin Muscle Pink Yes No Yes Thick Tendon White Yes No Yes Thin Ligament White / Yellow Tough Tough Yes Thin Cartilage White / Grey Tough Bone Copyright © 2010 Ryan P. Murphy
- 78. • Please record the following chart in your journal. Tissue Color Stretch (Y/N) Hard (Y/N) Fibers (Y/N) Thick (mm) Skin Yellowish White Yes No No Thin Muscle Pink Yes No Yes Thick Tendon White Yes No Yes Thin Ligament White / Yellow Tough Tough Yes Thin Cartilage White / Grey Tough 1/2 Bone Copyright © 2010 Ryan P. Murphy
- 79. • Please record the following chart in your journal. Tissue Color Stretch (Y/N) Hard (Y/N) Fibers (Y/N) Thick (mm) Skin Yellowish White Yes No No Thin Muscle Pink Yes No Yes Thick Tendon White Yes No Yes Thin Ligament White / Yellow Tough Tough Yes Thin Cartilage White / Grey Tough 1/2 Yes Bone Copyright © 2010 Ryan P. Murphy
- 80. • Please record the following chart in your journal. Tissue Color Stretch (Y/N) Hard (Y/N) Fibers (Y/N) Thick (mm) Skin Yellowish White Yes No No Thin Muscle Pink Yes No Yes Thick Tendon White Yes No Yes Thin Ligament White / Yellow Tough Tough Yes Thin Cartilage White / Grey Tough 1/2 Yes Thin 1/2 Bone Copyright © 2010 Ryan P. Murphy
- 81. • Please record the following chart in your journal. Tissue Color Stretch (Y/N) Hard (Y/N) Fibers (Y/N) Thick (mm) Skin Yellowish White Yes No No Thin Muscle Pink Yes No Yes Thick Tendon White Yes No Yes Thin Ligament White / Yellow Tough Tough Yes Thin Cartilage White / Grey Tough 1/2 Yes Thin 1/2 Bone Copyright © 2010 Ryan P. Murphy
- 82. • Please record the following chart in your journal. Tissue Color Stretch (Y/N) Hard (Y/N) Fibers (Y/N) Thick (mm) Skin Yellowish White Yes No No Thin Muscle Pink Yes No Yes Thick Tendon White Yes No Yes Thin Ligament White / Yellow Tough Tough Yes Thin Cartilage White / Grey Tough 1/2 Yes Thin 1/2 Bone Pink and White Copyright © 2010 Ryan P. Murphy
- 83. • Please record the following chart in your journal. Tissue Color Stretch (Y/N) Hard (Y/N) Fibers (Y/N) Thick (mm) Skin Yellowish White Yes No No Thin Muscle Pink Yes No Yes Thick Tendon White Yes No Yes Thin Ligament White / Yellow Tough Tough Yes Thin Cartilage White / Grey Tough 1/2 Yes Thin 1/2 Bone Pink and White No Copyright © 2010 Ryan P. Murphy
- 84. • Please record the following chart in your journal. Tissue Color Stretch (Y/N) Hard (Y/N) Fibers (Y/N) Thick (mm) Skin Yellowish White Yes No No Thin Muscle Pink Yes No Yes Thick Tendon White Yes No Yes Thin Ligament White / Yellow Tough Tough Yes Thin Cartilage White / Grey Tough 1/2 Yes Thin 1/2 Bone Pink and White No Yes Copyright © 2010 Ryan P. Murphy
- 85. • Please record the following chart in your journal. Tissue Color Stretch (Y/N) Hard (Y/N) Fibers (Y/N) Thick (mm) Skin Yellowish White Yes No No Thin Muscle Pink Yes No Yes Thick Tendon White Yes No Yes Thin Ligament White / Yellow Tough Tough Yes Thin Cartilage White / Grey Tough 1/2 Yes Thin 1/2 Bone Pink and White No Yes Yes CollagenCopyright © 2010 Ryan P. Murphy
- 86. • Please record the following chart in your journal. Tissue Color Stretch (Y/N) Hard (Y/N) Fibers (Y/N) Thick (mm) Skin Yellowish White Yes No No Thin Muscle Pink Yes No Yes Thick Tendon White Yes No Yes Thin Ligament White / Yellow Tough Tough Yes Thin Cartilage White / Grey Tough 1/2 Yes Thin 1/2 Bone Pink and White No Yes Yes Collagen Thick MarrowCopyright © 2010 Ryan P. Murphy
- 88. “Name that part of a chicken leg coming up.”
- 96. Switched?
- 104. Connective Tissue
- 105. Connective Tissue
- 106. Connective Tissue
- 119. • Final Activity! The Muscular System Tour – http://www.anatronica.com/systems.html
- 120. • Try and guess the mystery picture beneath the boxes. – Raise your hand when you think you know. You only get one guess. Copyright © 2010 Ryan P. Murphy
- 121. Copyright © 2010 Ryan P. Murphy
- 128. • How is your bundle coming along. You should be close to page 7 by now.
- 129. • Video Link! Muscular System Crash Course. – (Optional and Advanced) – Preview for language. – http://www.youtube.com/watch?v=jqy0i1KXUO4
- 130. • Review Game: Levels of Biological Organization, Skeletal System, Muscular System.
- 132. Bundled homework package, lesson notes, worksheets, review games, and much more on the full unit.