7 simple steps for replacement and testing of an alternator
•
0 likes•381 views

Get the Lowest Prices on “Alternators” with Free Shipping and 2 Years Warranty only on http://www.theautopartsshop.com

Recommended
More Related Content
Viewers also liked
Viewers also liked (10)
Recently uploaded
Recently uploaded (20)
7 simple steps for replacement and testing of an alternator
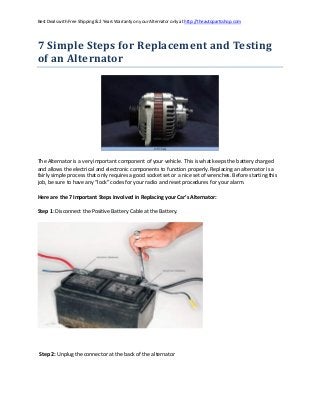
- 1. Best Deals with Free Shipping & 2 Years Warranty on your Alternator only at http://theautopartsshop.com 7 Simple Steps for Replacement and Testing of an Alternator The Alternator is a very important component of your vehicle. This is what keeps the battery charged and allows the electrical and electronic components to function properly. Replacing an alternator is a fairly simple process that only requires a good socket set or a nice set of wrenches. Before starting this job, be sure to have any “lock” codes for your radio and reset procedures for your alarm. Here are the 7 Important Steps Involved in Replacing your Car’s Alternator: Step 1: Disconnect the Positive Battery Cable at the Battery. Step 2: Unplug the connector at the back of the alternator
- 2. Best Deals with Free Shipping & 2 Years Warranty on your Alternator only at http://theautopartsshop.com Step 3: Remove the Serpentine Belt. Step 4: Remove the bolts or nuts holding the alternator in and it’s out!.
- 3. Best Deals with Free Shipping & 2 Years Warranty on your Alternator only at http://theautopartsshop.com Step 5: Adjust the replacement depending on the housing and spin the rear ,comparing to the old alternator. Step 6: Be sure to route the belt correctly
- 4. Best Deals with Free Shipping & 2 Years Warranty on your Alternator only at http://theautopartsshop.com Step 7: Reconnect the plug on the back of the alternator, and reconnect the battery cable. Get the Lowest Prices on “Alternators” with Free Shipping and 2 Years Warranty only on http://www.theautopartsshop.com Image Crédits : Web: secondchancegarage.com You Tube: Janerikiborge Wikipedia HowStuffWorks.com