SlideShare a Scribd company logo
1 of 22
Download to read offline
Framing
Now that the foundation is in place and level, you are ready to proceed with the
framing. Of course you remembered to put the bolts in the foundation, 1/2" bolts
at all corners, and not more than 6' apart in any place.
It has taken a long time to get the lot graded and the foundation in, but the framing
will make a big showing in a short time.
When the concrete has hardened for a day or two, the framing can begin. The
mud sill, that 2" x 4" or 2" x 6" piece that rests directly on the concrete, should be
of redwood, cedar, or cypress, or of wood that has been treated to prevent decay or
termite damage; lumber is treated with creosote, or metallic salts.
To get the mud sills straight (the concrete may not be as straight as you expected
it to be), stretch a line even with the outside of the foundation wall, or where the
outer edge of the mud sill is to be. Place the mud sill inside the bolts and against
them if possible. Then measure from the line to the center of the bolts and
transfer this distance to the mud sill measuring from the outside of the mud sill.
Then take the square and square across the center of the bolts, marking this on the
mud sill. This will indicate the places to bore the holes for the bolts. Bore the holes
about 1/16" larger than the bolts.
Put a thin layer of mortar on the wall and press the mud sill down into the soft
mortar; place the washers and nuts on the bolts and tighten down on the mud sill
until it is exactly level and solidly in place. If any low places occur, the mud sill can
be shimmed up with a shingle driven under it. Then the mortar can be packed
back into place with a thin board or the butt end of a shingle. It is highly important
to get the mud sill exactly level and straight as all the future building will be based
on it.
The girders or sills are then placed across the building on a level with the top of
the mud sill and well supported at the places shown on your plans. Often the
girders are made 1/8s" to 1/4" higher in the center of the house than at the outer
walls toallow for slight settlement or shrinkage of the timber. Do not overdo this.
The size of the joists depends on the span. The accompanying chart will indicate the
approximate spans permissible with various sized joists with normal loads of 40 lbs.
per square foot, which is generally assumed as the maximum loads that will occur
in a house. Joists are uniformly spaced at 16" on centers.
Span in Feet Size of Joist
Under 9' 2” x 6”
9' to 12' 2” x 8”
12'to 15' 2” x 10”
15'to 18' 2” x 12”
18'to 21' 2” x 14”
up to 26' 3” x 14”
Joists are often fastened at the outer end by a piece of the same size as the joist
called a box sill. See illustration. This is well nailed with three l6d spikes to the
ends of the joists and tends to keep them in line. If a joist happens to be slightly
narrower than the rest, it can be pushed up into place with a short piece of
shingle. A joist that is wider than the average should be notched at the lower edge
so that the top is in line with the others. All joists must come to the same level on
top so the floor will be even and level.
Nearly always you will find that joists will have a slight curvature. Put the curve up
so that when the joist sags a bit it will be nearer straight than it was before. If you
put the crowning side down, the natural sag will make the curvature worse. Be sure
to put the crowning side up every time, as this will make a much straighter floor.
After Che joists are all placed and spiked to the box sill and to the mud sill, go over
the entire area looking for joists that project above the average level of the floor.
These can be trimmed off with a hand axe or adze, and should be made level with
the average. Sometimes a joist is low; then you should spike a piece of 2" x 4" on
the side of it, bringing the 2" x 4" up to the required level, leaving the joist
where it was but letting the extra piece serve as the nailing surface for the joist. It is
most important to get the floor joists level before placing the sub-floor.
An hour or two spent in seeing that the floor joists are exactly level all over the
area will save much difficulty later on, and will result in a better finished floor. Who
wants to stumble over a hump in the living room floor or have a low place in the
kitchen floor where water will collect?
When the joists are all placed, the bridging should be nailed in place between
them to keep them vertical and to help distribute any heavy load between several
joists.
Bridging is of two kinds: solid bridging, consisting of pieces of material similar to
the joists, cut between them and nailed in place, and diagonal bridging, made of
pieces of 1" x 3" or other suitable size, cut so that one end may be nailed to one
joist each joist in its exact position, keeping the spacing correct at 16" on centers.
Then place a 2" x 6" straight edge on top of the joists to see that none are high or
too low. If you nail the bridging with one joist one too low, you will fix it
permanently in that position.
The Sub-Floor
The sub-floor can be of 1" boards, either square-edged, tongue and groove, or
shiplap. It should be placed diagonally and well nailed, with two eight-penny nails at
each bearing on the joists, with three nails at each end of each piece. Care should
be taken to see that two consecutive joints do not occur on the same joist. Two
boards should cross a joist between joints.
The boards should be cut at an angle of 45° where joints meet on a joist. The
practice of some cheap builders of letting the square ends butt together over a
joist leaves too much of the board without a bearing at the end.
The sub-floor is laid diagonally to brace the building and to make k easier to lay
the finish floor. You can run the finish floor either way in a room near the top at
one end and to an adjacent joist near the bottom at the other end. Another
similar piece is placed next to the first one, only running in the opposite direction
so that it crosses the first piece.
To cut a pattern for the bridging, lay a piece of joist flat and mark across it the
location of two adjacent joists and draw the position of the bridging as shown in
the accompanying sketch.
Normally, if there is room to get under the floor, the lower ends of the bridging
are not nailed until the sub-floor is laid. Just put the bridging in place and nail the
top ends. Often the nails are started in the bridging while a person is working at
the work bench. Then they can easily be driven after the bridging is in place. If you
will not be able to get under the floor, put the bridging in place and nail the top
ends; then lay a board on the joists and tack where the sub-floor is on diagonally,
but where the sub-floor is at right angles with the joists, the finish floor cannot be
run parallel with the sub-floor, and this often results in having to run the finish
floor the short way of the room which does not give a pleasing appearance.
Plywood is recently coming into use for sub-floors. This goes down quickly and
makes a level floor if you have been careful enough in spacing the floor joists.
Improper spacing of the joists will make it very difficult to fit the plywood, but the
boards do not require such refinement in spacing. Plywood should be nailed at 6"
intervals along the edges and at 12" intervals on all other bearings.
Plywood has the advantage that linoleum, carpet, and other floor coverings can be
put directly on it without the necessity of using a finish floor, which is usually a
necessity where the common boards are used as a sub-floor.
Under F.H.A. financing and some other types, a finish floor is often required, even
under wall-to-wall carpeting, on the theory that the carpet will be worn out before
the mortgage is paid off. It seems like an unnecessary expense, but it would be
well to make sure just what is required before going ahead with any part of the
building.
One precaution is necessary—be sure not to let the plywood sub-floor get too wet
when you plaster. It may be covered with "tar paper" during the plastering
operations, or you can take special precautions in using water so that very little
gets on the floor. If you use dry wall construction, this will be no problem. Plaster
should be cleaned up immediately, as if left to harden on the floor, it becomes
almost impossible to remove.
Sole Pieces
After the sub-floor is complete, you are ready to place the sole pieces. These are the
pieces the walls rest on. Place them around the outside of the building first and see
that they are straight. This is the last chance you will have to correct any slight
irregularities in the foundation and joist framing. A sole piece can be drawn in or
pushed out in the neighbourhood of a half inch at this stage if necessary to make the
dimensions exactly right. When the sole pieces for the outside walls are in place,
mark off the partitions and place the sole pieces for them. Cut out for the doors,
leaving a space 3" wider than the finish measurements of the doors, and mark the
places where the windows are to be.
When the sole pieces are all in place, look them over carefully and check the size of
each space, the placement of the doors, etc., as this will be the last chance you will
have to change any partition, or any door. Be sure your wife is satisfied that
everything is just as she had pictured it, and that everything will work out exactly
as you had planned. Do not make any changes without careful thought, but
sometimes you will see that a certain door should be moved 6" to allow for a
cupboard, or to accommodate a certain piece of furniture more readily, or to keep
from interfering with another door or a window. Remember that after you start
framing the walls, changes are almost impossible to make without a great deal of
tearing out and building again with consequent loss of time and waste of
materials. It is not too difficult, however, to move the sole pieces slightly before you
start the rest of the frame. Yon have been working from a plan before, but now you
have the full-sized rooms before you and can see just what you are getting.
Since foundations and rooms always look much smaller before the walls are around
them, do not be too much disappointed at the apparent small size of the rooms
at this stage. When you get the walls up and the ceiling on, they will look much
larger.
When you are satisfied with the location of the sole pieces, nail them down
securely to the joists, through the sub-floor, with l6d or 20d nails.
If the studding did not come cut to the exact length, you will need to cut them
now. The usual length is 8', but some manufacturers cut them one inch short of
this, which is all right and not noticeable in the height of the ceiling.
You are now ready to mark out for the studding, the windows, etc. Select straight
pieces of 2" x 4" for the upper plates to match the sole pieces, and lay them
beside the sole pieces and mark them both at the same time. This will assure that
the studs will stand straight up and down.
Mark the location of the windows and doors first, using a coloured crayon if
possible to avoid confusion with the regular spacing of the rest of the frame. See
sketch. Add the thickness of two studs, 31/4", to the width of the openings to allow
for the cripples or trimmers around the openings.
Mark for the studs at 16" centers, beginning at the inside of the corner where
the lath or wallboard will start. The first space at the corner will be 15 1/4". To check
your spacing, see that a distance of 4' from the corner hits the center of the
stud at that point. The spacing is extremely important, as the lath or wallboard or
plywood is exactly 4' wide and the joint must come on the stud. See sketch for fur-
ther explanation.
The upper plate is marked exactly the same as the sole piece. The wall is usually
framed on the floor; a long wall can be framed in two or three sections to make it
easier to handle. Place the upper plate eight feet from the corresponding sole
piece and nail the full-length studding to the upper plate with three l6d nails. Put
the headers for the windows and doors in place and nail them to the studs with
several I6d nails at the correct height. Place the trimmers under the headers and nail
them well, and place the lower headers and nail them securely. The cripples under
the lower headers should be left until the wall is in place.
When you make an opening in a wall the load above must somehow be supported.
This is usually done by means of a header, supported on both ends by studding
directly under the header. These headers must be as thick as the wall in which they
are placed. For a 2" x 4" stud wall this would be either two pieces of 2" lumber
set on edge or one piece of 4" timber may be used.
While the required sizes of headers vary widely in different parts of the country, the
following table would be a safe guide, in the absence of any specific requirements to
the contrary.
 Widths of OpeningsSizes of Headers
 Under 3'-6" 4" x 4" or 2 pc. 2" x 4" on edge
 3'-6" to 6' 4" x 6" or 2 pc. 2" x 6" on edge
 6' to 8' 4" x 8" or 2 pc. 2" x 8" on edge
 8' to 10'-6" 4" x 10" or 2 pc. 2" x 10" on edge
 10'-6" to 12'-6" 4" x 12" or 2 pc. 2" x 12" on edge
 12'-6" to 15' 4" x 14" or 2 pc. 2" x 14" on edge
A full-length stud should be placed at each side of every opening, in addition to the
regularly spaced studding. If an opening can be moved slightly to allow it to come
against one of the regular studs you will save a stud. The height of the header off
the floor will depend on the height of the doors as the windows are usually made
to come to the same height on top as the doors.
The difference in the size of the windows is accounted for at the bottom. Short
studs called cripples are cut to reach from the upper edge of the headers to the
underside of the upper plate. Trimmers on the side of the door extend from the
underside of the header to the sole piece. Trimmers for the windows extend from
the underside of the header to the lower header. This will depend on the type
and size of the window used.
The headers are made 31/4" longer than the width of the openings, so they can
be supported by 2" x 4"s. Thus each opening has double framing around it. At
the bottom of the windows a single 2" x 4" may be used. It must be supported
at its ends by a cripple stud. Thus it is the same length as the header. When the
wall framing is done, there will be no space greater than 16" between studs any-
where in the building, except the openings purposely left for windows, doors,
heaters, or for other purposes.
It is usually best to figure the height from the bottom of the studs. Allow 15/8" for
the sole piece, but subtract from this the thickness of the finish floor and the
thickness of the threshold. If you are using asphalt tile or linoleum, the thickness of
the floor would be 1/8", but if you are using hardwood floors, it might be 1/2" or
3/4”, depending on the type used. The threshold would normally be about 3/4" if
you use an aluminum or brass threshold, it would be well to check the thickness, but
the 3/4" would not be too far off. You are allowed a small variation anyway, as the
casing will cover any slight discrepancy, even up to nearly an inch if necessary.
Allow the height of the door, which in houses is usually 6'-8". Then allow for the
head jamb, which will vary from 3/4" to 11/8"'. A small additional allowance is
advisable to make sure the jamb will slide easily into the opening. The amount of
tolerance you can give yourself will depend largely on the width of the casing
you intend to use. Where you are using linoleum or asphalt tile floor, the
underside of the header will usually be about 80" above the lower end of the
studs. Where a wood floor is contemplated, this can be made about 81" without
danger of being greatly in error. The thickness of the sole piece just about makes
the proper allowance.
To find the size of the openings for wood windows that are double hung, allow 4"
more than the nominal height of the complete window for the frame. If the
glass size is 32" x 24" (the width is always given first) the height of the rough
opening would be calculated like this. The height of the two pieces of glass is 48".
Add to this 3" for the bottom rail, 1" for the meeting rail, and 2" for the top rail.
This makes the total height of the window 54". Add to this the 4" for the frame,
and you have 58" as the total distance between the headers.
For the width, allow 32" for the glass, 2" on each side for the stiles, 1" on each
side for the frame, and if weights are used an additional 2" for the weights. This
would give a total of 42" for the rough openings with weights, or 39" for the
window without weights. The 1" is allowed as room in which to plumb the frame, in
case the frame is not exactly accurate.
If aluminum or other metal-framed windows are used, it is better to buy them
before you start framing and measure them to see the size of openings required.
Although sometimes the catalogues will give the sizes, it is better to measure the
actual windows, avoiding any possible mistakes. Most aluminum windows are just
nailed directly to the studs and are very easy to install. The most important
thing to watch is to get them level and square. If you get the window or door
openings too large, it is easy to nail in another piece of 2" x 4" or 1" x 4", but if
you get them too small, it is difficult to enlarge the opening, as it must be done
with a hand axe. Of course if the opening is much too small, the studding must
be taken out and moved.
It used to be the practice to stand up all the walls and then saw out the studs where
the windows occur, but this takes too much time and wastes material. Now the
framing is made while the wall is flat on the floor.
After the wall is nailed together, tip it up into position by placing the lower end of
the studs against the sole and lifting it into position. Sometimes it is easier to lift
the plate to an intermediate position and let it rest temporarily on a couple of
saw horses, as you can get a better hold of it to lift it into the final position. An
extra man or two will be found very useful at this stage of operations. Perhaps
you can frame up several sections and get the neighbours to help you set them up
in the evening. A long wall can be left in several sections and erected a section at
a time, thus making it easier to lift it into position.
Toenail the studs to the sole piece at the places previously marked. Keep the braces
out of the way of the next section of wall to be framed. Do not try to plumb the wall
yet; wait until it is all together, and plumb it at one time. Continue until all the wall
sections are complete. Then nail them together at the corners, plumbing first the
corners and then the partition intersections. Now check everything.
The studs are fastened to the upper plate with three l6d nails, and to the sole
piece with two 8d nails on one side and one l6d nail on the opposite side. These
are called "toenails" because of the angle at which they are driven. See detail
drawing. Do not drive nails in the edges of the studs where the laths are to be
nailed, as this often interferes with the lathing. A nail in the outside edge should
do no harm if you wish to drive one there, but the two nails and the one spike
suggested above are adequate.
The outside walls are set up first before the partitions. After these are all standing in
place, the corners must be carefully and accurately plumbed. If the plates are all
the same length as the corresponding sole pieces, the work of getting the corners
plumb should not be difficult.
When the walls are all standing up, you will start at one corner to get them
exactly plumb and square. Plumb one corner with a good spirit level, or hang a
heavy plumb bob at the corner and measure from the string both ways to the
corner at the top and bottom to see that the corner is exactly plumb. The
plumb bob can be suspended from a nail driven into the corner of the upper
plate. Let the plumb bob hang an inch or more from the plate, and always measure
the string, both top and bottom, never from the point of the plumb bob. In the
absence of a plumb bob, a large rock or heavy tool can be substituted for it and
you will get just as good results, as you measure from the string anyway. Avoid trying
to use a plumb bob on a windy day. The air is usually quieter in the morning, and
you can be more accurate then.
When one corner is plumb, go to the opposite corner and true it up. The other two
corners should then be plumb, but check them. Then check all the partitions at each
end of each partition and make a final check of the corners. If the plates were cut
the same length as the sole pieces, and were marked exactly alike, things should
come out exactly plumb all around. If any difficulties are found, see if you do not
have a crooked stud in one of the corners. Sometimes it is well to find a straight
piece of 2" x 4" or 1" x 4" that is a little more than 8' long and use it with the
level to eliminate being deceived by crooked studs. Then if you sight down the
upper plates, you should be able to get the entire frame in line rather easily.
When the frame is satisfactorily plumbed, it is necessary to double all the upper
plates. Start with the short partitions and place the second plate so that all joints lap
those of the plate that is on top of the studding. This second plate should tie the
entire building together and should be nailed with three or four nails at each
place where it overlaps the plate beneath it. Try otherwise to keep your nails
directly over the studs, so that when you bore holes in the plate for the electric
wiring you won't surprise your bit by boring into too many nails, joints in this top
plate should not occur within four feet of the joints in the first plate. If a plate is
crooked, try to find one equally crooked and place it so that the curve in the top
plate counteracts the curve in the one beneath it.
The braces so far have been temporary. Now you must make provision for the
permanent bracing of the frame. The upper plate should be doubled before you
begin the permanent bracing. The frame must be thoroughly braced. There are
several methods in common use. Perhaps the best method is to cover the entire
outside of the building with diagonal sheathing well nailed with 8d nails and to
brace the partitions with pieces of 2" x 4" cut between the studs at a 45 ° angle,
from the sole to the plate. The sheathing, sometimes called boxing, should extend
down to the mud sill and be well nailed to it.
Another equally strong frame is achieved if 1/2" plywood is well nailed to the
outside of the wall frame, using 8d nails at 6" centers around the edges and at 12"
centers to the intermediate studding. If glue is also used the frame will be even
stronger.
The second method consists of placing 2" x 4" pieces as above in the outside walls
at the corners and along the wall as needed, and also in the partitions.
The third method would be to use let-in braces in the walls and partitions. This
consists of cutting notches in the studs large enough for a 1" x 6" diagonal brace
to extend from the sole to the plate. These should be at all corners and at intervals
along the frame as needed. Do not be afraid of getting too much bracing in a
frame.
In areas where wind storms are liable to be a problem, by all means use
diagonal sheathing, extending it from the foundation to the roof, and tie down the
rafters with knee braces. Then brace the partitions besides. When the storm comes,
you will be glad that you have done a thorough job of bracing.
Corner view of framing. Note brickwork around fireplace, fire stops and l" x 6" let-in bracing. Large
opening is for sliding glass doors. Ends of rafters are rounded. Note flashing where fireplace passes
through roof.
View of the framing at the end of a house. Note the let-in braces, the flashing around the door and
window, the fire stops.
Composition board 34" thick makes an excellent insulating cover for a house and will
add enough structural stability for most locations if well nailed with 8d nails at 6"
intervals.
The partitions should be braced as well as the outside walls. Don't be afraid of
making the house too rigid; a good solid frame is the best insurance against
windstorms and earthquakes.
When the frame is fully braced, you are ready to put in the fire stops, which are
merely short pieces of 2" x 4" placed between the studs somewhere about mid-
height to keep the space between them from becoming a flue in case of fire. Most
codes state that no space between framing members may be more than 7' in
length without a fire stop; this is done to catch the walls with eight-foot studs.
Many codes permit 8' spaces, but of course it isn't much trouble to put them in,
and it might be beneficial even if they are not required.
It is a good idea to pick up the short pieces of 2" x 4" about six inches long and
nail them to the corner studs, and beside each door opening, as something to nail
the base boards to. That way the nails do not need to be so near the ends of the
base.
When the frame is up, braced, fire stopped and otherwise completed, you are ready
for the ceiling joists. These are also placed 16" apart center to center, and are
commonly placed the shortest way of the largest rooms. Your ceiling framing
plan that you drew should be followed. Be sure they are well nailed to the plate.
Small metal hangers are advisable to hold them securely to the plate in districts
subject to high winds. You want to know that they are going to stay in place. Be
sure to put the crowning side of all ceiling joists up, so that when they sag, they
will be nearly straight. In places where the joists run parallel with some of the
plates, it is necessary to nail what is called backing on top of the plate so as to have
something to nail the lath to when you come to that phase of the construction, and
backing is much easier to put on now than after the rafters get in the way. Use a
piece of 2" x 8" and nail it directly on top of the plate, letting an equal amount
project on each side of the plate.
Be sure to spike the backing solidly to the plate, taking care to keep the nails directly
above the studs so the electrician won't bore into them when he bores the holes for
his wiring. Spikes distributed indiscriminately along the upper plate or the backing
can be a real source of provocation when you come to bore for the wiring. With an
electric drill you can ruin a bit in a hurry on a spike, often with resulting naughty
words and short temper.
Mark the plate for the joists by using an "X" on the side of the line where you want
the joist, and for the rafters by using the letter "R" between two lines to show the
location of each rafter. See detail. Ceiling joists are also placed with the crowning or
convex side up, so they can sag a little and still be straight.
Joists may be spliced in the center of the building over a partition, but be sure to
make the splices so the spacing will not be over 16"; it may be less than 16" at the
side of the room, but must continue across the room at the exact 16" interval. The
joists are toenailed to the plates with I6d nails, one on each side at least.
In a hip roof a little difficulty may be encountered where the joists run parallel to the
outside wall. Sometimes it is necessary to omit one or two joists, double the one
that is left, and run short cripple joists out to the wall. See illustration page 125.
These can also be nailed to the sides of the rafter.
Ceiling joists should, as far as possible, run in a direction so the ends can be
nailed to the rafters to take the sidewise thrust and keep the building from
spreading. If this is not possible, extra pieces of 2" x 4" can be used to tie the
lower ends of the rafters.
The California style of building dispenses entirely with the sheathing; just put up
the frame, brace it well, wrap it with wire and paper and stucco it. Although many
old builders are horrified at such flimsy-appearing construction, it seems to stand
up as well as any type of building and is cheaper and less trouble to build. The
stucco, which is remarkably free from cracks, makes a good substantial building. Of
course, California does not have the extremes of climate that some places have. It is
always warm, sometimes hot, and then still hotter; and the precipitation is limited
to a few gentle showers, with once in a while a dust storm.
Any house under construction is prone to theft. If you want to secure your
property, drop by our website for information.

More Related Content

What's hot

How to construct a suimple garden pond
How to construct a suimple garden pondHow to construct a suimple garden pond
How to construct a suimple garden pondPraveen Sudarsan
 
How to build a raised formal pool
How to build a raised formal poolHow to build a raised formal pool
How to build a raised formal poolPraveen Sudarsan
 
Timber Panels Installation
Timber Panels InstallationTimber Panels Installation
Timber Panels InstallationDeziner Panels
 
Spring Box_compressed
Spring Box_compressedSpring Box_compressed
Spring Box_compressedLynn Roberts
 
How to Install Allure GripStrip Flooring - Official Installation Instructions...
How to Install Allure GripStrip Flooring - Official Installation Instructions...How to Install Allure GripStrip Flooring - Official Installation Instructions...
How to Install Allure GripStrip Flooring - Official Installation Instructions...AllureFlooring
 
Wall and Floor Tiling - Tools and Equipment: An Introduction
Wall and Floor Tiling -  Tools and Equipment: An IntroductionWall and Floor Tiling -  Tools and Equipment: An Introduction
Wall and Floor Tiling - Tools and Equipment: An IntroductionDjCurrie
 
Brick masonry tools
Brick masonry toolsBrick masonry tools
Brick masonry toolsSahil Pahal
 
English and flemish bond
English and flemish bondEnglish and flemish bond
English and flemish bondMani Das
 

What's hot (18)

Certainteed Drywall Installation Guide
Certainteed Drywall Installation GuideCertainteed Drywall Installation Guide
Certainteed Drywall Installation Guide
 
How to construct a suimple garden pond
How to construct a suimple garden pondHow to construct a suimple garden pond
How to construct a suimple garden pond
 
How to build a raised formal pool
How to build a raised formal poolHow to build a raised formal pool
How to build a raised formal pool
 
Timber Panels Installation
Timber Panels InstallationTimber Panels Installation
Timber Panels Installation
 
Vestibule connector
Vestibule connectorVestibule connector
Vestibule connector
 
Build a carport
Build a carportBuild a carport
Build a carport
 
Spring Box_compressed
Spring Box_compressedSpring Box_compressed
Spring Box_compressed
 
Curtains
CurtainsCurtains
Curtains
 
Replacing a brick
Replacing a brickReplacing a brick
Replacing a brick
 
How to Install Allure GripStrip Flooring - Official Installation Instructions...
How to Install Allure GripStrip Flooring - Official Installation Instructions...How to Install Allure GripStrip Flooring - Official Installation Instructions...
How to Install Allure GripStrip Flooring - Official Installation Instructions...
 
Wall and Floor Tiling - Tools and Equipment: An Introduction
Wall and Floor Tiling -  Tools and Equipment: An IntroductionWall and Floor Tiling -  Tools and Equipment: An Introduction
Wall and Floor Tiling - Tools and Equipment: An Introduction
 
Build a shower cubicle
Build a shower cubicleBuild a shower cubicle
Build a shower cubicle
 
Brick masonry tools
Brick masonry toolsBrick masonry tools
Brick masonry tools
 
Eave finishes
Eave finishesEave finishes
Eave finishes
 
Waterproof your roof
Waterproof your roofWaterproof your roof
Waterproof your roof
 
English and flemish bond
English and flemish bondEnglish and flemish bond
English and flemish bond
 
Fitting a mortice latch
Fitting a mortice latchFitting a mortice latch
Fitting a mortice latch
 
Rat trap bond masonary
Rat trap bond masonaryRat trap bond masonary
Rat trap bond masonary
 

Similar to Framing Basics to Remember for Stronger Homes

Similar to Framing Basics to Remember for Stronger Homes (20)

Deck marking
Deck markingDeck marking
Deck marking
 
Haleys how to guide powerpoint[1]
Haleys how to guide powerpoint[1]Haleys how to guide powerpoint[1]
Haleys how to guide powerpoint[1]
 
Deck marking
Deck markingDeck marking
Deck marking
 
Ceramic tiles for worktops
Ceramic tiles for worktopsCeramic tiles for worktops
Ceramic tiles for worktops
 
Lay carpet tiles
Lay carpet tilesLay carpet tiles
Lay carpet tiles
 
Wall tiling
Wall tilingWall tiling
Wall tiling
 
Planning a new internal partition
Planning a new internal partitionPlanning a new internal partition
Planning a new internal partition
 
How to tile a floor
How to tile a floorHow to tile a floor
How to tile a floor
 
Laying a brick walkway or patio
Laying a brick walkway or patioLaying a brick walkway or patio
Laying a brick walkway or patio
 
Lean-toToolShed.pdf
Lean-toToolShed.pdfLean-toToolShed.pdf
Lean-toToolShed.pdf
 
Lean-toToolShed.pdf
Lean-toToolShed.pdfLean-toToolShed.pdf
Lean-toToolShed.pdf
 
Lean-toToolShed.pdf
Lean-toToolShed.pdfLean-toToolShed.pdf
Lean-toToolShed.pdf
 
Fixing linings
Fixing liningsFixing linings
Fixing linings
 
Build Your Own Underground Root Cellar.pdf
Build Your Own Underground Root Cellar.pdfBuild Your Own Underground Root Cellar.pdf
Build Your Own Underground Root Cellar.pdf
 
Installing deck posts
Installing deck postsInstalling deck posts
Installing deck posts
 
Installing the deck railing
Installing the deck railingInstalling the deck railing
Installing the deck railing
 
Drafting
DraftingDrafting
Drafting
 
Foundations for light garden walls
Foundations for light garden wallsFoundations for light garden walls
Foundations for light garden walls
 
Fireplace
FireplaceFireplace
Fireplace
 
Coffee table @1
Coffee table @1Coffee table @1
Coffee table @1
 

More from Deborah Davis

Australian Period Homes: A Quick Guide for Beginners
Australian Period Homes: A Quick Guide for BeginnersAustralian Period Homes: A Quick Guide for Beginners
Australian Period Homes: A Quick Guide for BeginnersDeborah Davis
 
10 Amazing Facts About Santa Ana
10 Amazing Facts About Santa Ana10 Amazing Facts About Santa Ana
10 Amazing Facts About Santa AnaDeborah Davis
 
Your First Dental Implant Procedure
Your First Dental Implant ProcedureYour First Dental Implant Procedure
Your First Dental Implant ProcedureDeborah Davis
 
The 4 degrees of separation between pain and pleasure
The 4 degrees of separation between pain and pleasureThe 4 degrees of separation between pain and pleasure
The 4 degrees of separation between pain and pleasureDeborah Davis
 
Staying Cool During Summer
Staying Cool During SummerStaying Cool During Summer
Staying Cool During SummerDeborah Davis
 
Flowers and Shrubs to Grow This Summer
Flowers and Shrubs to Grow This SummerFlowers and Shrubs to Grow This Summer
Flowers and Shrubs to Grow This SummerDeborah Davis
 
5 Essential Tips for Safe Mobile Crane Operations
5 Essential Tips for Safe Mobile Crane Operations5 Essential Tips for Safe Mobile Crane Operations
5 Essential Tips for Safe Mobile Crane OperationsDeborah Davis
 
Do I Have PTSD? - The Signs & Symptoms of Post-Traumatic Stress Disorder
Do I Have PTSD? - The Signs & Symptoms of Post-Traumatic Stress DisorderDo I Have PTSD? - The Signs & Symptoms of Post-Traumatic Stress Disorder
Do I Have PTSD? - The Signs & Symptoms of Post-Traumatic Stress DisorderDeborah Davis
 
Essential Equine Supplies for First-Time Horse Owners
Essential Equine Supplies for First-Time Horse OwnersEssential Equine Supplies for First-Time Horse Owners
Essential Equine Supplies for First-Time Horse OwnersDeborah Davis
 
What Type Of Crane Do I Need?
What Type Of Crane Do I Need?What Type Of Crane Do I Need?
What Type Of Crane Do I Need?Deborah Davis
 
Taking Care of Your Mind, Body and Soul: 4 Steps to Achieving Overall Wellbeing
Taking Care of Your Mind, Body and Soul: 4 Steps to Achieving Overall WellbeingTaking Care of Your Mind, Body and Soul: 4 Steps to Achieving Overall Wellbeing
Taking Care of Your Mind, Body and Soul: 4 Steps to Achieving Overall WellbeingDeborah Davis
 
Equine Dentistry: Pelham Bits Explained
Equine Dentistry: Pelham Bits ExplainedEquine Dentistry: Pelham Bits Explained
Equine Dentistry: Pelham Bits ExplainedDeborah Davis
 
Equine Dentistry: Equine Teeth Cleaning with Equine Dentist Mark Burnell
Equine Dentistry: Equine Teeth Cleaning with Equine Dentist Mark BurnellEquine Dentistry: Equine Teeth Cleaning with Equine Dentist Mark Burnell
Equine Dentistry: Equine Teeth Cleaning with Equine Dentist Mark BurnellDeborah Davis
 
Facial Volume Loss and Dermal Fillers
Facial Volume Loss and Dermal FillersFacial Volume Loss and Dermal Fillers
Facial Volume Loss and Dermal FillersDeborah Davis
 
Internal Diseases in Horses - Common Symptoms and Treatments
Internal Diseases in Horses - Common Symptoms and TreatmentsInternal Diseases in Horses - Common Symptoms and Treatments
Internal Diseases in Horses - Common Symptoms and TreatmentsDeborah Davis
 
Quick Guide to Solve Minor Housekeeping Concerns
Quick Guide to Solve Minor Housekeeping ConcernsQuick Guide to Solve Minor Housekeeping Concerns
Quick Guide to Solve Minor Housekeeping ConcernsDeborah Davis
 

More from Deborah Davis (16)

Australian Period Homes: A Quick Guide for Beginners
Australian Period Homes: A Quick Guide for BeginnersAustralian Period Homes: A Quick Guide for Beginners
Australian Period Homes: A Quick Guide for Beginners
 
10 Amazing Facts About Santa Ana
10 Amazing Facts About Santa Ana10 Amazing Facts About Santa Ana
10 Amazing Facts About Santa Ana
 
Your First Dental Implant Procedure
Your First Dental Implant ProcedureYour First Dental Implant Procedure
Your First Dental Implant Procedure
 
The 4 degrees of separation between pain and pleasure
The 4 degrees of separation between pain and pleasureThe 4 degrees of separation between pain and pleasure
The 4 degrees of separation between pain and pleasure
 
Staying Cool During Summer
Staying Cool During SummerStaying Cool During Summer
Staying Cool During Summer
 
Flowers and Shrubs to Grow This Summer
Flowers and Shrubs to Grow This SummerFlowers and Shrubs to Grow This Summer
Flowers and Shrubs to Grow This Summer
 
5 Essential Tips for Safe Mobile Crane Operations
5 Essential Tips for Safe Mobile Crane Operations5 Essential Tips for Safe Mobile Crane Operations
5 Essential Tips for Safe Mobile Crane Operations
 
Do I Have PTSD? - The Signs & Symptoms of Post-Traumatic Stress Disorder
Do I Have PTSD? - The Signs & Symptoms of Post-Traumatic Stress DisorderDo I Have PTSD? - The Signs & Symptoms of Post-Traumatic Stress Disorder
Do I Have PTSD? - The Signs & Symptoms of Post-Traumatic Stress Disorder
 
Essential Equine Supplies for First-Time Horse Owners
Essential Equine Supplies for First-Time Horse OwnersEssential Equine Supplies for First-Time Horse Owners
Essential Equine Supplies for First-Time Horse Owners
 
What Type Of Crane Do I Need?
What Type Of Crane Do I Need?What Type Of Crane Do I Need?
What Type Of Crane Do I Need?
 
Taking Care of Your Mind, Body and Soul: 4 Steps to Achieving Overall Wellbeing
Taking Care of Your Mind, Body and Soul: 4 Steps to Achieving Overall WellbeingTaking Care of Your Mind, Body and Soul: 4 Steps to Achieving Overall Wellbeing
Taking Care of Your Mind, Body and Soul: 4 Steps to Achieving Overall Wellbeing
 
Equine Dentistry: Pelham Bits Explained
Equine Dentistry: Pelham Bits ExplainedEquine Dentistry: Pelham Bits Explained
Equine Dentistry: Pelham Bits Explained
 
Equine Dentistry: Equine Teeth Cleaning with Equine Dentist Mark Burnell
Equine Dentistry: Equine Teeth Cleaning with Equine Dentist Mark BurnellEquine Dentistry: Equine Teeth Cleaning with Equine Dentist Mark Burnell
Equine Dentistry: Equine Teeth Cleaning with Equine Dentist Mark Burnell
 
Facial Volume Loss and Dermal Fillers
Facial Volume Loss and Dermal FillersFacial Volume Loss and Dermal Fillers
Facial Volume Loss and Dermal Fillers
 
Internal Diseases in Horses - Common Symptoms and Treatments
Internal Diseases in Horses - Common Symptoms and TreatmentsInternal Diseases in Horses - Common Symptoms and Treatments
Internal Diseases in Horses - Common Symptoms and Treatments
 
Quick Guide to Solve Minor Housekeeping Concerns
Quick Guide to Solve Minor Housekeeping ConcernsQuick Guide to Solve Minor Housekeeping Concerns
Quick Guide to Solve Minor Housekeeping Concerns
 

Recently uploaded

Virat Kohli Centuries In Career Age Awards and Facts.pdf
Virat Kohli Centuries In Career Age Awards and Facts.pdfVirat Kohli Centuries In Career Age Awards and Facts.pdf
Virat Kohli Centuries In Career Age Awards and Facts.pdfkigaya33
 
'the Spring 2024- popular Fashion trends
'the Spring 2024- popular Fashion trends'the Spring 2024- popular Fashion trends
'the Spring 2024- popular Fashion trendsTangledThoughtsCO
 
BOOK NIGHT-Call Girls In Noida City Centre Delhi ☎️ 8377877756
BOOK NIGHT-Call Girls In Noida City Centre Delhi ☎️ 8377877756BOOK NIGHT-Call Girls In Noida City Centre Delhi ☎️ 8377877756
BOOK NIGHT-Call Girls In Noida City Centre Delhi ☎️ 8377877756dollysharma2066
 
8 Easy Ways to Keep Your Heart Healthy this Summer | Amit Kakkar Healthyway
8 Easy Ways to Keep Your Heart Healthy this Summer | Amit Kakkar Healthyway8 Easy Ways to Keep Your Heart Healthy this Summer | Amit Kakkar Healthyway
8 Easy Ways to Keep Your Heart Healthy this Summer | Amit Kakkar HealthywayAmit Kakkar Healthyway
 
83778-876O7, Cash On Delivery Call Girls In South- EX-(Delhi) Escorts Service...
83778-876O7, Cash On Delivery Call Girls In South- EX-(Delhi) Escorts Service...83778-876O7, Cash On Delivery Call Girls In South- EX-(Delhi) Escorts Service...
83778-876O7, Cash On Delivery Call Girls In South- EX-(Delhi) Escorts Service...dollysharma2066
 
《QUT毕业文凭网-认证昆士兰科技大学毕业证成绩单》
《QUT毕业文凭网-认证昆士兰科技大学毕业证成绩单》《QUT毕业文凭网-认证昆士兰科技大学毕业证成绩单》
《QUT毕业文凭网-认证昆士兰科技大学毕业证成绩单》rnrncn29
 
8377877756 Full Enjoy @24/7 Call Girls In Mayur Vihar Delhi Ncr
8377877756 Full Enjoy @24/7 Call Girls In Mayur Vihar Delhi Ncr8377877756 Full Enjoy @24/7 Call Girls In Mayur Vihar Delhi Ncr
8377877756 Full Enjoy @24/7 Call Girls In Mayur Vihar Delhi Ncrdollysharma2066
 
labradorite energetic gems for well beings.pdf
labradorite energetic gems for well beings.pdflabradorite energetic gems for well beings.pdf
labradorite energetic gems for well beings.pdfAkrati jewels inc
 
Uttoxeter & Cheadle Voice, Issue 122.pdf
Uttoxeter & Cheadle Voice, Issue 122.pdfUttoxeter & Cheadle Voice, Issue 122.pdf
Uttoxeter & Cheadle Voice, Issue 122.pdfNoel Sergeant
 
Call In girls Delhi Safdarjung Enclave/WhatsApp 🔝 97111⇛⇛47426
Call In girls Delhi Safdarjung Enclave/WhatsApp 🔝  97111⇛⇛47426Call In girls Delhi Safdarjung Enclave/WhatsApp 🔝  97111⇛⇛47426
Call In girls Delhi Safdarjung Enclave/WhatsApp 🔝 97111⇛⇛47426jennyeacort
 

Recently uploaded (11)

Virat Kohli Centuries In Career Age Awards and Facts.pdf
Virat Kohli Centuries In Career Age Awards and Facts.pdfVirat Kohli Centuries In Career Age Awards and Facts.pdf
Virat Kohli Centuries In Career Age Awards and Facts.pdf
 
'the Spring 2024- popular Fashion trends
'the Spring 2024- popular Fashion trends'the Spring 2024- popular Fashion trends
'the Spring 2024- popular Fashion trends
 
BOOK NIGHT-Call Girls In Noida City Centre Delhi ☎️ 8377877756
BOOK NIGHT-Call Girls In Noida City Centre Delhi ☎️ 8377877756BOOK NIGHT-Call Girls In Noida City Centre Delhi ☎️ 8377877756
BOOK NIGHT-Call Girls In Noida City Centre Delhi ☎️ 8377877756
 
8 Easy Ways to Keep Your Heart Healthy this Summer | Amit Kakkar Healthyway
8 Easy Ways to Keep Your Heart Healthy this Summer | Amit Kakkar Healthyway8 Easy Ways to Keep Your Heart Healthy this Summer | Amit Kakkar Healthyway
8 Easy Ways to Keep Your Heart Healthy this Summer | Amit Kakkar Healthyway
 
83778-876O7, Cash On Delivery Call Girls In South- EX-(Delhi) Escorts Service...
83778-876O7, Cash On Delivery Call Girls In South- EX-(Delhi) Escorts Service...83778-876O7, Cash On Delivery Call Girls In South- EX-(Delhi) Escorts Service...
83778-876O7, Cash On Delivery Call Girls In South- EX-(Delhi) Escorts Service...
 
《QUT毕业文凭网-认证昆士兰科技大学毕业证成绩单》
《QUT毕业文凭网-认证昆士兰科技大学毕业证成绩单》《QUT毕业文凭网-认证昆士兰科技大学毕业证成绩单》
《QUT毕业文凭网-认证昆士兰科技大学毕业证成绩单》
 
8377877756 Full Enjoy @24/7 Call Girls In Mayur Vihar Delhi Ncr
8377877756 Full Enjoy @24/7 Call Girls In Mayur Vihar Delhi Ncr8377877756 Full Enjoy @24/7 Call Girls In Mayur Vihar Delhi Ncr
8377877756 Full Enjoy @24/7 Call Girls In Mayur Vihar Delhi Ncr
 
labradorite energetic gems for well beings.pdf
labradorite energetic gems for well beings.pdflabradorite energetic gems for well beings.pdf
labradorite energetic gems for well beings.pdf
 
Uttoxeter & Cheadle Voice, Issue 122.pdf
Uttoxeter & Cheadle Voice, Issue 122.pdfUttoxeter & Cheadle Voice, Issue 122.pdf
Uttoxeter & Cheadle Voice, Issue 122.pdf
 
Call Girls 9953525677 Call Girls In Delhi Call Girls 9953525677 Call Girls In...
Call Girls 9953525677 Call Girls In Delhi Call Girls 9953525677 Call Girls In...Call Girls 9953525677 Call Girls In Delhi Call Girls 9953525677 Call Girls In...
Call Girls 9953525677 Call Girls In Delhi Call Girls 9953525677 Call Girls In...
 
Call In girls Delhi Safdarjung Enclave/WhatsApp 🔝 97111⇛⇛47426
Call In girls Delhi Safdarjung Enclave/WhatsApp 🔝  97111⇛⇛47426Call In girls Delhi Safdarjung Enclave/WhatsApp 🔝  97111⇛⇛47426
Call In girls Delhi Safdarjung Enclave/WhatsApp 🔝 97111⇛⇛47426
 

Framing Basics to Remember for Stronger Homes

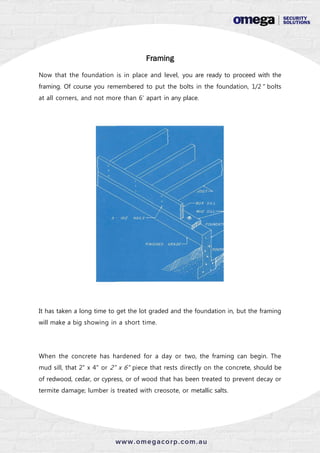
  • 1. Framing Now that the foundation is in place and level, you are ready to proceed with the framing. Of course you remembered to put the bolts in the foundation, 1/2" bolts at all corners, and not more than 6' apart in any place. It has taken a long time to get the lot graded and the foundation in, but the framing will make a big showing in a short time. When the concrete has hardened for a day or two, the framing can begin. The mud sill, that 2" x 4" or 2" x 6" piece that rests directly on the concrete, should be of redwood, cedar, or cypress, or of wood that has been treated to prevent decay or termite damage; lumber is treated with creosote, or metallic salts.
  • 2. To get the mud sills straight (the concrete may not be as straight as you expected it to be), stretch a line even with the outside of the foundation wall, or where the outer edge of the mud sill is to be. Place the mud sill inside the bolts and against them if possible. Then measure from the line to the center of the bolts and transfer this distance to the mud sill measuring from the outside of the mud sill. Then take the square and square across the center of the bolts, marking this on the mud sill. This will indicate the places to bore the holes for the bolts. Bore the holes about 1/16" larger than the bolts. Put a thin layer of mortar on the wall and press the mud sill down into the soft mortar; place the washers and nuts on the bolts and tighten down on the mud sill until it is exactly level and solidly in place. If any low places occur, the mud sill can be shimmed up with a shingle driven under it. Then the mortar can be packed back into place with a thin board or the butt end of a shingle. It is highly important to get the mud sill exactly level and straight as all the future building will be based on it. The girders or sills are then placed across the building on a level with the top of the mud sill and well supported at the places shown on your plans. Often the girders are made 1/8s" to 1/4" higher in the center of the house than at the outer walls toallow for slight settlement or shrinkage of the timber. Do not overdo this. The size of the joists depends on the span. The accompanying chart will indicate the approximate spans permissible with various sized joists with normal loads of 40 lbs. per square foot, which is generally assumed as the maximum loads that will occur in a house. Joists are uniformly spaced at 16" on centers.
  • 3. Span in Feet Size of Joist Under 9' 2” x 6” 9' to 12' 2” x 8” 12'to 15' 2” x 10” 15'to 18' 2” x 12” 18'to 21' 2” x 14” up to 26' 3” x 14” Joists are often fastened at the outer end by a piece of the same size as the joist called a box sill. See illustration. This is well nailed with three l6d spikes to the ends of the joists and tends to keep them in line. If a joist happens to be slightly narrower than the rest, it can be pushed up into place with a short piece of shingle. A joist that is wider than the average should be notched at the lower edge so that the top is in line with the others. All joists must come to the same level on top so the floor will be even and level.
  • 4. Nearly always you will find that joists will have a slight curvature. Put the curve up so that when the joist sags a bit it will be nearer straight than it was before. If you put the crowning side down, the natural sag will make the curvature worse. Be sure to put the crowning side up every time, as this will make a much straighter floor. After Che joists are all placed and spiked to the box sill and to the mud sill, go over the entire area looking for joists that project above the average level of the floor. These can be trimmed off with a hand axe or adze, and should be made level with the average. Sometimes a joist is low; then you should spike a piece of 2" x 4" on the side of it, bringing the 2" x 4" up to the required level, leaving the joist where it was but letting the extra piece serve as the nailing surface for the joist. It is most important to get the floor joists level before placing the sub-floor. An hour or two spent in seeing that the floor joists are exactly level all over the area will save much difficulty later on, and will result in a better finished floor. Who wants to stumble over a hump in the living room floor or have a low place in the kitchen floor where water will collect? When the joists are all placed, the bridging should be nailed in place between them to keep them vertical and to help distribute any heavy load between several joists. Bridging is of two kinds: solid bridging, consisting of pieces of material similar to the joists, cut between them and nailed in place, and diagonal bridging, made of pieces of 1" x 3" or other suitable size, cut so that one end may be nailed to one joist each joist in its exact position, keeping the spacing correct at 16" on centers.
  • 5. Then place a 2" x 6" straight edge on top of the joists to see that none are high or too low. If you nail the bridging with one joist one too low, you will fix it permanently in that position. The Sub-Floor The sub-floor can be of 1" boards, either square-edged, tongue and groove, or shiplap. It should be placed diagonally and well nailed, with two eight-penny nails at each bearing on the joists, with three nails at each end of each piece. Care should be taken to see that two consecutive joints do not occur on the same joist. Two boards should cross a joist between joints.
  • 6. The boards should be cut at an angle of 45° where joints meet on a joist. The practice of some cheap builders of letting the square ends butt together over a joist leaves too much of the board without a bearing at the end. The sub-floor is laid diagonally to brace the building and to make k easier to lay the finish floor. You can run the finish floor either way in a room near the top at one end and to an adjacent joist near the bottom at the other end. Another similar piece is placed next to the first one, only running in the opposite direction so that it crosses the first piece. To cut a pattern for the bridging, lay a piece of joist flat and mark across it the location of two adjacent joists and draw the position of the bridging as shown in the accompanying sketch. Normally, if there is room to get under the floor, the lower ends of the bridging are not nailed until the sub-floor is laid. Just put the bridging in place and nail the top ends. Often the nails are started in the bridging while a person is working at the work bench. Then they can easily be driven after the bridging is in place. If you will not be able to get under the floor, put the bridging in place and nail the top ends; then lay a board on the joists and tack where the sub-floor is on diagonally, but where the sub-floor is at right angles with the joists, the finish floor cannot be run parallel with the sub-floor, and this often results in having to run the finish floor the short way of the room which does not give a pleasing appearance. Plywood is recently coming into use for sub-floors. This goes down quickly and makes a level floor if you have been careful enough in spacing the floor joists.
  • 7. Improper spacing of the joists will make it very difficult to fit the plywood, but the boards do not require such refinement in spacing. Plywood should be nailed at 6" intervals along the edges and at 12" intervals on all other bearings. Plywood has the advantage that linoleum, carpet, and other floor coverings can be put directly on it without the necessity of using a finish floor, which is usually a necessity where the common boards are used as a sub-floor. Under F.H.A. financing and some other types, a finish floor is often required, even under wall-to-wall carpeting, on the theory that the carpet will be worn out before the mortgage is paid off. It seems like an unnecessary expense, but it would be well to make sure just what is required before going ahead with any part of the building. One precaution is necessary—be sure not to let the plywood sub-floor get too wet when you plaster. It may be covered with "tar paper" during the plastering operations, or you can take special precautions in using water so that very little gets on the floor. If you use dry wall construction, this will be no problem. Plaster
  • 8. should be cleaned up immediately, as if left to harden on the floor, it becomes almost impossible to remove. Sole Pieces After the sub-floor is complete, you are ready to place the sole pieces. These are the pieces the walls rest on. Place them around the outside of the building first and see that they are straight. This is the last chance you will have to correct any slight irregularities in the foundation and joist framing. A sole piece can be drawn in or pushed out in the neighbourhood of a half inch at this stage if necessary to make the dimensions exactly right. When the sole pieces for the outside walls are in place, mark off the partitions and place the sole pieces for them. Cut out for the doors, leaving a space 3" wider than the finish measurements of the doors, and mark the places where the windows are to be. When the sole pieces are all in place, look them over carefully and check the size of each space, the placement of the doors, etc., as this will be the last chance you will have to change any partition, or any door. Be sure your wife is satisfied that everything is just as she had pictured it, and that everything will work out exactly as you had planned. Do not make any changes without careful thought, but sometimes you will see that a certain door should be moved 6" to allow for a cupboard, or to accommodate a certain piece of furniture more readily, or to keep from interfering with another door or a window. Remember that after you start framing the walls, changes are almost impossible to make without a great deal of tearing out and building again with consequent loss of time and waste of materials. It is not too difficult, however, to move the sole pieces slightly before you start the rest of the frame. Yon have been working from a plan before, but now you have the full-sized rooms before you and can see just what you are getting.
  • 9. Since foundations and rooms always look much smaller before the walls are around them, do not be too much disappointed at the apparent small size of the rooms at this stage. When you get the walls up and the ceiling on, they will look much larger. When you are satisfied with the location of the sole pieces, nail them down securely to the joists, through the sub-floor, with l6d or 20d nails. If the studding did not come cut to the exact length, you will need to cut them now. The usual length is 8', but some manufacturers cut them one inch short of this, which is all right and not noticeable in the height of the ceiling. You are now ready to mark out for the studding, the windows, etc. Select straight pieces of 2" x 4" for the upper plates to match the sole pieces, and lay them beside the sole pieces and mark them both at the same time. This will assure that the studs will stand straight up and down. Mark the location of the windows and doors first, using a coloured crayon if possible to avoid confusion with the regular spacing of the rest of the frame. See sketch. Add the thickness of two studs, 31/4", to the width of the openings to allow for the cripples or trimmers around the openings. Mark for the studs at 16" centers, beginning at the inside of the corner where the lath or wallboard will start. The first space at the corner will be 15 1/4". To check your spacing, see that a distance of 4' from the corner hits the center of the
  • 10. stud at that point. The spacing is extremely important, as the lath or wallboard or plywood is exactly 4' wide and the joint must come on the stud. See sketch for fur- ther explanation. The upper plate is marked exactly the same as the sole piece. The wall is usually framed on the floor; a long wall can be framed in two or three sections to make it easier to handle. Place the upper plate eight feet from the corresponding sole piece and nail the full-length studding to the upper plate with three l6d nails. Put the headers for the windows and doors in place and nail them to the studs with several I6d nails at the correct height. Place the trimmers under the headers and nail them well, and place the lower headers and nail them securely. The cripples under the lower headers should be left until the wall is in place. When you make an opening in a wall the load above must somehow be supported. This is usually done by means of a header, supported on both ends by studding directly under the header. These headers must be as thick as the wall in which they
  • 11. are placed. For a 2" x 4" stud wall this would be either two pieces of 2" lumber set on edge or one piece of 4" timber may be used. While the required sizes of headers vary widely in different parts of the country, the following table would be a safe guide, in the absence of any specific requirements to the contrary.  Widths of OpeningsSizes of Headers  Under 3'-6" 4" x 4" or 2 pc. 2" x 4" on edge  3'-6" to 6' 4" x 6" or 2 pc. 2" x 6" on edge  6' to 8' 4" x 8" or 2 pc. 2" x 8" on edge  8' to 10'-6" 4" x 10" or 2 pc. 2" x 10" on edge  10'-6" to 12'-6" 4" x 12" or 2 pc. 2" x 12" on edge  12'-6" to 15' 4" x 14" or 2 pc. 2" x 14" on edge A full-length stud should be placed at each side of every opening, in addition to the regularly spaced studding. If an opening can be moved slightly to allow it to come against one of the regular studs you will save a stud. The height of the header off the floor will depend on the height of the doors as the windows are usually made to come to the same height on top as the doors. The difference in the size of the windows is accounted for at the bottom. Short studs called cripples are cut to reach from the upper edge of the headers to the underside of the upper plate. Trimmers on the side of the door extend from the underside of the header to the sole piece. Trimmers for the windows extend from the underside of the header to the lower header. This will depend on the type and size of the window used.
  • 12. The headers are made 31/4" longer than the width of the openings, so they can be supported by 2" x 4"s. Thus each opening has double framing around it. At the bottom of the windows a single 2" x 4" may be used. It must be supported at its ends by a cripple stud. Thus it is the same length as the header. When the wall framing is done, there will be no space greater than 16" between studs any- where in the building, except the openings purposely left for windows, doors, heaters, or for other purposes. It is usually best to figure the height from the bottom of the studs. Allow 15/8" for the sole piece, but subtract from this the thickness of the finish floor and the thickness of the threshold. If you are using asphalt tile or linoleum, the thickness of the floor would be 1/8", but if you are using hardwood floors, it might be 1/2" or 3/4”, depending on the type used. The threshold would normally be about 3/4" if you use an aluminum or brass threshold, it would be well to check the thickness, but the 3/4" would not be too far off. You are allowed a small variation anyway, as the casing will cover any slight discrepancy, even up to nearly an inch if necessary.
  • 13. Allow the height of the door, which in houses is usually 6'-8". Then allow for the head jamb, which will vary from 3/4" to 11/8"'. A small additional allowance is advisable to make sure the jamb will slide easily into the opening. The amount of tolerance you can give yourself will depend largely on the width of the casing you intend to use. Where you are using linoleum or asphalt tile floor, the underside of the header will usually be about 80" above the lower end of the studs. Where a wood floor is contemplated, this can be made about 81" without danger of being greatly in error. The thickness of the sole piece just about makes the proper allowance. To find the size of the openings for wood windows that are double hung, allow 4" more than the nominal height of the complete window for the frame. If the glass size is 32" x 24" (the width is always given first) the height of the rough
  • 14. opening would be calculated like this. The height of the two pieces of glass is 48". Add to this 3" for the bottom rail, 1" for the meeting rail, and 2" for the top rail. This makes the total height of the window 54". Add to this the 4" for the frame, and you have 58" as the total distance between the headers. For the width, allow 32" for the glass, 2" on each side for the stiles, 1" on each side for the frame, and if weights are used an additional 2" for the weights. This would give a total of 42" for the rough openings with weights, or 39" for the window without weights. The 1" is allowed as room in which to plumb the frame, in case the frame is not exactly accurate. If aluminum or other metal-framed windows are used, it is better to buy them before you start framing and measure them to see the size of openings required. Although sometimes the catalogues will give the sizes, it is better to measure the actual windows, avoiding any possible mistakes. Most aluminum windows are just nailed directly to the studs and are very easy to install. The most important thing to watch is to get them level and square. If you get the window or door openings too large, it is easy to nail in another piece of 2" x 4" or 1" x 4", but if you get them too small, it is difficult to enlarge the opening, as it must be done with a hand axe. Of course if the opening is much too small, the studding must be taken out and moved. It used to be the practice to stand up all the walls and then saw out the studs where the windows occur, but this takes too much time and wastes material. Now the framing is made while the wall is flat on the floor.
  • 15. After the wall is nailed together, tip it up into position by placing the lower end of the studs against the sole and lifting it into position. Sometimes it is easier to lift the plate to an intermediate position and let it rest temporarily on a couple of saw horses, as you can get a better hold of it to lift it into the final position. An extra man or two will be found very useful at this stage of operations. Perhaps you can frame up several sections and get the neighbours to help you set them up in the evening. A long wall can be left in several sections and erected a section at a time, thus making it easier to lift it into position. Toenail the studs to the sole piece at the places previously marked. Keep the braces out of the way of the next section of wall to be framed. Do not try to plumb the wall yet; wait until it is all together, and plumb it at one time. Continue until all the wall sections are complete. Then nail them together at the corners, plumbing first the corners and then the partition intersections. Now check everything. The studs are fastened to the upper plate with three l6d nails, and to the sole piece with two 8d nails on one side and one l6d nail on the opposite side. These are called "toenails" because of the angle at which they are driven. See detail drawing. Do not drive nails in the edges of the studs where the laths are to be nailed, as this often interferes with the lathing. A nail in the outside edge should do no harm if you wish to drive one there, but the two nails and the one spike suggested above are adequate. The outside walls are set up first before the partitions. After these are all standing in place, the corners must be carefully and accurately plumbed. If the plates are all the same length as the corresponding sole pieces, the work of getting the corners plumb should not be difficult.
  • 16. When the walls are all standing up, you will start at one corner to get them exactly plumb and square. Plumb one corner with a good spirit level, or hang a heavy plumb bob at the corner and measure from the string both ways to the corner at the top and bottom to see that the corner is exactly plumb. The plumb bob can be suspended from a nail driven into the corner of the upper plate. Let the plumb bob hang an inch or more from the plate, and always measure the string, both top and bottom, never from the point of the plumb bob. In the absence of a plumb bob, a large rock or heavy tool can be substituted for it and you will get just as good results, as you measure from the string anyway. Avoid trying to use a plumb bob on a windy day. The air is usually quieter in the morning, and you can be more accurate then. When one corner is plumb, go to the opposite corner and true it up. The other two corners should then be plumb, but check them. Then check all the partitions at each end of each partition and make a final check of the corners. If the plates were cut the same length as the sole pieces, and were marked exactly alike, things should come out exactly plumb all around. If any difficulties are found, see if you do not have a crooked stud in one of the corners. Sometimes it is well to find a straight piece of 2" x 4" or 1" x 4" that is a little more than 8' long and use it with the level to eliminate being deceived by crooked studs. Then if you sight down the upper plates, you should be able to get the entire frame in line rather easily. When the frame is satisfactorily plumbed, it is necessary to double all the upper plates. Start with the short partitions and place the second plate so that all joints lap those of the plate that is on top of the studding. This second plate should tie the entire building together and should be nailed with three or four nails at each place where it overlaps the plate beneath it. Try otherwise to keep your nails directly over the studs, so that when you bore holes in the plate for the electric wiring you won't surprise your bit by boring into too many nails, joints in this top
  • 17. plate should not occur within four feet of the joints in the first plate. If a plate is crooked, try to find one equally crooked and place it so that the curve in the top plate counteracts the curve in the one beneath it. The braces so far have been temporary. Now you must make provision for the permanent bracing of the frame. The upper plate should be doubled before you begin the permanent bracing. The frame must be thoroughly braced. There are several methods in common use. Perhaps the best method is to cover the entire outside of the building with diagonal sheathing well nailed with 8d nails and to brace the partitions with pieces of 2" x 4" cut between the studs at a 45 ° angle, from the sole to the plate. The sheathing, sometimes called boxing, should extend down to the mud sill and be well nailed to it. Another equally strong frame is achieved if 1/2" plywood is well nailed to the outside of the wall frame, using 8d nails at 6" centers around the edges and at 12" centers to the intermediate studding. If glue is also used the frame will be even stronger. The second method consists of placing 2" x 4" pieces as above in the outside walls at the corners and along the wall as needed, and also in the partitions. The third method would be to use let-in braces in the walls and partitions. This consists of cutting notches in the studs large enough for a 1" x 6" diagonal brace to extend from the sole to the plate. These should be at all corners and at intervals along the frame as needed. Do not be afraid of getting too much bracing in a frame.
  • 18. In areas where wind storms are liable to be a problem, by all means use diagonal sheathing, extending it from the foundation to the roof, and tie down the rafters with knee braces. Then brace the partitions besides. When the storm comes, you will be glad that you have done a thorough job of bracing. Corner view of framing. Note brickwork around fireplace, fire stops and l" x 6" let-in bracing. Large opening is for sliding glass doors. Ends of rafters are rounded. Note flashing where fireplace passes through roof.
  • 19. View of the framing at the end of a house. Note the let-in braces, the flashing around the door and window, the fire stops. Composition board 34" thick makes an excellent insulating cover for a house and will add enough structural stability for most locations if well nailed with 8d nails at 6" intervals. The partitions should be braced as well as the outside walls. Don't be afraid of making the house too rigid; a good solid frame is the best insurance against windstorms and earthquakes. When the frame is fully braced, you are ready to put in the fire stops, which are merely short pieces of 2" x 4" placed between the studs somewhere about mid- height to keep the space between them from becoming a flue in case of fire. Most codes state that no space between framing members may be more than 7' in length without a fire stop; this is done to catch the walls with eight-foot studs.
  • 20. Many codes permit 8' spaces, but of course it isn't much trouble to put them in, and it might be beneficial even if they are not required. It is a good idea to pick up the short pieces of 2" x 4" about six inches long and nail them to the corner studs, and beside each door opening, as something to nail the base boards to. That way the nails do not need to be so near the ends of the base. When the frame is up, braced, fire stopped and otherwise completed, you are ready for the ceiling joists. These are also placed 16" apart center to center, and are commonly placed the shortest way of the largest rooms. Your ceiling framing plan that you drew should be followed. Be sure they are well nailed to the plate. Small metal hangers are advisable to hold them securely to the plate in districts subject to high winds. You want to know that they are going to stay in place. Be sure to put the crowning side of all ceiling joists up, so that when they sag, they will be nearly straight. In places where the joists run parallel with some of the plates, it is necessary to nail what is called backing on top of the plate so as to have something to nail the lath to when you come to that phase of the construction, and backing is much easier to put on now than after the rafters get in the way. Use a piece of 2" x 8" and nail it directly on top of the plate, letting an equal amount project on each side of the plate. Be sure to spike the backing solidly to the plate, taking care to keep the nails directly above the studs so the electrician won't bore into them when he bores the holes for his wiring. Spikes distributed indiscriminately along the upper plate or the backing can be a real source of provocation when you come to bore for the wiring. With an
  • 21. electric drill you can ruin a bit in a hurry on a spike, often with resulting naughty words and short temper. Mark the plate for the joists by using an "X" on the side of the line where you want the joist, and for the rafters by using the letter "R" between two lines to show the location of each rafter. See detail. Ceiling joists are also placed with the crowning or convex side up, so they can sag a little and still be straight.
  • 22. Joists may be spliced in the center of the building over a partition, but be sure to make the splices so the spacing will not be over 16"; it may be less than 16" at the side of the room, but must continue across the room at the exact 16" interval. The joists are toenailed to the plates with I6d nails, one on each side at least. In a hip roof a little difficulty may be encountered where the joists run parallel to the outside wall. Sometimes it is necessary to omit one or two joists, double the one that is left, and run short cripple joists out to the wall. See illustration page 125. These can also be nailed to the sides of the rafter. Ceiling joists should, as far as possible, run in a direction so the ends can be nailed to the rafters to take the sidewise thrust and keep the building from spreading. If this is not possible, extra pieces of 2" x 4" can be used to tie the lower ends of the rafters. The California style of building dispenses entirely with the sheathing; just put up the frame, brace it well, wrap it with wire and paper and stucco it. Although many old builders are horrified at such flimsy-appearing construction, it seems to stand up as well as any type of building and is cheaper and less trouble to build. The stucco, which is remarkably free from cracks, makes a good substantial building. Of course, California does not have the extremes of climate that some places have. It is always warm, sometimes hot, and then still hotter; and the precipitation is limited to a few gentle showers, with once in a while a dust storm. Any house under construction is prone to theft. If you want to secure your property, drop by our website for information.